Hasegawa 1/72 F8U-1T Crusader
| KIT #: | Airmodel conversion #24 |
| PRICE: | 6.5Euro and 6.5Euro respectively |
| DECALS: | Two options with the Hasegawa kit |
| REVIEWER: | Carmel J. Attard |
| NOTES: | The Airmodel conversion kit is a vac form type and also has parts for RF-8 version |
| HISTORY |
The
To facilitate operation of the
aircraft at small auxiliary airfields and therefore
to reduce landing
roll to 2,700feet,
a landing parabrake (parachute) was installed in a domed housing at the base of
the rudder. When use of the parachute was required to stop the rollout on one of
these small fields, the pilot could actuate the system. When actuated the
spring-loaded door on the aft end of the parabrake housing opened and the
triple-canopied parachute deployed, significantly shortening the rollout.
Extensive
demonstrations were conducted for several years, but no buyers were found for a
new jet trainer.
The lone TF8A
performed extremely well, and the Navy was quick to order an initial batch of 12
production two-seaters. However, the ensuing budget cutting forced the
cancellation of that order before any could be built. The lone TF-8A was powered
by the J57-P-20
 engine, derated to produce the same thrust as the J57-P-4A
engine, about 16,500 pounds in afterburner. The airplane featured ventral fins
and afterburner-cooling airscoops like other Crusader models; Mach 1.6 was
attained.
engine, derated to produce the same thrust as the J57-P-4A
engine, about 16,500 pounds in afterburner. The airplane featured ventral fins
and afterburner-cooling airscoops like other Crusader models; Mach 1.6 was
attained.
As a proposed combat
efficiency trainer, TF-8A armament was to consist of two 20-mm cannons (144
rounds each), and two fuselage-mounted
After its use by the
Navy, the lone two seater served NASA at its Ames-Dryden Flight Research Center,
Edwards AFB, where it served as a chase plane among other duties. NASA
redesignated it NTF-8A. The aircraft had a lengthy career as a demonstrator and
as a test pilot trainer. Unfortunately, the airplane crashed on 28th
July 1978 when the Vought pilot and the Filipino student ejected and the
aircraft crashed in a farmer’s field ending as a total loss.
| THE KITS |
 lack of a speed brake, which can be drooped, the normal
static position. The horizontal tail is too big for an F-8E but would probably
be okay for an F-8J, which require engraving the second slat line on the wing.
The ventral fin appears the right size and it would be easier to delete the fin
if you were converting one of the early machines.
lack of a speed brake, which can be drooped, the normal
static position. The horizontal tail is too big for an F-8E but would probably
be okay for an F-8J, which require engraving the second slat line on the wing.
The ventral fin appears the right size and it would be easier to delete the fin
if you were converting one of the early machines.
The Airmodel kit comes in pack No
24 which has fuselage conversion parts for an RF8 version and the Trainer
version. Molded in white vac form polystyrene, there is sufficient detail and
wing parts to enable modification for both types. In the case of the TF-8A,
there is also the cockpit hood less wing screen in which case same one is used
from the Hasegawa kit. A reasonable side view is provided for reference during
the conversion. There are arrow marks to indicate salient features on the TF-8
particularly the para brake fairing and dorsal housing which incidentally also
comes as a separate piece to fit on the forward part of the wing at centre.
| CONSTRUCTION |
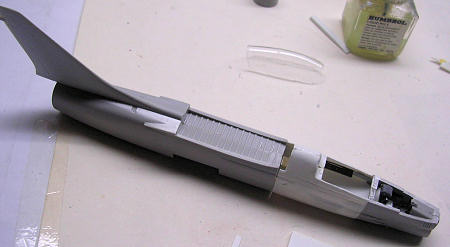
 fitted to the inside of the Airmodel kit nose area. The detailed kit bulkhead is also to be used on the TF8
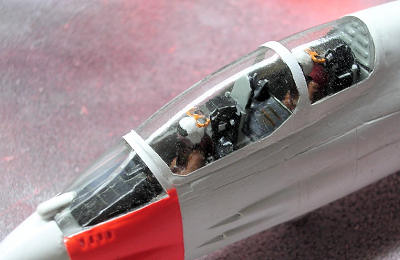
cockpit and two crew figures were prepared to take their seat at later stage.
The section of the kit having the refuelling attachment is now removed and put
aside. The Airmodel nose parts were also cut and sanded, then sliced to conform
with the rest of the forward fuselage from the injected kit…. see photo.
Interior was built up with side consoles, central coaming with windshield, extra
seat, another set of instruments and control column. The fuselage consisting of
three main parts is then joined together. The central wing fairing was added to
the wing upon sending to fit. This was then merged to the fuselage raised back
forming
a
smooth hump with the clear canopy. Kit cone and
infrared sensor then added to the nose area. I also added nose weight to play
safe in case it is tail heavy. The rest of kit was built as per instructions. At
rear tail fin and rudder root I added the parabrake fairing, which also comes
with the vac form kit.
fitted to the inside of the Airmodel kit nose area. The detailed kit bulkhead is also to be used on the TF8
cockpit and two crew figures were prepared to take their seat at later stage.
The section of the kit having the refuelling attachment is now removed and put
aside. The Airmodel nose parts were also cut and sanded, then sliced to conform
with the rest of the forward fuselage from the injected kit…. see photo.
Interior was built up with side consoles, central coaming with windshield, extra
seat, another set of instruments and control column. The fuselage consisting of
three main parts is then joined together. The central wing fairing was added to
the wing upon sending to fit. This was then merged to the fuselage raised back
forming
a
smooth hump with the clear canopy. Kit cone and
infrared sensor then added to the nose area. I also added nose weight to play
safe in case it is tail heavy. The rest of kit was built as per instructions. At
rear tail fin and rudder root I added the parabrake fairing, which also comes
with the vac form kit.
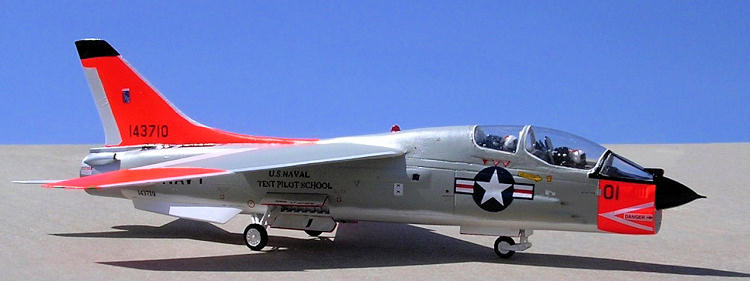
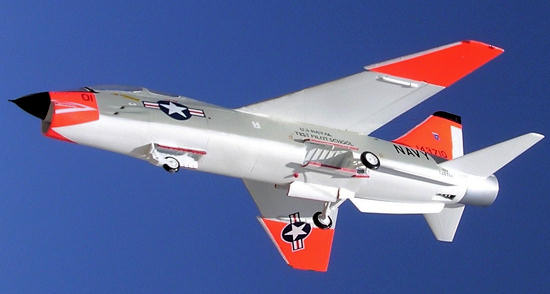
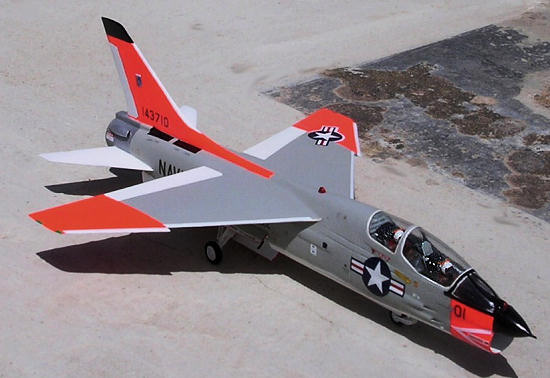
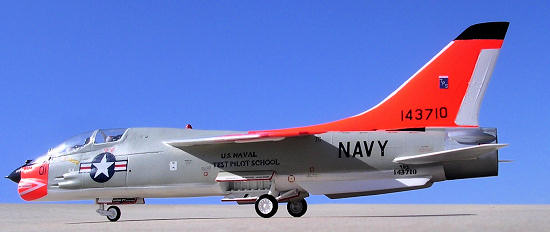
| COLORS & MARKINGS |
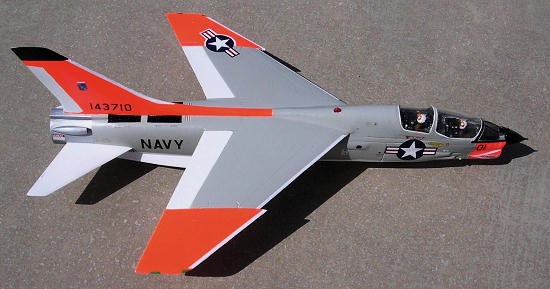 I was surprised to note that there
were no less than four different liveries worn by this single aircraft during
its service life, all comprising of the basic gull gray, white and day glow with
steel engine exhaust area. I used the usual Model Master brands mentioned in
previous kit make. The decals came from kit itself and added fine lettering on
fuselage coming from Micro scale decal sheet in my decal box. The legend TPS on
side of fuselage was printed on a transparent decal sheet; being black lettering
alone it was easy to do. The TPS crest on tail fin was hand painted. Before and
after application of decals a coat of Klear was applied. Finally the kit was
given an overall coat of semi gloss lacquer.
I was surprised to note that there
were no less than four different liveries worn by this single aircraft during
its service life, all comprising of the basic gull gray, white and day glow with
steel engine exhaust area. I used the usual Model Master brands mentioned in
previous kit make. The decals came from kit itself and added fine lettering on
fuselage coming from Micro scale decal sheet in my decal box. The legend TPS on
side of fuselage was printed on a transparent decal sheet; being black lettering
alone it was easy to do. The TPS crest on tail fin was hand painted. Before and
after application of decals a coat of Klear was applied. Finally the kit was
given an overall coat of semi gloss lacquer.
| CONCLUSIONS |
| REFERENCES |
Reference: Steve Pacer book Naval
Fighters No 16.
May 2012
If you would like your product reviewed fairly and fairly quickly, please contact the editor or see other details in the Note to Contributors.