| KIT #: | 07233 |
| PRICE: | 23$ |
| DECALS: | Two options |
| REVIEWER: | Francisco Santoro |
| NOTES: | Condor Decals 48050 |
| HISTORY |
 The Lockheed
Martin/Douglas A-4AR Fightinghawk is a derivative of the last version of the
famous Skyhawk, the A-4M. It was designed for the Fuerza Aérea Argentina in
1995, and it incorporates the avionics of the Lockheed Martin F-16 Fighting
Falcon. This aircraft was the intended replacement for the older A-4Bs and A-4Cs
that, by 1990s, were approaching their operational limit. The FAA received a
total of 36, 4 OA-4ARs trainers and 32 A-4ARs single-seat fighters.
The Lockheed
Martin/Douglas A-4AR Fightinghawk is a derivative of the last version of the
famous Skyhawk, the A-4M. It was designed for the Fuerza Aérea Argentina in
1995, and it incorporates the avionics of the Lockheed Martin F-16 Fighting
Falcon. This aircraft was the intended replacement for the older A-4Bs and A-4Cs
that, by 1990s, were approaching their operational limit. The FAA received a
total of 36, 4 OA-4ARs trainers and 32 A-4ARs single-seat fighters.
As of this article’s writing, it appears the US government has bypassed the UK’s embargo on the British made components for the FAA, and has allowed the sale of 36 F-16As to the air force. Time will tell, however, if these much needed replacements for the remaining Fightinghawks arrive. Until then, the FAA will soldier on with this venerable design.
| THE KIT |
 Hasegawa
released their new tool 1:48 Douglas A-4E in the year 2000. Since then they have
released lots, and I mean lots, of boxings of different Skyhawk variants from, B
to M, with the appropriate parts and decals to build the intended box version.
The A-4M was released originally as PT33 in 2004.
Hasegawa
released their new tool 1:48 Douglas A-4E in the year 2000. Since then they have
released lots, and I mean lots, of boxings of different Skyhawk variants from, B
to M, with the appropriate parts and decals to build the intended box version.
The A-4M was released originally as PT33 in 2004.
I built this model two years ago, so some details may be a bit fussy. I do remember the kit is molded in a hard, light grey plastic with clear parts. The sprues were bagged inside a single bag. Two decal options were provided: A-4M 159489 from VMA-214 “Black Sheeps” and 158189 from VMA-331 “Bumble Bees.”
| CONSTRUCTION |
Every aircraft I build tends to follow the same recurring steps. This one was no exception, and I began by painting most parts on the sprues. Landing gear, wheels, gear wells and gear doors were painted Revell 05 Matt White. The rims of the gear doors received a coat of Revell 36 Scarlet Red. The tyres were painted Revell 78 Tank Grey. While the paint dried, I tackled the cockpit. The parts were mostly painted Revell 76 Light Grey, the seat cushion in Olive Drab, and the smaller details matt black. The engine was painted Revell 91 Steel and the exhaust can was painted black to prevén the bare plastic from showing.
 Then the
parts were glued to one side of the fuselage and left to cure. Meanwhile I
worked on the nose cone and wings. The latter come molded in a single lower half
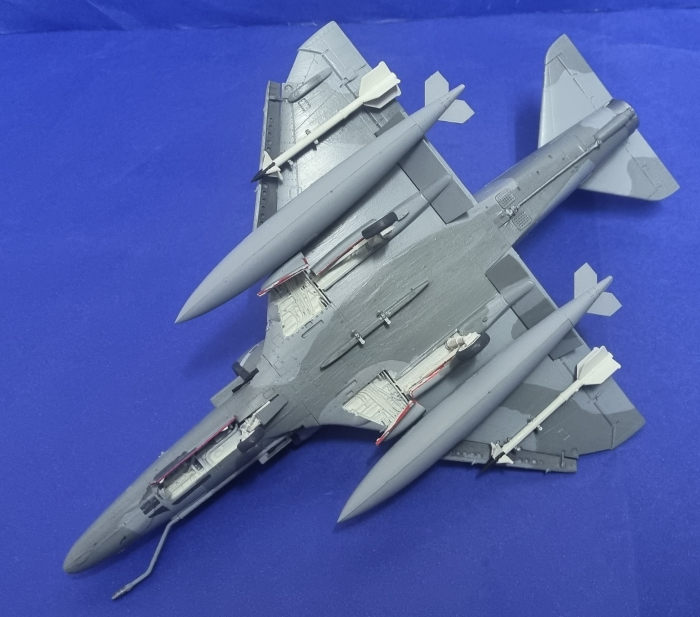
and two top halves. I opened all the holes for the fuel tanks and missile racks.
The flaps were glued to the lower wing, and then the top halves were added. The
slats are to be glued in the extended position.
Then the
parts were glued to one side of the fuselage and left to cure. Meanwhile I
worked on the nose cone and wings. The latter come molded in a single lower half
and two top halves. I opened all the holes for the fuel tanks and missile racks.
The flaps were glued to the lower wing, and then the top halves were added. The
slats are to be glued in the extended position.
Back to the fuselage, I added some noseweight to not end up with a tailsitter. I glued both halves together, taking care nothing was misaligned to avoid fit issues. There were none, so I glued the hump and left it to cure.
After the fuselage halves had cured, I glued them to the wings. Fit was excellent, needing no filler at all. Can´t say the same for the fuselage. This one needed a bit of putty on the avionics hump, but not that much.
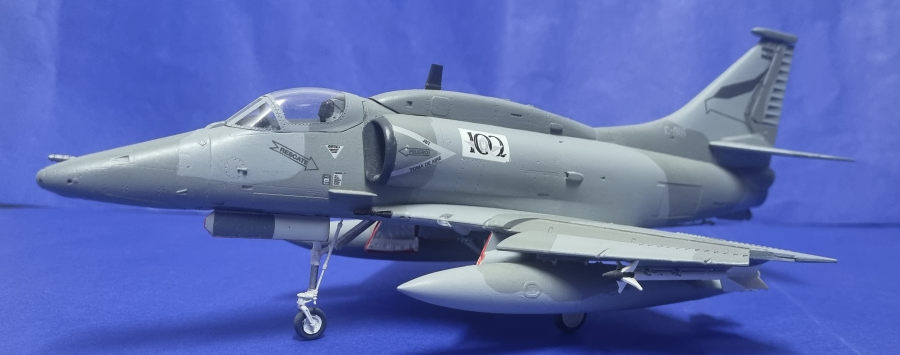
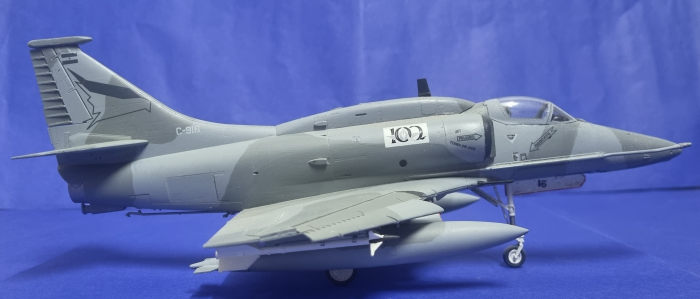
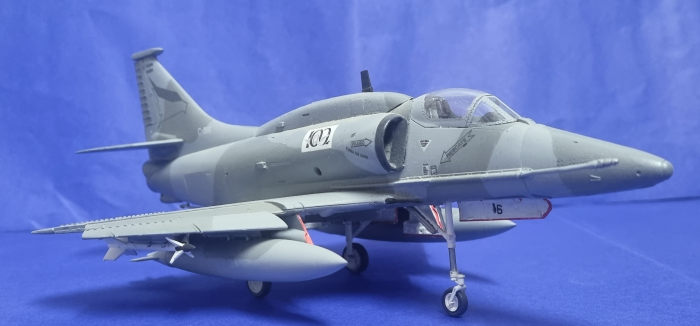
| COLORS & MARKINGS |
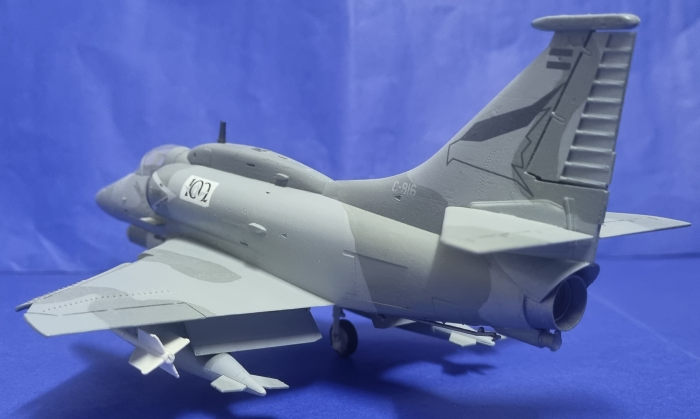 Argentinian
A-4ARs are painted in a wraparound camouflage of two grey colours. For this I
used Revell 76 Light Grey and Revell 43 Medium Grey. I followed the painting
instructions provided in the Condor Decals sheet. The model was then glossed
with Revell 01 Gloss and the decals were applied. The Condor stencils are very
thin, prone to folding, but somehow impervious to softening chemicals. Go
figure. The model was matt coated with Revell 02 Matt.
Argentinian
A-4ARs are painted in a wraparound camouflage of two grey colours. For this I
used Revell 76 Light Grey and Revell 43 Medium Grey. I followed the painting
instructions provided in the Condor Decals sheet. The model was then glossed
with Revell 01 Gloss and the decals were applied. The Condor stencils are very
thin, prone to folding, but somehow impervious to softening chemicals. Go
figure. The model was matt coated with Revell 02 Matt.
I glued the landing gear, fuel tanks, two spare AIM-9 missiles I had from the Hobby Craft A-4B (these were glued to the outer racks), tyres, arrestor hook, gear doors and clear parts. Since the smaller nose antennaes weren’t present on the A-4AR, I left them off. The refuelling probe was glued too.
| CONCLUSIONS |
If you made it to this section, you may have realised I didn´t add any aftermarket correction items to this kit. That’s because I thought, back in 2021, the stock A-4M would work fine, since the photos I found of the aircraft didn´t show any external differences with what came with the kit. Aconcagua Models is in the process of releasing a resin nose and 3d printed parts to accurately convert the Hasegawa A-4M into an A-4AR.
10 October 2023
Copyright ModelingMadness.com. All rights reserved. No reproduction in part or in whole without express permission.
If you would like your product reviewed fairly and fairly quickly, please contact the editor or see other details in the Note to Contributors.