| KIT #: | ?02295 |
| PRICE: | $95.00 or so |
| DECALS: | Two options |
| REVIEWER: | Donald Zhou |
| NOTES: |
Advantages: Well detailed, full weapon fit, and BIIIGGG. Disadvantages: Accuracy issues, no metal landing gears, some details missing. P.S. G-Factor brass landing gears and Cutting Edge “fancy girl” decals used |
| HISTORY |
So much are said about the Thud and its service in Vietnam, with words such as “Thud Ridge” already being legends, that I won’t say much about it here and reinvent the wheel. Rather, I’ll just cover one particular Thud in detail
Pussy Galore II
One of the most famous, or
infamous, depending on your point of view, F-105D was known as Pussy Galore.
This aircraft was flown by Captain Victor “Vic” Vizcarra. The original Pussy
Galore I marking was painted in July 1965. That F-105D was one of the earlier
versions without the spine, the rear mounted cooling scoops and vents for the
M61.The idea came about as an inside joke for the KC-135 tanker crews,
especially the boom operators who had trouble putting the boom into the
receptacle so Capt. Vizcarra painted Pussy Galore right on the nose so that her
umm………”Strategic Part” was right over the r eceptacle! She was named after the
female executive pilot to the evil Goldfinger in the James Bond film of the same
name.
eceptacle! She was named after the
female executive pilot to the evil Goldfinger in the James Bond film of the same
name.
The first meeting between Ms. Galore and the tankers did not end well. The pilot (not Vizcarra) told the tanker crew that “she” was a virgin and this is “her” first time. The boom operator mistook the phrase as this the first in-flight refuel for the pilot and talked him all the way in, much to the bemusement of all the Thud pilots involved. No mention was made of Galore, much to their disappointment.
Subsequent flights proved to be much more entertaining. The instant Ms. Galore showed up, there were cries of “SHE’S HERE!” and Vic can see crews crowding the boom operator window for a view, with camera flashes going off also. There were snickers when the boom operator inserted the boom into Galore’s “Strategically Positioned” receptacle, completing the equivalent of an umm….ohh yeah! After coming off the boom, there were cries of, “Was that good for you?” “Ok, just how much did it cost me this time?” “Take good care of her now!” and “God damn it! There goes another 100 bucks down the drain!” can be heard. There were quite a few laughter, snickering and smiles from both sides at those.
Alas, it all came to an end eventually. The original Pussy Galore was shot down in 1967 during a dreaded trip “downtown” with the pilot missing (not Vic). By that time, she had switched from a silver painted finish (not NMF as many would believe) to the common three toned South-East Asian finish with sadly, Ms. Galore painted over.
By that time, Vic had already painted a Pussy Galore II in October 1966. This F-105D was a later version with the slightly raised spine, cooling scoops on the rear end, and venting holes for the M61. It came in the standard three-toned SE camo. To get permission, Vic had to jump through three hoops in order to get permission to do Pussy Galore II. It proved just as a big hit with the tankers as Pussy Galore I. Unfortunately, this plane also did not make it. During the bombing lull ordered by LBJ in 1968, Pussy Galore II was sent over to Taiwan for a needed major maintenance and overhaul operation. Unfortunately, she was involved in a major ground collision accident and became a total write-off.
The marking itself though, didn’t last that long. It was found out by the Wing commander three weeks after application. The commander was Robert Scott (Read Tom Clever’s review on Hobby Boss’s F-84E to get a good start on this great man), a WW II war hero and great pilot…Who also happens to be a devoted Christian! He immediately went apoplectic ape S_____ and ordered Galore removed on the spot! Thus ending the Pussy Galore story.
 Just how popular Pussy
Galore was? Well, on one needed R&R trip to Guam, one day, Vic and his fellow
Thud pilots raided the local watering hole. They were instantly met by a bunch
KC-135 tanker crews. They recognized them by their Thud patches. The tanker crew
instantly asked them about a special and very VERY memorable Thud because it had
a huge naked chick sprawled on the nose, with her special part strategically
covering the receptacle. They said not only was that Thud an “eyeful” for
everyone involved, but it was also a huge morale booster on an otherwise boring
tanker sortie and made the boom operator’s life a hell of a lot easier. Everyday
they were praying that this Thud would show up and brighten the tanker crew’s
day a bit. This is why it was so disappointing when she finally disappeared for
good! They asked who was it that came up with the idea and who was the driver of
that Thud. They also said this wasn’t their first time asking this question.
Well, someone on Vic’s team ratted him out as the guy who came up with THE
Pussy Galore concept! The tanker crew actually cheered when they realized not
only did they found out the pilot, but got a name to go with the plane also! For
the rest of that night, Vic couldn’t buy a drink without someone from the tanker
crew picking up his tab! Never EVER underestimate the effect of a good morale
boost no matter where it came from!
Just how popular Pussy
Galore was? Well, on one needed R&R trip to Guam, one day, Vic and his fellow
Thud pilots raided the local watering hole. They were instantly met by a bunch
KC-135 tanker crews. They recognized them by their Thud patches. The tanker crew
instantly asked them about a special and very VERY memorable Thud because it had
a huge naked chick sprawled on the nose, with her special part strategically
covering the receptacle. They said not only was that Thud an “eyeful” for
everyone involved, but it was also a huge morale booster on an otherwise boring
tanker sortie and made the boom operator’s life a hell of a lot easier. Everyday
they were praying that this Thud would show up and brighten the tanker crew’s
day a bit. This is why it was so disappointing when she finally disappeared for
good! They asked who was it that came up with the idea and who was the driver of
that Thud. They also said this wasn’t their first time asking this question.
Well, someone on Vic’s team ratted him out as the guy who came up with THE
Pussy Galore concept! The tanker crew actually cheered when they realized not
only did they found out the pilot, but got a name to go with the plane also! For
the rest of that night, Vic couldn’t buy a drink without someone from the tanker
crew picking up his tab! Never EVER underestimate the effect of a good morale
boost no matter where it came from!
| THE KIT |
Emilo Diaz already previewed the “G” version of Trumpeter’s 1/32 scale Thuds. Which can be viewed here. The short of it is. The D version was released by Trumpeter in 2003. At first, it was a sensation since this is the first time the huge F-105 was kitted in 1/32 scale. Upon opening the huge box, one is greeted by a dozen or so sprues. The tires and clear parts are located in a small box in the center with all the hinges and metal rods for the moving control surfaces that was in vogue in those days.
Just remember this kit was released in 2003, when Trumpeter was still a “young-on” learning the ropes. The model is proto-typical 2003 Trumpeter. Details, especially the rivets are heavy, but looks good under several coats of paint. Details are generally considered good. There is a radar with an open radome, a detailed J75 is included…That will never be seen once you put it into the fuselage. Cockpit details can be considered adequate but nothing to write home about and moving control surfaces, with the aforementioned rods and hinges included.
However, being this is Trumpeter
when they are going through their “learning and pain” stage, there are several
faults for the kit also. Despite the details, there are several deficiencies and
faults. The nose for exa mple, the bottom curves up too “violently” and the side
“bulges” (if you look at the F-105 from up top, you will see the forward
fuselage sides beneath canopy bulging outward) are not nearly as prominent,
resulting in the radome being too small. The instrument panel coaming is way too
high with the canopy and inside devoted of the details. This is also true of the
gear bays and doors. Details are slim or non-existent at all. Finally, the
ventral fin front is too “bulgy”, unlike the sharp edge of the real thing. This
one can be forgiven since due to the technology of that time, you can’t mold
that kind of edge without destroying the plastic by making it too thin. The
worst offender though, are the landing gears. Due to the fact it is molded to
scale, they are too long and too thin. With the fact you need plenty of weight
in the nose to prevent tail sitting, the model is heavy and will crush them if
you use the kit gears. This is why this kit took so long to build. I first
bought it in China in 2009, but didn’t finish it until I came back to the States
and bought G-Factor’s brass landing gear sets to finally make sure the kit can
stand on its three legs! Finally, the vertical stabilizer is way too tall. It’s
correct for a “G” version, but not correct for a D, which should be shorter.
Guess Trumpeter tried to keep the cost down by using the same thing for both
versions.
mple, the bottom curves up too “violently” and the side
“bulges” (if you look at the F-105 from up top, you will see the forward
fuselage sides beneath canopy bulging outward) are not nearly as prominent,
resulting in the radome being too small. The instrument panel coaming is way too
high with the canopy and inside devoted of the details. This is also true of the
gear bays and doors. Details are slim or non-existent at all. Finally, the
ventral fin front is too “bulgy”, unlike the sharp edge of the real thing. This
one can be forgiven since due to the technology of that time, you can’t mold
that kind of edge without destroying the plastic by making it too thin. The
worst offender though, are the landing gears. Due to the fact it is molded to
scale, they are too long and too thin. With the fact you need plenty of weight
in the nose to prevent tail sitting, the model is heavy and will crush them if
you use the kit gears. This is why this kit took so long to build. I first
bought it in China in 2009, but didn’t finish it until I came back to the States
and bought G-Factor’s brass landing gear sets to finally make sure the kit can
stand on its three legs! Finally, the vertical stabilizer is way too tall. It’s
correct for a “G” version, but not correct for a D, which should be shorter.
Guess Trumpeter tried to keep the cost down by using the same thing for both
versions.
Now, it seems like I’m trying to put down the model. I’m not, the kit can be built into a quite good representation of the Thud, but for those that care, those are the problem of the kit. How much mileage you want to go is up to you since these days, there are plenty of aftermarket correction sets for this kit!
| CONSTRUCTION |
Construction begin with oddly enough, the cockpit. The bang seat is…rudimentary at best, with painted on seat belts. Instrument panel works. It uses the now obsolete film sandwich type. Aftermarket sets are now all over the place. Get one if you need to, especially to fix the too high coaming mistake of the kit.
Next are all the accessories of the kit. A detailed M61 Vulcan cannon, with flexible plastic ammo links and an ammo drum is included but like the J75 engine, once you put it into the plane, it will never be seen. Unfortunately, you still need to put in the M61 as the barrel tip can be seen outside the cover. Fortunately, I have two F-14 Tomcat kits so I built the M61 from one of them and promptly grafted it into the gun bay of this bird instead! One of these days, I’ll finish the rest and build a display stand to display the entire M61 weapon system as it is quite good looking when done.
 The massive J75 engine is next. At
one point I thought of building it outside and use an ancient film canister to
rebuild an exhaust so I can display the engine on the outside but eventually
laziness prevailed and I just simply threw the engine on the inside and called
it quits.
The massive J75 engine is next. At
one point I thought of building it outside and use an ancient film canister to
rebuild an exhaust so I can display the engine on the outside but eventually
laziness prevailed and I just simply threw the engine on the inside and called
it quits.
The inflight refueling probe is next. The F-105 have both the drogue and probe system and the boom and receptacle system since at that time the air force hasn’t decided on which. Since I’m not going to display the probe, I cemented the covers shut.
The nose gear bay is next. However, again, due to the heavy weight of this model, plastic gears simply will not support the weight. But since I wanted the project to continue, I cemented the gear bays anyways. The bays themselves are nothing home to write about. The details in general is lacking. However, since they will be buried so far into the fuselage, it won’t be missed.
The internal weapon bay is now assembled. It’s ironic. F-105 primary mission was to carry a nuke in this bay, then fly hard and fast down in the weeds and deliver it to the target………….But spent most of the life carrying an extra 550 gallon fuel tank inside, never to be opened while lugging six 750lbs conventional bombs on the outside to deliver them from medium altitude! You can open up the bay doors but I chose not to since this bay was never opened during the F-105 Vietnam combat life except during maintenance. I did put in some nails in them, taped up to secure them since this aircraft is quite tail heavy when done. In fact, before the fuselage was closed up, I also insert plenty nails into the nose for this fact.
Before you close up the fuselage,
it is recommended that the rear tail pieces are cemented to their respective
sides, then run cement slowly along the joints inside and out for a close smooth
joint. Cementing the front halves together first, then insert the completed rear
section into it produces a rather large centerline seam that I had to put some
energy into to cure. You can void this if you cement the rear halves
 onto the
front halves before closing up the fuselage.
onto the
front halves before closing up the fuselage.
Wings assemblies are next. Forget about the metal hinges and rods for all the control surfaces. They rarely work and use something tougher like superglue or epoxy glue as the plastics here are overtly thick and cement have a hard time melting them and gluing them down.
Various accessories such as the coaming, vertical and horizontal stabilizers and main gears are assembled. Again, get metal replacements for the main gears or else the model will never stand on its feet.
The radome and radar are then build up. I never ever wanted to display the radar, but build it up to use it as a blocker since I did insert plenty of ball bearings into the radome to again, weight the nose down. Unfortunately, the radome it seems, was designed to be posed open as closing it produced a hideous gap all along the surface that took plenty of putty to cure.
For next couple of pages, you can forget about putting in the rear facing bomb damage assessment camera panel and the landing gears for now. The model is generally complete except the canopies. These are kind of weak as there are no details on the inside but closed up, they still works adequately.
It’s at this point that the entire project got stalled for the next 4 years until I came back to the States and got the G-Factor landing gears. But before that though, I finally decided to hit the paint shop.
| COLORS & MARKINGS |
Before main painting can begin, I painted the wells interior green, then stuff it with toilet paper when dried.
 The main scheme is the standard
South East Asian scheme. There were several variations but being the Lazy Bum
that I am, I just used the paint scheme called out by Trumpeter. Painting begin
with light grey on the bottom, and also the gear doors. This was painted in
several shades after all the panel lines was shaded and washed with Taimya’s
flat black. Then the top side was painted with dark tan first, then medium green
and dark green. All of the camo patterns was free handed…I’m too lazy to use
tape so sue me! This was also done to the two wing drop tanks, light grey on the
bottom and top of the pylons and medium green on the top of the tanks and bottom
of the pylons. The nose and the bomb damage assessment housing then was taped
off and painted flat black before the tail petal sections was painted burnt
metal with metallic grey. As final shading, I used Tamiya flat black, heavily
diluted and “streak” it across the surface, running along the airflow to dirty
up the airplane a bit but also to give the plane some highlights.
The main scheme is the standard
South East Asian scheme. There were several variations but being the Lazy Bum
that I am, I just used the paint scheme called out by Trumpeter. Painting begin
with light grey on the bottom, and also the gear doors. This was painted in
several shades after all the panel lines was shaded and washed with Taimya’s
flat black. Then the top side was painted with dark tan first, then medium green
and dark green. All of the camo patterns was free handed…I’m too lazy to use
tape so sue me! This was also done to the two wing drop tanks, light grey on the
bottom and top of the pylons and medium green on the top of the tanks and bottom
of the pylons. The nose and the bomb damage assessment housing then was taped
off and painted flat black before the tail petal sections was painted burnt
metal with metallic grey. As final shading, I used Tamiya flat black, heavily
diluted and “streak” it across the surface, running along the airflow to dirty
up the airplane a bit but also to give the plane some highlights.
At this point, decals can
begin. Two version are included in the kit: The Polish Glider and Alice’s Joy.
The decals are printed by two-bobs and in perfect clear register but there are
mistakes. The polish emblem on the Polish Glider for example, the coloring is
wrong. Besides, I’m not interested in them at all…Ohh YES! I WAAAANNNTTT
Pussy Galore II and that’s a fact! Unfortunately, by the time I bought the
model, Cutting Edge, the company that makes the last remaining Pussy Galore II
markings (The first few companies that makes it, like Albatross, went defunct a
long time ago) also went defunct and the decals were selling on eBay for as much
as $100 a pop! No go! So I waited….and waited….and waited…and waited….and sigh,
 came back to the States, and waited….and waited…and waited….And….What is this?
It seems someone had picked up Cutting Edge, Yellow Hammer among other decals! I
promptly ordered “Fancy Girl II”, the decal sheet with both Pussy Galore II and
Memphis Belle II, an F-105D now preserved at the Museum of the United States Air
Force. It’s expensive at a total of $28 but worth it.
came back to the States, and waited….and waited…and waited….And….What is this?
It seems someone had picked up Cutting Edge, Yellow Hammer among other decals! I
promptly ordered “Fancy Girl II”, the decal sheet with both Pussy Galore II and
Memphis Belle II, an F-105D now preserved at the Museum of the United States Air
Force. It’s expensive at a total of $28 but worth it.
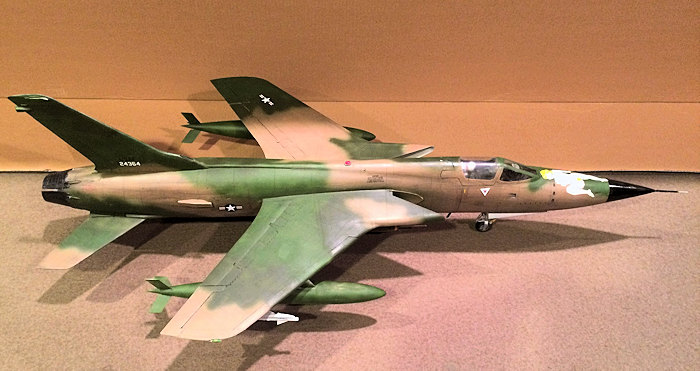
I used the few stencils and the stars and bars from the kit decals. These go on much easier than the now too thin Trumpeter decals and go down easily with a few drops of Mr. Mark Softener, my favorite decal softener. Pussy Galore II was another story! Sigh, I know companies like to keep it thin and thin decals conforms onto the surface far easier but damn it! Does it have to be THAT thin?!?!?!?!? While working on Ms. Galore, I promptly broke both of her legs and spent the next 15 minutes trying to piece her back together….ULTRA CAREFULLY…. Trying not to break anything else….And promptly forgot that the F-105 receptacle lies slightly off center to the right! I put her right in the center! By the time I found out, she was already down flat with two coats of Mr. Mark Softener!!! Sigh, what is done, is done….No one but me can tell the difference anyways. And oh yes, do be careful with these decals if you are using Mr. Marks. It tends to melt the paint off the decals if you wait too long! The rest of the decals went on fine. Despite the hassle, I finally got Ms. Pussy Galore II in 1/32 scale! That deserves a pat on the back! “pat, Pat, PAT!!!” AHH! That felt good!
| FINAL CONSTRUCTION |
It’s also during the decaling that finally, FINALLY, my G-Factor landing gears arrived! These are beautiful to say the least, much more detailed than the kits part and most importantly, they are hefty and will have no problem supporting the now extremely heavy set model! Also included are the actuating gears for both the nose and the main gears. These are accurate, especially the main ones. They are beautiful indeed…And I promptly proceeded to f--- them up royally, well almost that is!
Yeah, I was so happy that while
cutting them off of their pour stubs with my Dremel, I promptly cut off and then
sanded off the location/insertion tab on top of the main gears! An “OHH DOH”
moment if there ever was one! I almost wanted to go Homer Simpson and bang my
head up against a wall while doing my best “Doh, Doh, DOH!!” impression! Calming
down, I look at the gears. Getting another set is not an option…..So I hit the
local hobby shop at my earliest convenience and bought a brass rod instead. Back
home, I put the gears into my vice and held it tight, then with a Dremel and
small drill bit, drilled a hole into the top of the main gears, then through the
top of the wings where the location holes are before inserting the brass rod
into the gears and cutting them off. Afterwards, I superglue the gears shut and
sanded off the protruding rod on top of the wings before puttying it up and
sanding it smooth. A hassle but the gears are even stronger now. The nose gear
also took some work since I closed the bay early. I had to carefully shorten the
locating studs on the gear and the actuating rod so I can insert both of them
correctly into place. It took some elbow grease but I got both of them to go and
they fit tightly in place. Breathing a sigh of relief at avoiding a total
disaster, I proceeded to add the rest of the left over accessories. These are
mostly the rods and gear doors. These went on no problem. They are missing a lot
of details on the inside surfaces but they
 will do. The tail hook, unfortunately
was lost while the model was being shipped back here from China….I’m hoping
someone will make an extra someday. Now, the weapons.
will do. The tail hook, unfortunately
was lost while the model was being shipped back here from China….I’m hoping
someone will make an extra someday. Now, the weapons.
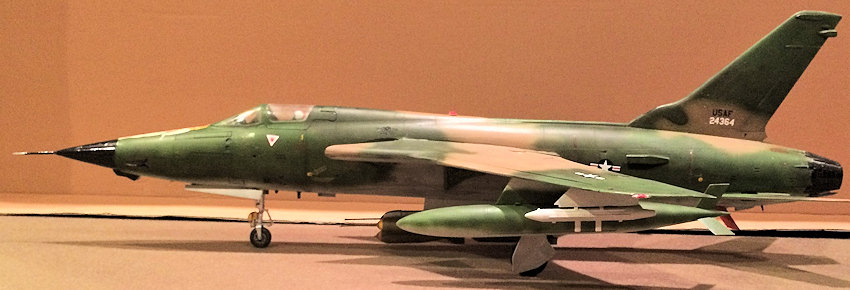
Weapons are a standard Vietnam War era loadout. The MER that came in the kit was too thin so I used the extra one from my 1/32 scale Tamiya F-4E Phantom kit instead. Some modifications was needed to graft the kit’s 750lbs bombs on to it. I used superglue to facilitate this. The top front ones used the extended daisy cutter fuses instead. The weapons in this kit is extensive. One thing you can say about Trumpeter kits, they give you a lot of weapons. Both the G and D weapons are included so you will have plenty of extras when done.
For the wings, the two wing tanks are mounted. They are heavy so use superglue. Now for the outboard pylons, I wanted to use two extra 750lbs bombs but instead went with the later load of an ECM pod and a Sidewinder for self-defense. I grafted the extra ECM pods from my Phantom kit onto the right station and grabbed an extra AIM-9B Sidewinder from my F-86 kit onto the left and viola……urr….Almost done that is….
So I was looking into my bag of extra that was stored in a box that was stored at my friend’s house since my teenage years (he sent it to me with a bunch of my teenage model that I built some 20 years ago when I finally got back to the States. Bless his soul for keeping that box in his basement for the past 20 years!) And what is this? I dug out this ancient 1970’s 1/32 scale Harrier I pilot! His plane was destroyed a long time ago but I don’t care! He is now Capt. Vic Vizcarra! It took a bit of work. I had to cut down the bang seat legs and the coaming some more (until both can go no further) since his head was hitting the top of the canopy. Finally I got him to sit on the seat (had to remove the bottom seat cushion) and got the canopy closed up and the model was finally complete!
| CONCLUSIONS |
Despite all the warts and faults of the kit and some mistakes of my own doing, this is one huge kit! It is big with a capital B! It is about an inch longer than my F-4E kit and about ¾ inches longer than my F-14B. And Ms. Galore had already attracted several glances and comments and more than a few laughs when I told my friends why she was, well, what she was! You can certainly turn this kit into a real stunner with all the aftermarket parts, but even without, it still is a stunner just because of its size. And certainly, building this kit turned up a lot of the stories and sacrifices made by all the men who had to go “downtown” through places such as “Thud Ridge” and in the process, over 350 Thuds were lost and many of its pilots either were killed, MIA, and became POW’s at the infamous Hanoi Hilton! So this build was certainly dedicated to them and their courageous sacrifices although I can’t escape the little irony of facts that it was Trumpeter, a Chinese company (Specifically, Wasan Plastic Co.) that is the first and only company that did a Thud in this scale!
P.S. Ohh, for anyone who has a 1/32 Thud and would like to do Memphis Belle II, I can give it to ya for $8! :P
30 June 2016
Copyright ModelingMadness.com If you would like your product reviewed fairly and
fairly quickly, please
contact
the editor or see other details in the
Note to
Contributors.