| KIT #: | WP 10002 |
| PRICE: | $35.00 |
| DECALS: | Two options |
| REVIEWER: | John Summerford |
| NOTES: |
| HISTORY |
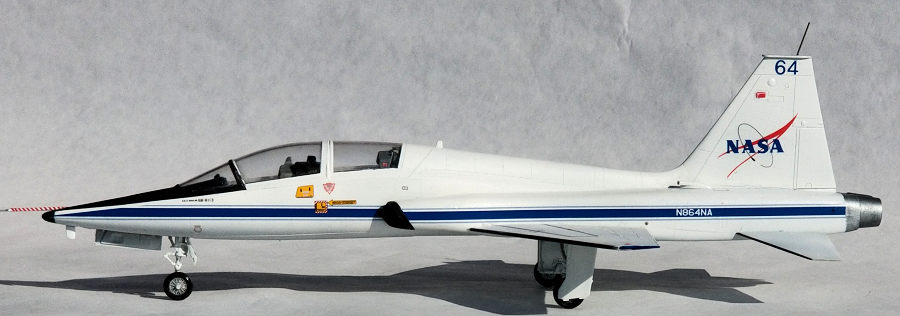
During the height of the Space Shuttle era, NASA operated a fleet of thirty-two T-38 aircraft. They were used as a jet trainer for astronauts, as well as chase planes. The fleet was housed primarily at Ellington Field in Houston, Texas. The low operating costs and ease of maintenance made the T-38 an ideal aircraft to utilize in its various roles.
Also, at that time, NASA established the tradition of astronauts arriving at the Kennedy Space Center in a T-38.
| THE KIT |
 Sealed in one bag are two
sprues of 83 gray parts and a bag of five clear parts. There is also a bag of
decals, vinyl masks and two resin wheels. The kit does not have any photo-etch
parts. Surface detail on the plastic is discrete.
Sealed in one bag are two
sprues of 83 gray parts and a bag of five clear parts. There is also a bag of
decals, vinyl masks and two resin wheels. The kit does not have any photo-etch
parts. Surface detail on the plastic is discrete.
A brief history in English and Korean plus a parts map can be found on the front page of the instructions. The other three pages detail 15 steps. A separate sheet has painting and decaling instructions for two aircraft. The first option is for a chase plane for the Columbia’s landing at White Sands, New Mexico. The second option is and aircraft operating at the Dryden Flight Research Center at Edwards AFB. Color call-outs are referenced to FS codes and Mr. Color paints.
| CONSTRUCTION |
 In the first four steps the
cockpit is built up and it, plus the nose wheel well, and are trapped in the
fuselage halves. I painted the side consoles dark gray and swiped the raised
detail with a silver artist’s pencil to reveal the switches and levers. Seat
harnesses are not included, so I fabricated my own.
In the first four steps the
cockpit is built up and it, plus the nose wheel well, and are trapped in the
fuselage halves. I painted the side consoles dark gray and swiped the raised
detail with a silver artist’s pencil to reveal the switches and levers. Seat
harnesses are not included, so I fabricated my own.
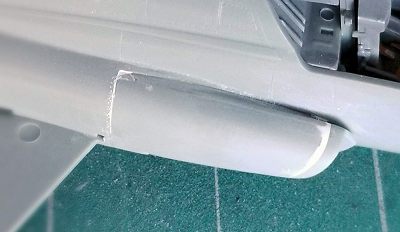
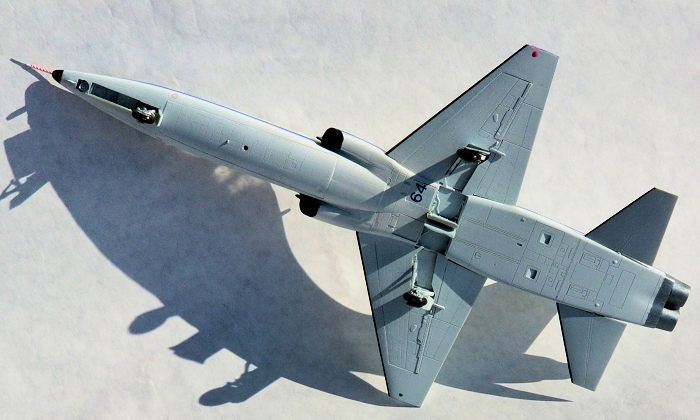
In the next three steps the bottom of the fuselage is completed, with the intake, tail fin, and wings, following. I needed just a spot of filler on the underside. There are no parts for trunks or compressor faces, so I moved on to the intakes. I opted to build them from the inside out, meaning instead of building each side as a sub-assembly then gluing to the fuselage, I glued the splitter plates in place first, then the cover, and added the lip last. This allowed me to deal with the seams easily. I filled the gaps between the fin plus the top wing halves with putty and carefully smoothed them so as to keep as much of the surface detail as possible.
Step 7 consists only of attaching the flap actuators. In the instructions, they are numbered as parts B-21, but on the sprue, they are B-26.
 I skipped the next four
steps that deal with the landing gear and doors to step 12. This step calls for
attaching the stabilators and a pair of air scoops at the leading edge of the
fin. I saved the stabilators for post-painting and moved on to the canopy. Step
13 has the parts for an open canopy installed while Step 14 is for the close
canopy option. The final step involves attaching the clear parts plus the pitot
tube, which again, I saved for later. Directions for applying the vinyl masks
are supplied here.
I skipped the next four
steps that deal with the landing gear and doors to step 12. This step calls for
attaching the stabilators and a pair of air scoops at the leading edge of the
fin. I saved the stabilators for post-painting and moved on to the canopy. Step
13 has the parts for an open canopy installed while Step 14 is for the close
canopy option. The final step involves attaching the clear parts plus the pitot
tube, which again, I saved for later. Directions for applying the vinyl masks
are supplied here.
Fortunately, this model is not a tail sitter, so there is no need to add ballast under the coaming.
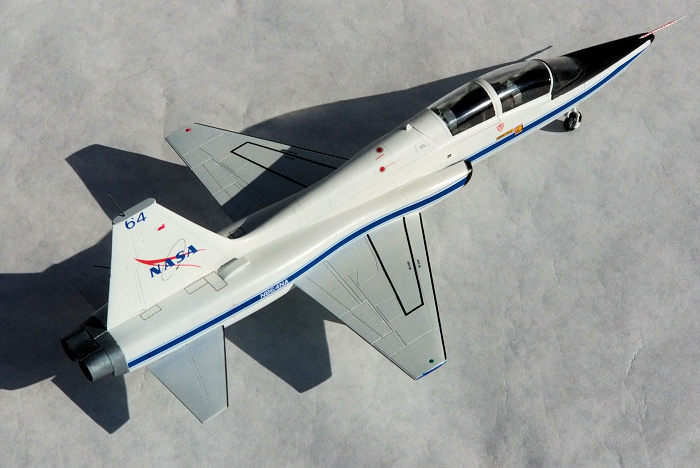
I like the clean lines of this plane and wanted to show them off with the canopy closed. I had fit issues with the windshield and front canopy. After removing some material from both, the raised frame detail became narrower one the left side. Two gaps opened up by the sills. I cheated by filling the gaps with white glue and cleaned up with a damp cotton swab and trimming the masks to create a consistent frame width.
Once the masks were in place, the model was placed on a stand via the incomplete exhaust section and moved to the paint station.
| COLORS & MARKINGS |
 I am trying to transition to
acrylic paints, mostly to make clean-up easier and make the process faster. As
such, I started by spraying Mig One Shot white primer straight from the bottle
onto the landing gear and their doors. My airbrush clogged before I moved on to
the airframe. (My airbrush tip might be a millimeter too small.) On some advice,
I thinned the primer with some Alclad II cleaner that I had on hand. The ratio
that I used was 50-50 and I achieved an even flow, but the coat was thin and I
was forced to make multiple passes to achieve acceptable coverage. That coat
revealed more work to do on some seams. The second coat used an 80-20 thinned
mixture and resulted in much better coverage.
I am trying to transition to
acrylic paints, mostly to make clean-up easier and make the process faster. As
such, I started by spraying Mig One Shot white primer straight from the bottle
onto the landing gear and their doors. My airbrush clogged before I moved on to
the airframe. (My airbrush tip might be a millimeter too small.) On some advice,
I thinned the primer with some Alclad II cleaner that I had on hand. The ratio
that I used was 50-50 and I achieved an even flow, but the coat was thin and I
was forced to make multiple passes to achieve acceptable coverage. That coat
revealed more work to do on some seams. The second coat used an 80-20 thinned
mixture and resulted in much better coverage.
A coat of acrylic gloss white was sprayed on next. When dry, masking was applied for the black trim on the leading edges of the wings and stabilators, plus around the intake lips and anti-glare panel. I had some paint peel off with the masks and also some bleed to clean up, so white touching-up was conducted.
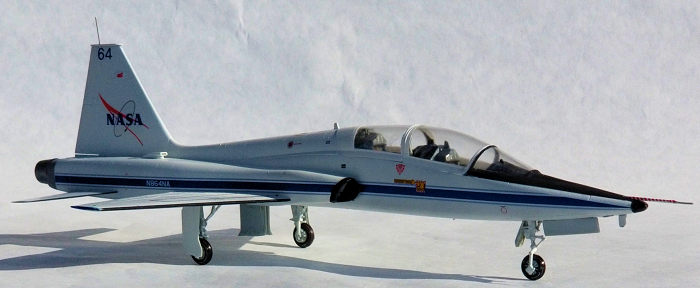 I decided on the Edwards AFB
decal option. Before applying the NASA logos on the fin, I noticed that the
tails have very little carrier film, so brushed on some decal fix. The decals
were applied over four sessions. They behaved well and some Micro Set was
brushed on just to make sure they settled down. There was one exception. The
pitot has red diagonal stripes on it and the decal is wide enough to wrap around
it two times. I sliced the decal down the middle and reserved one half for “just
in case”. So, of course, the one time I’ve wanted a decal to fold, it wouldn’t.
A few brushstrokes of Solveaset got it to conform.
I decided on the Edwards AFB
decal option. Before applying the NASA logos on the fin, I noticed that the
tails have very little carrier film, so brushed on some decal fix. The decals
were applied over four sessions. They behaved well and some Micro Set was
brushed on just to make sure they settled down. There was one exception. The
pitot has red diagonal stripes on it and the decal is wide enough to wrap around
it two times. I sliced the decal down the middle and reserved one half for “just
in case”. So, of course, the one time I’ve wanted a decal to fold, it wouldn’t.
A few brushstrokes of Solveaset got it to conform.
After the decals dried, the exhaust cans were glued in place. Working forward, the stabilators were glued into place with a slight droop. The main landing gear and doors were installed followed by the nose gear. The landing light lens was given a swipe from a liquid chrome pen on the backside and glued in the retracted position. The last part was the pitot.
| CONCLUSIONS |
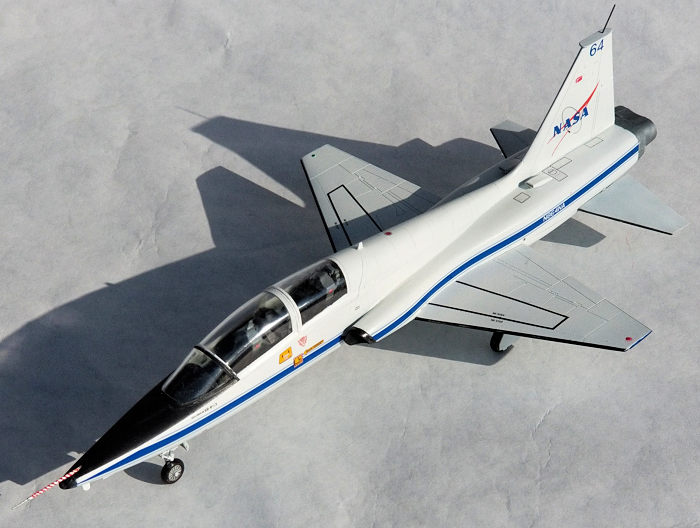
I’ve always thought the F-5/T-38 a beautiful aircraft. I also think the NASA livery their most elegant paint scheme. I’m glad this kit comes with those markings. I didn’t encounter any major issues during the build. Perhaps the best way to avoid the fit problems of the canopies is to model them open. Unlike many of my builds, I spent under 20 hours on the model.
15 June 2020
Copyright ModelingMadness.com If you would like your product reviewed fairly and fairly quickly, please
contact
the editor or see other details in the
Note to
Contributors. Back to the Main Page
Back to the Review
Index Page
Back to the Previews Index Page