Italeri & ESCI 1/72 RF-4 Phantom II
| KIT #: | 133/9029 |
| PRICE: | $1.00 SRP (when new) |
| DECALS: | Two/Three options |
| REVIEWER: | Nicolai Plesberg |
| NOTES: | An American RF-4C built from the Italeri kit, while the Esci became a German RF-4E |
| HISTORY |
The story on the F-4 Phantom II fighter plane goes way back to the early 1950s as a successor to the original Phantom (the McDonnell FH-1) and the prototype, the XF4H1, first flew on May 27 1958.
Originally conceived as a carrier-based attack aircraft with four 20mm cannon,
it ended up as a gunless all-weather interceptor with an advanced radar and
radar guided as well as infra-red guided missiles. The configuration was a
rather large fuselage with an unprecedented space available for fuel, two
General Electric J79 single shaft turbojet engines housed in a beautifully
tailored ducting system with fully ramp-type lateral intakes and variable
afterburner nozzles close together ahead of the tail section and angled slightly
downwards to give extra punch when taking off from a carrier. It in fact
resembled its direct ancestor, the F3H Demon, more than the FH-1, but the new
F4H (as the Phantom II was then known as) was area ruled and had enormous blown
flaps and blown drooping leading edges. The wings were also
 unusual in
that the folding outer sections had a sharp dihedral and the tail planes (in
fact powered horizontal stabilizers) were, if even more unusual, having a sharp
anhedral angle giving the aircraft a characteristic inverted butterfly tail.
unusual in
that the folding outer sections had a sharp dihedral and the tail planes (in
fact powered horizontal stabilizers) were, if even more unusual, having a sharp
anhedral angle giving the aircraft a characteristic inverted butterfly tail.
The
first variant, the F4H-1, soon to be redesignated the F-4A, entered service in
1960, but soon gave way to the much improved F-4B, which had a redesigned
forward fuselage; the crew stations were raised to give better view and the
radar was replaced with the substantially larger Westinghouse APQ-72 radar set,
which meant that the nose section had to be elongated as well as increased in
diameter, giving the F-4 its well known bulbous shape. US Navy and Marine Corps
Squadrons all operated the F-4B, but trials had shown the US Air Force that the
F-4 could be adopted for its air-ground requirements. Initially designated the
F-110A the Air Force changed the designation to F-4C. After procuring 583 of the
C model the Air Force bough 793 of the F-4D, which in every way was a “cleaned”
up F-4C; specifically adapted for the air-ground role accor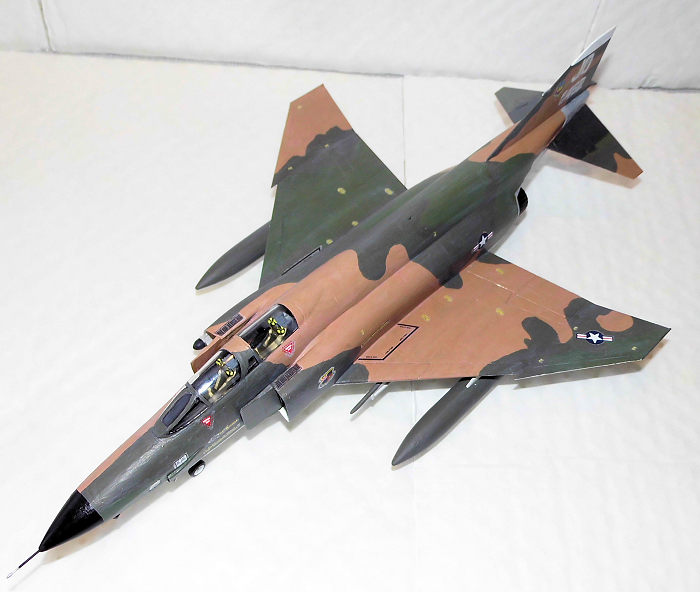 ding
to the Air Force’s requirements. Next model to be procured was the highly
advanced multi-sensor reconnaissance RF-4C with a battery of forward-looking and
oblique cameras, IR linescan, SLAR (Side Looking Airborne Radar) and a small
forward oblique mapping radar. The RF-4C served in Vietnam, where it replaced
the RF-101C Voodoo. The RF-4C was not wired to carry any sorts of weaponry,
though in its later service years a few were in fact wired to carry and fire
Sidewinders for self-defense. Twelve ex-USAF RF-4Cs were exported to Spain. The
Marine Corps procured their own variant of the RF-4, namely the RF-4B, which
essentially was the RF-4C´s reconnaissance systems build into the F-4B airframe.
ding
to the Air Force’s requirements. Next model to be procured was the highly
advanced multi-sensor reconnaissance RF-4C with a battery of forward-looking and
oblique cameras, IR linescan, SLAR (Side Looking Airborne Radar) and a small
forward oblique mapping radar. The RF-4C served in Vietnam, where it replaced
the RF-101C Voodoo. The RF-4C was not wired to carry any sorts of weaponry,
though in its later service years a few were in fact wired to carry and fire
Sidewinders for self-defense. Twelve ex-USAF RF-4Cs were exported to Spain. The
Marine Corps procured their own variant of the RF-4, namely the RF-4B, which
essentially was the RF-4C´s reconnaissance systems build into the F-4B airframe.
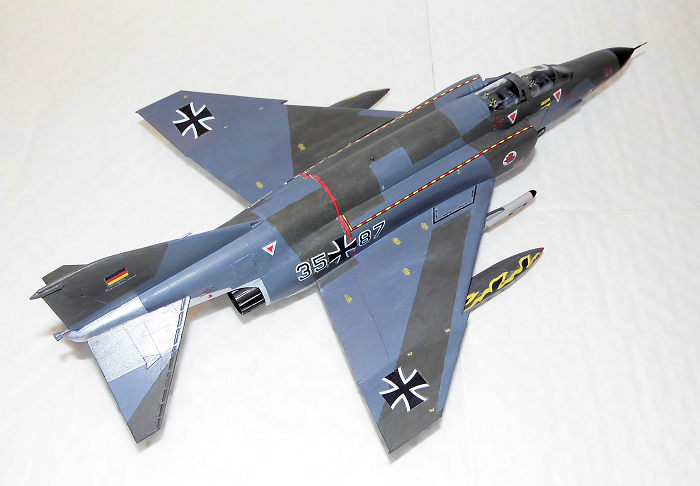
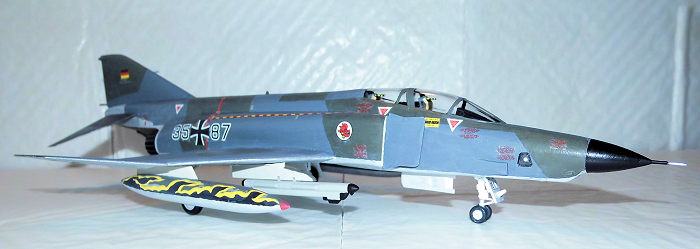
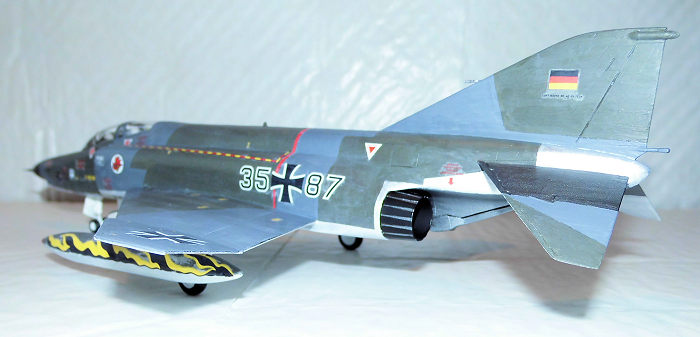
The RF-4E has the same sensor suite (although not as advanced as it was meant for export markets) as the RF-4C, but built into the F-4E airframe with more powerful engines and slotted stabilators. Later in the production life of the aircraft, a more aerodynamic camera bay window section was developed with all RF-4Es to Israel being so equipped. This feature was retrofit to earlier aircraft as well. The RF-4E was exported to Japan, West Germany, Israel, Turkey and Iran. The only RF-4s wired to carry Sidewinders for self-defense from the beginning were the RF-4Es exported to Israel. German RF-4Es were upgraded to allow them to operate in the fighter-bomber role.
| THE KITS |
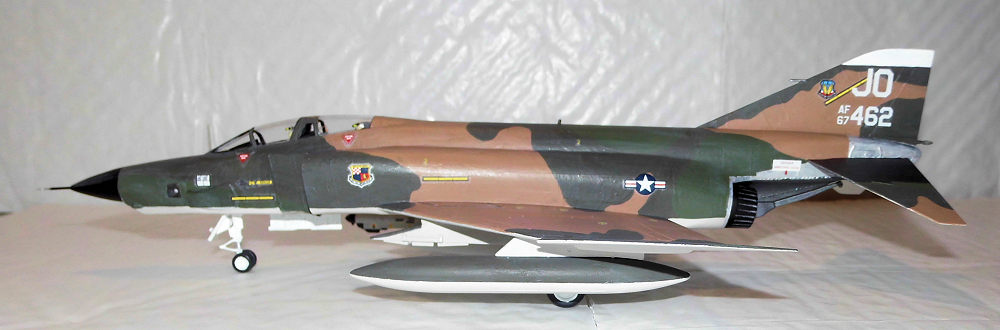
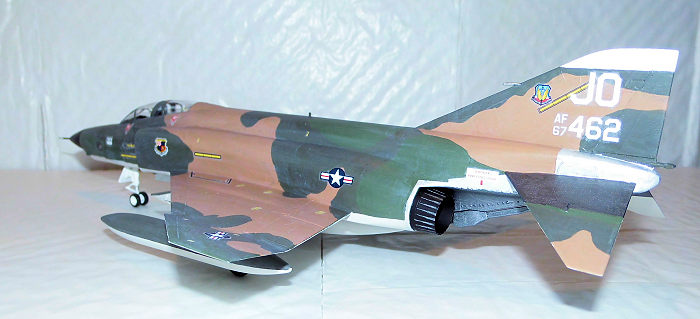
The Italeri kit stems from the very early 1980s molded in a green plastic (68 parts) and 11 parts in clear plastic with fine raised panel lines, a decent interior for the time and a quite nice landing gear, with detail just popping out, if painted properly. Three drop tanks are included, two 370 gal on the outer wing stations and one 600 gal on the centreline. Pylons for the inner stations are also included and together with the burner cans constitute the differences between the two variants possible; the RF-4C and the RF-4E. Color callouts for both details as well as the main colors are generic, which means that you’re on your own when it comes to pick the exact colors. Decals are for a USAF RF-4C from the 30th TRS / 363rd TRW and a West German RF-4E from AG 51 and nicely printed by Cartograf although with a flat look (not the gloss modern variety).
 The Esci
kit is contemporary with the Italeri one although it is very different in
appearance. First off it has more parts (about 83, including 12 in clear) molded
in brown plastic and it sports
engraved panel lines, something
that Esci pioneered in those days. Second it simply looks more detailed and more
rounded off than the Italeri one does. Esci has, for example, included two sets
of stabilators; one unslotted set for the RF-4C and one slotted set for the
RF-4E. The Italeri one only includes one set, which, to my eyes at least, looks
like a hybrid between the two variants. The Esci burner cans are a bit nicer
than Italeri’s; I think I will use both pairs! The Esci inner pylons are also
nicer than Italeri’s; same reasoning applies! It also includes two 370 gal drop
tanks and one ALQ 119 ECM pod. Color callouts are for Humbrol Enamels although
some of the colors have an alternative FS 595 number. Decals are for three
aircraft; first a RF-4C from the 160th
TRS 187th
TRG Alabama ANG, then an RF-4E from AG 51 Luftwaffe in West Germany and last an
RF-4C from Ala 12, Ejército del Aire, the Spanish Air Force. They are, as the
Italeri sheet, printed nicely with a flat finish by Cartograf.
The Esci
kit is contemporary with the Italeri one although it is very different in
appearance. First off it has more parts (about 83, including 12 in clear) molded
in brown plastic and it sports
engraved panel lines, something
that Esci pioneered in those days. Second it simply looks more detailed and more
rounded off than the Italeri one does. Esci has, for example, included two sets
of stabilators; one unslotted set for the RF-4C and one slotted set for the
RF-4E. The Italeri one only includes one set, which, to my eyes at least, looks
like a hybrid between the two variants. The Esci burner cans are a bit nicer
than Italeri’s; I think I will use both pairs! The Esci inner pylons are also
nicer than Italeri’s; same reasoning applies! It also includes two 370 gal drop
tanks and one ALQ 119 ECM pod. Color callouts are for Humbrol Enamels although
some of the colors have an alternative FS 595 number. Decals are for three
aircraft; first a RF-4C from the 160th
TRS 187th
TRG Alabama ANG, then an RF-4E from AG 51 Luftwaffe in West Germany and last an
RF-4C from Ala 12, Ejército del Aire, the Spanish Air Force. They are, as the
Italeri sheet, printed nicely with a flat finish by Cartograf.
| CONSTRUCTION |
 As I
revived these two from my stash in the autumn of 2015 it was with the fact, that
I had begun construction 20 years ago or so; the fuselages had been glued
together, interiors partially assembled and painted, and for the Italeri kit the
wings, drop tanks and nose section had been glued together as well. Even the
arrester hook had been modified so it actually could function as such; just
because the engineering of the part made that possible. The Esci one is designed
differently and thus cannot be made to work unless considerable work is put into
it! I decided not to do this, since it really was not a goal in itself; I just
moved on from were I left them all those years ago.
As I
revived these two from my stash in the autumn of 2015 it was with the fact, that
I had begun construction 20 years ago or so; the fuselages had been glued
together, interiors partially assembled and painted, and for the Italeri kit the
wings, drop tanks and nose section had been glued together as well. Even the
arrester hook had been modified so it actually could function as such; just
because the engineering of the part made that possible. The Esci one is designed
differently and thus cannot be made to work unless considerable work is put into
it! I decided not to do this, since it really was not a goal in itself; I just
moved on from were I left them all those years ago.
First I removed the adhesive tape from the Italeri wings, which actually was quite easy – the tape hadn’t grown stuck! I then removed the wings and drop tanks from the sprues from the Esci kit, cleaning them up and gluing them together. When dry they were sanded and filled here and there, as were the fuselage seams. When all that had been sanded to a satisfactory result, I painted the interior bits finished, made my solution for the camera port windows (for any information on that, please go here) and applied the instrument panel decals (plus side panel decals for the Esci kit), which were sealed with flat varnish once dry. I then located and with tiny drops of plastic glue secured the camera port windows in the nose section on the Esci kit; the “camera sheets” were subsequently glued to the windows from the inside in both kits nose sections using white glue (a slight modification from the mentioned procedure in the link above, but I reserve the right to alter the method if it suits better in the given situation).
Seat belts of Tamiya tape were cut out and put on the ejection seats, painted cream and done some touch up in cockpit / interiors before gluing sticks and seats to the floors. When dry the interiors / lower front fuselage parts were glued to the respective fuselage; both kits had the engineering done in such a way, that this sequence is possible! I also glued an ALQ 119 pod, from one of Hasegawa’s weapon sets, together to complement the Italeri Phantom. The interior of both kits air intakes were dealt with next; painted gloss white in several sessions to get a perfect coverage. The nose section from the Esci kit was also glued together at this stage.
 When
fuselage nose sections had set there were a couple of filling / sanding sessions
as the fit of the forward fuselage as engineered on both kits were not quite up
to modern standards so a considerable amount of time should be invested here.
Even though the intakes will hide most of the mentioned area it will still be a
good idea to eliminate the poor fit or it will show; at least if someone picks
up the model and inspect it from below! The intake back areas plus the cockpit
edges were finished off in flat black at this stage. As soon as those seams had
been effectively dealt with the nose sections and intakes were glued onto the
fuselages; on the Italeri one the rudder (oddly comes as a separate part) was
attached too. Regarding nose weight let me be clear on that: I didn’t glue any
in because NO,
and I absolutely mean NO
F-4 model will EVER
require nose weight for two very basic reasons:
When
fuselage nose sections had set there were a couple of filling / sanding sessions
as the fit of the forward fuselage as engineered on both kits were not quite up
to modern standards so a considerable amount of time should be invested here.
Even though the intakes will hide most of the mentioned area it will still be a
good idea to eliminate the poor fit or it will show; at least if someone picks
up the model and inspect it from below! The intake back areas plus the cockpit
edges were finished off in flat black at this stage. As soon as those seams had
been effectively dealt with the nose sections and intakes were glued onto the
fuselages; on the Italeri one the rudder (oddly comes as a separate part) was
attached too. Regarding nose weight let me be clear on that: I didn’t glue any
in because NO,
and I absolutely mean NO
F-4 model will EVER
require nose weight for two very basic reasons:
the wheel base is pretty large, but most importantly
the location of the main gears is well behind the centre of gravity and only models with the main gears located ahead of the centre of gravity will require nose weight!
As soon
as the intakes had been faired in, the wings were glued to the fuselages; in
both cases the fit was actually quite nice, but filler and sanding is absolutely
required to get smooth joints. When that had been done the adaptation of the
stabilizers went in the works. Sure the slotted ones were glued immediately to
the Esci fuselage with no trouble unlike the unslotted ones which didn’t fit
into the slots in the Italeri fuselage so some cutting and sanding was required
to achieve an acceptable fit – but it eventually succeeded. Some gluefilling /
sanding came next and the stabilators sat firmly to their respective fuselage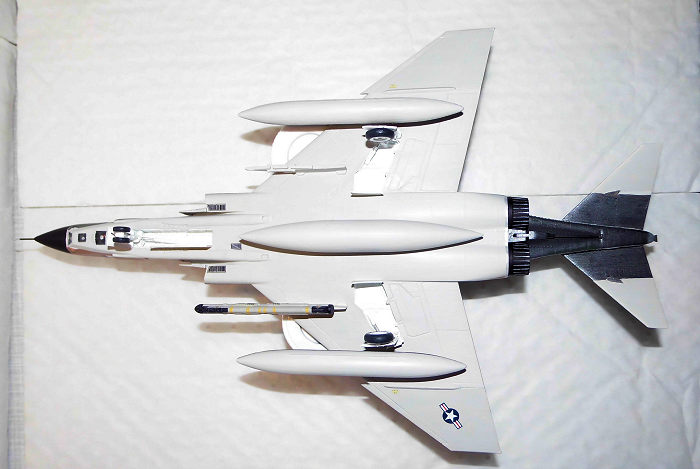 s.
The final thing missing in the cockpits was actually a shroud covering the rear
seat’s instrument panel. This was accomplished by cutting them out from paper
(easiest material to use) and attached with white glue. When dry they were
painted flat black. Then the canopy parts were cleaned and attached with gloss
varnish – except the rear canopy on the Italeri one because one corner of the
canopy was simply missing! The missing corner was built up of a piece of clear
plastic from a spare canopy and the edge (the framing) was reconstructed from
Evergreen bits. It was then attached to the cockpit opening with a combination
of clear varnish and ordinary glue. Some careful sanding when set became
necessary as with filling gaps with clear gloss varnish and finalize with a
light sanding when set. Gear parts plus doors were next; gears were carefully
assembled using the locating holes in gear bays for aligning the parts while
they dried. Then several coats of gloss white were painted on gears, inner side
of doors and the bays until the coverage was satisfying. Tires were painted tire
black and oleos silver. When both airframes had been cleaned thoroughly (side
note: dust in engraved panel lines can apparently get really stuck!) the gear on
both models was glued in place and subsequently went to the paint shop.
s.
The final thing missing in the cockpits was actually a shroud covering the rear
seat’s instrument panel. This was accomplished by cutting them out from paper
(easiest material to use) and attached with white glue. When dry they were
painted flat black. Then the canopy parts were cleaned and attached with gloss
varnish – except the rear canopy on the Italeri one because one corner of the
canopy was simply missing! The missing corner was built up of a piece of clear
plastic from a spare canopy and the edge (the framing) was reconstructed from
Evergreen bits. It was then attached to the cockpit opening with a combination
of clear varnish and ordinary glue. Some careful sanding when set became
necessary as with filling gaps with clear gloss varnish and finalize with a
light sanding when set. Gear parts plus doors were next; gears were carefully
assembled using the locating holes in gear bays for aligning the parts while
they dried. Then several coats of gloss white were painted on gears, inner side
of doors and the bays until the coverage was satisfying. Tires were painted tire
black and oleos silver. When both airframes had been cleaned thoroughly (side
note: dust in engraved panel lines can apparently get really stuck!) the gear on
both models was glued in place and subsequently went to the paint shop.
| COLORS & MARKINGS |
For the RF-4C the standard SEA camouflage scheme was applied using only acrylics; Vallejo silver grey (883) for the undersides, Humbrol 118 for the tan, Humbrol 117 for the light green and Humbrol 116 for the dark green. The drop tanks were also painted accordingly to the instructions at this stage. The fin top was painted flat white (Humbrol 34 also the acrylic variant). Of course some touch up was necessary, but nothing new in that. Finally I could apply the finishing gloss coat for the decals. As a curious side note Italeri advises in the instructions that the under surfaces should be painted white. This is of course incorrect as the underside grey in the SEA scheme is FS36622 light grey.
The
RF-4E was a bit trickier because it demanded a lot of masking due to the German
splinter cam scheme. First though the under sides were painted silver using
Vallejo acrylic (997), but it took six coats to get an acceptable result.
Personal note: I think I should have used enamel paint for this, because the
Vallejo acrylic silver didn’t seem to be adequate for painting larger surfaces,
since I had that trouble with i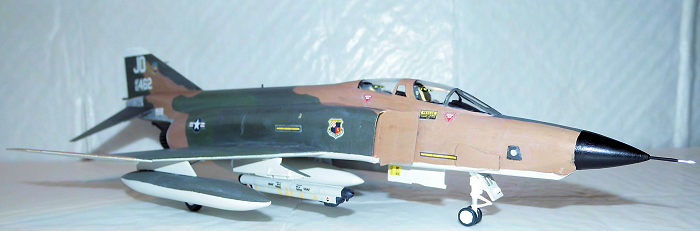 t!
Next I took a couple of hours to mask off those areas on the sides / upper
surfaces that should be painted grey. The grey color I used for that was Vallejo
Neutral Grey (992). Two coats were sufficient to get good coverage. The masking
tape was removed immediately after the second coat had been applied. When dry
some new masking tape was applied to mask off the areas that should be painted
green. The green color employed was the same color as the dark green in the SEA
scheme on the RF-4C : Humbrol 116 Dark Green. Two coats of this color were again
sufficient to get good coverage. Some touch up was also necessary here, but I
guess it’s mandatory anyway! The tips on the drop tanks went red (Humbrol 19
also the acrylic variant) as the final touch before the gloss coat.
t!
Next I took a couple of hours to mask off those areas on the sides / upper
surfaces that should be painted grey. The grey color I used for that was Vallejo
Neutral Grey (992). Two coats were sufficient to get good coverage. The masking
tape was removed immediately after the second coat had been applied. When dry
some new masking tape was applied to mask off the areas that should be painted
green. The green color employed was the same color as the dark green in the SEA
scheme on the RF-4C : Humbrol 116 Dark Green. Two coats of this color were again
sufficient to get good coverage. Some touch up was also necessary here, but I
guess it’s mandatory anyway! The tips on the drop tanks went red (Humbrol 19
also the acrylic variant) as the final touch before the gloss coat.
For both models were various metallic shades applied around the tail / exhaust area, as this is, if anything else, a very clear trademark of a Phantom.
The decals for the RF-4C performed well without any incidents as I had expected from Cartograf printed decals! The ones for the RF-4E, also performed reasonably well even though there were a couple of wrinkles. The first wrinkle was that the long walkway decals for the upper fuselage actually went in several pieces when moving them into position and it was quite a work to get all the pieces aligned up well before I could fix them in place. The second wrinkle was that the flame decals for the drop tanks wouldn’t really like to conform so they cracked a bit here and there. I had to use white glue in order to get a reasonable fit along the curvature of the tanks! Some cracks were, however, touched up with flat black and a suitable yellow color I found to match the yellow color on the decals pretty well.
When the decals had dried they were cleaned with a moist anti-static cloth to remove any residue left. Then they were sealed with a coat of clear gloss; when dry they final flat coat was applied.
| FINAL CONSTRUCTION |
The last
things missing were the mounting of the exhaust petals, the pylons, the
remaining gear doors, the jammer pods and the drop tanks. The exhaust petals
were painted flat black / burned metal to replicate the burned /dirty look of
the real thing. If anything the Phantom is well known of the dirty trail its
engines leaves on the sky and hence the dirty / burned look of the exhaust
petals. The jammer pods were painted light gull grey (Humbrol 129); on the
Hasegawa one the belonging decals were applied. They were of
 course
sealed with flat varnish when dry. The nose sections on both models were painted
satin black (Humbrol 85). The parts were attached with slow drying CA glue /
plastic glue depending on what I found suitable in each case. They were followed
up by the very last touch ups.
course
sealed with flat varnish when dry. The nose sections on both models were painted
satin black (Humbrol 85). The parts were attached with slow drying CA glue /
plastic glue depending on what I found suitable in each case. They were followed
up by the very last touch ups.
In case of the Italeri Phantom, I first attached the tail hook before gluing the exhausts in place. You see the engineering of the kit parts made it possible to get the hook actually working. It was in fact quite easy; first I had drilled a hole of one millimetre in diameter in the swivelling point of the hook. Then the corresponding holes in the fuselage halves had been drilled (all of this was of course done before the fuselage had been joined – easy done). When mounting the hook it was simply placed where it should be and a suitable piece of stretched sprue rod stuck through the holes and a tiny amount of glue securing the sprue rod in each end. When dry the sprue rod was cut / sanded to shape in each end and the areas touched up with the burned metal color I had used, and then the burner cans were glued in place. And with that both of my recce Phantoms were finished.
| CONCLUSIONS |
When comparing these two old kits it is clear that the Esci one wins with a higher overall score; it has engraved panel lines, the interior, gear and other details are a tad nicer than the Italeri counterparts, not to mention the raised panel lines that the Italeri kit offers. The overall appearance of the Esci kit is of a higher quality and finish contra the more simplified look of the Italeri parts even though the finished models of both kits fortunately do look like a RF-4 Phantom II and they will also represent great value compared to the benchmark of 1/72 scale Phantom kits; namely Hasegawa’s excellent line of Phantom kits. I believe that Hasegawa’s RF-4 boxing addresses the one issue with the nose section I mentioned earlier in this review, which neither Italeri nor Esci have done anything about: during the production run of the RF-4C the recce nose got more curves, but both kits noses only reflect the early RF-4C style nose. This means, strictly speaking, that you may not be able to build a correct RF-4E or a late RF-4C straight out of the box with these kits unless of course you don’t care about such issues. As a curious note the German RF-4E’s actually had the flat bottomed recce nose so the kit is correct for this. This eventually means you’re bound to do a thorough research on that particular airframe you are going to model whether it will be a RF-4C or a RF-4E!
Even though I have a few Hasegawa Phantoms in my stash (although not the RF-4) the Esci and Italeri kits can be recommended to all modelers; either the experienced who may wish to do a super detailed project or to the novice modeler who’d whish to build his first Phantom model; it’s better to gain experience on an old cheap kit rather than using an expensive newer kit, because if something goes south, it’s only your wallet, and maybe your self confidence, that will suffer!
| REFERENCES |
American Warplanes by Bill Gunston Cresent Books, 1986 Salamander Books ISBN 0-517-61351-4
F-4 Phantom II in action by Larry Davies © 1984 Squadron Signal ISBN 0-89747-154-7
F-4C, F-4D and RF-4C Phantom II In detail and scale by Bert Kinzey © 1994 Detail and Scale, Inc. ISBN 1-888974-25-7
6 November 2018
Copyright ModelingMadness.com.
If you would like your product reviewed fairly and fairly quickly, please contact the editor or see other details in the Note to Contributors.
Back to the Main Page Back to the Review Index Page Back to the Previews Index Page