Italeri 1/48 U-2R
| KIT #: | 822 |
| PRICE: | €15 when new |
| DECALS: | Three options |
| REVIEWER: | Spiros Pendedekas |
| NOTES: | Techmod 4 color lozenge and rib tapes |
| HISTORY |
With the rise of the
Cold War, the US military recognized that strategic reconnaissance could not be
carried out by the then converted bombers and similar aircraft, as they were
extremely vulnerable to Soviet air defense assets. A dedicated aircraft, capable
of flying at 70,000 feet (a height then considered “safe” in regards to the then
Soviet defense technology…) was visualized and sought after.
Whereas Bell, Fairchild and Martin received relevant USAF contracts, Lockheed,
despite not receiving any, decided to nevertheless engage their top engineer
Clarence "Kelly" Johnson in such a project. What his “Skunk Works” unit came up
with, was to essentially mount two sailplane wings onto an F-104 fuselage. Named
CL-282, the project had a dodgy start, being initially rejected by the USAF.
Time proved to be this project’s ally, though: having already changed its name
to U-2, it ended up beιng wholeheartedly accepted and funded by the CIA. The
rest is history…
 Nicknamed
"Dragon Lady", production U-2 provided day and night, high-altitude, all-weather
intelligence. Essentially a jet powered glider, it was a very difficult aircraft
to fly and, because of a high stall speed relative to its maximum speed, a
handful to land, requiring a chase car with another U-2 pilot to help talk the
aircraft down!
Nicknamed
"Dragon Lady", production U-2 provided day and night, high-altitude, all-weather
intelligence. Essentially a jet powered glider, it was a very difficult aircraft
to fly and, because of a high stall speed relative to its maximum speed, a
handful to land, requiring a chase car with another U-2 pilot to help talk the
aircraft down!
Initially conceived to take off from a dolly and land on a skid, designers came
to their senses and a bicycle configuration landing gear was finally adopted,
with the wheels located behind the cockpit and engine. To maintain balance
during takeoff, auxiliary wheels, known as “pogos”, were installed under each
wing, dropping away upon takeoff. The fact that pilots wore space-like suits, in
order to maintain proper oxygen and pressure levels at those high altitudes,
only contributed to boosting the myth surrounding this exotic aircraft,
especially in its early years.
Apart from their active role during the Cold War (the infamous Gary Powers
incident included…), U-2s have not only taken part in post-Cold War conflicts in
Afghanistan and Iraq, but have also supported several multinational NATO
operations. The type has also been used for electronic sensor research,
satellite calibration, scientific research, and communications purposes.
It is an ageless aircraft, proudly serving the USAF for over 50 years, together
with B-52, KC-135, and C-130, with its newest models (TR-1, U-2R and U-2S)
entering service in the 80s and the latest version undergoing a technical
upgrade in 2012. A total of 104 have been built between 1955 and 1989.
| THE KIT |
This kit was introduced
by Italeri in 1988 as TR-1A/B, which is the later version of the U-2, featuring
greater wing span. Since then, with the occasional addition of new parts, it has
been frequently reboxed by Italeri (and “sister” Testors) as U-2R/Senior Span
and even as U-2S by Academy (in 2014).
My copy was the original 1988 edition, discovered at an Athens Hobby shop in
2000, still sealed and at a price I could not refuse. It came in a flimsy-ish
top opening Italeri box, with an ungainly pic of a U-2 flying in a surreal
looking sky as a boxart. Upon opening the box I was greeted with a lot of black
plastic, 80 parts in total, arranged in three sprues: two of them basically
contain the wing parts, intakes, doors and nose halves, whereas the third one
contains all the rest, the two fuselage halves included.
 Cockpit
detail is average. Should you want to pose the canopy open, some beefing up will
be absolutely necessary. Landing gear is equally averagely represented, with
some detail molded onto the bay walls. All 8 wheels are one piece, a nice touch.
Intakes are shallow and bland, the same being true with the exhaust nozzle.
Cockpit
detail is average. Should you want to pose the canopy open, some beefing up will
be absolutely necessary. Landing gear is equally averagely represented, with
some detail molded onto the bay walls. All 8 wheels are one piece, a nice touch.
Intakes are shallow and bland, the same being true with the exhaust nozzle.
Options include building the operational single seater or the trainer double
seater. The air brakes can be optionally posed open. Panel lines are raised all
over, and not that many really, but that is the case in the real plane, as well.
Molding is quite good, with only a bit of flash noticeable here and there. Some
warping can be observed at the wing halves, but this might be understandable for
such big parts, let alone that it usually “disappears” upon joining the wing
halves most of the times…
Clear parts look well molded and crystal clear. Instructions come as a small
pamphlet, containing a small history and a parts list, with the construction
spread in 6 very clear steps. Interestingly, the model is so engineered that kit
parts are consecutively used in series at each construction step: parts 1 to 18
at step1, parts 19 to 24 at step 2 and so on, a nice touch, especially helpful
for less experienced modelers, who will not have to worry about losing track of
parts.
Color callouts are clearly provided at all construction steps, however I am a
tad sceptical about the zinc chromate recommendation for the intake innards:
they should most probably be white (though I have also seen black at some net
pics). Three scheme options are provided: the classic operational all-black, a
colorful NASA white over gray - or duck egg blue? - and an all-white USAF two
seater trainer. Where instructions really come short is at the camo drawings and
decal placements: not all views are provided for all schemes, leaving the
modeler speculating. This is especially irritating on the NASA version, where
only one side view is provided (and, surprisingly, it is the most complex of the
three schemes!). Thankfully, the net can once again save the day, enabling the
modeler to have access to the newer, very comprehensive Testors equivalent
ones…Decals were superbly printed by Zanchetti Buccinasco and, despite being
old, their condition looked good.
| CONSTRUCTION |
Having decided to build the single seater all-black
operational version, I started by assembling the cockpit: I attached the
instrument panel (with the characteristic viewfinder ducting at its rear), the
2-piece control yoke and 5-piece seat into the cockpit tub. Basic cockpit color
was Hu140 Gull Gray, with black instrument panel, side consoles and yoke. The
instrument panel was dry brushed with silver and had some red knobs painted with
a 10/0 brush. The quite good looking seat was painted black (also dry brushed
with silver), with red cushions, khaki belts and yellow/black ejection handle.
 After
attaching the two front underside transparencies (of which, I believe, the big
rectangular one is for the camera and the small circular one is for the downward
vision periscope), I joined the two fuselage halves, with the cockpit tub, the
two wheel bays and the exhaust nozzle trapped in between. I then attached the
intakes and front nose, all 2-piece affairs. Fit was sufficient allover, with
filling and sanding taking place where required.
After
attaching the two front underside transparencies (of which, I believe, the big
rectangular one is for the camera and the small circular one is for the downward
vision periscope), I joined the two fuselage halves, with the cockpit tub, the
two wheel bays and the exhaust nozzle trapped in between. I then attached the
intakes and front nose, all 2-piece affairs. Fit was sufficient allover, with
filling and sanding taking place where required.
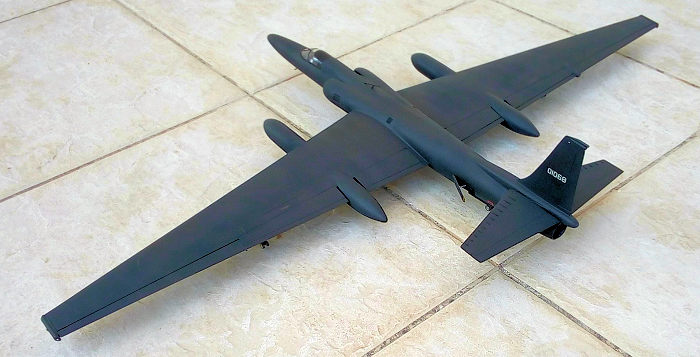
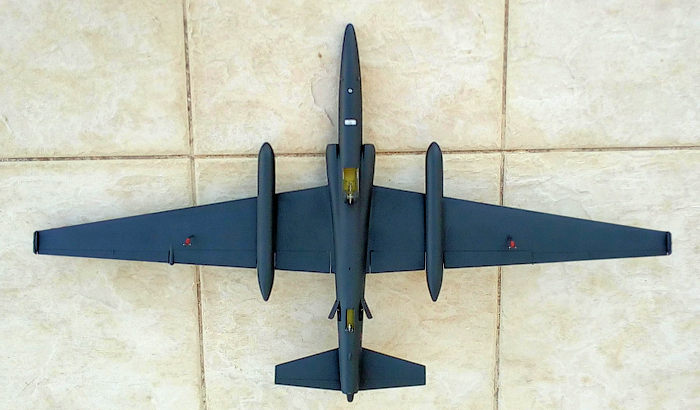
The main wings are nice subassemblies, comprising of no less than 8 pieces each,
the equipment wing conformal pods included. The massive assembled wings were
then filled and sanded (an operation much more easily done when not attached to
the fuselage), then attached, followed by the single piece tail planes. The main
wings were supported with paint jars of suitable height, in order to remain
horizontal until glue curing. To my joy, no main wing warping was then evident.
After a final filling and sanding session, I masked the underside
transparencies, blanked the cockpit with wet tissue and took this big motorized
spy-glider to the paint shop!
| COLORS & MARKINGS |
 I applied a
coat of Hu33 Matt Black all over, including doors and airbrakes external
surfaces. I did not care about evenness of application: in fact, the more uneven
the result, the more realistic it would look, livening up the monotonous looks
of this big black plane. And yes, the result was not so even!
I applied a
coat of Hu33 Matt Black all over, including doors and airbrakes external
surfaces. I did not care about evenness of application: in fact, the more uneven
the result, the more realistic it would look, livening up the monotonous looks
of this big black plane. And yes, the result was not so even!
Though there are pics depicting U-2s with white intake trunking, there are also
a hefty amount of pics depicting birds with black ones. Taking into account that
the kit intakes’ shallowness/blandness would be more than evident, I was not at
all reluctant in painting the intakes black, the same being true for the also
shallow exhaust nozzle: it looked deeper in matt black!
Upon decaling, I spot-applied small amounts of Future, only at the areas the
decals were to be applied. Speaking of decals, the few applied behaved nicely,
no remarks whatsoever. A coat of Future sealed them.
| FINAL CONSTRUCTION |
 I attached
the bicycle landing gear, followed by the wheels and doors, aligned everything
and let the glue cure. The pogo legs had their mini wheels attached, but were
glued into position only after main landing gear glue had cured, and, moreover,
attached in such an angle, as to allow the big wing droop just a tad, as
observed in reality. This was possible by supporting each wing with suitable
means (paint jars...) at the “correct” droop, until pogo glue cured.
I attached
the bicycle landing gear, followed by the wheels and doors, aligned everything
and let the glue cure. The pogo legs had their mini wheels attached, but were
glued into position only after main landing gear glue had cured, and, moreover,
attached in such an angle, as to allow the big wing droop just a tad, as
observed in reality. This was possible by supporting each wing with suitable
means (paint jars...) at the “correct” droop, until pogo glue cured.
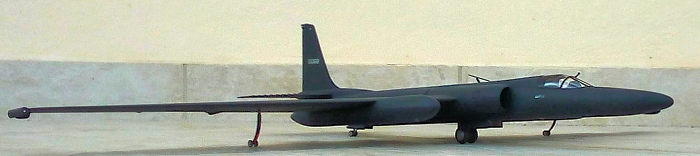
The bicycle landing gear legs, all rims, bays and door innards were painted
Testors Steel, tires were black and oleos were highlighted with a fine chrome
pen. Pogo struts were painted insignia red, as was the usual case in reality
(and adding some "color" to this total black/bland bird). For the same reason of
adding interest, the air brakes were attached “open”, having their innards
painted zinc chromate and their actuators steel. The two front pitots, the
distinctive rear view mirror and the top mounted UHF aerial were attached and
accordingly painted. Blobs of red and green clear paint were utilized to
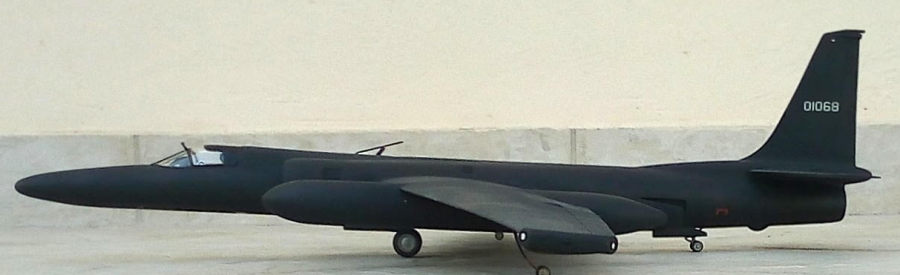
represent the wingtip and anti-collision lights, before calling this “Spy in the
Sky” done!
| CONCLUSIONS |
AFV came with a new tool, early version U-2 in
2019, offering tons of detail and being sensibly priced, truly deserving the
“modern kit’ label. Understandably requiring the modeler to take his time with
it, this kit is the obvious choice for an accurate looking quarter scale U-2. I
would also put a safe bet on seeing late U-2 versions by AFV, sometime in the
future.
The Testors/Italeri is a solid, classic kit of this iconic plane, with good
general shape, low parts count, easiness in assembly and good (not perfect) fit.
Cockpit, landing gear, intakes and exhaust could be busier, but, back in 1988,
when this kit was introduced, this level of detail was acceptable. Panel lines
are few and raised (not a problem for me, let alone the fact that U-2 large
surfaces look flat and panel-less, so the absence of panel lines might be
beneficial…).
This kit can even be recommended for a less experienced modeler, who wants to
test his skills in putting together a big plane, he could even practice
airbrushing by painting those large black surfaces too! The experienced modeler
who wants to tackle it, can take advantage of the low kit price and get
aftermarket upgrades that address the kit’s most oversimplifications or
deficiencies (seat, cockpit, horizontal stabilizers, corrected seamless intakes,
exhaust nozzle, white metal landing gear, vac canopy and the like). All these
upgrades look gorgeous and seem easily available.
I had a great time building this kit: construction was simple, fit was good (not
perfect), painting could not be easier! The final result sure looks like an
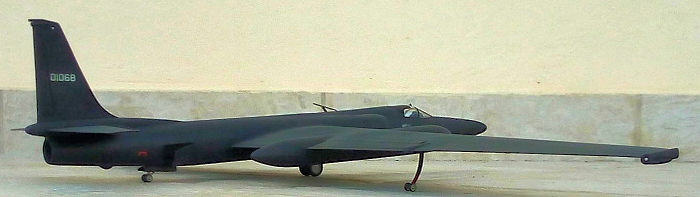
operational U-2, ready for its next mission!
This kit is regularly reissued by Italeri at low prices, offering interesting
schemes. If you own one (or fancying to buy one), provided that you have some
respectable sized space (this is a big model!), I wholeheartedly recommend you
to go on and build it. No matter which road you choose (out of the box or “super
detail”), you will definitely have a very enjoyable time and come up with a big
model of this iconic plane!
Happy modeling!
19 April 2022
Copyright ModelingMadness.com. All rights reserved. No reproduction in part or in whole without express permission.
If you would like your product reviewed fairly and fairly quickly, please contact the editor or see other details in the Note to Contributors.