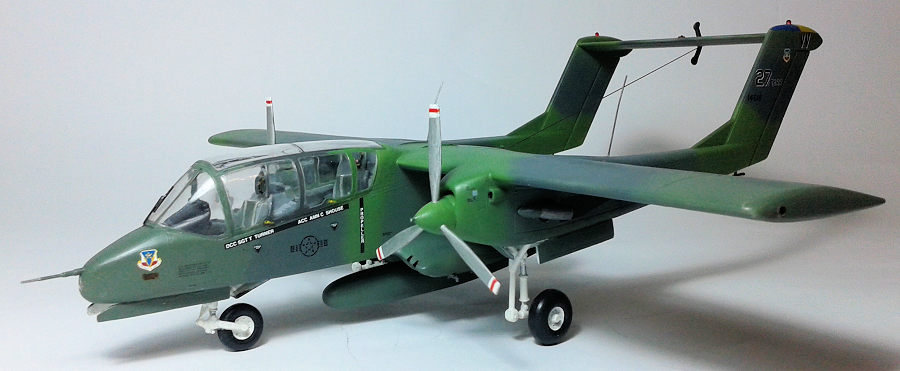
Testors/Hawk 1/48 OV-10A 'Bronco'
| KIT #: | 506 |
| PRICE: | 8 Euros |
| DECALS: | One option |
| REVIEWER: | Spiros Pendedekas |
| NOTES: | Interior scratch built as were other parts of the kit |
| HISTORY |
The North American Rockwell OV-10 Bronco is an American twin-turboprop light attack and observation aircraft. It was developed in the 1960s as a special aircraft for counter-insurgency (COIN) combat, and one of its primary missions was as a forward air control (FAC) aircraft. It can carry up to 3,200 lb of external munitions, internal loads such as paratroopers or stretchers, and loiter for three or more hours.
The aircraft was initially conceived in the early 1960s through an informal collaboration between WH Beckett and Colonel KP Rice, U.S. Marine Corps, who met at Naval Air Weapons Station China Lake, California, and who also happened to live near each other. The original concept was for a rugged, simple, close air support aircraft integrated with forward ground operations. At the time, the U.S. Army was still experimenting with armed helicopters, and the U.S. Air Force was not interested in close air support.
The concept aircraft was to operate from expedient forward air bases using roads as runways. Speed was to be from very slow to medium subsonic, with much longer loiter times than a pure jet. Efficient turboprop engines would give better performance than piston engines. Weapons were to be mounted on the centerline to get efficient unranged aiming like the Lockheed P-38 Lightning and North American F-86 Sabre aircraft. The inventors favored strafing weapons such as self-loading recoilless rifles, which could deliver aimed explosive shells with less recoil than cannons, and a lower per-round weight than rockets. The airframe was to be designed to avoid the back blast.
 Eleven
proposals were submitted, including: the Grumman Model
134R tandem-seat version of the already-fielded U.S. Army's OV-1
Mohawk (the U.S. Marine Corps dropped out of the Mohawk program in 1958), Goodyear GA
39, Beechcraft PD-183, Douglas D-855, Convair Model
48 Charger, Helio 1320, Lockheed CL-760,
a Martin design,
and the North American Aviation/Rockwell NA-300.
Eleven
proposals were submitted, including: the Grumman Model
134R tandem-seat version of the already-fielded U.S. Army's OV-1
Mohawk (the U.S. Marine Corps dropped out of the Mohawk program in 1958), Goodyear GA
39, Beechcraft PD-183, Douglas D-855, Convair Model
48 Charger, Helio 1320, Lockheed CL-760,
a Martin design,
and the North American Aviation/Rockwell NA-300.
In August 1964, the NA-300 was selected. A contract for seven prototype aircraft was issued in October 1964. Convair protested the decision and built a small-wing prototype of the Model 48 Charger anyway, which first flew on 29 November 1964. This was also a twin-boom aircraft that had a broadly similar layout to the OV-10. The Charger, while capable of outperforming the OV-10 in some respects, crashed on 19 October 1965 after 196 test flights. Convair subsequently dropped out of contention.
The Bronco started flying midway through the Charger's test program on 16 July 1965, and became one of the premier counter-insurgency (COIN) aircraft of the next 30 years. It did not achieve Rice's L2 VMA concept, because the DoD insisted on 40-foot (12 m) long wings which made it depend on airbases.
The Bronco performed observation, forward air control, helicopter escort, armed reconnaissance, utility light air transport and limited ground attack. The Bronco has also performed aerial radiological reconnaissance, tactical air observation, artillery and naval gunfire spotting, airborne control of tactical air support operations and front-line, low-level aerial photography. A prototype in Vietnam designed to lay smoke was extremely successful, kept in service by evaluators for several months, and only reluctantly released, was not purchased due to a perceived lack of mission.
Racked armament in the Vietnam War was usually seven-shot 2.75 in (70 mm) rocket pods with white phosphorus marker rounds or high-explosive rockets, or 5 in (127 mm) four-shot Zuni rocket pods. Bombs, ADSIDS air-delivered/para-dropped unattended seismic sensors, Mk-6 battlefield illumination flares, and other stores were also carried.
 Operational experience showed some weaknesses in the OV-10's design. It was
significantly underpowered, which contributed to crashes in Vietnam in sloping
terrain because the pilots could not climb fast enough. While specifications
state that the aircraft could reach 26,000 feet (7,900 m), in Vietnam the
aircraft could reach only 18,000 feet (5,500 m). Also, no OV-10 pilot survived
ditching the aircraft.
Operational experience showed some weaknesses in the OV-10's design. It was
significantly underpowered, which contributed to crashes in Vietnam in sloping
terrain because the pilots could not climb fast enough. While specifications
state that the aircraft could reach 26,000 feet (7,900 m), in Vietnam the
aircraft could reach only 18,000 feet (5,500 m). Also, no OV-10 pilot survived
ditching the aircraft.
The OV-10 served in the U.S. Air Force, U.S. Marine Corps, and U.S. Navy, as well as in the service of a number of other countries. A total of 81 OV-10 Broncos were ultimately lost to all causes during the course of the Vietnam War, with the Air Force losing 64, the Navy 7, and the Marines 10.
The 27 TASS
The 27th Tactical Air Support Squadron was activated at Davis–Monthan Air Force Base, Arizona in July 1977, but inactivated three years later when the 23rd Flying Training Squadron moved from Bergstrom to Davis-Monthan along with the 602d Tactical Air Control Wing and assumed the 27th's mission, personnel and equipment.
It was activated again in May 1984 at George Air Force Base, California. In September 1985, the 27th Air Refueling Squadron and 27th Ferrying Squadron were consolidated with 27th Tactical Air Support Squadron.
| THE KIT |
This is the 1998 reissue of the 1972 Testors, which in turn was a reissue of the 1966 Hawk kit. You can read the Editor’s thorough review here.
 The kit is
definitely basic, with various omissions and inaccuracies (wrong engines
distancing, wrong tail, a joke cockpit, non-existing wheel wells, crude landing
gear legs, childish wheels and the list goes on…). There are four generic bombs
provided that I tossed them. The sprues are neatly packed altogether and there
is quite a lot of flash. The plastic itself is soft and workable. The clear
parts look crystal clear. The Scalemaster decal sheet looks very good indeed……
The kit is
definitely basic, with various omissions and inaccuracies (wrong engines
distancing, wrong tail, a joke cockpit, non-existing wheel wells, crude landing
gear legs, childish wheels and the list goes on…). There are four generic bombs
provided that I tossed them. The sprues are neatly packed altogether and there
is quite a lot of flash. The plastic itself is soft and workable. The clear
parts look crystal clear. The Scalemaster decal sheet looks very good indeed……
The instructions are very nicely and attractively written, with a brief history, detailed assembling and painting guidelines, weathering techniques, various “tips and tricks” and figure painting suggestions. They really try to do the best to turn on your modeling desire for this ultra-basic kit.
Bought in 2007 sealed for less than 8 euros, residing in my 380ish shelf of doom, this kit was begging me to build it. So, after 12 years of painless waiting, despite its serious downfalls (or because of them???...), I decided this old granny deserved a go….
| CONSTRUCTION |
I am no fan of buying extra stuff for kits, with the occasional exception of decals. Though there are really nice correction and detail sets “out there” that really boost the kit, I decided to do mine without them, and to implement scrathbuilt details and corrections wherever I could.
Being not a Bronco expert, I would not deal with the incorrect engines position and less than stellar tail. I decided to live with them, thinking that the end result will look like a Bronco anyway, plus enjoying the added benefit of getting rid of the penlight ruler crowd (once they know about the “left as is” above stuff, I don’t think they will consider approaching the model…).
The instruction steps are really basic and I wouldn’t bother follow them. So, after cleaning up the parts, I started doing subassemblies: the two fuselage halves, with the cockpit floor trapped between them, the two sponsons, which were then glued to the fuselage, the two wing halves (upper-lower), the two booms and the two propellers (which are mentioned as keyed at the instructions, but the blades looked the same to my eye, all six of them - I did my best for the props to look left and right…).
I glued
the two booms to the wing, trapping the stabilator between them at the back and
then glued the whole major assembly to the fuselage. Take your time here, align
everything carefully as long as the glue has not cured, to avoid misalignments.
Nevertheless, there will be some quite substantial gaps and misfits between the
parts you would have to deal with. Thank goodness the plastic is VERY workable,
bec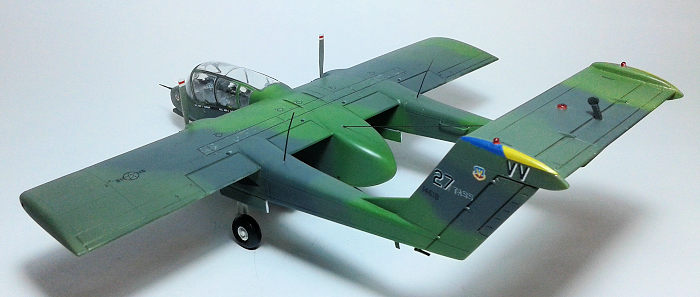 ause you know the endless story: sanding, filling, sanding…..I even used
stretched and liquefied (with MEK) sprue at some nasty gaps. I drilled out the
air inlets at each engine nacelle for a more realistic look. I also deepened the
four gun holes at the sponsons.
ause you know the endless story: sanding, filling, sanding…..I even used
stretched and liquefied (with MEK) sprue at some nasty gaps. I drilled out the
air inlets at each engine nacelle for a more realistic look. I also deepened the
four gun holes at the sponsons.
I then turned my attention to the non-existent wheel wells. I looked at walk around photos and when I saw how busy the real thing looks, had this melancholy feeling. To ease the pain, I listened to Ella’s “My melancholic baby” and decided to box them as follows: for the main wheel wells I used F-102 (I think) leftover weapon bay walls that looked detailed enough, sporting some plumbing-ish detail. The result, though fictitious, looks acceptably busy. For the nose wheel well I used sheet styrene, formed into shape (by checking actual photos), with ribbing made from stretched sprue. The result is also fictitious, but closer to the real thing and anyway you don’t see revolting empty holes at the wheel well are anymore.
The model is a severe tail sitter. I stuffed in front as much lead as I could, but it was not enough. So I formed two lead 1mm plates and super glued them at the back seater floor and rear wall. I aimed for marginally sufficient amount of lead, as the main gear legs are clumsy and weak and I wanted to extra-stress them as little as possible. The lead plates also helped for a more realistic effect, by increasing the height of the rear floor and filling the empty space between the seat and the rear wall.
The 27TASS Broncos typically flew their missions with centerline drop tanks installed. Alas, no tank was provided from the kit. Using photo reference, I made a centerline fuel tank by joining leftover fore and aft tank pieces of the desired profile from spares. Loops of measuring, checking, filing, sanding and filling finally paid off and I had my acceptable looking fuel tank. I also modified a spare pylon to obtain the look of the Bronco’s one and glued it into place.
The exhausts were carefully drilled to become hollow and stretched sprue was used to simulate the inner strengthening fillets. Their front part was painted as per camo, whereas the rear part was painted Testors burned metal.
After all these, I did a final filler session (Squadron green) wherever it was needed, gave the model a wet 2000 grit sanding to prepare the surfaces and make the heavy riveting less prominent. It was time for the paint shop.
| COLORS & MARKINGS |
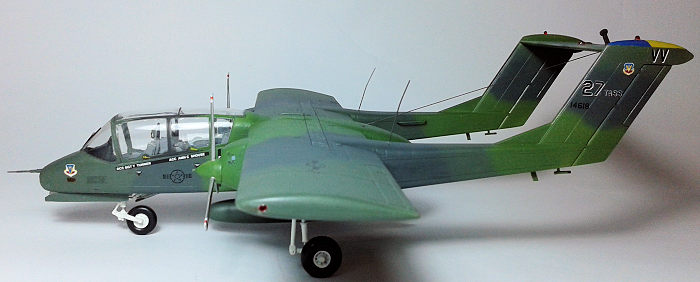
I decided to do Col. Bob Johnston’s plane, Commander of 27TASS at Georgia AFB sometime in the 80’s. It’s ser. No was 14618 and sported the typical lizard camo with two greens and a dark grey.
For the
color shades, I browsed the web and found a nice 1986 photo of a pristine 27TASS
commander’s Bronco with the exact camo I was doing, taken d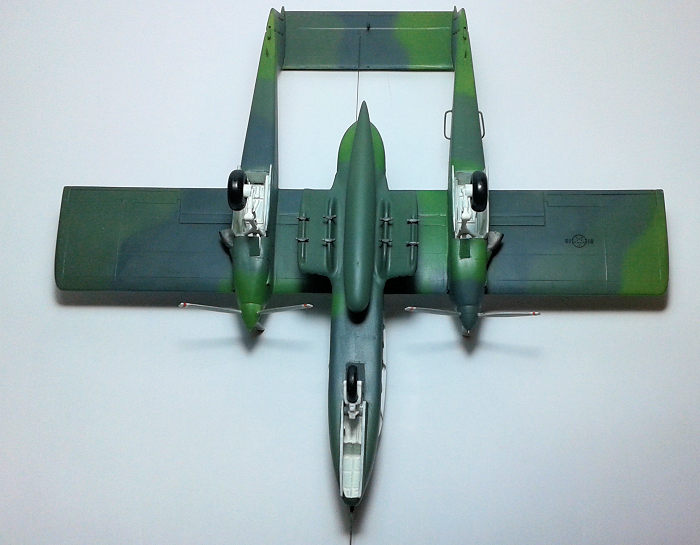 uring that year’s airshow at Canada’s London international airport. I used darkened Hu78 for the
dark green, darkened Revell 360 for the light green and Hu32 for the dark grey.
I first sprayed the light green, followed by the darker green and the dark grey.
The camo was freehanded using my Revell master class airbrush, with the
necessary back and forth corrections made with my Badger SG100. When satisfied
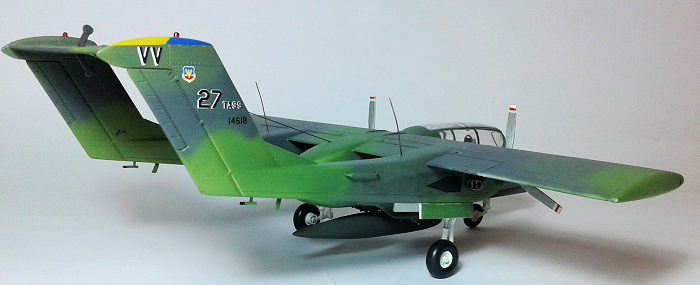
with the result, I gave the model a coat of Future. I brush-painted the
blue-yellow fin top stripe (which I think indicates that this is the CO’s
aircraft, the rest of the Squadron planes being yellow finned only). It was then
time for decaling.
uring that year’s airshow at Canada’s London international airport. I used darkened Hu78 for the
dark green, darkened Revell 360 for the light green and Hu32 for the dark grey.
I first sprayed the light green, followed by the darker green and the dark grey.
The camo was freehanded using my Revell master class airbrush, with the
necessary back and forth corrections made with my Badger SG100. When satisfied
with the result, I gave the model a coat of Future. I brush-painted the
blue-yellow fin top stripe (which I think indicates that this is the CO’s
aircraft, the rest of the Squadron planes being yellow finned only). It was then
time for decaling.
I used the provided Scalemaster sheet. All decals were perfectly registered and behaved well. Despite my initial fears, and with the occasional aid of Mr Mark Softer, they snuggled around every rivet! My only small complaint was some silvering spots at the top big walkway decal. Despite my efforts they diminished but not vanished. Another coat of Future sealed everything.
The specific plane, being Commander’s personal, meant it was kept in pristine condition, as photo evidence proves anyway. Combined with the fact that I am not extremely fond of, and also (or should I say because of…) not good in weathering, I only applied light smoke stains aft of the two exhausts and gave the model a final coat of Humbrol satin cote.
| FINAL CONSTRUCTION |
The
completion of the cockpit was next: the kit’s rendition is a joke, with a floor,
a dinosaur seat and a mummy pilot, I only kept a floor part. After studying
cockpit photos (thanks internet!) I started scratchbuilding. First I made two
seats, using as a base two leftover Sukhoi 27 (!!) seats, filed accordingly and
beefed up with rear plates from sheet styrene, stretched sprue to replicate the
top integral canopy breaker, the ejection rails, the eject handle at the bottom
and the emergency release handle at left side of
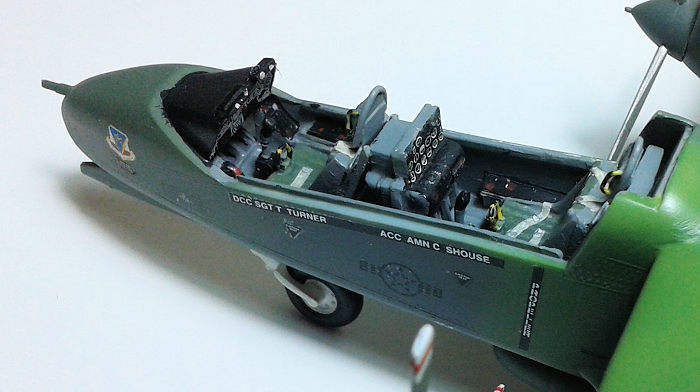 cushion. The seats (as well as
the cockpit walls) were painted gull grey with dark green seat covers, dark grey
cushions with red warning triangle decals and yellow-black emergency handles. I
also added seatbelts made from masking tape. Looking closer to the Bronco’s
LW-3B seats than before!
cushion. The seats (as well as
the cockpit walls) were painted gull grey with dark green seat covers, dark grey
cushions with red warning triangle decals and yellow-black emergency handles. I
also added seatbelts made from masking tape. Looking closer to the Bronco’s
LW-3B seats than before!
For the rear instrument panel, I used block styrene and a leftover console from…my already built Mach2 Do-26 that looked the part, cut and modified according to photos. Block styrene was also used to construct side panels and a throttle semi disc base. I made four rudder pedals from sheet styrene and used two control sticks from spares that looked the part. Everything was painted gull grey (Hu140) with the top of side panels, the stick handles, dashboards and anti-glare panel painted black. I used the supplied decal for the front instrument panel and a generic (from the decal dungeon) for the back. I also glued two small pieces of styrene on top of anti-glare panel to simulate some instrumentation appearing at the real thing. Some red and white knobs were fine brush painted here and there and called the cockpit done!
It was time to deal with the landing gear. First, I drilled holes circumferentially to the rims of all three wheels, to simulate the bolts you see at the real thing and I glued two small hubs from spares at the center of the main wheel hubs.
The nose
landing gear is one piece with the wheel. After cleanup, I called it
“acceptable” and left it “as is”. The main gear legs are another story: apart
from looking crude, their base is totally wrong! There should be two discrete
struts there and not an appalling triangular solid block. To fix them, I
performed a surgery: I completely cut-off the triangular base and replaced it
with two struts of correct diameter from spares. The actuating rod that passes
through it was also treated to look the part. I also drilled 6 holes to the
crude back pla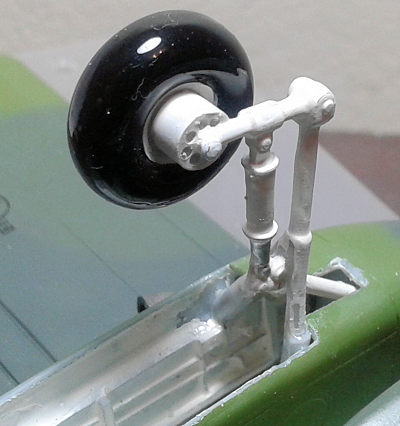 te of the wheel attachment blocks at 6 corresponding places, to
simulate the six piston brake caliper. The final result looks better now.
te of the wheel attachment blocks at 6 corresponding places, to
simulate the six piston brake caliper. The final result looks better now.
Wheel wells, inner side of doors, landing gear and rims were painted white with black tires. It took multiple sessions to install all these at their corresponding positions. Take care installing and aligning, especially the main landing gear and let the glue cure thoroughly, before resting the model on its feet: the whole construction is flimsy and the model is quite heavy; I’m usually impatient to let my models stand on their feet, but, especially in this case, I behaved. As for the gear doors, walk around photos show that they are actuated via rods that “disappear” in the well. I replicated these with stretched sprue, painted white as well.
The prominent light in front of the nose was missing. I drilled a corresponding hole, filled with white glue, then, after curing, painted it chrome with my pilot silver pen and filled it flush with Humbrol clearfix. Looks good!
The pitot tube was useable after some cleanup. I affixed it into place and, after breaking it five times, I left it off to install before taking the final photos…
The instructions state to glue the anti-collision beacon on top of the wing. According to photos, it is glued on top of horizontal stabilizer and that’s where I fixed it. There are no navilights for the wings and fins. I made them from clear stretched sprue, affixed them into place and painted them with Humbrol clear paints.
Only one crude mass balance is provided for the top of the stabilizer. Photos show one also to the bottom. I tossed the kit supplied one,I scratch built two and affixed them into place.
Most photos show these birds with a loop antenna at right boom, and two small antennas nunder the bottom end of the booms. Those were scratchbuilt with stretched sprue and sheet styrene and affixed in position.
The
propeller hubs were painted according to camo colors, the blades were painted
Testors steel, with the tips white, red and white. I drilled the center of the
hubs and installed hyp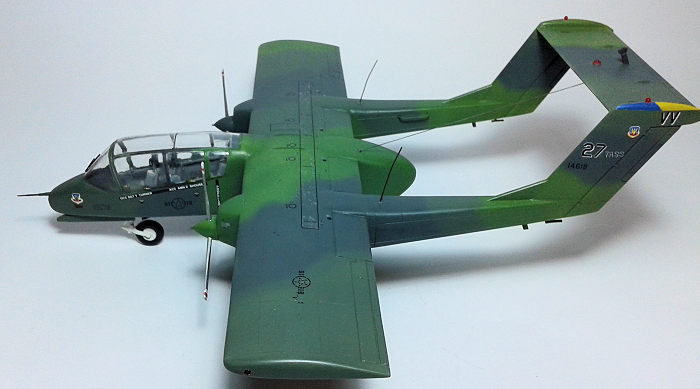 o needles, to make them look like the real ones. Then the
props were glued into place – no rotating props here…
o needles, to make them look like the real ones. Then the
props were glued into place – no rotating props here…
The transparencies were hand painted (I still cannot understand why I rarely mask canopies to have a better looking result….probably laziness) and glued carefully into place. Fit is not so good, especially at the top part which was warped. Anyway, I did my best, the gaps feathered with white glue.
I made two wire VHF antennas from stretched sprue and glued them on top of each boom close to the wing joint. I also run stretched sprue from the top end of the fuselage (a tad off to the left) to the underside of the stabilator.
Finally, a windscreen wiper was made out of stretched sprue, painted black and installed on the windscreen. After that, I called this kit done!
| CONCLUSIONS |
This is definitely a very basic kit with a lot of oversimplifications and omissions. There are also significant shape issues, as stated above. Building it OOB presents no difficulties and can be done by a beginner, but the end result will look somehow toyish. I have seen quite a few detailing and correcting resin stuff at the net (don’t know about the availability), that will absolutely enhance the final result, with extra effort and money, of course. Anyways, if you want a REALLY good Bronco, try the 1/32 Kitty Hawk kit. I’ve heard it’s stunning!
As to my approach, I scratch built everything I could. Despite the dimensional inaccuracies, the various omissions and my less than moderate skills, the end result looks like (or, more precisely, gives the illusion of) a Bronco and that satisfies me. Bizarrely, I somehow liked this sweet Testors/Hawk oldie and had extremely great time putting it together, improving and scratchbuilding. I am glad I could share it with you, fellow MM readers.
| REFERENCES |
https://en.wikipedia.org/wiki/North_American_Rockwell_OV-10_Bronco
https://en.wikipedia.org/wiki/27th_Tactical_Air_Support_Squadron
Various internet sites (walk arounds and photos)
2 July 2020
Copyright ModelingMadness.com. All rights reserved.
If you would like your product reviewed fairly and fairly quickly, please contact the editor or see other details in the Note to Contributors.
Back to the Main Page Back to the Review Index Page Back to the Previews Index Page