Testors 1/48 SR-71 Blackbird
| KIT #: | 7584 |
| PRICE: | Around €40 when new |
| DECALS: | Three options (one is for the trainer version) |
| REVIEWER: | Spiros Pendedekas |
| NOTES: |
| HISTORY |
Known to pilots with
many nicknames ("Sled", "Habu", "SR", "Lady in Black" and, of course,
"Blackbird"), with performance that in many aspects still remains unsurpassed
today, the SR-71 easily falls into the “Legends of the Skies” category.
Typically covered by a veil of mystery, this fabulous machine with the exotic
shape has fascinated and will continue to fascinate even those who do not care
about aviation.
It was developed as a top secret military project by Lockheed and its designer
Clarence Johnson, with the first flight taking place in 1964. It was used by the
USAF until 1998 and by NASA until 1999, where it was finally retired. Of the 32
built, 12 were lost in accidents, but none by enemy fire.
 The high
temperatures created by friction in the upper atmosphere during its extended
Mach 3+ flights required a range of specially designed materials, including high
temperature fuels, sealants, lubricants, wiring and other components.
The high
temperatures created by friction in the upper atmosphere during its extended
Mach 3+ flights required a range of specially designed materials, including high
temperature fuels, sealants, lubricants, wiring and other components.
Ninety-three percent of the aircraft was made of titanium alloy which allowed
the aircraft to operate in a mode where temperatures ranged from 450°F (232°C)
at its rear middle to 950°F (510°C) near the engine exhaust. The cockpit canopy
was made of special durable glass that could withstand temperatures as high as
640°F (338°C).
Needless to say the SR-71 became a platform for testing and implementing edge
technologies, with many of them said to be classified even today. Those included
astro-navigation systems, opto-electronics, IRs, laser sensoring, various data
acquisition systems and so on.
A worthy successor did not appear, perhaps obviously not needed, due to the
advances of other technologies (satellites and the like). It has been stated,
however, that even today there exist “voids” at those “new” technologies that
the Blackbird could fill very efficiently!
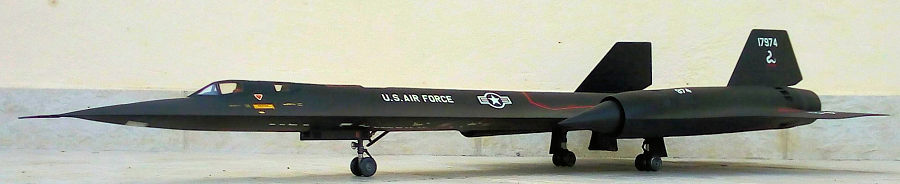
Nicknamed "ICHIBAN”, the SR-71A s/n 61-17974 was lost on 21 April 1989 over the
South China Sea, when, flying at Mach 3+, the port engine disintegrated and
shrapnel hit the hydraulic lines, causing a loss of flight controls. Both pilot
Lt Col Dan House and RSO Blair Bozek ejected safely and were rescued by native
fishermen. This was the last ever Blackbird loss.
| THE KIT |
This kit was introduced
as SR-71 by “Testors – Italeri” back in 1982 and as YF-12 1n 1983, with the same
year also reboxed by Tamiya. Since then it has been reboxed another six times by
Testors, with the final reissue in 1998.
I was lucky enough to locate a 1995 copy of this kit at one of my favorite hobby
shops in Athens, back in 2005. The kit came in a big, sturdy, side opening,
generic Testors box, with a sticker depicting a finished model and some
additional info (codes, skill levels and the like).
Upon opening the box, I was treated with a lot of old fashioned shiny black
plastic: four sprues and a separate large top fuselage part, all sealed in two
bags. Surface detail is sufficient, all of the raised type. The characteristic
Blackbird corrugations, which at the real plane allow for expansion due to the
high temperatures, are realistically represented.
 Cockpit
detail is on the sparse side (not a problem for me, as I systematically go with
“closed” canopies). Apart from the wheels that look the part, landing gear,
including bays, is not that particularly detailed: those areas were very busy
looking in reality. Engine inlets and exhausts are also not particularly
detailed: let’s hope the small inlet opening and the long exhaust depth will
hide a good portion of that “simplification”. General molding is acceptable,
with some flash observed, mainly around delicate parts.
Cockpit
detail is on the sparse side (not a problem for me, as I systematically go with
“closed” canopies). Apart from the wheels that look the part, landing gear,
including bays, is not that particularly detailed: those areas were very busy
looking in reality. Engine inlets and exhausts are also not particularly
detailed: let’s hope the small inlet opening and the long exhaust depth will
hide a good portion of that “simplification”. General molding is acceptable,
with some flash observed, mainly around delicate parts.
Clear parts come separately bagged and look passable. The nice instructions come
as a 12-page double sided booklet: main construction is sufficiently spread in
13 clear steps, not only including complete color callouts, but also technical
notes regarding the real plane - a nice touch! Also included are a sufficient
history of the type with reference sources, preliminary construction and
painting info, helpful hints, walkaround photos at the back page, together with
a small text paying tribute to all those who in any way contributed to this
plane’s existence, manufacture and operational use. Really, the instruction
booklet, though old fashioned, is superb.
Three scheme options are provided (one is for the trainer), with painting and
decal placing instructions also excelling in here. Decals are nicely printed by
Scalemaster and, despite their age, look usable.
| CONSTRUCTION |
 Having
decided to build the “A” version, and following those wonderful instructions
(meaning, changing the habits of a modeling lifetime…), I started by attaching
the correct part for the “A” version aft of the cockpit opening, then attached
the two instrument panels and seat back plates from the inside. The three piece
seats were assembled and attached onto the cockpit floors. The front stick was
attached, as well. Cockpit tubs were then trapped between the top and bottom
fuselage halves. Basic cockpit color was gull gray (Hu140), with black
instrument panels and stick grip, red seat cushions and headrest and
yellow/black ejection handles. The radar screens were painted chrome and then
received blobs of green paint, to simulate green glass. Seat belts were added,
made from masking tape.
Having
decided to build the “A” version, and following those wonderful instructions
(meaning, changing the habits of a modeling lifetime…), I started by attaching
the correct part for the “A” version aft of the cockpit opening, then attached
the two instrument panels and seat back plates from the inside. The three piece
seats were assembled and attached onto the cockpit floors. The front stick was
attached, as well. Cockpit tubs were then trapped between the top and bottom
fuselage halves. Basic cockpit color was gull gray (Hu140), with black
instrument panels and stick grip, red seat cushions and headrest and
yellow/black ejection handles. The radar screens were painted chrome and then
received blobs of green paint, to simulate green glass. Seat belts were added,
made from masking tape.
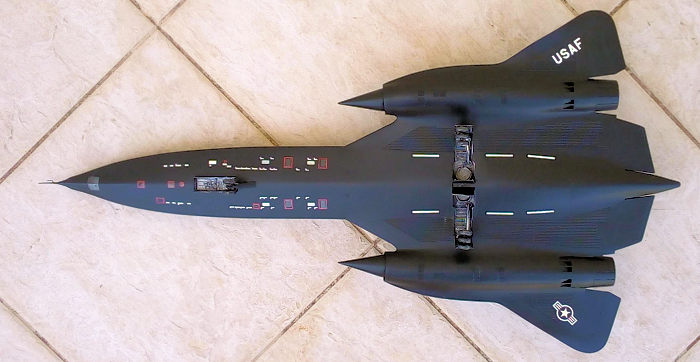
I proceeded by adding the group of four underside windows from the insides of
the bottom fuselage half, then attached the top fuselage part onto it. The two
piece nose was assembled (after having its underside transparency added from the
inside) and attached at the front. I continued by adding the rear top and bottom
main fuselage halves, with the main wheel bays trapped between them. The tail
cone was assembled and attached, too. Fit of all the above was average, with the
use of many clamps, in order to keep all those parts reasonably aligned till
curing.
 Since I am
an unremorseful sub-assembler, I found, to my joy, two richly satisfying
subassemblies in this build, none other than the two engine nacelles: each is a
9-piece affair, including the engine inlets and exhausts. Due to the less than
perfect fit, it did take some effort to put them together, with the usual clamps
put to good use.
Since I am
an unremorseful sub-assembler, I found, to my joy, two richly satisfying
subassemblies in this build, none other than the two engine nacelles: each is a
9-piece affair, including the engine inlets and exhausts. Due to the less than
perfect fit, it did take some effort to put them together, with the usual clamps
put to good use.
After I coarse sanded all assembled, but not joined parts (a job that would be a
lot more difficult if that big model was fully assembled…), I then attached the
nacelles to the main model, followed by an all-around filling and sanding.
Interestingly, not as much filler as expected was used, mainly due to the black
styrene’s relative softness and self-pliability, somehow melting into gaps and
filling them upon gluing.
The windshield and canopies were also attached at this point. Fit was average,
requiring careful filling and sanding.
The eight 2-piece wheels were assembled and sanded smooth. The 2-piece main
landing gear legs were assembled, as well. Examining net pics of SR-71 landing
gear parts, including bays and door innards, I noticed that they are anything
but simple and homogeneous: they are very busy, with the main colors observed
being grayish black, pure black, “titanium” and the like. The tires themselves
are aluminum powder impregnated (the main ones more heavily).
In order to make my life easier, I took the (not so brave) decision to attach
and consequently paint everything black, together with the rest of the model,
aiming to replicate the various above stated shades with judicious dry brushing.
So, after attaching and aligning all landing gear parts (including wheels and
doors – those main bogies were not the easiest for all of their three wheels to
touch the ground…), the whole model received a 1000 grit sanding, had all its
transparencies masked, and headed to the paint shop!
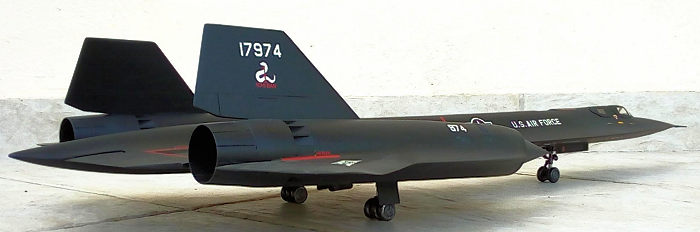
| COLORS & MARKINGS |
Officially, the Blackbird’s paint is an extremely
dark blue-black: in reality it looks completely black. I thus went on and
applied a coat of Hu21 Gloss Black, which went on smoothly, self levelled and,
to my joy, helped in covering some minor surface imperfections as well!
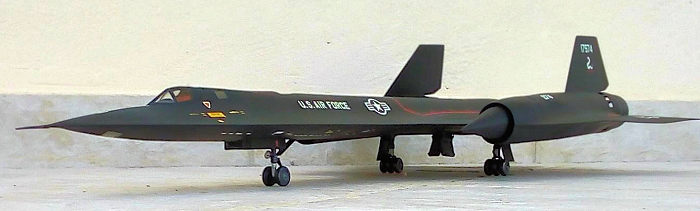
Upon drying, I applied the decals. I went for the famous hi-vis 17974 “ICHIBAN”
scheme. Scalemaster decals behaved well, with their white nicely opaque. Some
red walk lines were brittle due to age and some silvering was also noticed:
luckily, all was manageable. With the help of Mr Mark Softer, the decals
succumbed adequately onto the corrugated areas. A coat of Future sealed them.
 I went on and
dry brushed with silver all landing gear, including bays and door innards. By
judicious dry brushing, I managed to somehow provide an illusion of the aluminum
impregnation at the tires area. Light silver dry brushing was also applied at
the turbine area inside the exhaust. Oleos were highlighted with my fine tip
silver pen. The pitot tube was attached at the front and had its front part
painted gunmetal.
I went on and
dry brushed with silver all landing gear, including bays and door innards. By
judicious dry brushing, I managed to somehow provide an illusion of the aluminum
impregnation at the tires area. Light silver dry brushing was also applied at
the turbine area inside the exhaust. Oleos were highlighted with my fine tip
silver pen. The pitot tube was attached at the front and had its front part
painted gunmetal.
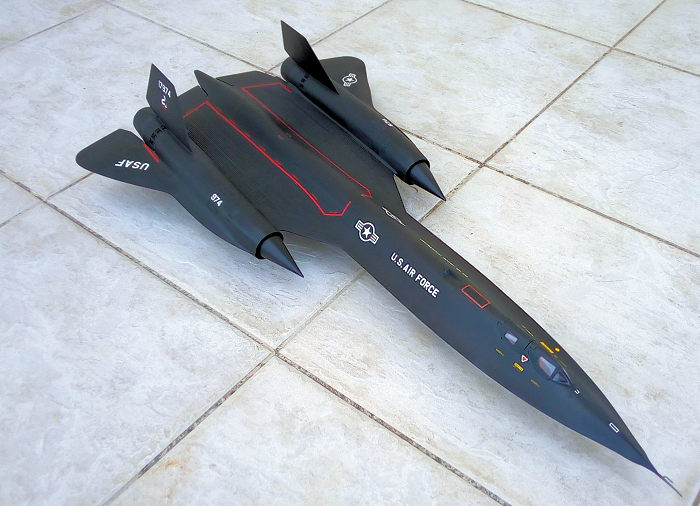
No weathering was applied whatsoever, as most net pics I found showed this bird
in “factory new” condition, a posture that I like in Blackbirds. A final matt
coat gave this beautiful plane its final hue, before calling it done!
| CONCLUSIONS |
The Testors SR-71 is a good “old school” kit of this
iconic plane: correct looking overall shape, not too many parts, good decals.
Panel lines are raised (not a problem for me); cockpit, landing gear and engine
areas detailing could be better.
Whereas construction is quick, parts count not really high, painting is simple,
and instructions are superb, the big size and less than perfect fit deem this
kit unsuitable for novice modelers. On the other hand, due to the exact above
reasons, an intermediate modeler can put it together quite quickly and come up
with an attractive result.
 A lot of
beautiful aftermarket stuff seems to exist, in order to improve/enhance this
kit’s simplistically represented areas, allowing the experienced modeler to come
up with his super-detailed masterpiece.
A lot of
beautiful aftermarket stuff seems to exist, in order to improve/enhance this
kit’s simplistically represented areas, allowing the experienced modeler to come
up with his super-detailed masterpiece.
Testors has not reissued this kit since 1989 (meaning it’s very difficult to
find, and at “collectors’ prices, as well). With the new tool Revell kit, a
possible reissue may not seem likely to take place, though you never know: maybe
Italeri will “surprise” us with a reissue at a low price…
As much as I love the “latest and greatest”, I also love putting together oldies
like this kit, especially when finding out that the build was much quicker than
originally anticipated. If you happen to own one, or (highly unlikely) bump into
a good bargain and have some respectable free shelf space, go on and build it:
you’ll be pleasantly surprised and a proud 1/48 Blackbird owner!
Happy modeling!
13 December 2022
Copyright ModelingMadness.com. All rights reserved. No reproduction in part or in whole without express permission.
If you would like your product reviewed fairly and fairly quickly, please contact the editor or see other details in the Note to Contributors.