ICM 1/48 OV-10A Bronco
| KIT #: | 48300 |
| PRICE: | $49.49 |
| DECALS: | Three options |
| REVIEWER: | David Meyer |
| NOTES: | Caracal 48068 |
| HISTORY |
The North American Rockwell OV-10 Bronco is an American twin-turboprop light attack and observation aircraft. It was developed in the 1960s as a special aircraft for counter-insurgency (COIN) combat, and one of its primary missions was as a forward air control (FAC) aircraft. It can carry up to 3,200 lb of external munitions, internal loads such as paratroopers or stretchers, and loiter for three or more hours. The Bronco performed observation, forward air control, helicopter escort, armed reconnaissance, utility light air transport and limited ground attack. The Bronco has also performed aerial radiological reconnaissance, tactical air observation, artillery and naval gunfire spotting, airborne control of tactical air support operations and front-line, low-level aerial photography.
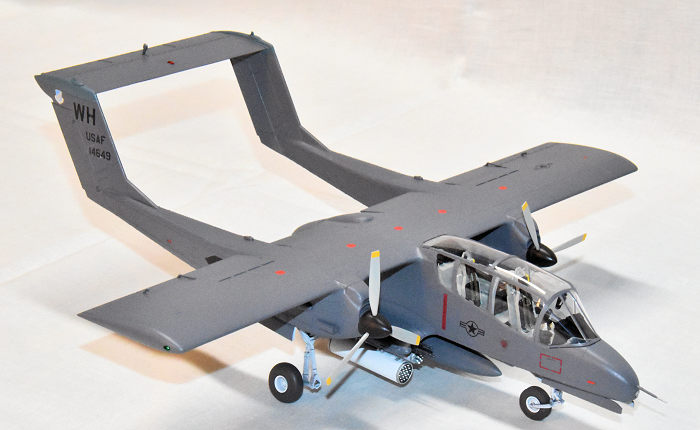
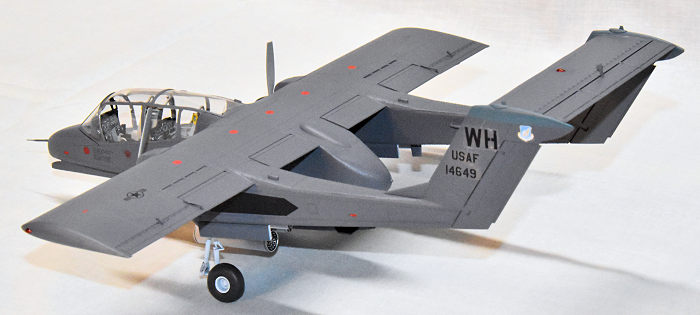
The OV-10 has a central nacelle containing pilots and cargo, and twin booms containing twin turboprop engines. The visually distinctive feature of the aircraft is the combination of the twin booms, with the horizontal stabilizer that connects them.
 The
aircraft's design supported effective operations from forward bases. The OV-10
can perform short takeoffs and landings, including on aircraft carriers and
large-deck amphibious assault ships without using catapults or arresting wires.
Further, the OV-10 was designed to take off and land on unimproved sites.
Repairs could be made with ordinary tools. No ground equipment was required to
start the engines. If necessary, the engines could operate on high-octane
automobile fuel with only a slight loss of power.
The
aircraft's design supported effective operations from forward bases. The OV-10
can perform short takeoffs and landings, including on aircraft carriers and
large-deck amphibious assault ships without using catapults or arresting wires.
Further, the OV-10 was designed to take off and land on unimproved sites.
Repairs could be made with ordinary tools. No ground equipment was required to
start the engines. If necessary, the engines could operate on high-octane
automobile fuel with only a slight loss of power.
The aircraft had responsive handling and could fly for 5 1/2 hours with external fuel tanks. The cockpit had extremely good visibility for a tandem pilot and co-pilot, provided by a wrap-around "greenhouse" that was wider than the fuselage. North American Rockwell custom ejection seats were standard, with many successful ejections during service. With the second seat removed, it can carry 3,200 pounds of cargo, five paratroopers, or two litter patients and an attendant.
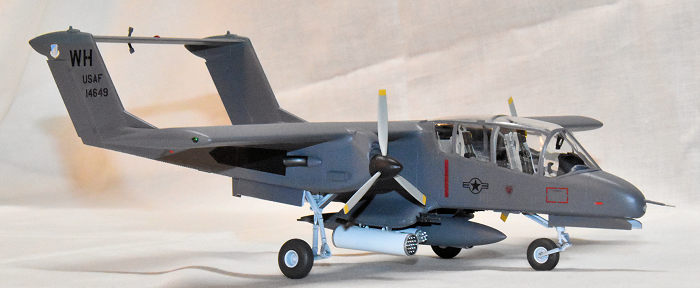
The bottom of the fuselage bore sponsons or "stub wings" that improved flight performance by decreasing aerodynamic drag underneath the fuselage. The sponsons were mounted horizontally on the prototype. Testing caused them to be redesigned for production aircraft; the downward angle of the sponsons on production models ensured that stores carried on the sponsons jettisoned cleanly. Normally, four 7.62 mm (.308 in) M60C machine guns were carried on the sponsons with the M60Cs accessed through a large forward-opening hatch on the top of each sponson. The sponsons also had four racks to carry bombs, pods, or fuel. The wings outboard of the engines contain two additional racks, one per side.
Racked armament in the Vietnam War was usually seven-shot 2.75 in rocket pods with white phosphorus marker rounds or high-explosive rockets, or 5 in four-shot Zuni rocket pods. Bombs, ADSIDS air-delivered/para-dropped unattended seismic sensors, Mk-6 battlefield illumination flares, and other stores were also carried.
 Operational
experience showed some weaknesses in the OV-10's design. It was significantly
underpowered, which contributed to crashes in Vietnam in sloping terrain because
the pilots could not climb fast enough. While specifications state that the
aircraft could reach 26,000 feet, in Vietnam the aircraft could reach only
18,000 feet . Also, no OV-10 pilot survived ditching the aircraft.
Operational
experience showed some weaknesses in the OV-10's design. It was significantly
underpowered, which contributed to crashes in Vietnam in sloping terrain because
the pilots could not climb fast enough. While specifications state that the
aircraft could reach 26,000 feet, in Vietnam the aircraft could reach only
18,000 feet . Also, no OV-10 pilot survived ditching the aircraft.
The OV-10 served in the U.S. Air Force, U.S. Marine Corps, and U.S. Navy, as well as in the service of a number of other countries. A total of 81 OV-10 Broncos were ultimately lost to all causes during the course of the Vietnam War, with the Air Force losing 64, the Navy 7, and the Marines 10.
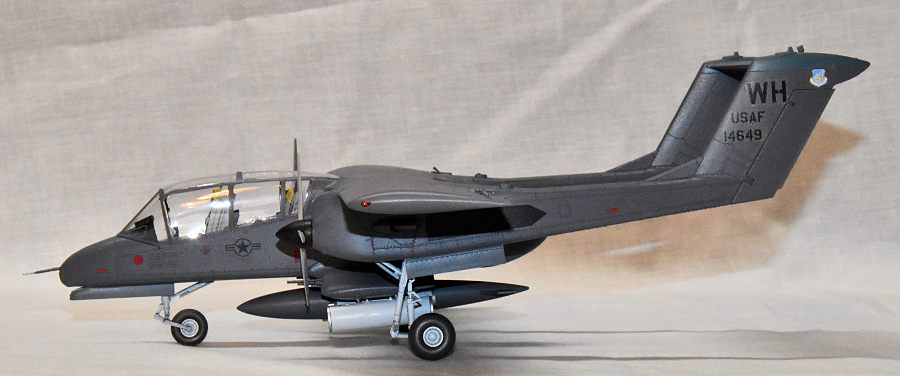
The 22nd Tactical Air Support Squadron (22nd TASS) was based at Wheeler Air Force Base on the island of Oahu, Hawaii from May 1971 until September 1991. It flew the Cessna O-2 until August 1983, when it transitioned to flying the North American Rockwell OV-10A Bronco. I was a U.S. Army air traffic controller in the early 1980s and, since the Wheeler AFB control tower was staffed by Army personnel, I was fortunate enough to work these aircraft at the time of the transition. I always liked the tail-high stance of the aircraft and purchased a set of Caracal decals #CD48068, which include a Wheeler based aircraft, and waited for a good 1/48 scale OV-10 model to come out. ICM recently released their OV-10, so I knew it was time to build!
| THE KIT |
The kit comes in a sturdy, side opening box, with a cover, containing 10 grey sprues of relatively soft, yet slightly brittle, parts, a sprue of clear parts and 2 sheets of decals, one sheet being for the weapons. The sprues came in several clear plastic bags with the clear parts being included in one of the bags. In spite of that, the clear parts were not scratched at all and crystal clear.
| CONSTRUCTION |
 The
construction begins with the cockpit. I’m not an “open cockpit” guy, but with
all of the glass on this aircraft, you’re going to see a lot of it. While this
model doesn’t have any photo etch parts, it does have quite a few in-scale small
parts to be added, which makes trying to clean up sprue attach points
interesting while trying not to feed the parts to the carpet monster. The paint
call-outs are for Revell, Tamiya and ICM’s own brand of paints. For the
interior, I went with Light Gull Gray, then picked out switches and knobs with a
silver art pencil. The kit does not contain seatbelts, so I made some from
masking tape and some etched buckles from my stash. Part E53 is added to the
forward part of the cockpit in step 18. It represents the actuating arms for the
front gear doors. Since you get two sprues containing the “E” parts, you get two
of them to try your luck at cutting them off of the sprue and cleaning them up
without breaking the delicate arms. I broke both of them, but was able to get
one put back together reasonably well and installed it. Since the arms stick out
from the front of the aircraft, I didn’t expect them to stay on the aircraft to
completion and I was correct in this assessment. It might be possible to attach
part E53 later in the build to preclude breaking them off, but I’m not sure if
that would work. Since I don’t build for contests and all of my aircraft live in
my display case 365 days a year, I didn’t worry about having the actuating arms
missing. To this point in time, no one has ever removed a model from my case to
look at the bottom. Parts D62 and D63 attach to the edge of the cockpit and form
part of the inner frame for the canopy. ICM suggests using parts F1 and F2, the
clear side windows, for templates to align these. I found that the attachment
points made the alignment easily correct, but still checked it with the clear
parts.
The
construction begins with the cockpit. I’m not an “open cockpit” guy, but with
all of the glass on this aircraft, you’re going to see a lot of it. While this
model doesn’t have any photo etch parts, it does have quite a few in-scale small
parts to be added, which makes trying to clean up sprue attach points
interesting while trying not to feed the parts to the carpet monster. The paint
call-outs are for Revell, Tamiya and ICM’s own brand of paints. For the
interior, I went with Light Gull Gray, then picked out switches and knobs with a
silver art pencil. The kit does not contain seatbelts, so I made some from
masking tape and some etched buckles from my stash. Part E53 is added to the
forward part of the cockpit in step 18. It represents the actuating arms for the
front gear doors. Since you get two sprues containing the “E” parts, you get two
of them to try your luck at cutting them off of the sprue and cleaning them up
without breaking the delicate arms. I broke both of them, but was able to get
one put back together reasonably well and installed it. Since the arms stick out
from the front of the aircraft, I didn’t expect them to stay on the aircraft to
completion and I was correct in this assessment. It might be possible to attach
part E53 later in the build to preclude breaking them off, but I’m not sure if
that would work. Since I don’t build for contests and all of my aircraft live in
my display case 365 days a year, I didn’t worry about having the actuating arms
missing. To this point in time, no one has ever removed a model from my case to
look at the bottom. Parts D62 and D63 attach to the edge of the cockpit and form
part of the inner frame for the canopy. ICM suggests using parts F1 and F2, the
clear side windows, for templates to align these. I found that the attachment
points made the alignment easily correct, but still checked it with the clear
parts.
The cockpit is trapped between the 2 fuselage sides, which fit well. One of the sides includes the pitot tube, which I also expected to be broken off prior to completion. The plastic is soft enough that, in spite of some snagging and bending back and forth, it stayed with the aircraft to the end! The bottom of the fuselage is added next and the fit is very good, with just a touch of filler where I got the cockpit a little wide when I attached it. The front seatback has two arms that stick up that I believe are supposed to attach to parts D62 and D63. Apparently I tipped my seat back somehow, because they don’t meet up, even though parts D62 and 63 did end up lining up with the clear canopy parts correctly. Parts E50 are added to the bottom of the fuselage to attach the drop tank and they give you another exercise in small part sprue clean-up.
Next, the sponsons are assembled and added to the fuselage. I had a small gap around these parts, but was able to take care of it with an application of Deluxe Materials Perfect Plastic Putty and a damp Q-tip. I attached the nose gear without the tire/wheel assembly to make painting easier. The gear parts are a little fiddly, but went together without a problem.
 The wing is
assembled next. Fit is good but don’t forget to open the holes for the wing
pylons if your aircraft calls for them. This aircraft is definitely a tail
sitter! Prior to attaching the wing, I glued a 15g bullet in the fuselage behind
the rear seat. It turned out to not be enough. I poured some number 8 lead shot
into the front of the nose gear bay (see the previous about nobody looking at
the bottom of my aircraft) and secured it with super glue. This proved to barely
do the job, so I also put a little more in the prop spinners. I intended to put
some weight in the front of the drop tank, but forgot prior to gluing the tank
together. Heavy sigh. I did accomplish the mission, it does stand on its gear.
The wing is attached to the fuselage and, again, the fit was good.
The wing is
assembled next. Fit is good but don’t forget to open the holes for the wing
pylons if your aircraft calls for them. This aircraft is definitely a tail
sitter! Prior to attaching the wing, I glued a 15g bullet in the fuselage behind
the rear seat. It turned out to not be enough. I poured some number 8 lead shot
into the front of the nose gear bay (see the previous about nobody looking at
the bottom of my aircraft) and secured it with super glue. This proved to barely
do the job, so I also put a little more in the prop spinners. I intended to put
some weight in the front of the drop tank, but forgot prior to gluing the tank
together. Heavy sigh. I did accomplish the mission, it does stand on its gear.
The wing is attached to the fuselage and, again, the fit was good.
ICM calls for the installation of the canopy at this time, but I waited until later to do that. Main landing gear, gear bay and both tail booms come next. The main gear each consist of six parts and are pretty fiddly. I found what worked for me was to tack the upper end of part E6 to part D40, leaving part D60 to swing free. Align the small pins on the outer ends of part D9 and D57 in step 54, that will give you the proper angle for the assembly. Seat the bottom of part D57 in the slot in part D60, the angle will pretty much be set by the slot. Because part D60 is still free moving, you can get the small pins from step 54 into the recesses in parts D40 and D56 and capture them there. They don’t fit the greatest, but good enough. Attach the whole assembly from step 55 to part D38 and then go back and glue all of the joints from the previous steps. It seems like a nightmare but actually isn’t bad once you figure it out and the resulting landing gear is pretty sturdy and looks correct and you only have one more to put together! The landing gear bay goes together easily and it fits positively into the booms. Step 60 gives the option of drilling holes for a towel bar type antenna. It shows the option on both sides of the boom and 2 antennas are provided, but the indentations on the inside of the boom parts to show you where to drill are only present on one of the booms. The booms and the bottom section go together well with no filler used. Rudders are added and the booms attached to the fuselage. I had some small gaps where these joined. In retrospect, I might have been able to put a sprue spreader into the booms to eliminate these, but I didn’t think of that at the time, and I was able to fix them with plastic putty again. I waited with adding the elevator until after painting to make painting the upper tips of the vertical tails easier. In step 90, a towel bar antenna is to be added. You get two of these on the sprues, but I broke both of them trying to cut them off of the sprue, so my aircraft doesn’t have one. I don’t expect anyone to notice.
The kit doesn’t come with canopy masks, but does include a template to cut some out using tape. I used green Frog Tape, a sharp blade and the templet and was happy with the results, even going around the uneven edges on the bottoms of the side frames. I then put on the canopy. It comes in 4 parts; the front windshield, the top and two sides. I attached the front then the rear of the top, leaving the front of the top loose as I was worried about attaching the sides. I added some small tape “handles” to the masks to help me with locating the side windows. It wasn’t the problem that I expected and they were glued in place. A few more small parts added and it was off to the paint shop!
| COLORS & MARKINGS |
 The overall
color as called for in the Caracal instructions is Gunship Gray and I used Ammo
by Mig for that. I then masked off the underside of the aircraft, exposing the
landing gear and gear bays to paint them white. The tips of the vertical
stabilizers are blue for the 22nd TASS. Caracal calls for French Blue but the
illustration that they have in the instructions and what I could find on-line
looked much lighter than that color. It may be from the Hawaii sunshine fading
the paint, but I decided that Vallejo Model Air Faded P.R.U. Blue looked closer
to what I was seeing on line. It was also a color I already had! I am happy with
the result, it looks right to me. I used a combination of the kit decals and
those from Caracal. They all laid down well with no problems. The kit might be a
little overboard on the rivets and Solvaset helped with conforming to those.
The overall
color as called for in the Caracal instructions is Gunship Gray and I used Ammo
by Mig for that. I then masked off the underside of the aircraft, exposing the
landing gear and gear bays to paint them white. The tips of the vertical
stabilizers are blue for the 22nd TASS. Caracal calls for French Blue but the
illustration that they have in the instructions and what I could find on-line
looked much lighter than that color. It may be from the Hawaii sunshine fading
the paint, but I decided that Vallejo Model Air Faded P.R.U. Blue looked closer
to what I was seeing on line. It was also a color I already had! I am happy with
the result, it looks right to me. I used a combination of the kit decals and
those from Caracal. They all laid down well with no problems. The kit might be a
little overboard on the rivets and Solvaset helped with conforming to those.
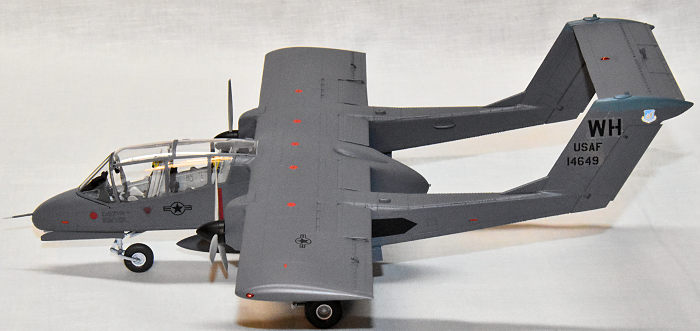
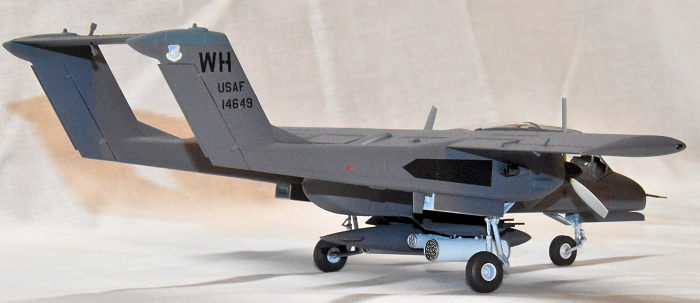
All that remained was to add the little pieces, the gear doors, tires with wheels and the elevator. I remember the OV-10s going out with rocket pods but can’t really remember which ones. I decided to go with a full load, two 17 shot rocket pods and two with 7 rockets, along with the always carried 4 M-60 machine guns and a drop tank.
| CONCLUSIONS |
Despite a few struggles with this kit, many of them self-induced, I’m very happy with how it turned out. It has the tail-high stance that I remember so well and the fit was good through-out. I would recommend this kit to anyone that already has some experience modeling due to some small parts and a few fiddly areas. I’m happy to have a representative of the OV-10s that I worked in my Army days!
31 October 2022
Copyright ModelingMadness.com. All rights reserved. No reproduction in part or in whole without express permission.
If you would like your product reviewed fairly and fairly quickly, please contact the editor or see other details in the Note to Contributors.