Monogram 1/48 B-58 Hustler
|
KIT #: |
04337 |
|
PRICE: |
$40.00 |
|
DECALS: |
Three options |
|
REVIEWER: |
Lee Kolosna |
|
NOTES: |
Revell of Germany boxing. Mike
Grant decals. |
The Convair B-58 Hustler was a major technological leap for manned strategic
bombers, possessing supersonic speed and very sophisticated flight control,
electronic countermeasures, and navigation systems. Unusual
for aircraft development, the US Air Force ordered the bomber into
production with a rapid process that bypassed the traditional competition
(Boeing was the only manufacturer that fielded a viable proposal) and
prototype development in favor of producing aircraft directly for
operational use after a short testing period. It
was intended to be a replacement for the B-47, which at the time was just
coming into service.
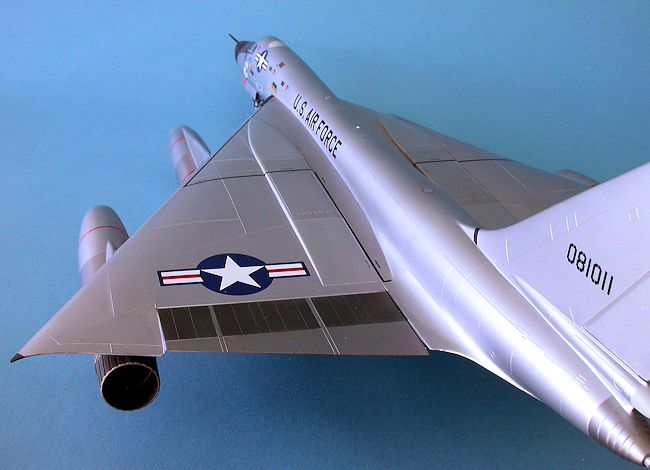
The radical bomber possessed a delta wing configuration, a 20mm
remotely operated gun turret in the tail for defense against enemy fighters,
a unique external weapons pod that contained both fuel and a nuclear bomb,
and four afterburning J79 jet engines that provided top-end speeds in excess
of Mach 2. The
first B-58 flew in November 1956. As
expected for such an advanced weapons system, testing was a long and
troublesome process that lasted much longer than planned. The
bomber was finally declared combat-ready in August 1962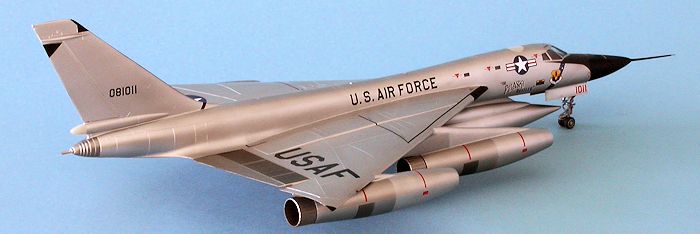 . Two
wings were deployed, one at Bunker Hill (later Grissom) Air Force Base in
Indiana, and one at Carswell Air Force Base in Texas.
. Two
wings were deployed, one at Bunker Hill (later Grissom) Air Force Base in
Indiana, and one at Carswell Air Force Base in Texas.
But the world was rapidly changing as Intercontinental Ballistic
Missiles (ICBMs) were becoming more and more viable as offensive weapons,
throwing doubt on the entire manned bomber leg of the nuclear triad. Soviet
anti-aircraft systems were also evolving, with less emphasis on interceptors
and instead on guided missiles that could match the speed of attacking
B-58s. Despite
having most of the bugs worked out by 1965, it was decided to begin to
retire the 112 aircraft due to their questionable survivability in a
shooting war and their significantly greater operating expense compared to
the B-52. The North American B-70 program was also affected by this change
in thinking. By
1970 all of the bombers were gone, having served in Strategic Air Command
for only a few years and never dropping a bomb in combat operations.
The airplane was not very well liked by its pilots or the Air Force
leadership in general. The
complex electronic systems were a maintenance headache in the vacuum tube
era, the range was short, the payload was small, it was expensive (costing
three times what a B-52 cost), and it was challenging to fly. Any
deviation from the flight envelope parameters resulted in unrecoverable
conditions that led to the loss of the airplane. Nearly
a quarter of all B-58s were destroyed in testing and operational accidents. The
FB-111 succeeded the B-58 and while it too had a long and controversial
development period, it went on to serve with distinction for over two
decades.
Molded
in silver polystyrene with 121 parts, this Monogram kit was originally
released in 1985 and continued the ambitious run of bomber kits in 1/48
scale. It
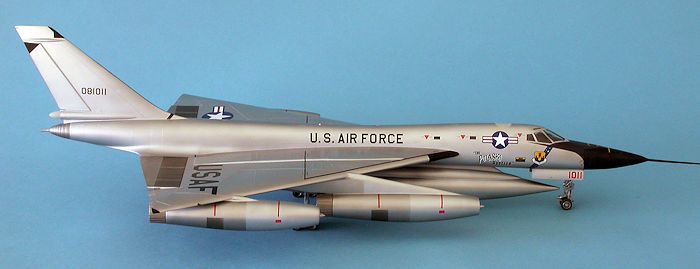
is now periodically reissued under the Revell brand logo. The
kit provides two different under-fuselage pods, the larger TCP
(Two-Component Pod)
 and a
smaller upper weapons portion of the same pod, the BLU-2/B-1. It
is pretty hard to find a photo of a B-58 fitted just with the smaller pod,
with the earlier BM-1C pod (it has four fins but is the same size as the TCP
that replaced it) being much more commonly seen in photos of B-58s during
the testing phase in the early 1960s. It
would have better to have had Monogram provide the BM-1C pod instead of the
small BLU-2/B-1 pod, but that is what was included for whatever their
reasons.
and a
smaller upper weapons portion of the same pod, the BLU-2/B-1. It
is pretty hard to find a photo of a B-58 fitted just with the smaller pod,
with the earlier BM-1C pod (it has four fins but is the same size as the TCP
that replaced it) being much more commonly seen in photos of B-58s during
the testing phase in the early 1960s. It
would have better to have had Monogram provide the BM-1C pod instead of the
small BLU-2/B-1 pod, but that is what was included for whatever their
reasons.
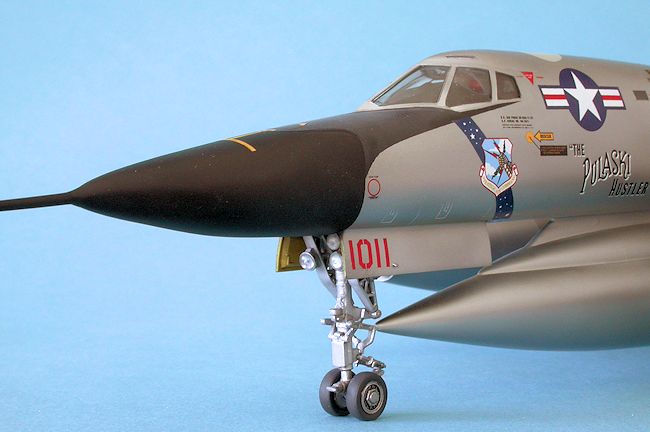
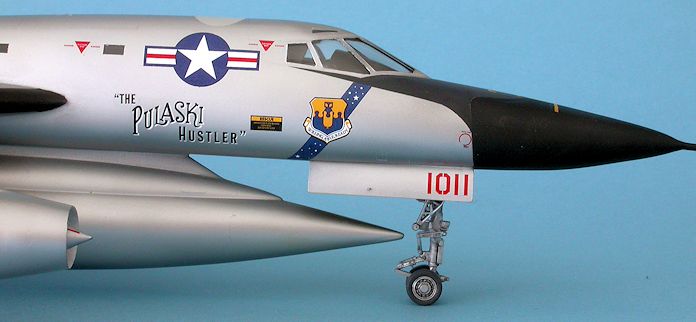
The pilot’s cockpit is
moderately detailed with instrument panels and control stick, as well as the
unique ejection seat capsule developed for the aircraft to allow pilots a
better chance of surviving an ejection at supersonic speeds. The
pilot’s access hatch can be posed in the open position, but there are no
hatches or interior detail provided for the Bomber/Navigator or Defensive
Systems Operator positions behind the pilot. The
very small windows for the bomber/navigator and DSO are incorrectly recessed
whereas they should fit flush with the surrounding fuselage.
The engines are rather simple
pieces that have blank plates behind the intake shock cones and the detail
of the exhausts is just barely adequate. External
bomb racks are included, a feature added to B-58s towards the end of their
service lives. These
long pieces had numerous sink marks that had to be filled. Four
Mk. 43 nuclear bombs are provided to add to the external racks if desired.
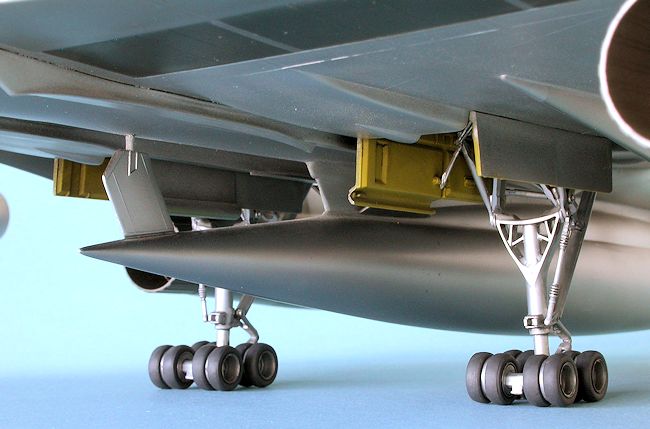
The complicated landing gear
arrangement with eighteen wheels was covered with some amount of flash and
prominent sink holes on the struts in my kit, which required a bit of
cleanup. Detail
in the wheel wells is passably busy, but modelers may want to add more. Weight
is needed in the nose to allow the model to sit properly on the tricycle
landing gear. The
Revell Germany issue includes decals in their usual matt finish and
instructions printed on newsprint paper in booklet form with color call-outs
linked to Revell paints. The
box is the infuriating flimsy clamshell type that I quickly ditched and
transferred the contents to a sturdy Trumpeter kit box I had left over from
another project.
 As far as
dimensional accuracy goes, this kit is pretty good other than the
aforementioned recessed windows and is much better than the 1/72 scale
Italeri kit or the ancient box-scale Revell offering. The
only glaring error that I can see is the molding of a seventh canopy window
pane on the rearmost starboard side of the pilot’s cockpit. I
don’t know if this was a special one-off feature of a museum B-58 used by
Monogram to design the kit, but I couldn’t find a single picture of such a
configuration in operational Hustlers.
As far as
dimensional accuracy goes, this kit is pretty good other than the
aforementioned recessed windows and is much better than the 1/72 scale
Italeri kit or the ancient box-scale Revell offering. The
only glaring error that I can see is the molding of a seventh canopy window
pane on the rearmost starboard side of the pilot’s cockpit. I
don’t know if this was a special one-off feature of a museum B-58 used by
Monogram to design the kit, but I couldn’t find a single picture of such a
configuration in operational Hustlers.
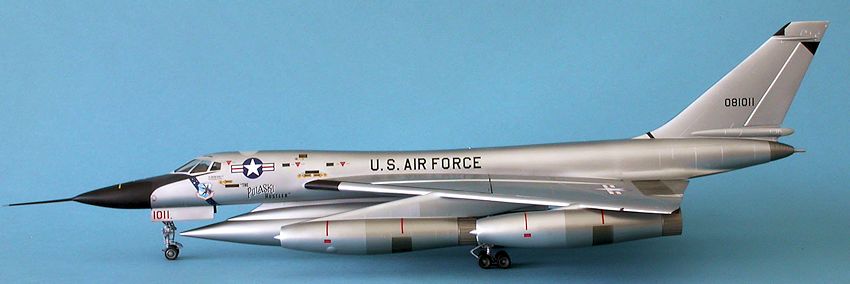
Decals provided in the kit are for three aircraft,
two in natural metal and one aircraft supposedly painted in the Southeast
Asia scheme for use in special operations in Vietnam but never photographed. The
debate over the reality of this super-secret camouflaged B-58 continues to
rage, but it did manage to get a painting schematic guide in the T.O. 1-1-4
order of the day. The
decals are typical of Revell Germany, being thick with a matt finish.
My first task was to deal with the internal seam
inherent in each air intake due to the left/right design of the engine pod. I
cut out the forward air intake of each half just at the location of the
shock cone attachment point, glued the pieces together with CA glue and
filled them, making sure that they were internally seamless, painted them
flat white, and reattached the now whole piece back onto the rest of the
glued-together engine pod. This
required more filling with CA glue. The
shock cone was painted Floquil Old Silver and flat black was hand-painted on
the blanking plate around the cone to give the illusion of depth.
The wheel wells were assembled and added to the bottom wing
section. Period
color photos show Chromate Yellow interiors. The
B-58 in the Air Force Museum has a honey-tinted white color in the wells. My
guess is that the Chromate Yellow was sprayed over with gloss white sometime
during IRAN,
 but that
is simply conjecture on my part. The
B-58 at the Pima Air and Space Museum in Tucson has overall silver wheel
wells with Chromate Yellow peeking through on the doors. I
went with Testors Acryl Chromate Yellow overall with silver landing struts
and wheels. The
tires were painted with my sadly diminishing stock of Polly Scale Scale
Black.
but that
is simply conjecture on my part. The
B-58 at the Pima Air and Space Museum in Tucson has overall silver wheel
wells with Chromate Yellow peeking through on the doors. I
went with Testors Acryl Chromate Yellow overall with silver landing struts
and wheels. The
tires were painted with my sadly diminishing stock of Polly Scale Scale
Black.
The cockpit was painted Dark Gull Gray FS36231 overall with
flat black instrument panels. The
ejection seat cushions were painted Insignia Red with light gray harnesses.
I decided to build the model in a closed cockpit configuration so I didn’t
spend too much time worrying about the detail inside because it is close to
invisible on the finished model.
As mentioned above the small rectangular windows for the two
other crew members should be flush with the fuselage instead of recessed as
provided by the kit. I
cut out small pieces of clear styrene from an old Compact Disc case and
glued them into the openings. I
filled the gaps with CA glue and sanded everything smooth, followed by a
polish with a tri-grit file and then Novus Plastic Polish #2 to bring the
windows back to clarity.
I added some large fishing weights to the nose and then glued
the fuselage top and bottom pieces together. The
tail pieces were glued together next, followed by the wing top and bottom
pieces. A
significant amount of time was required to fill the large seams in each and
every joint. Since
this model will have a natural metal finish, I used thick CA glue to mate
the pieces together and to fill the gaps. The
worst fit was encountered when each engine nacelle was glued to the
underside of the wing. This
is where things became really discouraging, as the gap between the top of
each pylon and the wing surface was quite prominent. Copious
amounts of CA glue was used to filled the gap, but sanding this smooth and
straight was really difficult in such a confined space. My
hands were beaten up after hours of sanding and polishing the pylon
attachment seams for the four engine pods.
 I blended
in the windscreen and the top hatch to the surrounding fuselage as this is
flush on the real aircraft by carefully filling the gaps and sanding in such
a manner as to not scratch the clear window sections. I
didn’t realize the error about the seventh window pane and dutifully masked
it off. I
would later rue that oversight. The
engraved navigation lights were cut out of the wing tips and replaced with
small pieces of clear red and clear green resin. These
were filled, sanded, and polished.
I blended
in the windscreen and the top hatch to the surrounding fuselage as this is
flush on the real aircraft by carefully filling the gaps and sanding in such
a manner as to not scratch the clear window sections. I
didn’t realize the error about the seventh window pane and dutifully masked
it off. I
would later rue that oversight. The
engraved navigation lights were cut out of the wing tips and replaced with
small pieces of clear red and clear green resin. These
were filled, sanded, and polished.
The enormous fuel tank was glued on and my heart sank when I
saw yet another huge gap between the fuselage surface and the top of the
pylon. This
took more hours of work to fill and sand and polish and I have to confess
that I seriously considered just abandoning the project as this was
absolutely no fun to do. As
a rule I don’t have a Shelf of Doom, but this model was put away for a year
before I was motivated to resume the painting of the natural metal finish. The
entire model was rubbed down with Novus Plastic Polish #2 and then washed in
the kitchen sink with warm water and a little dish washing liquid soap to
remove the copious amount of dust and grime accumulated in the construction
and seam filling phase.
I
knew that I needed a really tough base for the natural finish because the
B-58 has a number of multi-hued panels that would require a considerable
amount of masking to achieve. For
my primer base, I used Tamiya X-18 semi-gloss black Spray Lacquer right out
of the can. There
were a few runs that were sanded smooth before spraying Alclad II Lacquer
Aluminum over the entire model. Then
I began the lengthy process of masking off various sections of the model and
spraying other shades of Alclad to achieve the look I wanted. The
tail stinger was painted with Duraluminum. The
landing gear fairings on each wing were painted with White Aluminum. The
elevons have Dark Aluminum in the rear and Jet Exhaust in the forward
section. The
same two shades were used on each engine pod. The
exhausts were painted with Testors Metalizer Burnt Metal. The
radome, anti-glare panel, and the dielectric panels on the wing roots, wi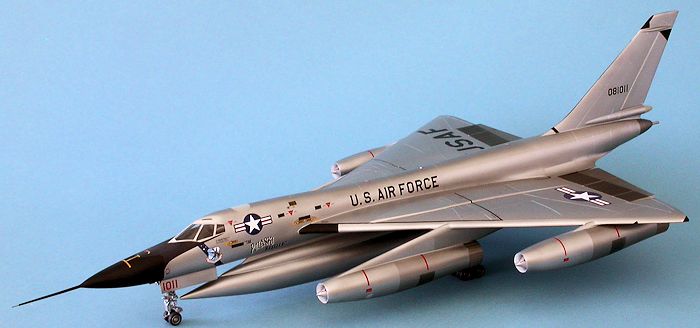 ng
tips, and top of the tail were painted with Polly Scale Steam Power Black.
ng
tips, and top of the tail were painted with Polly Scale Steam Power Black.
Looking
through my references, I realized that the extra cockpit window pane was
incorrect. I
fretted about what to do – I had already masked the window off and applied
the primer and the Alclad paint. If
I simply removed the masking and painted it over, the outline of the window
would be prominent. So
I tried to sand the surrounding area and feather in the transition, but that
didn’t work very well and there is a very visible (to me) shadow line in the
silver paint finish, a color that unfortunately hides nothing, ever. Other
than strip the entire model and start over again, I elected to press on and
to not look at that part of the model too closely. Grrrrr…
I eschewed the kit decals, which are notoriously prone to
silvering according to reviews I have read, in favor of markings provided on
decal sheet MG 48-004 issued by Mike Grant Decals. I
selected the markings for a 43rd Bomb Group B-58A from the early 60s with a
little bit of nose art, “The Pulaski Hustler”. The
decals went on beautifully although the long black walkway lines were
nerve-wracking to lay down straight. To
blend everything in with a consistent finish, I sprayed a thin coat of
Testors Metalizer Sealer. The
radome got a semi-gloss clear, and the anti-glare panel got a flat clear
finish.
I lost so many raised panel lines during the seam filling process
that I decided to replace them with drawn-on pencil lines which I think
fools the eye a little better on a natural metal finish model than
re-scribing.
 A
dark wash was added to the wheel wells to provide some depth to the molded
detail. This
was the only weathering I did as these aircraft were kept quite clean with
only a trace of exhaust residue seen on the underside of the elevons. The
complex landing gear pieces were glued in. I
expected trouble getting all eighteen wheels to touch the ground at the same
time – I wasn’t disappointed. Light sanding of the bottom of some of the
errant wheels helped. The nose landing gear assembly is particularly fragile
and nearly impossible to get aligned properly. I
detailed the three landing lights by drilling out the solid cones and adding
some clear circular lens pieces found in my spares box. A
couple of fins were added to the weapons pod and the pitot tube glued on and
faired into the nose. I’m
sure that this won’t last long before being broken off.
A
dark wash was added to the wheel wells to provide some depth to the molded
detail. This
was the only weathering I did as these aircraft were kept quite clean with
only a trace of exhaust residue seen on the underside of the elevons. The
complex landing gear pieces were glued in. I
expected trouble getting all eighteen wheels to touch the ground at the same
time – I wasn’t disappointed. Light sanding of the bottom of some of the
errant wheels helped. The nose landing gear assembly is particularly fragile
and nearly impossible to get aligned properly. I
detailed the three landing lights by drilling out the solid cones and adding
some clear circular lens pieces found in my spares box. A
couple of fins were added to the weapons pod and the pitot tube glued on and
faired into the nose. I’m
sure that this won’t last long before being broken off.
As
of this writing, Modeling
Madness has
been on-line almost twenty years, yet there has not been one single Monogram
1/48 scale B-58 kit review article published until now. In
all my years of attending contests and model club meetings, I can only
recall seeing one of these built. I
now know why: this is one of the most difficult models I have ever built. It
looks deceptively simple in the box with not very many pieces, but the
difficulty of the fit, the challenge of getting the seams perfectly smooth
for the natural metal finish, and the complexity of the landing gear
certainly make it an ordeal that few modelers evidently follow through with. I
know it really frustrated me much of the time and only by sheer stubbornness
did I continue to the end.
Why
did I do it? Because
this completes the Grand Cycle of Revell/Monogram US bombers for me in my
modeling career. I
have previously built the B-17G, B-24D, B-25H, B-25J, B-26B, B-29A, RB-36H,
B-52D, B-1B, and B-2 kits. The
only thing missing was the B-58 and that is now done. I
admit that it’s a bit silly, but it gives me satisfaction knowing that I
have achieved this milestone.
I
don’t recommend this model to anyone unless they are really keen on the
subject. I
found it to be very hard to build to the standard I expect of myself and I
can’t say I enjoyed the experience overall. On
the positive side, it’s an accurate B-58 Hustler, surely one of the coolest
bombers to ever fly and the finished model is quite an impressive piece. I
could see one of the Chinese model companies issuing a new tool kit as they
wouldn’t have to try very hard to get something that fits better than this
old Monogram nugget.
As
they say – been there, done that, got the t-shirt. Never
again.
McCullough, Anson: “B-58 --
Diehard of the Manned Bombers”, Airpower magazine,
November 2000
Peterson, Wayne: “Convair
B-58 Hustler”, Wings
& Airpower magazine,
December 2006
Smith, Dale: “Speed -- How the
Fastest Bomber Faded at the Finish”, Air
& Space Smithsonian magazine,
January 2006
Lee Kolosna
January 2015If you would like your product reviewed fairly and fairly quickly, please
contact
the editor or see other details in the
Note to
Contributors.
Back to the Main Page
Back to the Review
Index Page