Italeri 1/72 RF-4E Phantom II
| KIT #: | 133 |
| PRICE: | $ |
| DECALS: | Three options |
| REVIEWER: | Spiros Pendedekas |
| NOTES: | 1981 tooling |
| HISTORY |
The RF-4E is the photo-recon variant of the F-4E fighter, differing mainly in the nose where it carries its photo equipment. Four types of cameras can be carried, the most impressive of them being the LOROP KS-127A camera, which can take photos from a height of 35,000 feet. AAD-5 infrared system is also available, used for day and night identification.
 Alone,
Unarmed, Unafraid was the USAF photo-recon doctrine of the Vietnam War
era. Not so for the RF-4E, as it carries weapons and self-protection
devices.
Alone,
Unarmed, Unafraid was the USAF photo-recon doctrine of the Vietnam War
era. Not so for the RF-4E, as it carries weapons and self-protection
devices.
The plane can operate at heights from little to 40,000 feet depending on the type of mission, its main task being to identify before and after the attack of a target. In the second case the mission is called BDA (Battle Damage Assessment) and its success is a key factor in the design of attack operations.
Hellenic Air Force (HAF) received 8 brand new RF-4E’s in 1980, sharply upgrading its recognition capabilities. Their small number was well augmented in 1993 with 27 second-hand RF-4E from West German stocks.
All Greek RF-4E Phantoms had been operating from 348MTA “matia” (eyes) squadron at 110 AFB Larissa, until May 5, 2017, when they withdrew, their role taken by the F-16. Their impressive posture will much be missed.
| THE KIT |
 This
is the initial release (1981) RF-4C/E kit form Italeri; molded in a
shiny dark green plastic, somewhat on the brittle side. You can build it
as a C or E variant, by using different burner cans. The kit itself is
quite good for its age, with nice overall shape and crisp molding –
being it the first release. The panel lines are raised, not a problem
for me.
This
is the initial release (1981) RF-4C/E kit form Italeri; molded in a
shiny dark green plastic, somewhat on the brittle side. You can build it
as a C or E variant, by using different burner cans. The kit itself is
quite good for its age, with nice overall shape and crisp molding –
being it the first release. The panel lines are raised, not a problem
for me.
The kit shows its age at some areas. The landing gear bays look a bit sparse, though they have sufficient depth. The cockpit is also a par on the simplistic side and does not look busy enough. The instrument panel details are represented by decals. The two ejection seats are also simplified, their main body split vertically, resulting in a seam not very easy to deal with. No seat belts are provided. Since it would be a closed canopy build, the sparsity of the cockpit wouldn’t be that obvious, sans the seatbelts, which I planned to scratchbuild. The canopy is supplied in 4 pieces, so you can pose open if you so wish.
The intakes depth is quite shallow and there are no compressor faces, just a blank plate – matt black will definitely be painted!! Finally, the wingtips are oversimplified, the real ones looking beefier and busier.
 There
are two markings options, a USAF RF-4C in SEA camo and a Luftwaffe RF-4E
in Norm62 (“basalt” grey and dark green upper, with light gray lower).
The instructions are simple and easy to follow, though it would be nice
to provide head-on and side views to facilitate the modeler installing
the elevators and landing gear at the correct angles. Anyway, the magic
of the internet will save our day.
There
are two markings options, a USAF RF-4C in SEA camo and a Luftwaffe RF-4E
in Norm62 (“basalt” grey and dark green upper, with light gray lower).
The instructions are simple and easy to follow, though it would be nice
to provide head-on and side views to facilitate the modeler installing
the elevators and landing gear at the correct angles. Anyway, the magic
of the internet will save our day.
The particular kit was offered to me in plastic bag by a fellow, back in 1987, when we were cadets in the Air Force Academy. It was partially assembled. Some time ago, I discovered that some parts were lost (the camera windows, the rudder, one actuating rod) whereas the windscreen was cracked in two….sigh. The kit kept on resting in my shelf of doom for almost 40 years. Didn’t know what to do with it….toss it, use it as spares….what to do?
For some bizarre reason, I believe every kit, in whatever condition, deserves to be built. I also loved challenge of coping with the missing/damaged parts. (which could also serve as a –cheap- excuse to justify my mediocre build quality!!) So, I decided to give it a go…
| CONSTRUCTION |
I started by assembling the seats. They were painted flat black with dark green cushions. The ejection handles were painted yellow and black. I added some seatbelts made from masking tape to make them look busy and left them apart.
The already assembled cockpit was painted humbrol 140 gull grey. I used
the decals for the instrument panels, whereas I painted the top of the
side panels flat black and simulated some knobs and controls by a pplying
white and red paint here and there with a 10/0 brush. It was glued on
the bottom part of the fuselage, and then trapped between the fuselage
halves. The two halves of the cameras section were joined together with
the nose cone in front of them and the whole subassembly was glued to
the fuselage. The inside of the camera section is empty, so It was
painted flat black to hide the emptiness to the casual model observer
(not the penlight police, but I don’t think they would bother dealing
with this model...).
pplying
white and red paint here and there with a 10/0 brush. It was glued on
the bottom part of the fuselage, and then trapped between the fuselage
halves. The two halves of the cameras section were joined together with
the nose cone in front of them and the whole subassembly was glued to
the fuselage. The inside of the camera section is empty, so It was
painted flat black to hide the emptiness to the casual model observer
(not the penlight police, but I don’t think they would bother dealing
with this model...).
I assembled the intakes, painted the interior Humbrol 130 satin white and glued them in place. As there are no compressor faces, just bland shallow plates, they were also beforehand painted Humbrol 33 flat black, hoping they cannot be seen… The two prominent air scoops in front of the intakes were also glued on. Take your time when installing all these parts so they are properly aligned and you will have a good result. Fit is generally good. Of course (for me…..) some filling and sanding was needed. I used Squadron green putty – lovely stuff!
 The
wings were glued in place, then the elevators (I’m not sure if I goofed,
installing them upside down) and the monstrous arresting hook. I
scratched built the missing rudder from sheet styrene. I also assembled
the three drop tanks and left them aside, to be installed after painting
and decaling. Some filler was needed here and there too.
The
wings were glued in place, then the elevators (I’m not sure if I goofed,
installing them upside down) and the monstrous arresting hook. I
scratched built the missing rudder from sheet styrene. I also assembled
the three drop tanks and left them aside, to be installed after painting
and decaling. Some filler was needed here and there too.
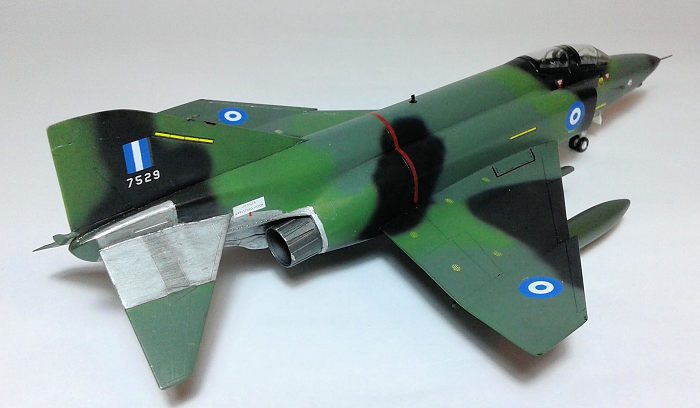
The rest of the kit assembles nicely. The burner cans, which do not have the correct depth, being shallow, were assembled, painted Testors burned metal and left aside. I tossed the odd looking pitot tube, replacing it with a custom one made from a needle, which I burned at the tip with a lighter to give this slightly burned metal pitot look! For a wheels down version, which is what I did, you have to split apart the gear doors. Since the camo lines are “crossing” them, I left them in one piece each and fit them to their corresponding bays with patafix, to split them after painting. The gear legs and wheel rims were painted white, with the inside of the rims gun metal to represent the main wheel brake assies. The “chrome” part of the absorbers was done with a PILOT silver marker.
I then gave the modeI a very light sanding with wet 2000 grit and headed to the paint shop.
| COLORS & MARKINGS |
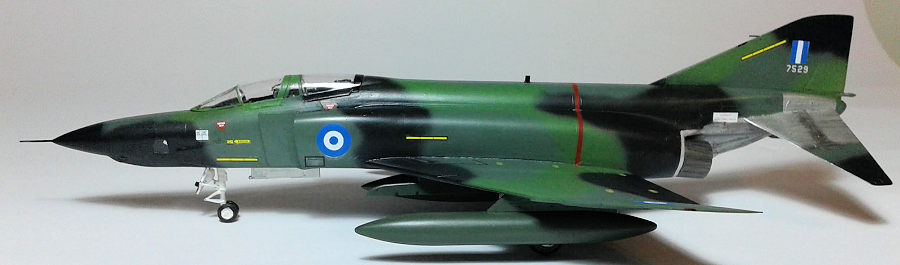
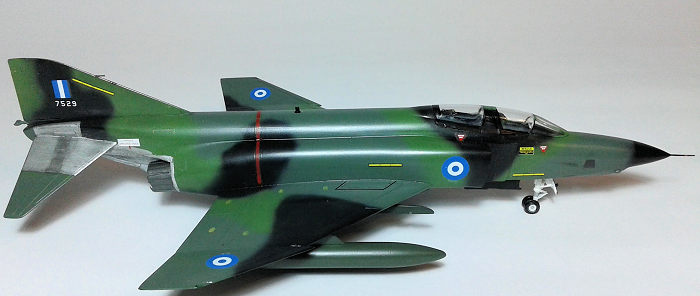
All 27 ex Luftwaffe RF-4E’s delivered to Greece were painted in Norm 83 camo, consisting of ”forest” green (FS34079), olive green (RAL6003) and black grey (officially RAL7021 but practically black to the eye). At first they sported light blue insignia instead of the dark blue ones normally used. Later on the color of the insignia would change to the normal HAF dark blue. I decided to paint my model as S/N 7529 (ex-Luftwaffe 35+82) with the light blue insignia (I loved the contrast they made to the darkish camo, but again beauty lies in the eyes of the beholder). For the camo pattern, I used the instruction sheet of Icarus decals #48003: Hellenic Air Force Jets part 2.
I use enamels for my builds. In this case I a mixture of Humbrol 116 and
78 for the forest green, darkened Revell 360 for the lighter green and Humbrol 85 coal black. I cannot comment on the accuracy of the
shades, but they didn’t look terribly wrong to my eyes (hint: I happened
to have them available in my stash....).
and Humbrol 85 coal black. I cannot comment on the accuracy of the
shades, but they didn’t look terribly wrong to my eyes (hint: I happened
to have them available in my stash....).
I freehanded the camo with my Revell master class airbrush, whereas I touched up oversprays with my Badger SG-100. It took some iterations to finish the camo. I know that the edges should be sharper for a proper scale effect, yet it looks adequate, matching my mediocre skills. I painted the exhaust area and inner part of elevators Testors steel. The different metal shade that you may notice at the elevators was represented by lightly applying Testors burned metal. The radome was painted flat black Humbrol 33 and the wheel wells Humbrol 130 satin white. The external tanks and wing pylons were usually painted in a dark green colour; I chose 116 dark green. I then gave the model a coat of Future (Klir) and proceeded with the decals.
I used light blue Greek national insignia, taken from a sheet made by Plastimodellismo model store in Athens, which behaved beautifully, though I noticed a very subtle shifting of the white, outside the blue border. The serials were taken from spare decals of my decal dungeon.
For the rest I used the 40 years old kit decals, which, to my surprise, were usable (using utmost care to avoid tearing them).I then gave the model another coat of Future to seal the decals.
| FINAL CONSTRUCTION |
I installed the burner cans. Then I installed the landing gear legs, the doors and wheels. I made two hydraulic jacks from stretched sprue. Take your time when installing all these and use reference photos and drawings, in order to align everything properly. Then I installed the wing armament pylons and all three external fuel tanks, a typical configuration for Greek RF-4’s. Finally I installed the seats and painted the dashboard flat black.
The model was then sprayed with Humbrol satin varnish.
 I
custom made a HUD from clear sheet. I hand painted the windscreen and
canopies framing, because I hate masking canopies, but, as you can see I
pay the price...something is left to be desired. I must start masking
canopies....Anyways, I joined together the cracked-in- two windscreen as
best as I could and installed all transparencies with white glue.
Although they aligned satisfactorily, I would prefer a one piece canopy
for my closed canopy configuration.
I
custom made a HUD from clear sheet. I hand painted the windscreen and
canopies framing, because I hate masking canopies, but, as you can see I
pay the price...something is left to be desired. I must start masking
canopies....Anyways, I joined together the cracked-in- two windscreen as
best as I could and installed all transparencies with white glue.
Although they aligned satisfactorily, I would prefer a one piece canopy
for my closed canopy configuration.
For the camera glasses, I used Humbrol clearfix. This is an amazing stuff. I did not expect it to work at such relatively big holes, but it did. Thumbs up Humbrol clearfix!
I replicated the navigation lights with drops of Humbrol clears and called the model done!
| CONCLUSIONS |
The kit itself is “old” for today’s standards and one could do better with newer representations. However, it has a good overall shape and is a pleasure to build. If you can find it cheap, grab one!
This is my first article at my beloved site MM. I chose this model for my article, because I had just finished it by the time I decided to try my luck, posting an article to MM. I know my job leaves a lot to be desired – definitely a 4-footer! However, I loved the challenge and had a fantastic time bringing it together.
P.S. I had decided to offer it as a surprise present to a friend who loves - but doesn’t build - models. You should see his surprised childish smile when I gave it to him. I was then a blissful man.
Happy modeling!
| REFERENCES |
Haf.gr Hellenic Air Force official site (for the historical background)
Icarus decals #48003 instruction sheet (for the camo).
The internet (for the rest of info needed)
25 May 2020
Copyright ModelingMadness.com
If you would like your product reviewed fairly and fairly quickly, please contact the editor or see other details in the Note to Contributors.
Back to the Main Page Back to the Review Index Page Back to the Previews Index Page