
Revell 1/32 F-4E Phantom II
| KIT #: | 04706 |
| PRICE: | 45 Euros when new |
| DECALS: | Three options |
| REVIEWER: | Spiros Pendedekas |
| NOTES: | Tailplane modified to slatted version. Icarus and Plastimodellismo decals |
| HISTORY |
The McDonnell Douglas F-4 Phantom II is a tandem two-seat, twin-engine,
all-weather, long-range supersonic jet interceptor and fighter-bomber originally
developed for the United States Navy by McDonnell Aircraft. It first entered
service in 1961 with the Navy. Proving highly adaptable, it was also adopted by
the United States Marine Corps and the United States Air Force, and by the
mid-1960s had become a major part of their air arms.
 It is a
large fighter with a top speed of over Mach 2.2. It can carry more than 18,000
pounds (8,400 kg) of weapons on nine external hardpoints, including air-to-air
missiles, air-to-ground missiles, and various bombs. The F-4, like other
interceptors of its time, was initially designed without an internal cannon.
Later models incorporated an M61 Vulcan rotary cannon. Beginning in 1959, it set
15 world records for in-flight performance, including an absolute speed record
and an absolute altitude record.
It is a
large fighter with a top speed of over Mach 2.2. It can carry more than 18,000
pounds (8,400 kg) of weapons on nine external hardpoints, including air-to-air
missiles, air-to-ground missiles, and various bombs. The F-4, like other
interceptors of its time, was initially designed without an internal cannon.
Later models incorporated an M61 Vulcan rotary cannon. Beginning in 1959, it set
15 world records for in-flight performance, including an absolute speed record
and an absolute altitude record.
As of 2021, 63 years after its first flight, the F-4 remains in service with
Iran, Japan, South Korea, Greece, and Turkey. The aircraft has most recently
been in service against the Islamic State group in the Middle East.
The Phantom entered service with the Hellenic Air Force in 1974 under the arms
programme “Peace Icarus”. Although it is a second-generation aircraft, 36
Hellenic Phantoms have been upgraded with advanced electronics (programme “Peace
Icarus 2000”), extending their operational life. They are based in Andrabida AFB
(117 Combat Wing, 338 and 339 Squadrons with call signs “Aris” and “Aias”
respectively). Initially in “Vietnam” camo, some of them wore the “Aegean Blue”,
whereas some received as US surplus, wore the “Hiil Gray”. After the upgrade
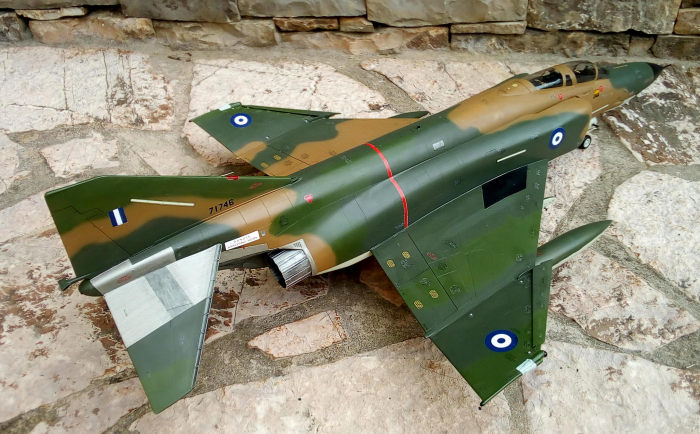
programme, all the Hellenic F-4Es wear the lovely three-tone “Aegean Ghost”
camouflage.
| THE KIT |
This is the second generation (1994 - onwards)
tooling of 1/32 Revell F-4 (the first generation mold dated back in n1972). Mine
is the 2002 F-4F reissue. It comes in the usual big Revell top opening box,
which is actually quite flimsy. There’s a nice boxart, depicting the beautiful
and quite famous blue/red “Wild Horse”one with the other two klt scheme options
flying in the far background. Upon opening the box, you are greeted with A LOT
of plastic, which is arranged in 7 main sprues, plus two massive fuselage parts.
Molding looks impressive, practically flash-free, with nicely recessed panel
lines.
 The cockpit
is well appointed, with raised detail instrument panels and side consoles,
control sticks, throttles and rudder pedals, 14 pieces in total. Nice decals can
optionally be used on the instrument and console panels. Sidewall detail is
quite sparse, though. Two types of good looking seats are provided, a “standard”
set (correct for the E, G and RF-4C versions) and an extra set provided at small
sprue, for the F version. Seat belts are molded on, looking acceptable.
The cockpit
is well appointed, with raised detail instrument panels and side consoles,
control sticks, throttles and rudder pedals, 14 pieces in total. Nice decals can
optionally be used on the instrument and console panels. Sidewall detail is
quite sparse, though. Two types of good looking seats are provided, a “standard”
set (correct for the E, G and RF-4C versions) and an extra set provided at small
sprue, for the F version. Seat belts are molded on, looking acceptable.
The fuselage is supplied in 4 parts and the main wing in 9 parts. The air
intakes look satisfactory in the front, but do not fully extend to the kit
provided compressor faces, leaving a blank space that might irritate quite a few
modelers. The exhausts are correct looking for that engine version, but their
depth is shallow.
There is an option for flattened or unflattened wheels and closed or open radome.
A good looking 6-piece radar is provided for the latter case.
External stores include the two wing tanks, two styles of centerline tanks, four
AIM-9s and four AMRAAMS. Neither bombs nor their pylons are provided.
The transparencies are nice and clear. The canopies are separate and can be
posed open or closed. An eye catcher 11-piece ladder is provided.
Some shape issues / inaccuracies and omissions have been reported, the anemic
looking nose and front LG being among the most important. For a complete listing
and remedial options on them, you may refer to Lee Kolosna’s excellent review here.
Instructions are the typical nice and clear Revell ones. Three very interesting
Luftwaffe scheme options are provided, one of them being the famous Wild Horse,
for the celebration of the JG 72 35th Anniversary. The decal sheet is massive,
excellently printed by Cartograf, and includes a lot of maintenance stencils.
| CONSTRUCTION |
I started by assembling the 15 piece cockpit. Basic color, including
fuselage sidewalls, was Hu140 Gull Gray, with black instrument panels, side
consoles, stick grips and antiglare panel. I did not use the cockpit decals, but
I drybrushed all raised detail with silver, the various knobs depicted in red,
yellow and white. Radar screens were painted silver, with clear green paint on
top of them and actually looked good!
The Martin-Bakers were assembled, too. They were painted black (drybrushed with
silver), with medium green cushions, olive drab parachute pack, cream seat belts
with silver buckles and yellow/black ejection handles. They were left aside to
be installed during final construction.
 The cockpit
was then trapped between the two front fuselage parts, together with the nose
wheel well front wall. The rest (4 pieces) of the NLG well was assembled inside
the bottom cover, which was then attached under the assembled front fuselage
part, followed by the two piece famous gun cover and the pair of side airscoops.
Having decided not to display the radar (I am a “closed panels/hatches/canopies”
guy…), I also glued the nose cone at the front, with a small extra airscoop on
top right. Fit was nice allover. Then I attached the air intakes, each comprised
of three pieces. Fit was also good, with the characteristic F-4 air intakes
profile looking ok.
The cockpit
was then trapped between the two front fuselage parts, together with the nose
wheel well front wall. The rest (4 pieces) of the NLG well was assembled inside
the bottom cover, which was then attached under the assembled front fuselage
part, followed by the two piece famous gun cover and the pair of side airscoops.
Having decided not to display the radar (I am a “closed panels/hatches/canopies”
guy…), I also glued the nose cone at the front, with a small extra airscoop on
top right. Fit was nice allover. Then I attached the air intakes, each comprised
of three pieces. Fit was also good, with the characteristic F-4 air intakes
profile looking ok.
The 11-piece compressor face was then assembled, with the actual compressors
painted steel and the surrounding area matt black. The assembly was then trapped
between the two massive rear fuselage halves, which were glued together. I then
drilled out all 14 pylons attaching holes at the central wing half and glued it
under the rear fuselage, followed by the top inner wing halves, thus ensuring a
good upper wing/fuselage joint. The outer wing halves were glued together, with
the extra slat above them and attached to the main wing at 12.5 degrees dihedral
(and not at 8 degrees, as the instructions erroneously call for). The 6
underwing fairings, fin top an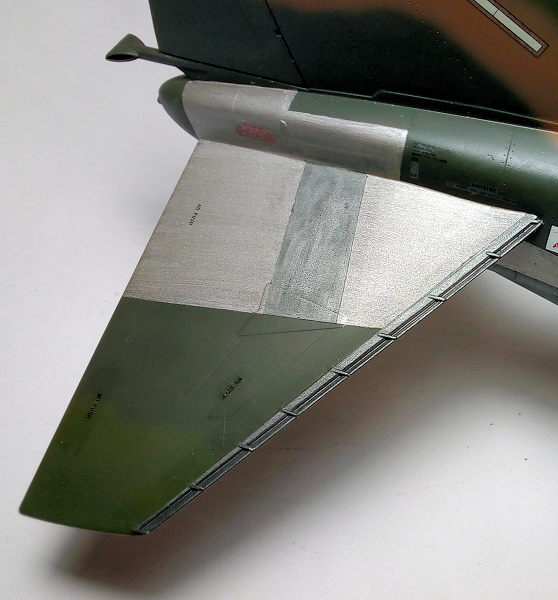 d
antenna, two small underwing panels, aft canopy fairing, tail hook and drag
chute housing cover were also attached at this point. The air brakes were also
attached in the closed position (which is not that realistic, as they - and also
the flaperons - droop very soon after engine shutdown...well, next time...).
d
antenna, two small underwing panels, aft canopy fairing, tail hook and drag
chute housing cover were also attached at this point. The air brakes were also
attached in the closed position (which is not that realistic, as they - and also
the flaperons - droop very soon after engine shutdown...well, next time...).
Then it was tail plane time: there are two types of F-4 stabilators, slatted and
unslatted. HAF F-4Es featured slatted stabilators, not provided in the Revell
kit. To fabricate them I used leftover 1/32 AMRAAM halves cut and filed to
shape, attached under the leading edge of the existing stabilator with 9 little
symmetrically placed pieces of stretched sprue, to represent the small
supporting struts of the real thing. The result looked quite convincing! The
stabilators were attached to the rear fuselage. Take your quality aligning time
here, in order to reassure they rest at the so characteristic 23 degrees
anhedral.
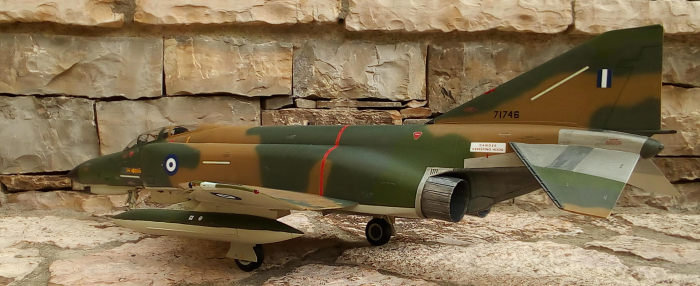
The 3-piece exhausts had acceptable detail, but lacked depth. In order to
somehow even this, I added a pair of 3-inches long tubes of same width, between
the exhaust nozzle and turbine housing. The exhausts looked more real now and
the lack of inserted tubes internal details is not that noticeable. They were
painted Testors Burned metal and left aside to be installed at the final stages.
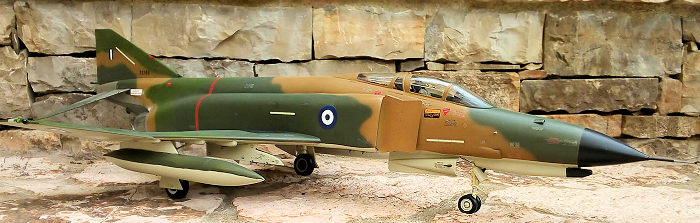
Subassemblies time: The wing tanks, armament pylons, wheels (I went for the
flattened option), landing gear main bodies and front side gear door were
assembled at this time. Two extra parts can be attached to the rear of each
armament pylon. Those seem to have been added at later pylons modification, not
applicable to my “early” F-4E, so, check your references! Wheel wells, inner
doors areas, landing gear parts and nose wheel rims were painted gloss white.
Main wheel rims were painted gloss white with gun metal brake assemblies. Tires
were painted black.
After major gluing had finished, I gave the basic model and subassemblies an
initial coarse sanding, followed by puttying (at quite a few places) with my
beloved Squadron Green Stuff. A fine grade (1000 grit) sanding took then place.
After declaring the looks acceptable, I proceeded to the paint shop.
| COLORS & MARKINGS |
Wanting to depict a “Vietnam” camoed HAF bird, I used the excellent
profiles of the 1/48 Icarus Decals sheet.
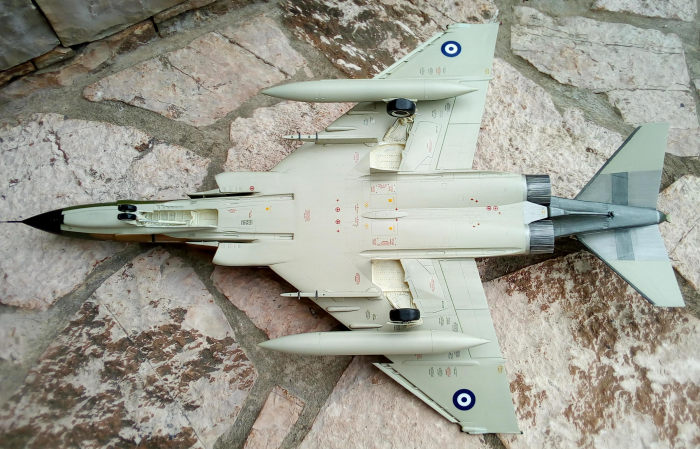
With my Revell Vario, I first painted the nose cone, the gun front and the two
wing walk panels flat black and masked them, followed by Hu28 (for the FS
36622) at all undersides (including wing tanks, armament pylons and doors outer
faces) and masked them as well. The top camo (including wing tanks and armament
pylons to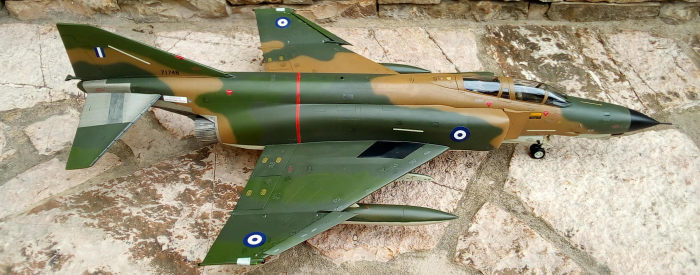 p
areas) was freehanded, using Hu116, 117 and 118 for the two greens and brown
respectively. I have to say that freehand demarcation lines do not look out of
place in 1/32, especially if done at “fine” airbrush settings. Upon removing the
masks and after some overspray corrections, a coat of Future was applied, in
order to prepare the model for decaling (and to protect the sensitive matt
coating from mini scratches as well!).
p
areas) was freehanded, using Hu116, 117 and 118 for the two greens and brown
respectively. I have to say that freehand demarcation lines do not look out of
place in 1/32, especially if done at “fine” airbrush settings. Upon removing the
masks and after some overspray corrections, a coat of Future was applied, in
order to prepare the model for decaling (and to protect the sensitive matt
coating from mini scratches as well!).
Basic insignia and codes were applied by using the generic “Plastimodellismo”
HAF insignia decal sheet, which was of good film quality, but showed some white
bleed through the outer blue roundel borders. For the extensive stenciling, I
used the dedicated excellent quality (Cartograf…) Icarus Decals sheet, which was
designed by an expert team of Greek modelers, using the F-4E technical
publications. If you are familiar with F-4Es, then you know they carry a
bazillion of stencils…..Well, ALL of them are represented in the three-leaf (!)
Icarus decal sheet. Suffice to say, I lost my sight and my sanity, in order to
apply them...A coat of Future sealed all them.
I then went and carefully hand painted the areas aft of the exhausts Testors
Burned Metal. The stabilator and adjacent fuselage “titanium” areas were hand
painted Testors Steel, with uneven smears of Gun Metal and Clear Blue, in order
to represent those characteristic looks.
Since this model was a build for a friend and my friend wanted a clean plane,
having exited the paint shop a couple of flights before, minimal weathering was
applied here and there, using dry pastels and some artists oils. A final almost
matt clear coat (80/20 matt/gloss) sealed everything in.
 After
attaching the HUD glass, the already hand painted canopy was attached in the
closed position. Fit was nice. The landing gear was then attached, together with
the landing gear doors and external stores. No missiles were attached, it being
a non-scramble aircraft.
After
attaching the HUD glass, the already hand painted canopy was attached in the
closed position. Fit was nice. The landing gear was then attached, together with
the landing gear doors and external stores. No missiles were attached, it being
a non-scramble aircraft.
For the front pitot and fin antenna, I used appropriately cut needle pieces. I
then attached the wing and fin navigation lights and painted them clear red and
green, as applicable. To my relief, they fitted satisfactorily, but, seriously,
I should have installed and faired them during construction – well, next time!
The small dorsal antenna aft of the canopy was attached and called this gorgeous
plane done!
| CONCLUSIONS |
The second generation Revell 1/32 Phantoms are good kits with nice
engraved detail, good fit and surprising easiness of assembly for such a big,
complex shaped jet model. Instructions are nice and clear, their only mistake
being the wrong printed angle of the external wing parts, something easy to
overcome. Cartograf decals are comprehensive and of excellent quality (as
usual). The kit is frequently reissued at several sub variants and I am sure
there is aftermarket beef-up stuff for it, as well as many fantastic scheme
decal options!
There are some shape and accuracy issues, mostly regarding the nose profile, the
anemic front landing gear and the cockpit sparseness. It is up to you to
evaluate how serious they are. I do not really mind, as I can live with them
(being a “closed canopy modeler” helps a lot in hiding the cockpit
sparseness!!!).
 The Tamiya
offering surely is a better kit with very few issues. It is more expensive than
the Revell (but not as much as it used to be, the Tam kit prices have fallen to
the range of 110 Euros, whereas the recent Revell prices have escalated to the
range of 90 Euros – as of 2021). So, you must balance your requirements and
conclude upon which one to get…..
The Tamiya
offering surely is a better kit with very few issues. It is more expensive than
the Revell (but not as much as it used to be, the Tam kit prices have fallen to
the range of 110 Euros, whereas the recent Revell prices have escalated to the
range of 90 Euros – as of 2021). So, you must balance your requirements and
conclude upon which one to get…..
It will not be very challenging for an average modeler to put the Revell kit
together OOB and come up with a most impressive model, which will make him feel
proud! The experienced modeler will have to address the kit’s issues, in order
to produce his masterpiece.
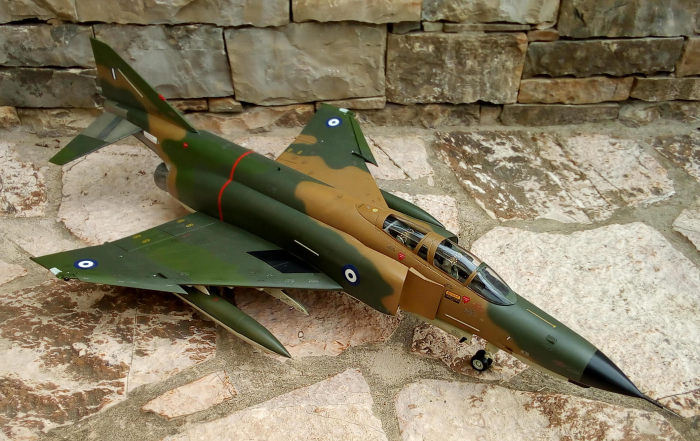
I had a great time putting it together, coming up with a nice’n’big model that
definitely looks like a mean F-4E. If you already have one, or if you find one
at a price offering you can’t refuse (and Revell does such offers quite often…),
grab it and build it!
Happy modeling!
26 July 2021
Copyright ModelingMadness.com. All rights reserved. No reproduction in part or in whole without express permission.
If you would like your product reviewed fairly and fairly quickly, please contact the editor or see other details in the Note to Contributors.