| KIT #: | 61605 |
| PRICE: | $10.00 or less |
| DECALS: | Four options |
| REVIEWER: | Spiros Pendedekas |
| NOTES: | 2004 reissue |
| HISTORY |
Japan selected the F-4 Phantom II as its new fighter at the end of the 1960s. On 1 November 1968, this choice was made public and Japan became one of the few countries that license-produced this aircraft. The Nihon Koku Jietai (航空自衛隊 - Japan Air Self-Defense Force - JASDF) received a total of 154 F-4EJ and RF-4Es. While the F-4EJs were built almost entirely by Mitsubishi Heavy Industries, the RF-4Es were bought directly from McDonnell-Douglas.
 The F-4EJ
entered service with the JASDF in August 1972 with a total of six Hikōtai
(Squadrons) operating the aircraft: the 301, 302, 303, 304, 305 and 306th. The
RF-4E equipped the 501st, which had previously operated one of the
less-well-known Sabre models, the RF-86F.
The F-4EJ
entered service with the JASDF in August 1972 with a total of six Hikōtai
(Squadrons) operating the aircraft: the 301, 302, 303, 304, 305 and 306th. The
RF-4E equipped the 501st, which had previously operated one of the
less-well-known Sabre models, the RF-86F.
On 9 March 2020, the RF-4 was retired after 45 years in JASDF service. 301st Hikōtai continued to operate the F-4EJ until 14 December 2020 when the Phantom was withdrawn from front-line service, remaining in use with the Air Development and Test Wing at Gifu. The final JASDF Phantoms were retired on 17 March 2021.
The 306th Tactical Fighter Squadron was founded at Hyakuri Air Base on December 1, 1981 with F-4EJ aircraft. It was the successor to the Lockheed F-104J/DJ Starfighter-equipped 205th Tactical Fighter Squadron and the sixth and final squadron of the JASDF to be equipped with the F-4. One of its aircraft (17–8440) was the last of the 5,195 F-4 Phantoms to be produced, manufactured by Mitsubishi on May 21, 1981. In 1989 the squadron's aircraft were upgraded to F-4EJ Kai standard. In 1997 it converted from the F-4 and became the eighth and final of the F-15J squadrons existing at that time.
| THE KIT |
 This is one
of Tamiya 1/100 kits which the company introduced back in the early 1970s,
hoping to become the standard small scale. Things did not work like this,
though, with Tamiya giving up introducing 1/100 toolings after a dozen types or
so, many of which were periodically reissued since then. Their Japanese Phantom
is one of those cases, first introduced in 1969 and reissued seven times ever
since, twice by Revell, twice by Ben Hobby and three times by Tamiya, the last
reissue taking place in 2004, which is the subject of this review.
This is one
of Tamiya 1/100 kits which the company introduced back in the early 1970s,
hoping to become the standard small scale. Things did not work like this,
though, with Tamiya giving up introducing 1/100 toolings after a dozen types or
so, many of which were periodically reissued since then. Their Japanese Phantom
is one of those cases, first introduced in 1969 and reissued seven times ever
since, twice by Revell, twice by Ben Hobby and three times by Tamiya, the last
reissue taking place in 2004, which is the subject of this review.
Though not exactly shake and bake kits, they are not too challenging to build and can be considered well done in their own manner. The specific kit, together with another very nice Tamiya 1/100 Me-262/Me-163 combo, was offered as a Christmas present to my sons from my local club and for an in-depth look at its contents you may look no further than our Editor’s thorough preview, found at the ever growing MM archives.
| CONSTRUCTION |
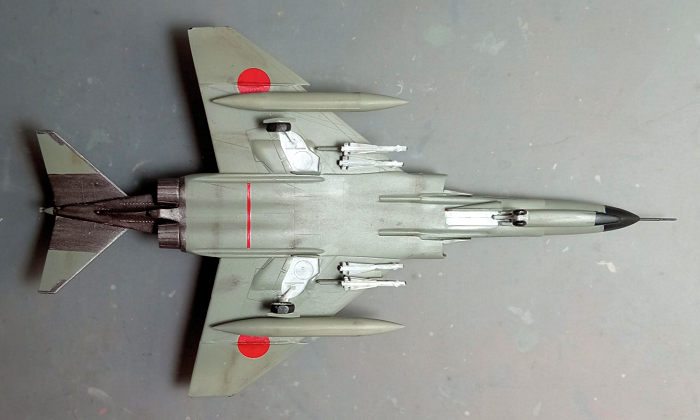
I started by joining the fuselage halves, trapping the simplistic cockpit tubs in between. The very nice single piece main wing was then attached underneath, followed by the 2-piece intakes and rear stabilators The pair of wing tanks was also assembled at this time, concluding a pleasant basic assembly.
Though not “modern Tamiya”, overall fit was quite good, needing filler at the usual suspect areas most of the F-4 models need, aka wing roots, intakes and lower fuselage joint (lining up the front Sparrow recessions was the most challenging step). After some sanding, I took the bird to the paint shop!
| COLORS & MARKINGS |
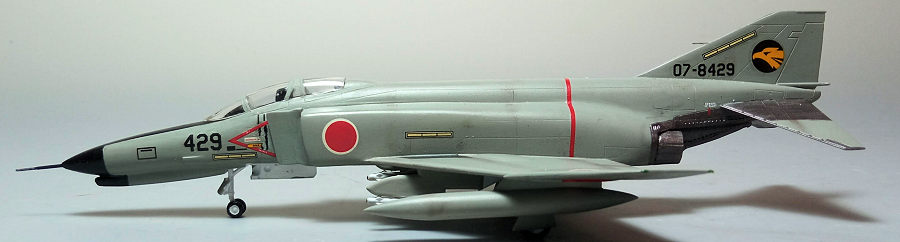
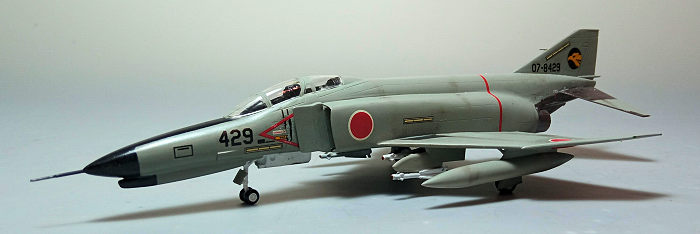
 I decided to
finish this machine as a 306 Squadron example which is one of the otherwise
identical four kit options of light gray over white undersides, differing only
in serial number and fin squadron emblem. After some net research, I concluded
that those machines switched to an all gray scheme from a point onwards, which I
found more aesthetically pleasing (translation: it was way easier to reproduce).
I decided to
finish this machine as a 306 Squadron example which is one of the otherwise
identical four kit options of light gray over white undersides, differing only
in serial number and fin squadron emblem. After some net research, I concluded
that those machines switched to an all gray scheme from a point onwards, which I
found more aesthetically pleasing (translation: it was way easier to reproduce).
I started by painting the nose and gun front area black, then masked them off and applied to the complete model a coat of Hu64 Light Gray. The wing tanks and missile pylons received the same gray, as well. For the tail and stabilator metallic portions I used Testors Steel, which I applied by brush, to give it a more uneven look. The arresting hook which is molded together with the fuselage received the same color, too. Finally, the wing root anti-slip rectangles were painted Hu123 Extra Dark Sea Gray, with a coat of Future preparing the bird for decaling.
The kit decals behaved in a satisfactory way, the only complaint being some brittleness, possibly due to their age. With the help of decal softener, I managed to apply most, but not all of them (the folding ones for the wingtip “electroluminescent” formation lights just split apart upon my attempt to fold them around the wingtips). Though Tamiya wants you to paint the distinctive red line that depicts the turbines’ cross section plane, I found way easier to use some leftover red line decals from my dungeon. A coat of Future sealed the decals.
| FINAL CONSTRUCTION |
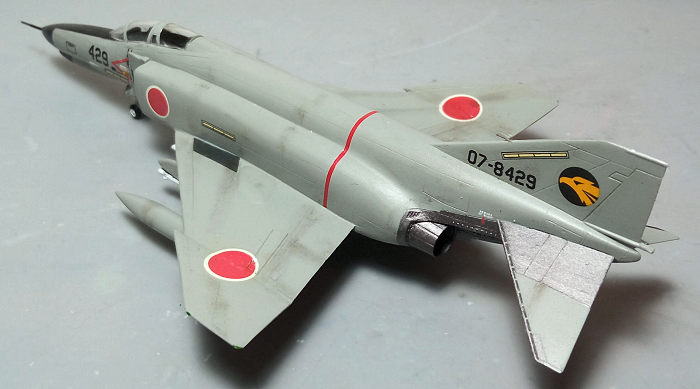
The landing gear was attached, with the bird proudly standing on its feet. The wheels were tad filed to look weighted. All landing gear parts, bays and door innards were painted white, oleos were highlighted with a fine tip silver pen, tires were black and the main wheels' brake housings were painted gunmetal. The exhausts were attached at this time, as well, painted Mr Color Burnt Iron, with their shallow end painted black, to add a sense of depth.
 The wing
tanks were attached, followed by the inner pylons. The four Falcons were painted
white, had their homing head painted clear orange and finally attached to the
pylons.
The wing
tanks were attached, followed by the inner pylons. The four Falcons were painted
white, had their homing head painted clear orange and finally attached to the
pylons.
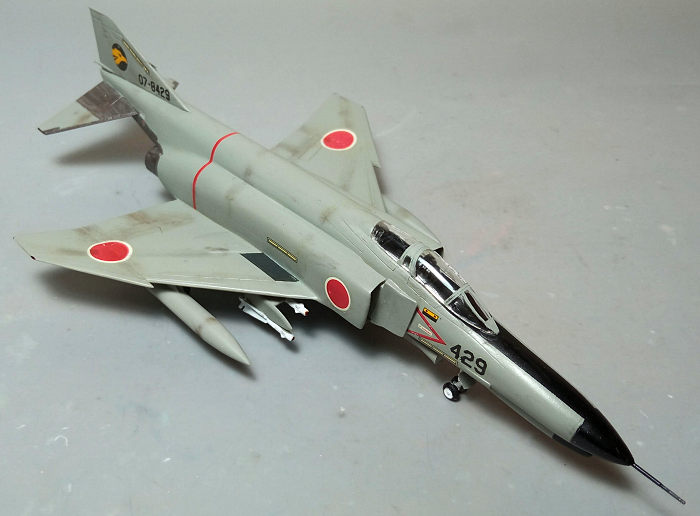
Weathering consisted of some black wash at the landing gear area, to give a used, oily look and application of dark brown and black dry pastels at places where dirt or grime would reside. A satin coat gave the bird its final hue.
The canopy had its well defined frames hand painted and attached with fit being quite good and the black cockpit innards trying their best to hide the inner sparseness (only a small acetate piece was added to the front, to represent the HUD). The pitot tube was painted black with gunmetal tip and attached. Blobs of red and green clear paint were “pinned” with a toothpick to represent the wingtip lights, before calling the Japanese Phantom done!
| CONCLUSIONS |
Despite being more than half a century old, this is still a good small scale kit of the iconic Phantom: overall shape looks correct, parts are well molded, landing gear and exhaust nozzles are adequately represented, canopy is well made and clear, instructions are very nice and construction is simple with fit being in most areas good. Decals will need your attention as they might have become brittle due to aging. The kit’s main issue is the very simplified cockpit, but, again, this is something that can be understood by the kit’s age, small scale and low price tag.
The kit used to sell at very low prices but, from some research, it does not seem too easy to locate nowadays (though Tamiya may surprise us in the future and reissue it at their usual nice, very low price policy). Definitely not a shake and bake kit but, then again, not difficult to put together, it is a more or less pleasant kit to build and come up with a beautiful small scale Phantom.
Happy Modeling!
Spiros Pendedekas
23 July 2024 Copyright ModelingMadness.com. All rights reserved. No
reproduction in part or in whole without express permission. If you would like your product reviewed fairly and fairly quickly, please
contact
the editor or see other details in the
Note to
Contributors.