Revell 1/48 F-105D Thunderchief
| KIT #: | 5840 |
| PRICE: | ~30 euros |
| DECALS: | Two options |
| REVIEWER: | Spiros Pendedekas |
| NOTES: | Monogram release |
| HISTORY |
The F-105, despite initial challenges, emerged as a key attack aircraft
in the early stages of the Vietnam War. Outperforming the F-100 in bomb
capacity, range and speed, the F-105's significance was evident from the onset.
Its pivotal role was highlighted in missions such as the attack on an
anti-aircraft site in 1964. As the conflict escalated, more F-105 squadrons were
deployed to air bases in Thailand for Operation Rolling Thunder in 1965,
showcasing the aircraft's crucial involvement in intense bombing operations.
On April 3, 1965, 79 aircraft were sent to attack the Thanh Hoa Bridge, with 45
F-105 Thunderchiefs involved. The following day, MiG-17s engaged the
Thunderchiefs, shooting down two and damaging another. The resistance of the
Thanh Hoa Bridge led to multiple missions attempting to damage it. President
Johnson ordered attacks on SA-2 positions outside the exclusion zone, leading to
Operation Spring High where 48 F-105s participated but faced heavy anti-aircraft
fire. The VPAF's MiG-21 pilots claimed to have downed 14 F-105s without losses
in December 1966.
 The F-105s used in combat missions were heavily loaded with fuel tanks and
bombs, often requiring in-flight refueling, and had to navigate dangerous
terrain like Thud Ridge to avoid air defenses near Hanoi. Flying close to the
city required precision or, as noted by Colonel Jack Broughton, an F-105 pilot
in Vietnam, flying close to Hanoi gave "simply no room for error".
The F-105s used in combat missions were heavily loaded with fuel tanks and
bombs, often requiring in-flight refueling, and had to navigate dangerous
terrain like Thud Ridge to avoid air defenses near Hanoi. Flying close to the
city required precision or, as noted by Colonel Jack Broughton, an F-105 pilot
in Vietnam, flying close to Hanoi gave "simply no room for error".
On 11 August 1967, F-105Ds from the 335th Tactical Fighter Squadron, supported
by F-105 Wild Weasels from the 338th Tactical Fighter Squadron, conducted
successful attacks on the Paul Doumer bridge over the Red River. They flew
low-altitude missions and performed dive bombings, facing heavy fire from North
Vietnamese anti-aircraft guns. They were typically escorted by F-4s to protect
them from enemy fighters. The F-105s were credited with 27.5 air-to-air
victories against VPAF aircraft, with 17 aircraft lost to enemy fighters. Most
victories were against MiG-17s using cannon fire and AIM-9 Sidewinder missiles.
With production ceasing, by the late 60s the type was systematically replaced by
F-4 Phantoms in the Vietnam War. The 355th Tactical Fighter Wing, the last
F-105D unit in Southeast Asia, began returning to the U.S in October 1970, while
F-105G Wild Weasel versions continued until the war's end, gradually replaced by
F-4G Wild Weasels. The F-105 Thunderchief proved to be an excellent tactical
fighter-bomber that, despite high combat losses due to its deployment in the
most dangerous, heavily defended airspace of the Vietnam War, successfully
delivered massive, high-speed conventional strikes.
| THE KIT |
 Monogram came in 1982 with their new
tool 1/48 F-105G, followed by the “F” and “D” versions in 1983 and 1985
respectively. All versions have been periodically being reboxed by Revell-Monogram
and also three times by Haegawa. A decent kit by all means, despite being
superseded by newer toolings.
Monogram came in 1982 with their new
tool 1/48 F-105G, followed by the “F” and “D” versions in 1983 and 1985
respectively. All versions have been periodically being reboxed by Revell-Monogram
and also three times by Haegawa. A decent kit by all means, despite being
superseded by newer toolings.
The specific copy is the 1999 Revell edition, bought around 2005 from one of my
then beloved/now sadly closed Athens hobby shops and for a more in depth look at
its contents, you may read its preview in
the ever growing MM archives.
I am honored to be internet friends with Dr Frank Spahr, a wonderful person, an
excellent modeler and a key contributor to MM. Since we had the same kit, we
decided a few months ago to build it simultaneously and post our articles to MM,
so the readers could see the different approaches in the same subject. He would
take the hard road of backdating the kit to an early f-105 variant, while I
would take my usual lazy road of building the kit out of the box.
| CONSTRUCTION |
I started with the cockpit, which, although
comprising a mere four pieces, including the seat, is quite acceptable,
especially under my “de rigeur” closed canopy attitude. Basic cockpit color was
Tamiya XF-66 Light Gray, the instrument panel, side consoles, stick grip and
front inner anti-glare area were painted black, while all raised detail
instruments and dials were dry brushed with silver and had some random
“switches” represented by “pinning” red and yellow paint. The prominent radar
screen and head up display projector both received a blob of green clear paint.
The seat had its framing painted the same cockpit gray, the head cushion red,
the rear and lower cushions olive drab, the seat belts light green with silver
and brass buckles and the ejection handles yellow with black lines.
 The cockpit, together with the nose wheel well, the gun muzzle (painted
gunmetal), the distinctive wing spar and the 2-piece afterburner can (painted
Testors Burned Metal) were next trapped between the fuselage halves. No weight
was mentioned (and, perhaps, none needed), but I secured around 20 grams of
fishing weights in the front, just to be on the safe side. The intake fences
were next attached to the fuselage, followed by the 2-piece wings, the nose cone
in the front and the rear fuselage scoops. The intake innards were painted
silver.
The cockpit, together with the nose wheel well, the gun muzzle (painted
gunmetal), the distinctive wing spar and the 2-piece afterburner can (painted
Testors Burned Metal) were next trapped between the fuselage halves. No weight
was mentioned (and, perhaps, none needed), but I secured around 20 grams of
fishing weights in the front, just to be on the safe side. The intake fences
were next attached to the fuselage, followed by the 2-piece wings, the nose cone
in the front and the rear fuselage scoops. The intake innards were painted
silver.
The outer wing pylons were attached, followed by the distinctive centerline
multi ejection rack (MER). The wing tanks were assembled at this time, as well.
Apart from the wing tanks, I decided not to add any other underwing ordnance, as
I have convinced myself that the cleaner looks are nice, so I could skip the
tedious job of preparing bombs and the like…
This concluded basic assembly, which was less complicated than initially feared.
Fit, while not Tamiya, was generally good, needing average filling and sanding
at all expected areas, such as the nose cone to fuselage joint and the wing
roots, with some extra attention paid at the afterburner can to the rear
fuselage joint. For the wing roots I took Frank’s advice of smearing some white
glue to the joint and smoothing it with a damp cotton bud. After a final fine
sanding, I took the Thud to the paint shop!
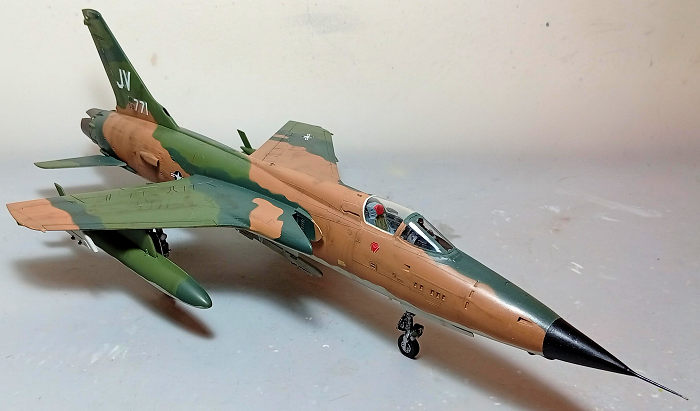
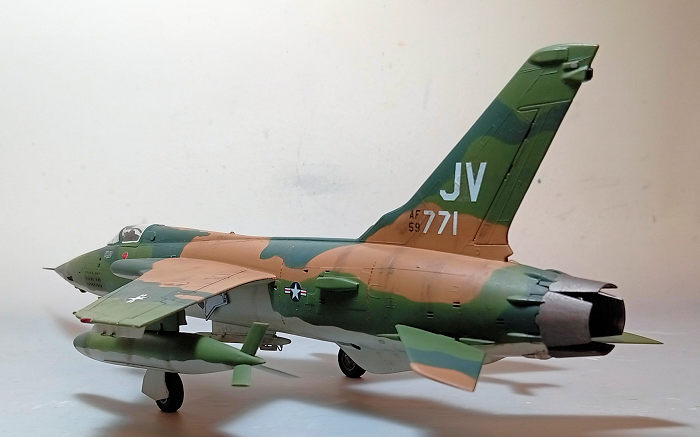
| COLORS & MARKINGS |
 I first painted all undersides, including doors, Hu28
Camouflage Gray, with the remaining sprayed on the topsides, to act as a primer
and, indeed, a number of areas that needed treatment were revealed on all sides.
The nose was then painted black and masked, followed by the second underside
coating, which was also masked. For the SEA (South East Asia) topside camo, I
used Hu91, Hu117 and Hu118 for the dark green, light green and tan respectively,
utilizing strings of Tak to achieve tight yet not dead hard demarcation lines.
To add some flavor (and as verified in a few cases via seasonal pics), I
painted the wing tanks’ topsides, together with their pylons, light green with
dark green at the front. A coat of Future prepared the bird for decaling.
I first painted all undersides, including doors, Hu28
Camouflage Gray, with the remaining sprayed on the topsides, to act as a primer
and, indeed, a number of areas that needed treatment were revealed on all sides.
The nose was then painted black and masked, followed by the second underside
coating, which was also masked. For the SEA (South East Asia) topside camo, I
used Hu91, Hu117 and Hu118 for the dark green, light green and tan respectively,
utilizing strings of Tak to achieve tight yet not dead hard demarcation lines.
To add some flavor (and as verified in a few cases via seasonal pics), I
painted the wing tanks’ topsides, together with their pylons, light green with
dark green at the front. A coat of Future prepared the bird for decaling.
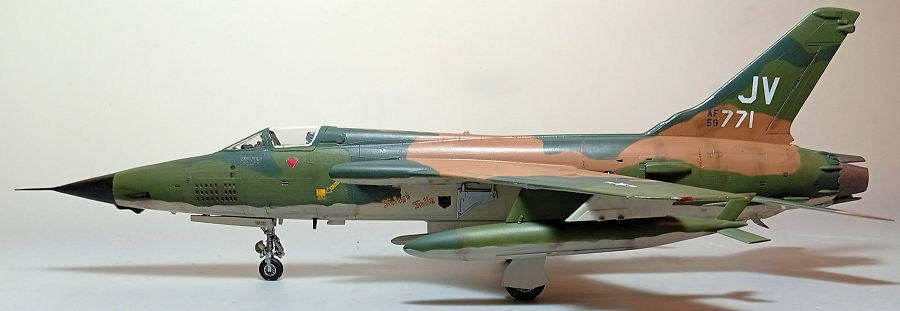
I used the kit decals to represent the famous 469 TFS, 388 TFW, #59-1771/JV
“Foley's Folly/Ohio Express” assigned to Capt. Peter K. Foley, as it stood in
1968 in Korat RTAFB. The almost 30 years old decals, apart from a slight
yellowness (hardly visible through the SEA shades), behaved very well, easily
detaching from their backing sheet and nicely adhering to the model’s surfaces.
Due to my usual clumsiness, I managed to mess up with the underside Star and Bar
roundel, for which I used a leftover, and the starboard "turbine keep clear”
stencil, where I messed up the top part, now writing only “keep clear”...oh,
well, keeping clear anyway…A coat of Future sealed the decals.
| FINAL CONSTRUCTION |
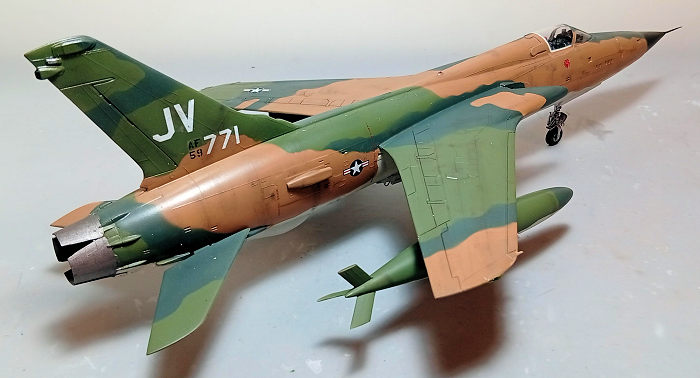
The landing gear was assembled and attached in
position. All landing gear bits, including wheel rims and door innards, were
painted silver, bay walls were painted a home brewed green zinc chromate, while
tires and the very nicely molded brake and electrical lines were painted black.
The distinctive nose leg located radar deflector was painted dark green. All
three wheels were tad filed to look weighted. I chose to paint the door innards
silver, as this was my interpretation by looking at seasonal pics. I might very
well be wrong and will leave the rest to the Thud Experten.
The distinctive four exhaust nozzle flaps/petals which double as airbrakes were
painted Mr Hobby Burned Iron and attached in position. The lower one was
provided as fully rested in down position, which would happen after some time
due to lack of hydraulic pressure after engine shutdown. However, after seeing a
number of pics where this lower petal would not droop and, since I preferred the
non-drooped stance more, I decided to perform a little surgery and modify its
attachment, so it could be attached in a “relaxed-up” position.
 The horizontal stabilizers were next attached. Pics show them drooped at around
a five degree positive angle after engine shutdown, so they were placed
likewise. The drop tanks were attached at this time, as well.
The horizontal stabilizers were next attached. Pics show them drooped at around
a five degree positive angle after engine shutdown, so they were placed
likewise. The drop tanks were attached at this time, as well.
The nose pitot was attached in the front. It was painted black with Testors
Burned Metal tip. The small port located angle of attack sensor was replicated
with a small piece of stretched sprue, painted gunmetal. The underside aft
located fuel dump, ventral exhaust and “Y” vent were also attached and painted
underside gray, with their outlets painted black to simulate hollowness. The kit
provided front underside antennas were finally attached.
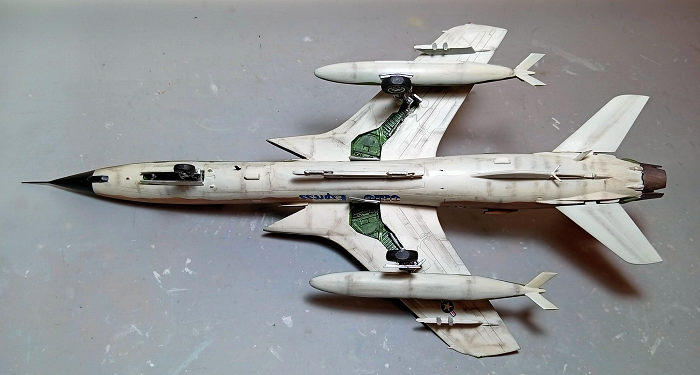
Time for some weathering, consisting of a black wash to the landing gear parts
and surroundings and brown/black pastels selectively applied to simulate dirt,
grime and the like. A final satin coat gave the bird its final hue.
The transparencies had their well defined frames hand painted. Though I found
the molded-on lines for the distinctive sealant between the transparency framing
and the actual transparent part very handy, I only replicated the most prominent
sealant on the main canopy, carefully applying off-white leftover paint with a
toothpick. The transparencies were then attached in position, with white glue
used to blend them to the fuselage. The fin located light was replicated by
painting the corresponding protruding fin area silver. The nearby ECM antenna
radome was painted black. Blobs of red and green clear paints replicated the
various lights, before calling the Thud done!
| CONCLUSIONS |
This project took a couple of months longer than
initially envisaged, as life got into the way of the hobby. Frank finished his
model well before I did; to his well known credit, he patiently waited for mine,
in order both our articles can be published at the same period, so that readers
can see the different approaches to the same kit.
 Despite the fact that Hobby Boss came in 2008 with a more advanced (and more
complex) 1/48 F-105, the venerable Revell/Monogram is still a good kit that
offers a decent representation of the iconic F-105. Shape looks accurate,
molding is acceptable, panel lines are raised (not a problem for a number of
us), cockpit detail is sufficient, landing gear is very well done, fit is
generally good, instructions are the well known good Monogram (though I would
like more info on the landing gear area color shades), transparencies are nice
and clear and the decals are great.
Despite the fact that Hobby Boss came in 2008 with a more advanced (and more
complex) 1/48 F-105, the venerable Revell/Monogram is still a good kit that
offers a decent representation of the iconic F-105. Shape looks accurate,
molding is acceptable, panel lines are raised (not a problem for a number of
us), cockpit detail is sufficient, landing gear is very well done, fit is
generally good, instructions are the well known good Monogram (though I would
like more info on the landing gear area color shades), transparencies are nice
and clear and the decals are great.
Out of the box, a very nice f-105 can be built, with the construction due to the
low parts count being uncomplex, deeming the kit suitable for the majority of
modelers but the beginners. Should you wish to go aftermarket, in order to
improve or upgrade your kit, you will not be disappointed, as there’s quite some
stuff available, with the decision of investing on aftermarket or going for the
more detailed Hobby Boss offering left to you.
Revell has not reissued the kit since 2013 and, as of 2026, the prices the kit
can nowadays be found second hand are not particularly low. A reissue in the
near future cannot be excluded. In any case, the Revell Monogram Thud is
definitely a kit worth tackling, especially if found at a good price.
My sincere thanks to my good friend Frank Spahr for his support throughout the
build.
Happy Modeling!
Spiros Pendedekas
13 February 2026
Copyright ModelingMadness.com. All rights reserved. No reproduction in part or in whole without express permission.
If you would like your product reviewed fairly and fairly quickly, please contact the editor or see other details in the Note to Contributors.