Academy 1/72 F-104G Starfighter
|
KIT #: |
12443 |
|
PRICE: |
€8.00 |
|
DECALS: |
One option |
|
REVIEWER: |
Spiros Pendedekas |
|
NOTES: |
Built “wheels up” with some cockpit scratch building |
Created as a day fighter, the Lockheed F-104 Starfighter is a single-engine,
supersonic interceptor aircraft that was extensively deployed as a
fighter-bomber during the Cold War. Starting its life as one of the Century
Series of fighter aircraft for the USAF, it was developed into an
all-weather multirole aircraft in the early 1960s and produced by several
other nations, seeing widespread service outside the United States.
 Germany received 916 “G” (for Germany) all-weather ground attack
Starfighters in total. They were 2,000 pounds heavier than the original
F-104, keeping the same engine. Most German missions required 4 wing tanks
attached, meaning more weight. Assigned to perform fast and low attack
missions (meaning sensitive to control input) in the usually overcast North
European weather, and also it being a “hot” jet (meaning approaching the
airfield and landing at high speeds) can easily explain the big initial
number of accidents of the German F-104s. After a number of fixes (training
techniques and procedures being among the most effective ones), things
improved, but not minimalized. In total, 292 German Starfighters were lost
and 115 pilots perished, a high attrition rate for this technically
advanced, gorgeous looking plane, beloved by the pilots who flew it.
Germany received 916 “G” (for Germany) all-weather ground attack
Starfighters in total. They were 2,000 pounds heavier than the original
F-104, keeping the same engine. Most German missions required 4 wing tanks
attached, meaning more weight. Assigned to perform fast and low attack
missions (meaning sensitive to control input) in the usually overcast North
European weather, and also it being a “hot” jet (meaning approaching the
airfield and landing at high speeds) can easily explain the big initial
number of accidents of the German F-104s. After a number of fixes (training
techniques and procedures being among the most effective ones), things
improved, but not minimalized. In total, 292 German Starfighters were lost
and 115 pilots perished, a high attrition rate for this technically
advanced, gorgeous looking plane, beloved by the pilots who flew it.
Despite the accident rate, the F-104G proved a highly efficient and reliable
platform in the hands of the Marineflieger pilots, serving the Bundesmarine
for 23 years during the challenging Cold War days.
First appeared in 1985, reboxed a few times since then, the kit looks like
one of Academy’s early attempts, also being more than evident that it is an
improved “copy” of the ancient Hasegawa 1963(!) mold. The “improvements”
mainly consist of replacing the raised panel lines with recessed ones and
provide a proper nozzle (though shallow and devoid of any internal detail).
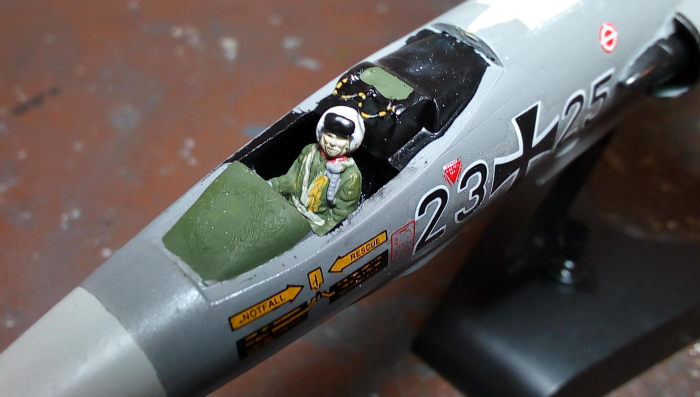
There’s no cockpit whatsoever, just a shallow tub and a mummy pilot to place
into. The airbrakes can be posed open, but there’s nothing inside, so better
close them. Since the wheel wells are nonexistent, a wheels-up build might
be considered. Landing gear parts, the one piece wings and tail plane and
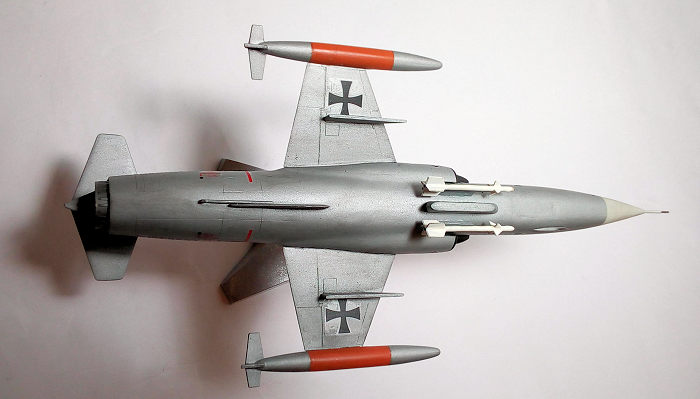
the two-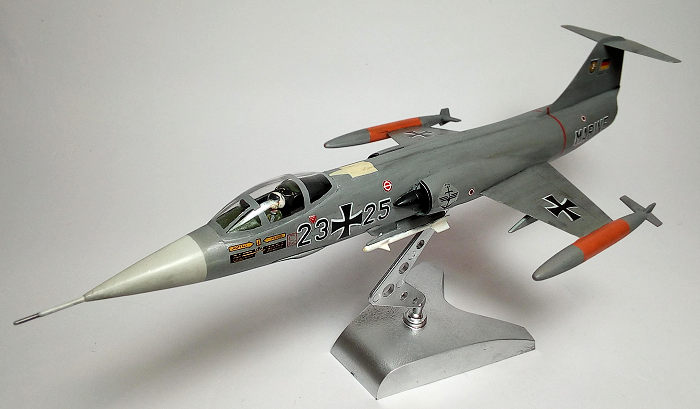 piece intake trunking are simple, but passable. Four external tanks,
two belly mounted sidewinders and an anemic underbelly recce pod are
provided. General molding is very good, with very little flash. The one
piece canopy is crystal clear, but it is nice looking framing is molded from
the inside (we’ll see how this will turn out). Also, its shape does not look
completely right.
piece intake trunking are simple, but passable. Four external tanks,
two belly mounted sidewinders and an anemic underbelly recce pod are
provided. General molding is very good, with very little flash. The one
piece canopy is crystal clear, but it is nice looking framing is molded from
the inside (we’ll see how this will turn out). Also, its shape does not look
completely right.
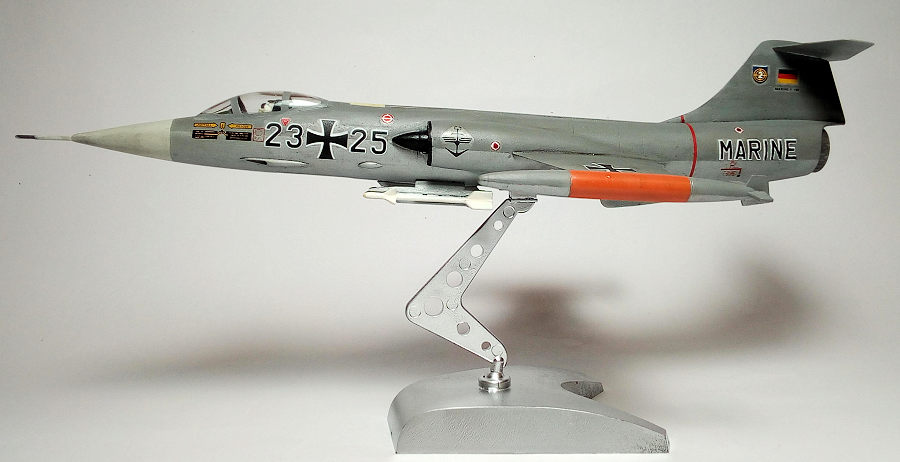
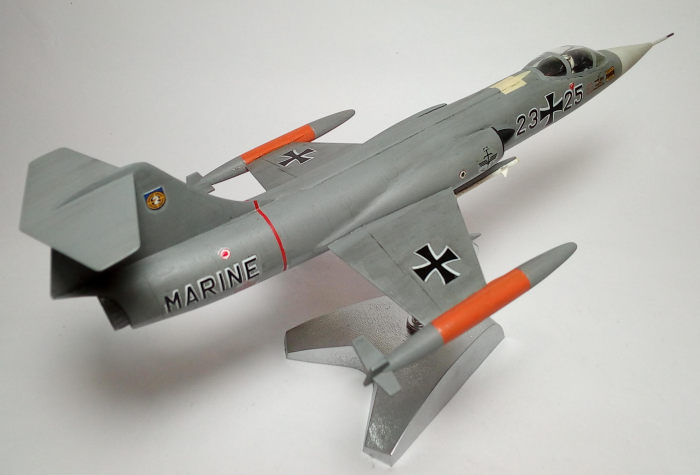
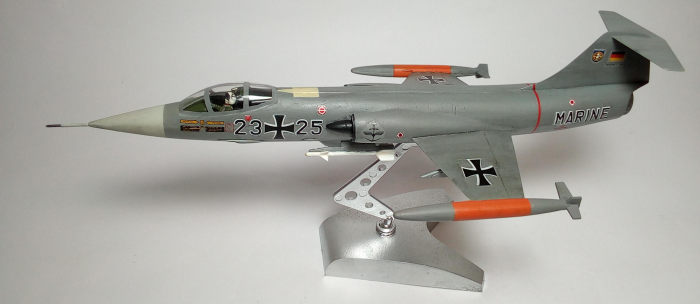
Instructions are a two sided printed page, basic, but adequate. Only one
decal option is provided, the 23+25 Marineflieger in splinter gray/green
over “white aluminum”. The decals are the “modern” Academy ones and seem of
good quality, but the colors do not look very opaque and, worse, their
registration looks to be off, especially the black/white borders of the
Luftwaffe crosses. Interestingly, the 20+91 boxart scheme is not provided. I
also wouldn’t mind if an instrument panel decal was provided, in order to
cover that totally bland kit area…
I wanted to build a wheels up model for my Godson’s name day. So, not
worrying for the wheel bays and airbrake housings emptiness, I figured this
simple and readily available kit would be a good choice; even more so, as
the provided decals accounted for the scheme he preferred! My idea was to
use a more detailed pilot figure (from my spares) and perform some upper
cockpit extra detailing, in order to busy up the empty cockpit.
 Since I wanted to do a wheels up version, I first glued the LG doors and air
brakes at “closed position, securing them with styrene rods and liquefied
styrene from the insides. Then I joined the two fuselage parts, with the
joke cockpit tub trapped between them. I attached the two piece intakes, the
wings (at the characteristic 10 degree anhedral), the tail plane and the
supporting rod between the MLG gear doors. Fit was good, with the exception
of doors and airbrakes, where various gaps and mismatches arose. The wing
tanks were assembled too.
Since I wanted to do a wheels up version, I first glued the LG doors and air
brakes at “closed position, securing them with styrene rods and liquefied
styrene from the insides. Then I joined the two fuselage parts, with the
joke cockpit tub trapped between them. I attached the two piece intakes, the
wings (at the characteristic 10 degree anhedral), the tail plane and the
supporting rod between the MLG gear doors. Fit was good, with the exception
of doors and airbrakes, where various gaps and mismatches arose. The wing
tanks were assembled too.
An application of liquefied styrene took care of all gaps, then a coarse
sanding, followed by putty application and final sanding, the end result
looking nice and smooth, though some detail was lost in the process. I
attached the wing pylons, the belly Sidewinder pylons and the camera pod.
The gun opening was also drilled out with my micro drills, for added
realism. The Marineflieger was then ready for the paint shop!
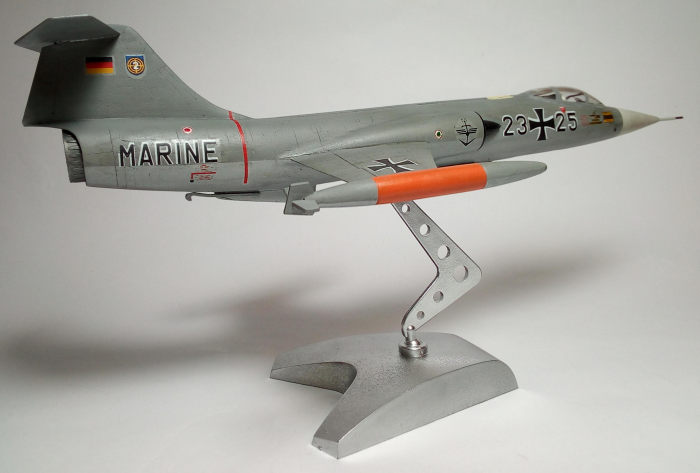
Bundesmarine F-104s sported the Norm62 camo at early 70s,
i.e. a splinter gray/green over RAL9006 (white aluminum), “off-white” radome
with its top part black antiglare. The Norm76 scheme succeeded it, with a
single gray top, over the same aluminum; the black anti glare radome area
was deleted, with everything else seemingly remaining the same. The tip
tanks sported a broad daglo orange middle section at both Norms. Though the
splinter top and black radome anti glare looked impressive, they also might
have been a tad much for this small 1/72 F-104. Adopting the “less is more”
approach, I decided to go for the later scheme.
 So, I started by painting the radome Hu196 for the “off white” and the tip
tanks’ middle section Hu18 Orange, followed by masking. For the “white
aluminum” I mixed Hu56 Aluminum and Hu11 Silver at equal ratios and sprayed
all undersides and intakes with my Revell Vario airbrush, the result looking
nice. After applying a protective coat of Future, I masked the area and
applied a top coat of a forgotten Molak 1126-s (Medium Gray) for the topside
gray, including the cockpit area. After removing the masking and correcting
minor oversprays, I applied an overall coat of Future, to prepare the model
for decaling. I also carefully hand painted the dashboard, the aft cockpit
anti glare area, the intake lips and shock cones black. The top dashboard
area was unevenly painted a thick olive drab, in order to represent the
characteristic blanket of the real thing. The top, aft of the canopy,
integrated IFF/UHF/TACAN aerial area, was hand painted “cream”.
So, I started by painting the radome Hu196 for the “off white” and the tip
tanks’ middle section Hu18 Orange, followed by masking. For the “white
aluminum” I mixed Hu56 Aluminum and Hu11 Silver at equal ratios and sprayed
all undersides and intakes with my Revell Vario airbrush, the result looking
nice. After applying a protective coat of Future, I masked the area and
applied a top coat of a forgotten Molak 1126-s (Medium Gray) for the topside
gray, including the cockpit area. After removing the masking and correcting
minor oversprays, I applied an overall coat of Future, to prepare the model
for decaling. I also carefully hand painted the dashboard, the aft cockpit
anti glare area, the intake lips and shock cones black. The top dashboard
area was unevenly painted a thick olive drab, in order to represent the
characteristic blanket of the real thing. The top, aft of the canopy,
integrated IFF/UHF/TACAN aerial area, was hand painted “cream”.
The kit decals adhered well and were thin enough to conform nicely. No
apparent silvering was noticed. The 23+25 codes were oversized, but I
managed to cram them together with the rest front fuselage decals without
overlapping. A coat of Future sealed all decals.
An appropriate pilot figure from spares was used. His uniform was painted
dark green, with white helmet, gray oxygen masks and gloves, black shades,
cream face, red scarf, linen seatbelts and yellow survival pack harnesses.
There’s no seat to speak of, only a crude tub upper ending, resembling a
head cushion. I added two ejection handles of stretched sprue, painted
yellow and black, attached the pilot to the cockpit and added a gunsight
glass, made of clear acetate.
 The fuselage mounted navigation lights were all provided as red decals. In
order to breathe some life, I touched them with the tip of my Pilot Silver
pen, then applied a droplet of clear red or green (as applicable) onto the
silver, the result looking more realistic.
The fuselage mounted navigation lights were all provided as red decals. In
order to breathe some life, I touched them with the tip of my Pilot Silver
pen, then applied a droplet of clear red or green (as applicable) onto the
silver, the result looking more realistic.
I attached the two tip tanks and the tail hook (painted with the underside
color). The front pitot was painted white, with Testors Burned Metal tip.
The exhaust was painted (and polished) Testors burned metal; its inner bland
rear end was painted black with some “copper” added, in order to simulate a
lit afterburner, and was attached. The two Sidewinders were painted white
with cream front seekers and had their nozzles drilled and painted black.
All above items were attached to their corresponding positions. I did not
attach the wing tanks, as they would compromise the so beautiful F-104
looks.
Marineflieger Starfighters were usually kept in good
condition so a light weathering was applied (mainly “dirtying”), followed by
the final “satin” coat (Humbrol clear gloss/matt at 70/30).
The canopy was carefully painted from the inside and, after slight trimming,
was attached in position. Fit was adequate, with the surrounding gap taken
care of white glue that, upon drying, “inherited” the surrounding color (Tom
Cleaver’s trick).
I used a leftover Academy Thunderjet base, painted Plastikote silver (from a
can), to place the model. In order to perform routine flights, my Godson did
not want the Starfighter permanently attached, so I used a dab of Tac
Patafix to attach it onto the base.
I then called the Marineflieger Starfighter done!
If you want the best 1/72 Starfighter, go for the modern Hasegawa kit, which
has been reboxed quite a few times with many interesting schemes. The Revell
offering is almost as good, with the Italeri/Esci one following.
 The Academy offering, which is an upgraded copy of the ancient first
generation Hasegawa kit, is by all means a very basic kit: good overall
shape, but nonexistent cockpit, wheel wells and airbrake housings. I had
some fit problems, mainly because I wanted to do a wheels-up version.
Otherwise, fit should be good.
The Academy offering, which is an upgraded copy of the ancient first
generation Hasegawa kit, is by all means a very basic kit: good overall
shape, but nonexistent cockpit, wheel wells and airbrake housings. I had
some fit problems, mainly because I wanted to do a wheels-up version.
Otherwise, fit should be good.
The decal sheet is of good material quality, but suffers from register and
size problems. Moreover, only one option is provided. Though the final
decaling looks acceptable, a well registered multi scheme decal sheet is
within Academy’s capabilities, without the need for price increase and would
make this kit more attractive. The practice of providing modern,
comprehensive decal sheets on ultrasimple old molds is not uncommon among
kit manufacturers, with those kinds of kits finding a place in the modern
kit market, as cheap, simple and nostalgic alternatives to the super
detailed modern molds.
Nevertheless, offered at a very cheap price, this kit might be a good choice
for a beginner, who will put it together quite easily and be able to
practice his skills. It is also a logical choice for a desktop “wheels-up”
model, provided that you’ll find a base for it. There exists quite a lot of
aftermarket stuff for 1/72 Starfighters, but, honestly, since this kit is
ultra-cheap and ultra-basic, I would not consider buying aftermarket for it,
except, possibly, a better decal sheet.
My end result was an acceptably looking wheels-up Marineflieger F-104. I
definitely had a great time putting it together. My Godson’s permanent smile
upon receiving it as his present, together with the successful “test
flights” that followed, was a nice validation.
Happy modeling!
Wikipedia
Scalemates
916-starfighter.de
Marine-flieger.de
Spiros Pendedekas
30 August 2021
Copyright ModelingMadness.com. All rights reserved. No
reproduction in part or in whole without express permission.
If you would like your product reviewed fairly and fairly quickly, please
contact
the editor or see other details in the
Note to
Contributors.
Back to the Main Page
Back to the Review
Index Page
Back to the Previews Index Page