PM 1/72 F-5A Freedom Fighter
| KIT #: | PM 221 |
| PRICE: | $AUD 10.00 |
| DECALS: | One option |
| REVIEWER: | George Oh |
| NOTES: | 15 years in the making |
| HISTORY |
 The
Northrop F-5 Freedom Fighter / Tiger is a family of supersonic lightweight
fighters that focus on performance at a low maintenance cost. The design
team took two compact, high-thrust General Electric J85 jet engines, and
built a small, highly-aerodynamic airframe around them. A terrific history
of the F-5 can be found here,
Airfix 1/72 F-5A (N156F), by Carmel J. Attard
(Many thanks, Carmel).
The
Northrop F-5 Freedom Fighter / Tiger is a family of supersonic lightweight
fighters that focus on performance at a low maintenance cost. The design
team took two compact, high-thrust General Electric J85 jet engines, and
built a small, highly-aerodynamic airframe around them. A terrific history
of the F-5 can be found here,
Airfix 1/72 F-5A (N156F), by Carmel J. Attard
(Many thanks, Carmel).
The US exported F-5s to countries in Europe, Asia, Africa, Latin America and South America, thus providing friendly Nations with supersonic-capable aircraft, without parting with their latest (and better) technology. As well, some F-5s found their way into the hands of other nations. In US service, the F-5 served as an advanced trainer and for aggressor training. F-5s saw combat over Vietnam and in the service of other receiver Nations. A few are still in active service.
| THE KIT |
 PM has
released the F-5 in single and twin-seater versions. This single-seater with new
decals was released (according to Scalemates) after 2002. The end-opening box
contains 3 sprues – a small one with one clear canopy, and two that frame 28
white plastic parts. Cockpit detail is limited to a blobby seat. Wheel wells are
simple undetailed recesses. Hanging-in-the-breeze bits are limited to two tip
tanks and an optional belly tank (for-which the belly-slot must be cleared).
PM has
released the F-5 in single and twin-seater versions. This single-seater with new
decals was released (according to Scalemates) after 2002. The end-opening box
contains 3 sprues – a small one with one clear canopy, and two that frame 28
white plastic parts. Cockpit detail is limited to a blobby seat. Wheel wells are
simple undetailed recesses. Hanging-in-the-breeze bits are limited to two tip
tanks and an optional belly tank (for-which the belly-slot must be cleared).
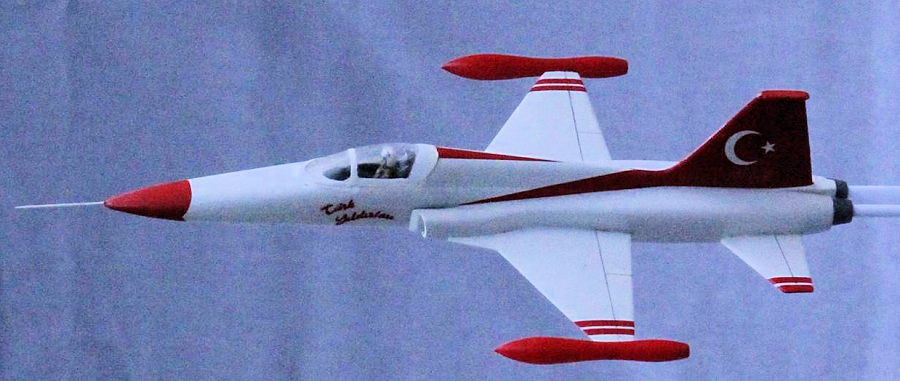
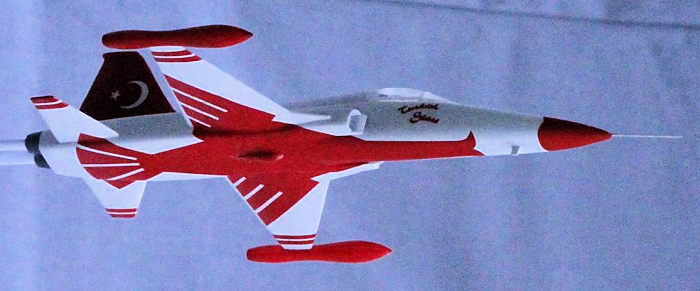
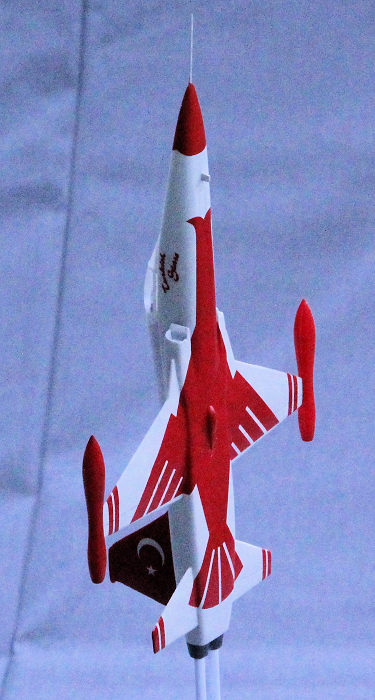
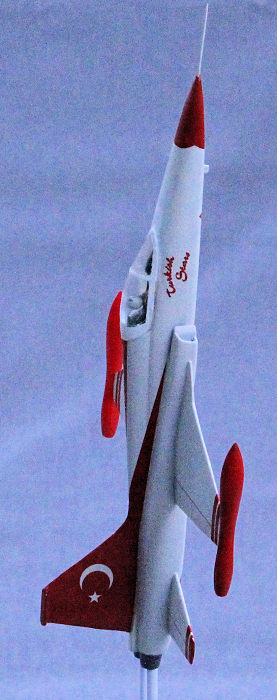
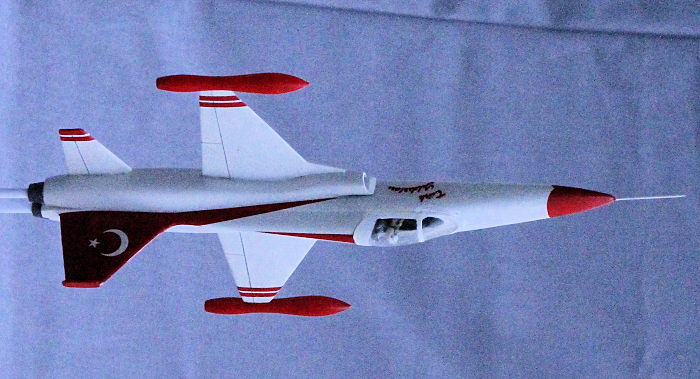
Instructions are on a single A4-sheet, that shows 5 simple assembly steps. Decals are limited to markings for a "Türk Yildizlari" aerobatic team aircraft (= the Turkish Stars. Never heard of them? They’re World-Famous in Turkey). But what a sheet!! In fact, I bought this kit because the boxart attracted me by displaying the large belly marking. I started building it because, with the low parts count and the single paint colour, this looked like a quick, easy build.
Right from the start, I intended to ensure that the large attractive belly marking would be visible, so this build would be an in-flight display. Naturally the plane would need a pilot (from the spares box) for realism and to obscure the rather ordinary seat. And so as not to mar the underside marking, I’d leave-off the drop tank. A weak-point of many modern aircraft models, is the nose-mounted pitot tube. So, I’d be using my favourite fix on that.
| CONSTRUCTION |
 Construction
started when I epoxied a small nut inside the radome housing to give me a
centre-line inside it. Through the centre of the nut, I threaded a dressmaker’s
pin (a long one with a ball on the blunt end) so that it stuck-out through the
radome to the correct distance. It was epoxied to the nut and then further
reinforced by a bed of Milliput both along the shaft and behind the nut. It is
so secure that I can hold the model horizontally by holding only the pin. The
cockpit area was painted and the painted seat and jet-pilot were added before
the fuselage was closed.
Construction
started when I epoxied a small nut inside the radome housing to give me a
centre-line inside it. Through the centre of the nut, I threaded a dressmaker’s
pin (a long one with a ball on the blunt end) so that it stuck-out through the
radome to the correct distance. It was epoxied to the nut and then further
reinforced by a bed of Milliput both along the shaft and behind the nut. It is
so secure that I can hold the model horizontally by holding only the pin. The
cockpit area was painted and the painted seat and jet-pilot were added before
the fuselage was closed.
The insides of the side intakes were painted, and then the intakes were assembled and fitted into place. Next came the one-piece wings, the two tail planes, and the one-piece two engine nozzles. Filler had to be trowelled around the intakes, the wings, and a bit around the tail elements, followed by wet-sanding to smooth things out. All undercarriage doors were glued into the closed position, and the fit was pretty good (= no filler). I left-off the two nose gun barrels to simplify the later application of decals. Subsequent research shows that I should have retained them. Rats!!! Fit of the canopy was less than sterling, as was my attempt to fill around it. Double rats!!!.
| COLORS & MARKINGS |
This was an easy paint job – an all-over gloss white. OK – there ARE several layers, because I sprayed-on a couple of coats of flat white (and lightly wet-sanded each) before the final coat of Tamiya gloss white. The tip tanks were sprayed with Mr Colour Shiny Red (but not attached, yet).
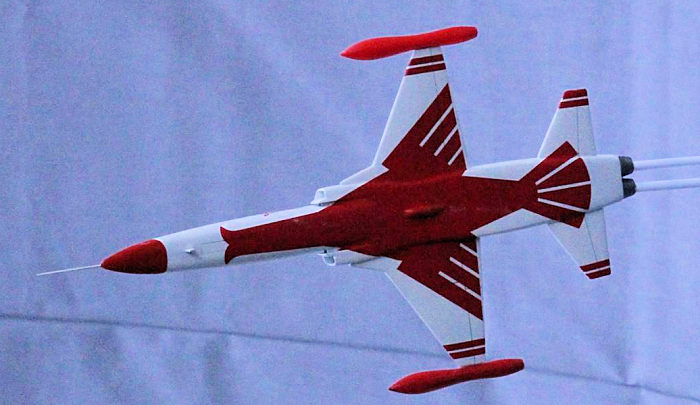 I started
with the make-or-break decal – the large belly one. I learnt that it was quite
robust as I held the rear end and slid the backing paper forwards. A little
coaxing into position was followed by a pressing down with a wet sponge.
Microsol settled it down into the trenches around the main undercarriage doors.
The decals on the sides of the fin and rudder were next. Nose, wingtip and
tailplane decals followed. Fit was almost perfect everywhere - almost, so I
covered-up any peep-through white with CM Blood red (from my dwindling supply).
I started
with the make-or-break decal – the large belly one. I learnt that it was quite
robust as I held the rear end and slid the backing paper forwards. A little
coaxing into position was followed by a pressing down with a wet sponge.
Microsol settled it down into the trenches around the main undercarriage doors.
The decals on the sides of the fin and rudder were next. Nose, wingtip and
tailplane decals followed. Fit was almost perfect everywhere - almost, so I
covered-up any peep-through white with CM Blood red (from my dwindling supply).
The two tail pipes were brush-painted with CM Boltgun metal (ditto). They were drilled-out to accept support rods (for that in-flight display look).
| FINAL CONSTRUCTION |
 Finally,
the two tip tanks were attached to the model. Unfortunately, I had to pack
it away to move house (Army posted me). (Tissue time -) In the pack-up, I
discovered that a tip tank had been knocked-off. Fortunately, I found it
later, all on its lonesome, so I stowed it away where I could find it later.
But when we landed, I couldn't find it (in 3 years). Then we had another
posting & house move, and I couldn't find it. This model languished on my
(rather extensive) SoD for 10 years (and yet another house move), because I
still can't find that errant tip tank. Tripple rats!!!
Finally,
the two tip tanks were attached to the model. Unfortunately, I had to pack
it away to move house (Army posted me). (Tissue time -) In the pack-up, I
discovered that a tip tank had been knocked-off. Fortunately, I found it
later, all on its lonesome, so I stowed it away where I could find it later.
But when we landed, I couldn't find it (in 3 years). Then we had another
posting & house move, and I couldn't find it. This model languished on my
(rather extensive) SoD for 10 years (and yet another house move), because I
still can't find that errant tip tank. Tripple rats!!!
But, last month, I saw another kit at a Swap n’ Sell, for $3, so I grabbed it. Back at home, I resurrected this oldie, washed it down and resumed the build. I put-on the side "Türk Yildizlari/Turkish Stars" decals and the spine decal. What I didn’t have, was the red oval ring/stripe around the canopy, or the English translation decals. I’ll live with those omissions.
My intention was to mount it in-flight, on its side, to show-off the red belly decal. But two problems defeated me. The small-diameter acrylic rod I had was too big in diameter, and thinner stuff wasn’t strong enough to support the model. Instead, I mounted it on white plastic rods (internally-reinforced with wire), in a 'vertical climb' orientation, and call it done. Yes - some of the photos here ARE turned on their sides (for a better fit).
| CONCLUSIONS |
This build was hindered by the loss of an obvious part (NOT the kit's fault), the need for care when applying the large decals, and the need for touching-up around the decals. It was enhanced by the low parts count and the simple paint scheme. I would recommend it to builders of all ages and experience levels, and fans of colourful combat aircraft.
Internet shows several liveries for the Turkish Stars / the Türk Yildizlari, but this one will do me. And what will I do with a spare F-5 with no tip tanks? Maybe I’ll turn it into a Mig.28 from the movie ‘Top Gun” with wingtip Sidewinder air-to-air missiles, IF I can get suitable decals for it!! Can anyone beat a 15-year build?
18 September 2025 Copyright ModelingMadness.com. All rights reserved. No
reproduction in part or in whole without express permission of the editor.
If you would like your product reviewed fairly and fairly quickly, please contact the editor or see other details in the
Note to
Contributors. Back to the Main Page
Back to the Review
Index Page
Back to the Previews Index Page