AFV Club 1/48 MiG-28
| KIT #: | AR48S09 |
| PRICE: | $50.00 SRP |
| DECALS: | Four options |
| REVIEWER: | Dan Lee |
| NOTES: | Quickboost F-16 pitot tube, F-5E early ejection seat, resin wheels and Furball Vinyl canopy masks. |
| HISTORY |
 The
Mig-28 (NATO Codename Fatuous) was the unlucky loser of the famous June 1986
Dogfight aka the Top Gun Incident. Despite getting off the first shot and
having the numerical advantage, four of six Mig-28s piloted by elite pilots
from /redacted/ were shot down in a fierce dogfight with three F-14s from
VF-1 flying off the nuclear powered aircraft carrier USS Enterprise. Three
were credited to LT Pete “Maverick” Mitchell and his RIO “Merlin” and one
was shot down by Lt “Iceman” Kazinski and his RIO “Slider”. Despite the fact
that this incident nearly set off WW3, both /redacted/ and the Mig-28 came
off looking 2nd best to the US
Navy and the international humiliation led to it's quick
retirement/replacement by the Mig-29.
The
Mig-28 (NATO Codename Fatuous) was the unlucky loser of the famous June 1986
Dogfight aka the Top Gun Incident. Despite getting off the first shot and
having the numerical advantage, four of six Mig-28s piloted by elite pilots
from /redacted/ were shot down in a fierce dogfight with three F-14s from
VF-1 flying off the nuclear powered aircraft carrier USS Enterprise. Three
were credited to LT Pete “Maverick” Mitchell and his RIO “Merlin” and one
was shot down by Lt “Iceman” Kazinski and his RIO “Slider”. Despite the fact
that this incident nearly set off WW3, both /redacted/ and the Mig-28 came
off looking 2nd best to the US
Navy and the international humiliation led to it's quick
retirement/replacement by the Mig-29.
Of course, the Mig-28 was purely fictional and actually the F-5E Tiger which was used by US Naval Fighter Weapons School aka Top Gun. The reason why the F-5E was used by Top Gun (the school not the movie) was because it closely resembled the performance characteristics of the Mig-21 in thrust, power to weight ratio, maneuverability, weapons and radar (and for some reason Mig-29s were not available for filming...)
| THE KIT |
 AFV Models
decided to branch off into airplanes in the early 2010s and the F-5E family was
one of their first airplane and currently only aviation model kits. Unlike their
armor kits, this AFV plane kit comes with only a few sprues in a solid cardboard
box.
AFV Models
decided to branch off into airplanes in the early 2010s and the F-5E family was
one of their first airplane and currently only aviation model kits. Unlike their
armor kits, this AFV plane kit comes with only a few sprues in a solid cardboard
box.
There are 10 sprues (nine different ones with a duplicate for weapons) including the parts for the later F-5E Sharknose Aggressor version including updated canopy + a small sprue of PE parts as well as some polycaps for weapons/fuel tanks if you want to do another version of the F-5E aggressor that is so equipped. The parts are mostly flash free, but there is some clean up required (at least on my copy of the kit.) The decals are mostly for the real life F-5E aggressor planes as the Mig-28 of the Top Gun movie fame only requires a mere four decals.
The instruction booklet is decent and provides locations of which part goes where as well as which parts belong to which version of the F-5E you want to build while the paint call outs are for several different brands of paint including Gunze/Mr Color.
| CONSTRUCTION |
This was one of the easiest aircraft kits I have ever built. I was kind of gearing up for a mental battle with this like every other F-5 aircraft I've built, but I was wrong.
I started off with the mid section and wings. It was pretty easy to put together. I was quite impressed with the kit and figured it was going to be a breeze (reality sez, hold my beer.)
I painted instrument panel
and interior of the cockpit first with grey Stynylrez primer and then Vallejo
Air USAF light grey. The various details were painted out with a brush as I
decided to use my mediocre b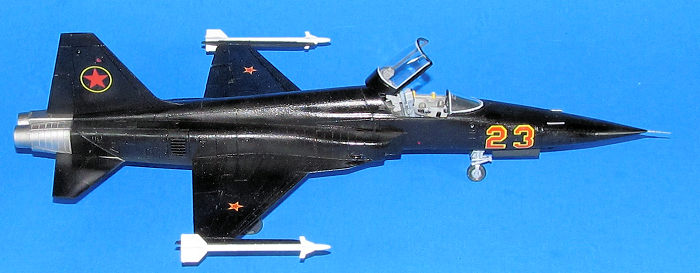 rush
skills instead of using 3D decals as I have with recent builds. I painted the
various canopy retraction mechanism parts Dark Gull Grey, black and/or USAF
light grey. Next I attached the IP and some of the canopy retraction mechanism
into the cockpit tub then attached it to one of the nose fuselage halves which I
glued together using CA glue for the external seams and regular glue for the
internal ones.
rush
skills instead of using 3D decals as I have with recent builds. I painted the
various canopy retraction mechanism parts Dark Gull Grey, black and/or USAF
light grey. Next I attached the IP and some of the canopy retraction mechanism
into the cockpit tub then attached it to one of the nose fuselage halves which I
glued together using CA glue for the external seams and regular glue for the
internal ones.
The cockpit/nose section needed the most attention with sandpaper with three small seams to fill/sand down. Once these were dealt with I glued the nose into the main fuselage. It fit together very nicely except the underside where there is a slight noticeable ridge, but it is barely seen so I wasn't going to spend much effort to fix it. A little bit of plastic putty smeared into the gap and cleaned with damp Q-tips was all the effort I took.
Later, I did run into a spot of trouble when the nose landing gear well decided to partially detach itself from the underside surface of the nose while I was working on sticking the landing gear in. I highly recommending reinforcing the nose wheel well piece with a piece of sprue or plastic long enough to meet the inner surface of the topside of the nose to keep it braced in. I ended up soaking the area with some Revell AG Contacta glue while I ripped out the instrument panel and shoved some solid metal rods to hold the nose wheel well in place while the glue dried.
In a fit of sanity, I kept off the aft engine section till after painting.
| COLORS & MARKINGS |
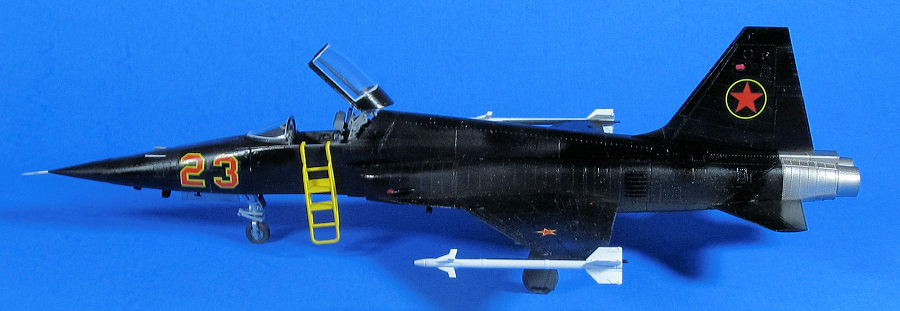
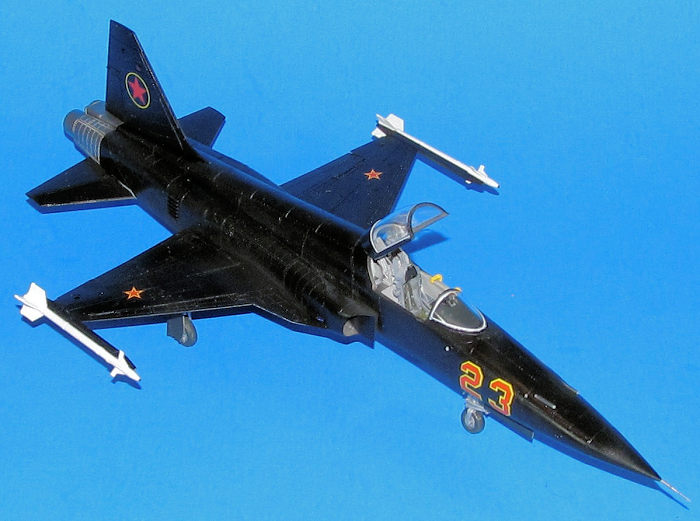
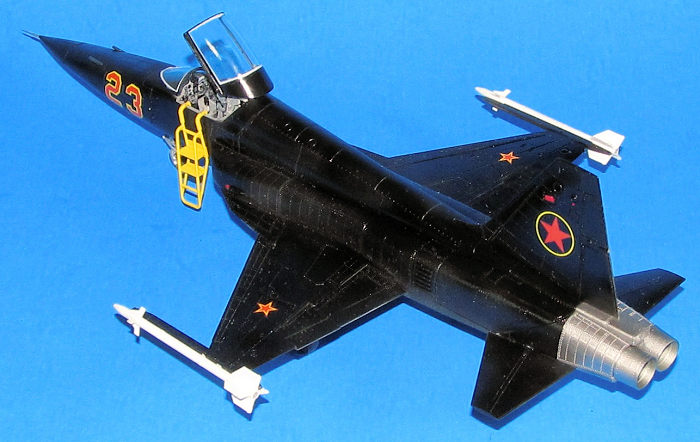
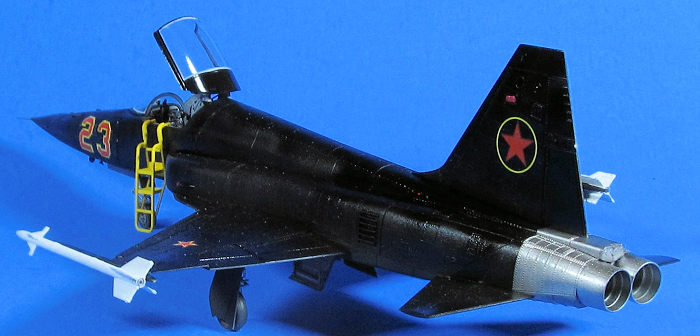
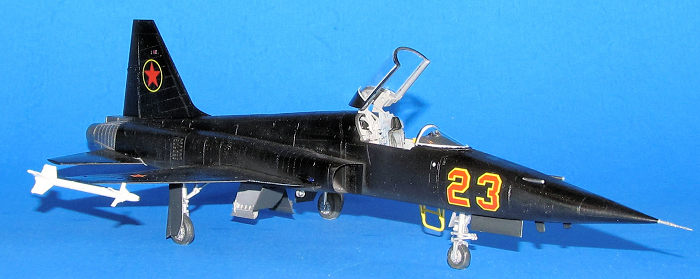
I masked off the cockpit and sprayed the model with black Stynylrez primer. Once the primer was fully cured, I polished down the surface with various grades of polishing pads. Next I sprayed the underside of the Mig-28 (both main fuselage and aft section) with the ironic shade of NATO black (the photos of the movie aircraft show a slight two tone camouflage scheme) and the topside with Tamiya and Gunze Gloss black. I ended up polishing the fuselage as smooth as I could before spraying on a final coat of NATO black and Gloss black.
The engine section was sprayed Vallejo Metal Color coat Aluminum with a barely noticeable hint of Vallejo gold to show some heat damage. The various main wheel wells and air brake wells were masked off and painted using Vallejo Air Silver.
 When the
paint was dry, I added the various star and number decals (a grand total of
eight!) I would need to make a Mig-28. The Top Gun movie Migs lacked the Bort
number, but I decided for “accuracy” to add the Bort number as Soviet, er,
/redacted/ planes would have a Bort number. I found no issues with the decals.
When the
paint was dry, I added the various star and number decals (a grand total of
eight!) I would need to make a Mig-28. The Top Gun movie Migs lacked the Bort
number, but I decided for “accuracy” to add the Bort number as Soviet, er,
/redacted/ planes would have a Bort number. I found no issues with the decals.
For a final coat, I sprayed Vallejo clear flat on the bottom and Vallejo gloss everywhere else.
The canopy parts were first masked off and painted Xtracrylix Dark Gull Grey for the interior color then when it was dry, I sprayed on a topcoat of Gunze acrylic Gloss Black. Next the resin wheel set I used was first primed with grey Stynylrez primer.
Meanwhile I used Furball Decals vinyl masks as well as home made masks made from low tack tape with my circle cutter for the resin wheels to cover the rims which were painted with Vallejo Metal Color Aluminum. Next I attached the vinyl masks for the canopy seals while using low tack tape to cover everything else. I sprayed on a dirty white paint to represent the canopy seal. It looked better than the ones I made for the 1/72 F-4C which look over scale. The tires were painted Tamiya German Grey XF-63 and when dry, the wheels were removed from the mold stub.
| FINAL CONSTRUCTION |
The various cockpit pieces including the IP were painted then jammed into the cockpit. I used a Quickboost F-5E ejection seat that had been primed and painted with various greys, greens and yellow for the ejection handles and then weathered with Tamiya black panel line wash to look slightly used.
 Next I
added the aft engine section which required a bit of sanding in certain
areas to improve the fit especially to the main fuselage. One thing I didn't
like was that the Ailerons weren't angled properly and I had the portside
one detach (while I was fiddling with the nose landing gear which added to
my frustration at the moment.) I fixed it by drilling out a hole in the
aileron and one at the attachment point then using 5 minute epoxy to glue
the aileron to a small cut length of metal wire.
Next I
added the aft engine section which required a bit of sanding in certain
areas to improve the fit especially to the main fuselage. One thing I didn't
like was that the Ailerons weren't angled properly and I had the portside
one detach (while I was fiddling with the nose landing gear which added to
my frustration at the moment.) I fixed it by drilling out a hole in the
aileron and one at the attachment point then using 5 minute epoxy to glue
the aileron to a small cut length of metal wire.
The landing gear is probably the most fiddly part of the kit. Be sure to lightly sand down the attachment tabs as they are actually higher than the fuselage slots they are supposed to go into. Once I figured that out everything went okay. The one thing you can't avoid is the fiddly doors. Again, I used Revell Contacta glue to attach the main landing gear mechanism to the landing gear and the landing gear doors. Patience is especially required there.
Next I glued the canopy retraction gear, the previously painted landing lights and formation lights onto the model. I took a surplus resin F-16 pitot tube and trimmed both it and the F-5 nose so that there is not obvious step between the two (the pitot tube is held on with a drop of CA glue.) The spainted resin wheels were glued onto the various landing gear. Finally the canopy pieces were glued in place and I finally had my Mig-28 done.
| CONCLUSIONS |
Despite some fiddly areas, I found the AFV F-5 an enjoyable build. Best F-5E kit overall and less headache than the F-5As I've built. Highly recommended for any level of modeller who wants to build an F-5E Tiger II in 1/48 scale.
No, I didn't have the Mig-28 dogfight any F-14s or F/A-18s while Highway To The Danger Zone blared from my speakers however tempting as it might have been.
4 April 2025
Copyright ModelingMadness.com. All rights reserved. No reproduction in part or in whole without express permission of the editor.
If you would like your product reviewed fairly and fairly quickly, please contact the editor or see other details in the Note to Contributors.
Back to the Main Page Back to the Review Index Page Back to the Previews Index Page