Hasegawa 1/48 CF-104 Starfighter
| KIT #: | 09712 |
| PRICE: | $35.00 |
| DECALS: | Two options |
| REVIEWER: | Dan Lee |
| NOTES: | True Detail C-2 ejection seat |
| HISTORY |
The CF-104 was based on the F-104G strike fighter aka the Deal of the Century to produce a multirole strike/recon fighter for NATO and MAP requirements. Initially, the CF-104 performed the nuclear strike mission (using US nuclear weaponry) and had an initial paint scheme of bare metal with wings and tail surfaces painted in anti-flash white and did not carry the 20mm M61 Gatling Gun. However, that mission changed in the early 70s when Canada opted out of the nuclear mission and the CF-104 became a conventional low level strike/recon plane with the M61 added back in.
 The CF-104
was a controversial plane in the RCAF/CAF, but considering the history of
Canadian aviation it seems par for the course. Many pilots loved to fly it, but
thanks to its low level strike/recon mission (which it wasn’t really designed
for and led to structural failures and crashes caused by said failures) and the
hazards of flying in Europe (bad weather etc) it had the reputation of being a
widow maker to the dismay of the Canadian public.
The CF-104
was a controversial plane in the RCAF/CAF, but considering the history of
Canadian aviation it seems par for the course. Many pilots loved to fly it, but
thanks to its low level strike/recon mission (which it wasn’t really designed
for and led to structural failures and crashes caused by said failures) and the
hazards of flying in Europe (bad weather etc) it had the reputation of being a
widow maker to the dismay of the Canadian public.
By the 1970s, it was decided that the CF-104 would be replaced with something more modern and less crash prone. After a long competition between the F-14 (way too expensive), the F-15 (too expensive), the F-16 (only one engine) and the F/A-18, the F/A-18 Hornet was selected as its replacement. By 1987, all CAF CF-104s were taken out of service and most of the survivors were sent to Turkey.
Tiger Meet aka Tiger, Tiger Burning Bright
The Tiger Meet began in 1961 as a meeting of various NATO squadrons who have a tiger in their squadron emblem. It was started by the USAF's 79th Tactical Fighter Squadron (not surprisingly named “Tigers”) who invited the RAF's 74th Squadron and Armee De L'Air's 1/12 (both not surprisingly named “Tiger.”) It grew to include other NATO countries and Neutral nations (Austria.)
 The Tiger
Meets are generally a social and public relations affair as the various units
show off their aircraft which usually have been brightly painted with Tiger
stripes, but they also happen to coincide with military training exercises.
Various awards are handed out to competing squadrons, but the most prestigious
award is the Silver Tiger which started in 1977. In three of its first five
years, it was won by 439 Squadron of the RCAF (aka the Sabre Toothed Tigers.)
The Tiger
Meets are generally a social and public relations affair as the various units
show off their aircraft which usually have been brightly painted with Tiger
stripes, but they also happen to coincide with military training exercises.
Various awards are handed out to competing squadrons, but the most prestigious
award is the Silver Tiger which started in 1977. In three of its first five
years, it was won by 439 Squadron of the RCAF (aka the Sabre Toothed Tigers.)
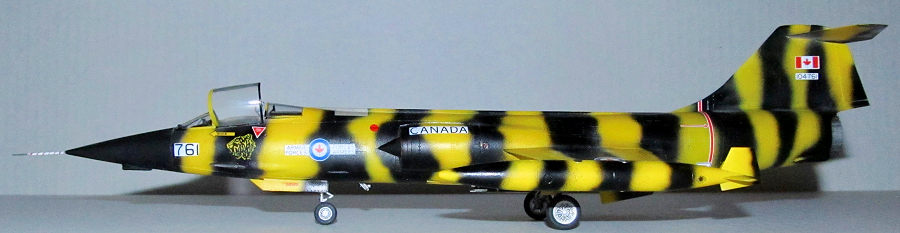
439 Squadron's CF-104s painted in Tiger Meet Livery are among the most memorable of the CF-104 markings. While 439 is now a Combat Support Squadron, it still remains an honorary member of the NATO Tiger Association.
The Tiger Meet continues on to include not only combat jets, but also helicopter units due to the increasing importance of modern combat and rescue helicopters in today's battlefields.
| THE KIT |
This particular boxing was
the limited edition Hasegawa CF-104 kit based on the F-104G kit with special
white metal ESM fairings for CF-104. The parts are typical stiff Hasegawa grey
plastic and include the older Hasegawa decals with ivory instead of pure white.
The decal sheet has two markings for the 1981 and 1982
 Tiger Meet
CF-104s. The decals are decent, the colors are in register and come with a
correct Canadian Maple Leaf which was lacking in the other CF-104 build I did.
Tiger Meet
CF-104s. The decals are decent, the colors are in register and come with a
correct Canadian Maple Leaf which was lacking in the other CF-104 build I did.
The parts on my kit had some flash around the small bits and nose cone. Otherwise, there weren't too many issues with the parts details aside from the surface being covered in visible divots/rivets like acne unlike the actual CF-104.
The only aftermarket concession I made was adding a True Details resin version of the Lockheed C-2 ejection seat as I painfully learned in the past build that due to the cramped conditions of the model that a resin cockpit was more a hinderance than a help to improve the details. The kit cockpit detail was good enough for me.
| CONSTRUCTION |
The model assembly began with the landing gear. The landing gear parts were cleaned up and polished before assembly to remove the mould lines, sprue nubs and flash. The wheel wells and landing gear parts were then primed with Badger Stynylrez black primer and sprayed on Vallejo Metal Color White Aluminum using an airbrush.
 Next the
cockpit parts were painted Xtracrylix Dark Gull Grey as a base coat then various
dials and switches were painted white, silver, black, red and yellow. I used the
instrument panel decal because it would be better than what I could paint. It
required Solvaset to get it to snuggle down into the detail.
Next the
cockpit parts were painted Xtracrylix Dark Gull Grey as a base coat then various
dials and switches were painted white, silver, black, red and yellow. I used the
instrument panel decal because it would be better than what I could paint. It
required Solvaset to get it to snuggle down into the detail.
The two piece engine exhaust was glued together with the seams filled with Vallejo plastic putty. It was primed first then painted XF-56 Metallic Grey, Silver and Vallejo Metal Color Pale Jet Exhaust. I opted to leave the exhaust alone because the seams would be hidden by the paint and by the various parts.
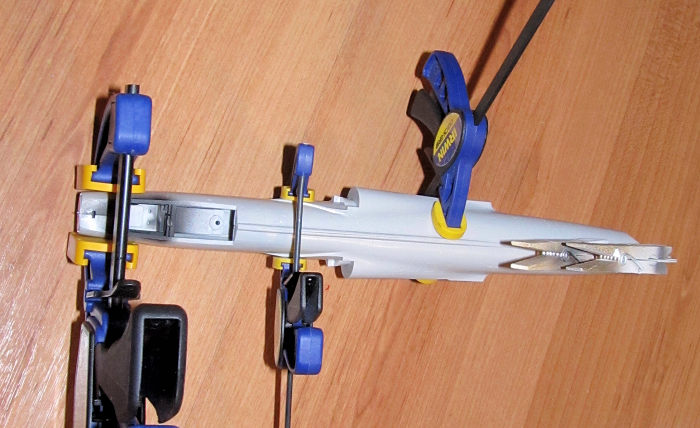
I added all the internal details (cockpit, exhaust, wheel wells and nose weight) to the port side fuselage piece before adding CA glue along the visible seams and Tamiya Extra Thin cement along the hidden ones in my typical process to avoid the dreaded phantom seam. Once the glue was cured, I sanded down the seams and then polished them using 1800 and 3200 grit polishing cloths to remove the scratches. Unlike most of my models I didn't need to redo the seams this time.
Next the nose cone and wings were glued in place followed by the intakes. The speed brakes were modified for closed position and glued in position. I had to add some plastic putty to fill in the gaps around the speed brakes and intakes.
I left off the horizontal stabilizer and the wingtip fuel tanks to make things easier for painting.
| COLORS & MARKINGS |
 I masked off
the canopy pieces and sprayed the windscreen black for the interior color and
dark gull grey for the interior color of the other canopy pieces. The pieces
were then glued in place using Krystal Kleer glue. Next the landing gear doors
were also glued using Krystal Kleer or taped in place for painting.
I masked off
the canopy pieces and sprayed the windscreen black for the interior color and
dark gull grey for the interior color of the other canopy pieces. The pieces
were then glued in place using Krystal Kleer glue. Next the landing gear doors
were also glued using Krystal Kleer or taped in place for painting.
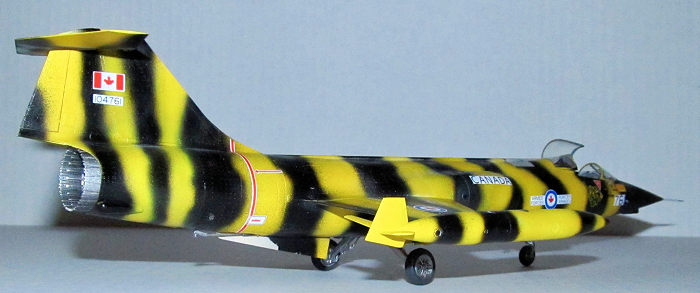
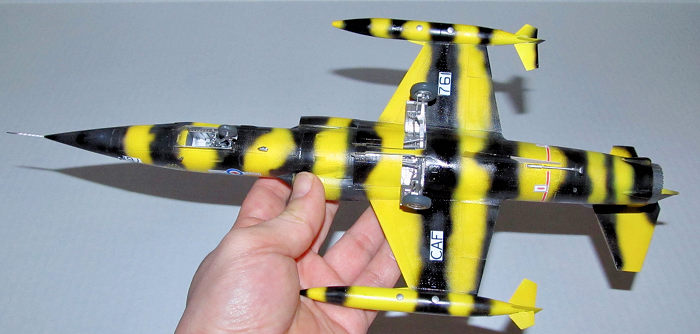
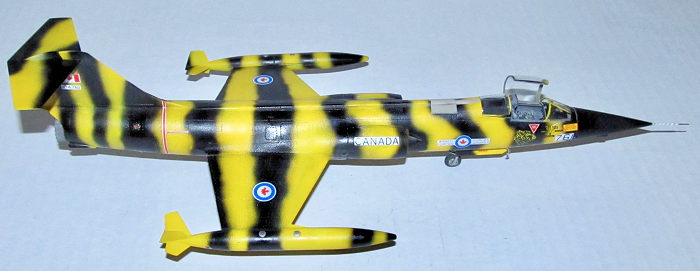
The plane was primed with Tamiya Flat White as a base for the yellow color. Once it was dry, I sprayed on Tamiya XF-8 flat yellow in two coats. When it was dry, I sprayed on Tamiya Gloss black based on the marking scheme in the instructions. Each black band was sprayed freehand. The wingtip fuel tanks and horizontal stabilizer were sprayed separately. The nose was masked off and sprayed flat black.
Next the area behind the cockpit was masked off and sprayed Tamiya Buff XF-57 while the various navigation lights were hand painted silver then various clear colors as per instructions.
The pitot tube was painted
silver then the silver areas were masked off while it was painted white and then
masked again for the red stripe. For masking the red stripe, I cut a really long
and thin piece of tape then wrapped it around the pitot tube at a 45 degree
angle for the candy stripe. For some reason Hasegawa did not provide a decal
although when I tried to use the decal in an earlier CF-104 build it ended up
being ruined when the Solvaset caused the decal to smear so masking/painting
proved to be the smarter choice. I sprayed on
 Insignia
Red for the red stripe. It wasn't perfect as I had made the masking too close in
some places, but I fixed it using a 000 brush, some thinned Insignia Red and a
very steady hand.
Insignia
Red for the red stripe. It wasn't perfect as I had made the masking too close in
some places, but I fixed it using a 000 brush, some thinned Insignia Red and a
very steady hand.
I sprayed on a gloss coat for the decals. When it was dry, I added each decal one by one as per the instructions. These Hasegawa decals went on okay using MicroSet/Sol with only a little bit of Solvaset needed for the really stubborn areas (especially where the divots/rivets are.)
Afterwards, the model was wiped down to remove the dried decal solution.. I didn't bother with weathering the plane as the Tiger Meet aircraft were kept in pristine condition.
The final coat was a touch strange. I sprayed flat coat on the nose while the plane got a mix of Xtracrylix Satin and Gloss (satin for the Yellow and gloss for the gloss black stripes.)
| FINAL CONSTRUCTION |
 The canopy
parts and the masking were removed and the various cockpit parts were brush
painted and added to the model. The True Details resin seat didn't fit as well
as it should and the sides needed to be shaved down so that it would fit. It
still sits a bit high due to the notch in the floor that should have been
removed. The resin ejection seat was painted as per photos before it was glued
into the cockpit.
The canopy
parts and the masking were removed and the various cockpit parts were brush
painted and added to the model. The True Details resin seat didn't fit as well
as it should and the sides needed to be shaved down so that it would fit. It
still sits a bit high due to the notch in the floor that should have been
removed. The resin ejection seat was painted as per photos before it was glued
into the cockpit.
I added the painted landing gear (using Tamiya Extra Thin Cement), various painted lights and canopy (white glue) and the pitot tube (CA glue.) Other small parts such as the AOA sensors and various antenna were added.
The last thing I glued in was the painted engine nozzle (using a mix of XF-56 Metallic Grey and Vallejo Metal Color Pale Exhaust.)
| CONCLUSIONS |
The Hasegawa CF-104 kit makes for a simple easy build as well have decent accuracy aside from the number of dimples and rivets on the surface. I've always liked the look of the Tiger Meet aircraft in part because I built the Revell Monogram 1/48 version with Canadian Tiger Meet markings as a kid. I thought it was the most beautiful model I had ever built. I'm sure that it was actually poorly painted with glaring obvious unfixed seams, but that's what memory will do to you.
Definitely, the Hase Starfighter is a kit recommended for all skill levels.
5 August 2019
Copyright ModelingMadness.com.
If you would like your product reviewed fairly and fairly quickly, please contact the editor or see other details in the Note to Contributors.
Back to the Main Page Back to the Review Index Page Back to the Previews Index Page