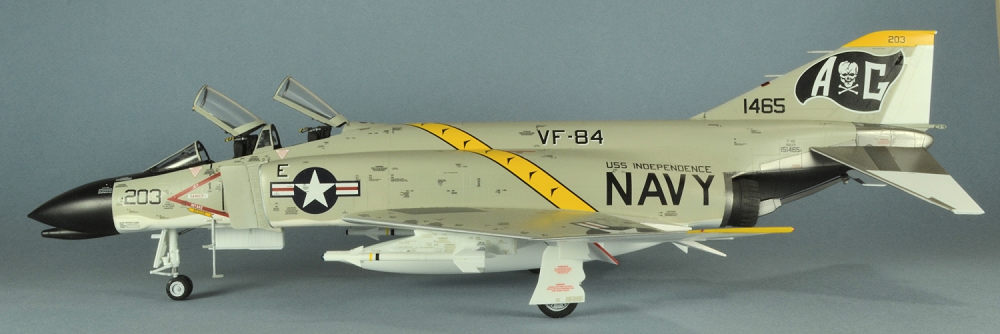
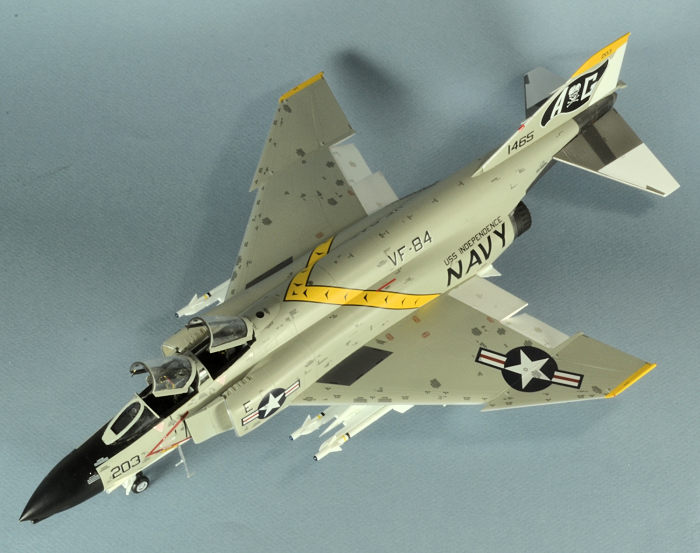
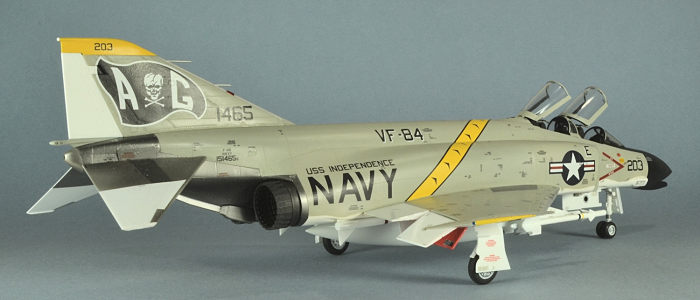
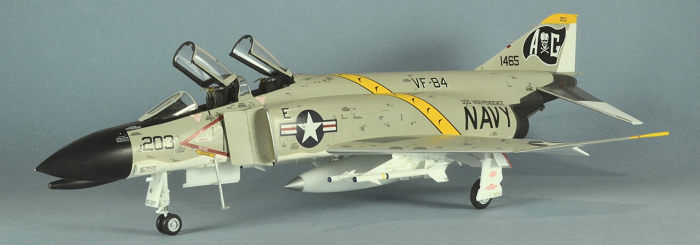
Academy 1/48 F-4B Phantom II
| KIT #: | 12232 |
| PRICE: | $38.00 from Korea |
| DECALS: | One option |
| REVIEWER: | Ben Brown |
| NOTES: | Parts included in kit allow it to be built as an F-4B or an F-4N. |
| HISTORY |
I’ll just refer you to Google or one of the many, many books that have been written about the mighty Phantom over the years.
The first Jolly Rogers squadron was VF-17, established in 1943. They flew F4U Corsairs from land bases in the Solomon Islands from 1943-1944. They were broken up in April 1944, and a new unit, designated VF-17, was formed to fly F6F Hellcats off of the USS Hornet in 1945. This squadron was disestablished in 1959, having been redesignated VF-61 in 1948.
 Many
veterans from the original VF-17 went on to become the nucleus of a new
squadron, VF-84 “Wolf Gang,” in 1944. They operated off of the USS Bunker Hill
until 11 May 1945, when a kamikaze hit the ship, killing 22 members of the
squadron. The squadron was reformed in the US, but the war ended before they
could get back into action. The squadron was disestablished in late 1945.
Many
veterans from the original VF-17 went on to become the nucleus of a new
squadron, VF-84 “Wolf Gang,” in 1944. They operated off of the USS Bunker Hill
until 11 May 1945, when a kamikaze hit the ship, killing 22 members of the
squadron. The squadron was reformed in the US, but the war ended before they
could get back into action. The squadron was disestablished in late 1945.
The second VF-84 Vagabonds was established in 1955, flying FJ-3 Furies. When VF-61 was disestablished, VF-84’s commander, who had served with VF-61, requested that his squadron be allowed to change its name to the Jolly Rogers. The squadron transitioned to F-8 Crusaders in 1959, then to the F-4B in 1964. They eventually flew the F-4B, F-4J, and F-4N, and flew over 1500 combat sorties over Vietnam in 1965. In 1976, the squadron received the F-14 Tomcat, and went on to become the first F-14 movie stars in “The Final Countdown.” VF-84 flew F-14s until they were disestablished in 1995, and VF-103’s “Sluggers” soon adopted the Jolly Rogers’ name and insignia. The now VFA-103 is still active with the F-18F Super Hornet.
| THE KIT |
Molded
in gray, black, and white plastic, the kit looks like a scaled-down Tamiya F-4,
with its one-piece fuselage. Rather than providing intake ducts with correct
length and shape, Academy has designed the ducts to taper down fairly sharply to
give the impression of greater depth. The tires are separate from the wheels,
allowing each to be painted separately before assembly. Both the early unslotted
stabilators and the later slotted stabs are provided. The panel line for the
break between the painted and titanium areas is in the wrong place, so there is
too much painted area on the stabs. The unslotted stabs are easily fixed by
filling and rescribing the panel lines or replacing them with some resin ones
from Hypersonic Models or Royale Resin. A more difficult-to-fix problem is with
the slotted stabs. The brackets that hold the part that makes up the slot are
parallel to the aircraft centerline on the real jet, but Academy has molded them
perpendicular to the leading edge of the stab. Hypersonic sells correct replacements. Each
speed brake had three ejector pin marks, and their placement made them a little
hard to fill. The aft canopy is too long, which moves the center section and
shortens the forward canopy, but it isn’t too noticeable unless the model is
sitting next to a Hasegawa, Zoukei-Mura, or Monogram kit. The air conditioning
system scoops on the sides of the nose are too narrow. These can be fixed with
styrene or replaced with parts from Hypersonic, Steel Beach, or XXM (included
with their engine intake set).
to the leading edge of the stab. Hypersonic sells correct replacements. Each
speed brake had three ejector pin marks, and their placement made them a little
hard to fill. The aft canopy is too long, which moves the center section and
shortens the forward canopy, but it isn’t too noticeable unless the model is
sitting next to a Hasegawa, Zoukei-Mura, or Monogram kit. The air conditioning
system scoops on the sides of the nose are too narrow. These can be fixed with
styrene or replaced with parts from Hypersonic, Steel Beach, or XXM (included
with their engine intake set).
There were complaints when this kit was first released that there were sink marks on the vertical stabilizer and under the wings. Mine has these, but they’re not noticeable on the finished model unless you are really looking for them.
Ordnance includes four AIM-7 Sparrow missiles, four each of several different versions of AIM-9 Sidewinder, and a dozen bombs. The kit also includes wing-mounted and centerline drop tanks, correct outer weapons pylons, two triple ejector racks, and two multiple ejector racks.
Decals are provided for a single jet from VF-111 during the Vietnam War.
| CONSTRUCTION |
Academy molded the inflight refueling probe bay too low on Part G19. If you want to display the IRF probe extended, you’ll have to trim and shim the part to reposition the cutout for the probe. I went with the quick and easy fix, and just installed Part G20 (the blanking plate for the USAF versions) and used Part G18 (the IFR probe door) as a template to rescribe the closed door in the correct position. If you do this, and keep the kit cockpit tub, don’t cut out the notches in the front and rear cockpits’ aft bulkheads. Otherwise, you’ll have to find something to fill the gap in the front cockpit, since the IFR probe bay won’t be there.
Both DMold and XXM make very nice intakes for the Academy F-4 kits. Having used DMold’s products in the past, I chose XXM’s this time to see how their products looked. The starboard intake needed tweaking, because it didn’t quite match the contour of the fuselage and the vari-ramp needed some trimming so it wouldn’t interfere with the intake. The port side took almost no time at all to install.
 The
cockpit is pretty good for an injected kit, although there is no sidewall detail
at all in the front cockpit. No instrument decals are provided, so I used some
from Mike Grant and an old Reheat sheet. Furball Decals has since released a set
of instrument panel decals. Because the cockpit tub forms the ceiling of the
nose gear well, I kept the kit tub and just added a few resin parts from a True
Details F-4J cockpit, some styrene strip, and wire. I also added some photo
etched cockpit sill details from an old Fotocut set that has been in my stash
since the 1980s. The center section of the front instrument panel is molded in
the same plane as the two side panels, but it should be moved a millimeter or so
forward. On the aft panel, the control stick for the radar should stick up
vertically from a little fold-out shelf mounted to the panel, but Academy has
molded it so the stick pokes horizontally out of the instrument panel. I fixed
this with a little styrene. The deck behind the rear seat should be flush with
the cockpit’s sills, with two small “ears” sticking up at the aft corners,
rather than having a raised step, but I left this alone. In 1964, F-4Bs were
equipped with Martin-Baker Mk.5 seats, so I added a set of Navy Mk.5s from
Hypersonic.
The
cockpit is pretty good for an injected kit, although there is no sidewall detail
at all in the front cockpit. No instrument decals are provided, so I used some
from Mike Grant and an old Reheat sheet. Furball Decals has since released a set
of instrument panel decals. Because the cockpit tub forms the ceiling of the
nose gear well, I kept the kit tub and just added a few resin parts from a True
Details F-4J cockpit, some styrene strip, and wire. I also added some photo
etched cockpit sill details from an old Fotocut set that has been in my stash
since the 1980s. The center section of the front instrument panel is molded in
the same plane as the two side panels, but it should be moved a millimeter or so
forward. On the aft panel, the control stick for the radar should stick up
vertically from a little fold-out shelf mounted to the panel, but Academy has
molded it so the stick pokes horizontally out of the instrument panel. I fixed
this with a little styrene. The deck behind the rear seat should be flush with
the cockpit’s sills, with two small “ears” sticking up at the aft corners,
rather than having a raised step, but I left this alone. In 1964, F-4Bs were
equipped with Martin-Baker Mk.5 seats, so I added a set of Navy Mk.5s from
Hypersonic.
Academy didn’t provide any details for the insides of the auxiliary intakes on the belly. Aires sells a set of resin interiors, but I just boxed mine in with styrene, since nobody will see the underside of my model once it’s in the display case.
The only two difficult areas I encountered during construction were the two lower fuselage parts and the main landing gear. For the lower fuselage, I added strips of styrene to reinforce the joint between the forward and aft sections. A little Mr. Surfacer was all that was needed to fill the seam. The horizontal seams where the forward part of the lower fuselage met the upper half needed extra attention and the white and gray plastic made it difficult to see if the seam was filled.
 The main
gear wells are a little fiddly to build, but will go together with a little
patience. The main gear struts have to be added fairly early and risk being
broken. I left the upper halves of the wings off until later in the build, so I
could add the struts and gear wells a little later. That let me work on the
seams between the upper and lower fuselage parts, aft fuselage, and tail without
having to worry about breaking the gear struts.
The main
gear wells are a little fiddly to build, but will go together with a little
patience. The main gear struts have to be added fairly early and risk being
broken. I left the upper halves of the wings off until later in the build, so I
could add the struts and gear wells a little later. That let me work on the
seams between the upper and lower fuselage parts, aft fuselage, and tail without
having to worry about breaking the gear struts.
The two black parts that make up the titanium area of the aft fuselage needed a lot of work, due to the odd engineering of the parts. There is a seam that runs right through the stabilators’ pivot point, and fixing that destroys the detail in that area. Fortunately, the photo etched parts that come with Hypersonic’s replacement stabilators replace the detail lost during clean-up.
One of the Eduard afterburner nozzles I used was about 1mm larger in diameter than the other, the photo etched parts were too large in diameter to fit inside the afterburner cans, and the thin vanes on the turbine parts (the ones that weren’t already missing from the factory) broke off at the slightest touch. I ended up substituting an old set of High Flight burner cans. I thought the afterburner nozzles were a little thick and the exterior detail was overdone, but they don’t look too bad under a coat of paint.
| COLORS & MARKINGS |
Since I was out of both Tamiya white primer and Gunze Mr
Base White, both of which will cover very well, I became impatient and
experimented with Model Master Flat White for the undersides. This paint covered
so poorly, I was faced with the choice of filled panel lines due to many layers
of paint or dark patches
 where the
gray resin and plastic parts showed through the translucent paint. After much
swearing, sanding, rescribing, and a second respray with similarly-poor results,
I gave up and sprayed several coats of Microscale clear gloss to get the model
ready for decals. One would think that after almost 50 years of modeling, I
would have learned to experiment on a scrap model and not my main modeling
project!
where the
gray resin and plastic parts showed through the translucent paint. After much
swearing, sanding, rescribing, and a second respray with similarly-poor results,
I gave up and sprayed several coats of Microscale clear gloss to get the model
ready for decals. One would think that after almost 50 years of modeling, I
would have learned to experiment on a scrap model and not my main modeling
project!
I had to use a combination of decals from the kit, Vagabond’s 48-1001, SuperScale’s 481268, and Furball’s 48-019 for the markings, since none of the manufacturers got all of the markings correct, when compared to photos. I somehow managed to lose the chevrons from both the Furball and Superscale sheets for the top of the fuselage stripe, so I had to make do with the too-small one from Vagabond. The Modex numbers on the nose were supposed to be shadowed with white, so I drew up my own and a person with an ALPS printer printed them for me. To make even more work for myself, I used Furball’s stencils, which is an 8.5 x 11 sheet with what seems like several thousand tiny decals on it. I think the only items missing from it were the landing gear strut placards (every decal manufacturer forgets those!).
| FINAL CONSTRUCTION |
One
thing common to almost all kit manufacturers is they completely neglect the
interior structure of jet canopies. The aftermarket has been no better. They’ll
give you a beautiful cockpit, but if they include
 anything
for the canopy interiors, they’re merely 2-dimensional photo-etched parts that
don’t build up the structure inside. Fortunately, Hypersonic sells a resin and
brass set that provides the bulky structure that is so noticeable in the F-4’s
canopy interior. They sell sets made specifically for the Hasegawa or the
Academy Phantoms. If I were to build another Academy F-4, I would use the better
canopy parts from a Hasegawa kit and the associated Hypersonic resin set.
anything
for the canopy interiors, they’re merely 2-dimensional photo-etched parts that
don’t build up the structure inside. Fortunately, Hypersonic sells a resin and
brass set that provides the bulky structure that is so noticeable in the F-4’s
canopy interior. They sell sets made specifically for the Hasegawa or the
Academy Phantoms. If I were to build another Academy F-4, I would use the better
canopy parts from a Hasegawa kit and the associated Hypersonic resin set.
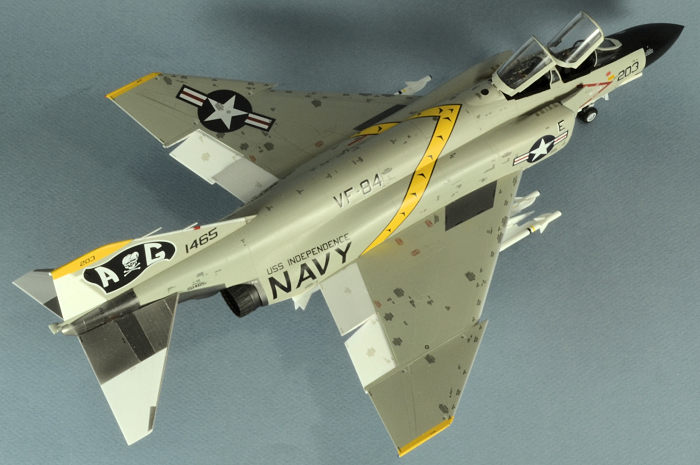
Academy provides two sprues containing AIM-7 Sparrows and several different versions of the AIM-9 Sidewinder. The only problem is the instructions only show the parts for one version of AIM-9 (the D?), so you’re left to your own devices to figure out what parts go with the other missile versions. I went with an air-to-air load of four AIM-9Bs, two AIM-7s in the aft missile wells, and a centerline drop tank.
| CONCLUSIONS |
Outside of a few self-inflicted problems, this was a fun kit. It is more difficult to build than the old Hasegawa F-4B, due to its complexity, but it makes up for it with mostly good fit and recessed panel lines. I found the multi-colored plastic to be an unnecessary distraction and it was hard to tell if the seams between the gray and white plastic were filled properly until after the model was primed. I think the Eduard version of this kit is all gray plastic. The parts breakdown required to get multiple versions from the molds makes assembly a little complicated at times, but overall fit is very good. Finally, thank you Academy for not relying on 2-dimensional photo-etched parts for the instrument panels and cockpit consoles! Good, old-fashioned injected parts are much better for these areas (do you hear me Kitty Hawk?!), although some decals for the instrument faces would have been nice.
As for the aftermarket parts I used, you can’t go wrong with either XXM’s or DMold’s intakes and Hypersonic’s products are outstanding. Eduard’s afterburner nozzles were okay. They look busy, but the nozzles are overly-thick and the raised exterior details are overdone. To be fair, the other J-79-8 (short) afterburner nozzles available in 1/48 suffer from the same issues. The fit of the individual afterburner parts needs improvement.
| REFERENCES |
Wikipedia
Sources:
SonyKen, from another forum, for the Furball VF-84 decals. Thank you!
Eduard Models: https://www.eduard.com/
Hypersonic Models: https://www.hypersonicmodels.com/
Furball Aero Design: https://www.furballaero-design.com/
XMM: http://xmold-modeling.com/
DMold: http://dmold-modelworks.com/
Ben Brown
23 July 2018
Copyright ModelingMadness.com
If you would like your product reviewed fairly and fairly quickly, please contact the editor or see other details in the Note to Contributors.
Back to the Main Page Back to the Review Index Page Back to the Previews Index Page