Academy 1/72 OV-10A Bronco
| KIT #: | 1655 |
| PRICE: | $12.50 MSRP |
| DECALS: | Two options |
| REVIEWER: | John Anthony |
| NOTES: | Best kit of the Bronco in any scale |
| HISTORY |
The OV-10 has been called the “ugly duckling” of the fleet by more than one military commentator, but as the adage goes, beauty is in the eye of the beholder, and perhaps the beauty of this aircraft is found more in its functionality and versatility. The instructions in the kit provide a well-written and succinct overview of the aircraft and I’ll quote it verbatim:
 “The Rockwell International OV-10A Bronco was
the winner of a competition to provide U.S. Air Force, the Navy, and the Marine
Corps with a Light Armed Reconnaissance Aircraft (LARA). Designed as a
counter-insurgency (COIN) plane, the OV-10A was first delivered to the Armed
Forces in 1969 and saw extensive duty in Viet Nam. The Bronco can take off from
short airstrips or can be fitted with floats or skis for more varied uses. It is
fitted to carry a wide variety of weapons but is more often used when equipped
with Doppler radar or TV reconnaissance apparatus. The Bronco’s varied
capabilities are even more apparent when considered in terms of its payload,
however. A cargo compartment underneath the middle of the wing can hold five
paratroops or two stretchers and a medic or more than 3,000 pounds of freight.
In 1969, 15 OV-10A’s were fitted with laser rangers, Loran navigation systems,
and stabilized night sighting systems for nighttime operations.”
“The Rockwell International OV-10A Bronco was
the winner of a competition to provide U.S. Air Force, the Navy, and the Marine
Corps with a Light Armed Reconnaissance Aircraft (LARA). Designed as a
counter-insurgency (COIN) plane, the OV-10A was first delivered to the Armed
Forces in 1969 and saw extensive duty in Viet Nam. The Bronco can take off from
short airstrips or can be fitted with floats or skis for more varied uses. It is
fitted to carry a wide variety of weapons but is more often used when equipped
with Doppler radar or TV reconnaissance apparatus. The Bronco’s varied
capabilities are even more apparent when considered in terms of its payload,
however. A cargo compartment underneath the middle of the wing can hold five
paratroops or two stretchers and a medic or more than 3,000 pounds of freight.
In 1969, 15 OV-10A’s were fitted with laser rangers, Loran navigation systems,
and stabilized night sighting systems for nighttime operations.”
A testament to the versatility and sturdiness of this aircraft is given by the fact that it found a number of foreign operators in addition to being adapted for civil use by NASA, the US Department of State, the Bureau of Land Management, and the California Department of Forestry and Fire Protection. A number of surviving OV-10’s can be found in air museums, but a few are still in active duty with the armed forces of Columbia, Philippines, and Venezuela.
| THE KIT |
Our dedicated editor has previewed this kit and you can find it here…
http://www.modelingmadness.com/scotts/viet/ov10preview.htm
I’m guessing that this plane hasn’t been the
most popular subject among modelers, which would explain the paucity of
available kits. Prior to the release of the Academy issue, if you wanted to
build an A variant, you could only choose between the Hasegawa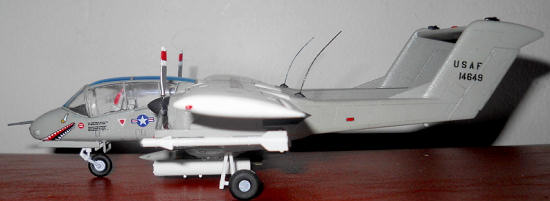 kit in 1/72 and
the Testors offering in 1/48. (Revell also made a mystery variant in 72nd
– some call it an A, others a B.) At any rate, all of these models have
blatant errors and a dearth of detail, and to date there still isn’t an
acceptable kit in 1/48 – the Testors issue needs to be drastically modified
with aftermarket goodies to whip it into shape. (Airfix issued a very nice
version of the long-nosed D variant throughout the 80s, but these boxes are
difficult to find today – you occasionally see one offered by vintage kit
vendors.)
kit in 1/72 and
the Testors offering in 1/48. (Revell also made a mystery variant in 72nd
– some call it an A, others a B.) At any rate, all of these models have
blatant errors and a dearth of detail, and to date there still isn’t an
acceptable kit in 1/48 – the Testors issue needs to be drastically modified
with aftermarket goodies to whip it into shape. (Airfix issued a very nice
version of the long-nosed D variant throughout the 80s, but these boxes are
difficult to find today – you occasionally see one offered by vintage kit
vendors.)
So perhaps this duckling is uglier to more beholders than less, but for those of us that appreciate the look and history of the OV-10s, the Academy offering is the best choice for an out-of-box build – and it’s readily available. (Academy also makes a kit of the OV-10D, #1680.) Despite the high quality of this box of parts, however, there are some minor issues that need correction, and I’ll point those out as I go along.
| CONSTRUCTION |
As usual construction begins with the office, in which there’s a fair amount of detail for the scale: ejection seats with molded belts and decals for the instrument and control panels. What is missing is any side panel detail, and that’s unfortunate as the canopies on these aircraft are large, and the interior is easily viewed. One glaring error is that the rear pilot isn’t supplied with a control stick. A friend of mine who was an OV-10 crew chief assured me that the co-pilot was fully capable of flying the aircraft himself, so I shaped my own control stick from a piece of 0.5mm Evergreen rod and bits of putty.
 In the technical nomenclature of the OV-10s, what
one would normally call the “fuselage” is instead called the “nacelle”
– the central structure that houses the pilots and cargo. Once the nacelle was
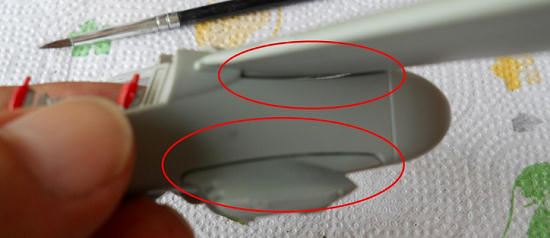
buttoned-up I dry-fitted it with the weapons sponson and wing assemblies, and
found some gaps that required filling. These are the largest gaps you’ll find
in the build though, and they’re not challenging to repair. (Some reviewers
have complained about the fit of these pieces to the point of dismissing the kit
altogether, which in my opinion is nonsense, especially considering how
well-engineered the rest of the model is.)
In the technical nomenclature of the OV-10s, what
one would normally call the “fuselage” is instead called the “nacelle”
– the central structure that houses the pilots and cargo. Once the nacelle was
buttoned-up I dry-fitted it with the weapons sponson and wing assemblies, and
found some gaps that required filling. These are the largest gaps you’ll find
in the build though, and they’re not challenging to repair. (Some reviewers
have complained about the fit of these pieces to the point of dismissing the kit
altogether, which in my opinion is nonsense, especially considering how
well-engineered the rest of the model is.)
I sanded out the centerline seams on the nacelle, attached the sponson and wing, filled the gaps with putty, and let the whole business dry overnight. In the meantime I painted as many tidbits as I could: the wheels and gear, external stores, canopy frames etc. I also assembled the boom halves, put everything on the shelf, and called it a good day of modeling.
Before I go on, let me backtrack for a moment and
suggest that if you’re building this kit, try to get as much weight forward of
the main gear as possible. Models with tricycle landing gear are generally
tail-draggers, but this one could easily qualify as the mother of them all.
Before I assembled the nacelle and attached the wing, I packed the no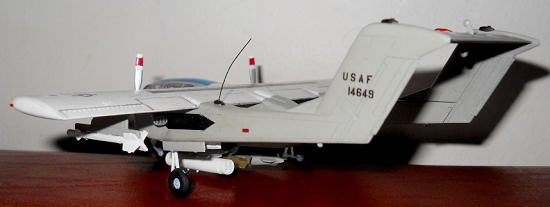 se full of
sinkers, as well as the storage compartment directly aft of the cockpit. Even
so, I had to add some weight to the front wheel bay to keep the thing from
tilting back every time someone opened the door. When I build the kit again, I’m
going to try and add some flattened sinkers under the cockpit floor as well.
se full of
sinkers, as well as the storage compartment directly aft of the cockpit. Even
so, I had to add some weight to the front wheel bay to keep the thing from
tilting back every time someone opened the door. When I build the kit again, I’m
going to try and add some flattened sinkers under the cockpit floor as well.
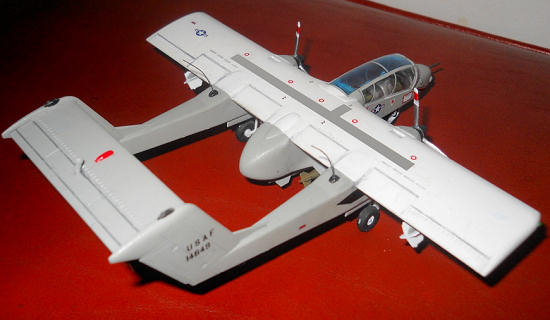
On to day two: I had never assembled one of these twin-boom structures, so after a bit of dry-fitting and pondering, I came up with the following order of operations. First, I sanded out the seams on the booms. Next, I attached the booms to the wing, allowing the glue to set for a few minutes. Then I attached the tailplane between the booms and gently tweaked everything into alignment using a small carpenter’s square. Finally, after the assembly had dried for a few hours, I filled the small gaps between the wings, booms, and tailplane with CA glue, and set everything aside for the yet another day.
| COLORS & MARKINGS |
 Day three brought a few surfacing touch-ups after
a coat of primer, and on to the paint booth. I chose the USAF scheme in which
the color call-out is ADC Gray (FS16473) for most of the airframe, with the top
of the wing being insignia white. I used Testors Aircraft Gray (#1731).
According to various online hobby paint comparison charts, that’s supposed to
be a close match to the FS color, although it looks a bit too dark when compared
to photos of USAF Broncos. (I did lighten the color with a few drops of white
but I don’t have the whole “scale effect” business down to a science yet.)
I painted the top of the wing flat white, gave the model a spritz of gloss and
applied the decals.
Day three brought a few surfacing touch-ups after
a coat of primer, and on to the paint booth. I chose the USAF scheme in which
the color call-out is ADC Gray (FS16473) for most of the airframe, with the top
of the wing being insignia white. I used Testors Aircraft Gray (#1731).
According to various online hobby paint comparison charts, that’s supposed to
be a close match to the FS color, although it looks a bit too dark when compared
to photos of USAF Broncos. (I did lighten the color with a few drops of white
but I don’t have the whole “scale effect” business down to a science yet.)
I painted the top of the wing flat white, gave the model a spritz of gloss and
applied the decals.
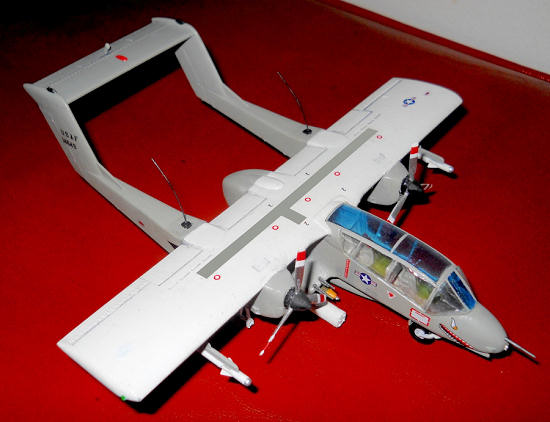
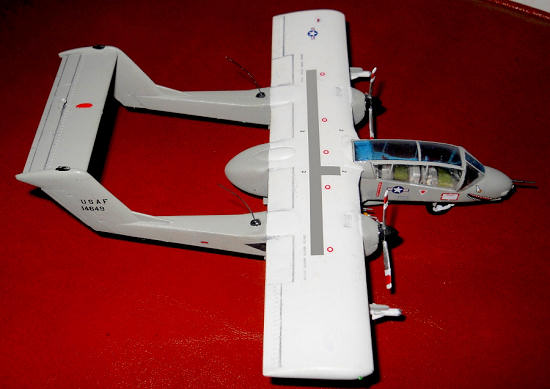
The decals are crisp, clean, and thin. They went on easily and settled with no complaints and no silvering. The decaling guide in the instructions is quite good but it isn’t 100% accurate - a better guide is the actual USAF dope sheet, “OV-10 Aircraft Marking Specification.”
| FINAL CONSTRUCTION |
Once the decals had dried and been sealed with lacquer, I attached the landing gear, gear doors, and external stores. At this point my day-by-day genesis story of the build goes astray. Modeler’s ADD kicked in and the OV-10 sat in revetment for a few weeks through no fault of its own. (Curiously, this always seems to happen when I open a new box of plastic - I’m guessing there might be a correlation there somewhere.) But when I returned to the kit there wasn’t much left to do. The props and canopy were attached, the antennas were fashioned from small gauge violin string, and the panel lines were given a very light acrylic wash of Payne’s Gray.
I have several notes about the final construction.
Firstly, I was rather afraid of the canopy
assembly because frankly, it looked intimidating. It’s one thing to fit a
windscreen onto a fuselage and tweak it with a bit of dry-fitting and sanding
and filling. It’s another thing altogether to construct this boxy contraption
of four pieces and get everything to fit just right. Or so I thought. To my
pleasant surprise, the canopy pieces are fairly well-engineered and fit rather
snugly, although the windscreen is a bit too wide. I attached the roof to the
wing first, and before the glue had dri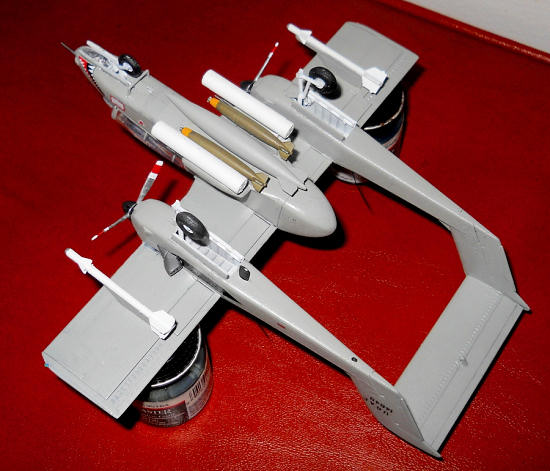 ed, I added the side windows. Everything
looked pretty good. After that had dried for an hour I added the windscreen and
applied a small bead of glue around the edge to seal a small gap. (My adhesive
of choice for canopies is Testors Clear Parts Glue – it’s basically a
white-glue that’s completely transparent when dry, and doesn’t craze
plastic.) The overall fit of the canopy pieces isn’t perfect by any means, but
it’s not bad – a better modeler could no doubt make it exact.
ed, I added the side windows. Everything
looked pretty good. After that had dried for an hour I added the windscreen and
applied a small bead of glue around the edge to seal a small gap. (My adhesive
of choice for canopies is Testors Clear Parts Glue – it’s basically a
white-glue that’s completely transparent when dry, and doesn’t craze
plastic.) The overall fit of the canopy pieces isn’t perfect by any means, but
it’s not bad – a better modeler could no doubt make it exact.
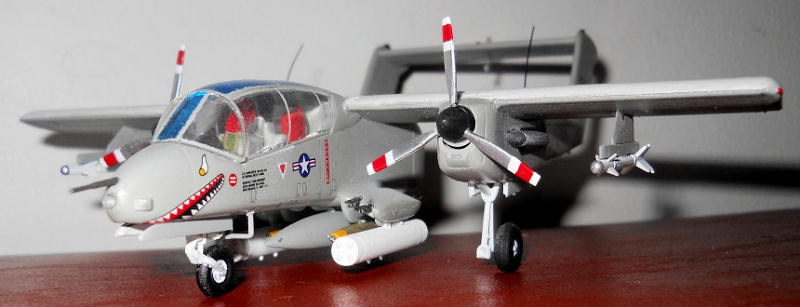
Secondly, the main wheels are not molded particularly well, but I don’t know of any aftermarket products than can correct them. The hubs are slightly too small and the tires are over-inflated - at least that’s the conclusion I draw from the photos I examined. One might search the spares box for a better set of wheels.
Thirdly, speaking of photos, most of the images I found of the parked aircraft showed the propeller blades angled with a neutral pitch. The modeler intent on exact replication of a parked Bronco would probably want to remove the blades and reattach them. Also, one will find some very shallow recessed lines on the blades, to be used as a guide for painting the cautionary stripes, but the lines are too far apart. It would be more accurate to fill them and paint narrower stripes.
Fourthly, the external stores are quite good with the exception of the centerline tank – it’s altogether too pointed, and really should be sanded down. The complete list of stores offered in the kit is as follows: 1 150 gallon fuel tank, 2 AIM-9 Sidewinders, 5 Mk. 82 bombs, 4 LAU-3 rocket pods, and 4 LAU-10 rocket pods.
Finally, according to the USAF fact sheet I mentioned earlier, the pitot tube angles downward at about 5 degrees from horizontal, contrary to the directions in the kit.
| CONCLUSIONS |
This was a fussy little build – not difficult mind you, but fussy. I felt like I could have built two average jets (whatever that means) in the time it took me to build the Bronco. Perhaps that has to do with the nature of the aircraft itself: the twin-boom structure, the unique canopy, and scores of little details that required constant use of my smallest tweezers and smallest brushes. The fussiness is also magnified by the small scale – I would be happy if Academy saw fit to blow this box of plastic up to 1/48.
That being said, this model abundantly repays all
the work you put into it - all the myriad details are out in the open for easy
viewing. How many of us have labored over the innards of a WWII bomber only to
reach the sad day when the fuselage has to be
 buttoned up, and all our work gets
hidden forever? That’s not an issue with the Bronco – the intricacies of
this model are in plain sight for everyone to see and admire, and the build
makes a distinctive addition to a shelf of jets. I built this kit out-of-the-box
in order to explore its idiosyncrasies, and now that I have an idea of its pros
and cons as it were, I intend to construct a few more with aftermarket
additions.
buttoned up, and all our work gets
hidden forever? That’s not an issue with the Bronco – the intricacies of
this model are in plain sight for everyone to see and admire, and the build
makes a distinctive addition to a shelf of jets. I built this kit out-of-the-box
in order to explore its idiosyncrasies, and now that I have an idea of its pros
and cons as it were, I intend to construct a few more with aftermarket
additions.
One of the reasons I frequent ModelingMadness is to research the available aftermarket products for a specific kit. Although I didn’t use any in this build, there are some very fine offerings out there for the Academy OV-10A, and I’ll list them for anyone who’s interested. Czech Master Kits offers an engine set (CMK7069), interior detail (CMK7025), and moveable control surfaces (CMK7030). Extratech and Eduard both offer photo-etched detail sets (EX72101 and ED72310 respectively), and Eduard also offers a set of masks (EDCX127).There are also a number of decal sheets available by various makers, with markings for Navy and USMC birds in addition to research aircraft flown by NASA, and fire-spotters operated by the CDL.
In closing, it may sound like I’ve nitpicked this model down to its minutiae, but that’s not because I disliked it. On the contrary, I enjoyed it immensely, and see in it the potential for a truly accurate and highly-detailed project. It’s certainly not a model for the beginner however, and even experienced builders will find themselves exercising the utmost patience. But in my opinion, the final result is definitely worth all the fiddling. Happy modeling! John.
John Anthony
December 2010 If you would like your product reviewed fairly and quickly, please contact the editor or see other details in the Note to
Contributors.