
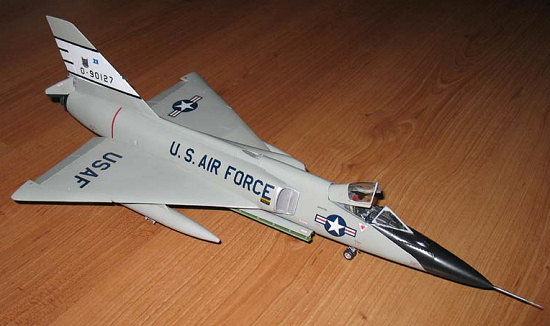
Monogram 1/48 F-106A
| KIT #: | 5809 |
| PRICE: | $20.00 MSRP |
| DECALS: | Two options |
| REVIEWER: | Dan Lee |
| NOTES: | Built right out of the box. |
| HISTORY |
The F-106 Delta Dart was the last purpose built Interceptor and pure delta winged fighter to serve in the USAF (from 1959 to 1987.) The purpose of the F-106 was to defend the continental US thru NORAD via the MA-1 Fire Control System to guide it into position to fire its Falcon and nuclear tipped Genie Missiles at incoming Soviet bombers if World War Three had started.
| THE KIT |
This is the 2004 Revell reboxing of the venerable Monogram F-106 Kit that was introduced in the mid 80s. It is the only available F-106 in 1/48 scale and typical of models from that era, it has raised panel lines and not the greatest fit or engineering.
| CONSTRUCTION |
 I read thru Fred Kraus’ review
before starting and loaded up on various grades of sandpaper, Mr Surfacer, and
CA glue.
I read thru Fred Kraus’ review
before starting and loaded up on various grades of sandpaper, Mr Surfacer, and
CA glue.
The first step was to wash the sprues with dish soap and warm water to remove the mold release agent. The parts were then removed from the trees. Despite the age of the kit, there wasn’t as much flash on the parts as one would expect.
The layout of the F-106 kit allows for doing things a bit differently than most airplane kits—it has a top half (with separate side by side halves) and a bottom half rather than the typical side by side most of us are used to. I started assembling the model by gluing the various wheel well parts into the lower half of the fuselage and then painted the wheel wells, missile bay and various missile bay components with MM Acryl Zinc Chromate Green (although the instructions erroneously call it interior green.) I ended up cutting off the actuator rods of the middle landing gear doors because they got in the way. I would glue them back on for final assembly.
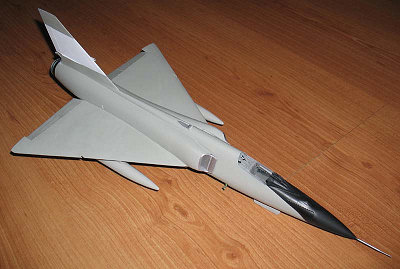
I then mated the wings and lower fuselage together because I wanted to close up the gaps on the underside of the delta wing leading edge as best I could before start filling and sanding. I ran a pin with CA glue on the tip down the seam (to complete this required many applications, but it is a lot more accurate and doesn’t need as much sanding than slopping it down), put some accelerator down on it and then put some Mr Surfacer 1000 on top of it. I put some 3M Blue Painters Tape to cover up the detail I didn’t want to sand away (learned this from FSM) and proceeded to sand the seam. It took several times to fill and sand before the seam disappeared. Why the model designer didn’t put the seam along a panel line I don’t know. As a final touch on the wing assembly, I took a razor saw and separated the elevons.
 The fuselage has issues with
the tail join—one piece is not thick enough and creates a rather prominent
step. I glued several strips of 10 thou plastic card to the tail to eliminate
most of the step between the tail surfaces. I filled the resulting large gaps
with more 10 thou plastic card and filled it with Mr Surfacer and removed the
excess with Mr Thinner and Q Tips. The rest of the top half of the fuselage was
glued together with no issues except the prominent gap along the neck and had to
be dealt with repeated filling (Mr Surfacer and CA glue) and sanding.
The fuselage has issues with
the tail join—one piece is not thick enough and creates a rather prominent
step. I glued several strips of 10 thou plastic card to the tail to eliminate
most of the step between the tail surfaces. I filled the resulting large gaps
with more 10 thou plastic card and filled it with Mr Surfacer and removed the
excess with Mr Thinner and Q Tips. The rest of the top half of the fuselage was
glued together with no issues except the prominent gap along the neck and had to
be dealt with repeated filling (Mr Surfacer and CA glue) and sanding.
The cockpit was fairly easy to assemble and paint (mostly FS36321, Dark Gull Grey)—I used cockpit photos I got from the internet to paint the instrument panel (Revell provides a cockpit decal, but I didn’t use it) using Warhammer/Citadel Red, Yellow, and Steel, and Tamiya White and Green. I also brush painted the ejection seat, but did not install it at the time. The tub and rear deck were glued in place before the top and bottom halves were glued together.
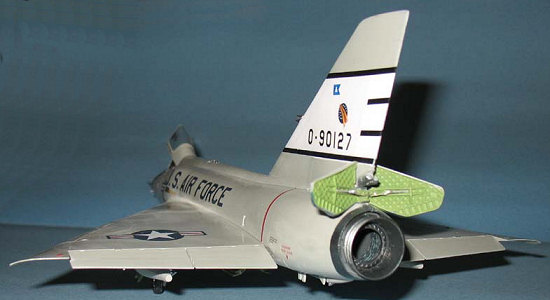
The final sub assembly before gluing the two fuselage halves together was to do assemble the burner can. Unfortunately, the can had a very large seam to deal with and there were a lot of corrugations in the burner can which would make filling and sanding rather difficult, a not so wonderful characteristic of 1980s era Monogram kits. I thought about replacing the tube with some sort of corrugated tube sans seams, but I couldn’t find any with the same diameter. In the end I decided not to care and painted the thing black so that any flaws would be barely noticed. I still had to deal with the seams on the burner nozzle and used the same combo of Mr Surfacer and CA glue to fill it with some careful sanding as to not remove the details.
The top and bottom fuselage halves
were glued together, but they had a big wicked seam that needed to be dealt
with. I used CA glue and Mr Surfacer to fill it and then took many grades of
sand paper to smooth everything out. The trickiest seams were those next to the
elevons and required a lot more patience to deal with (a smarter way would be to
cut the elevons off before gluing everything together and then reattaching them
afterwards.) The seams beside the elevons were comparatively easier to deal
with than the engine compartment as the seam ended up being a rather large step
and had the worst fit of all. I ended up using gluing 20 thou plastic card
along the step between the fuselage halves to provide additional material to
fill the gap. Repeated filling with superglue and Mr Surfacer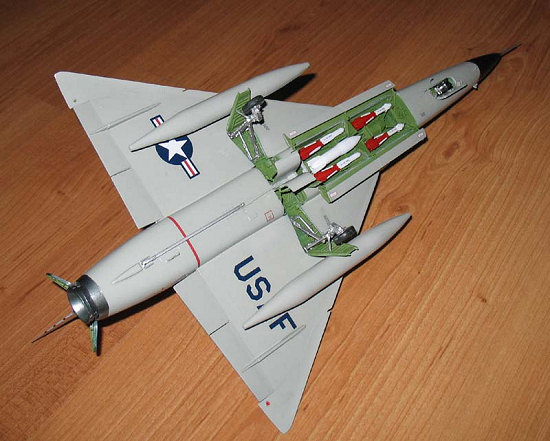 and sanding; this took at least five times before I got it right.
The intakes were assembled next. I filled the gaps in the intakes along the inside of the intakes with plastic card and Mr Surfacer and then glued them into place. The fit of the intakes were almost as terrible as the tail with gaps everywhere. I filled the top and side gaps with Mr Surfacer. The worst gap was at the bottom of the intakes. It took several applications of CA glue and Mr Surfacer to fill it out. Sanding took lots of attempts and swearing before I felt it was acceptable. The last gaps to be dealt with were the fuselage to delta wing join. Plastic Card, CA glue and Mr Surfacer were used to fill it and then sanded it down with 400 and 1600 grit sandpaper wrapped around a ruler.
The nose cone was glued on. The nose cone seams were easily filled with Mr Surfacer and the excess removed with Mr Thinner. I could not say the same about the pitot tube part as the fit was suspect. It needed some filling with CA glue and careful sanding to make it all smooth.
Most of the raised detail that was removed during sanding was redone with a number 11 blade and ruler. Those that couldn’t be redone were left alone as I wasn’t about to screw around with my painfully sanded seams for the odd missing detail. I like being accurate, but I’m not a fanatic about it.
The missiles were the last and least favorite of my construction tasks. I threw out the Falcon missiles that came with the kit because they were about as useless as their real life counterparts and opted to use the ones (a pair each of the IR and ARH missiles) from the Hase 1/48 C weapons set, but I kept the Genie AAM. Assembly was hassle free even though the Genie required some sanding and filling (which became 2nd nature while working on this kit.) Painting on the other hand wasn’t. The USAF painted the Falcons missiles a mix of white and red and the Genie was a pure white both missile paint schemes are hell for a guy like me. I ended up spraying all the missiles flat white and then carefully hand painted the red on the Falcons using Citadel Blood Red (which is probably the best brushable acrylic red I’ve ever used.) It looks okay in the missile bay, but just don’t look too close.
| COLORS & MARKINGS |
Painting
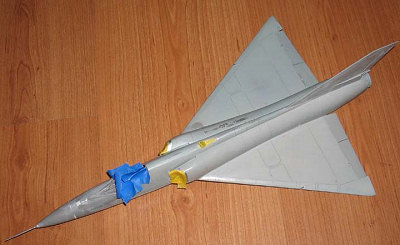
I started off filling the wheel wells and missile bay with wet toilet paper and then sprayed the top and forward areas of the Delta Dart with a light coat of Tamiya TS-30 silver leaf from the rattle can. There were two reasons for it:
 1) The intakes and the pitot
tube were silver-ish in color.
1) The intakes and the pitot
tube were silver-ish in color.
2) To see if there were any flaws in the seams as silver paint shows all. I had to fix the seams along the neck between the cockpit and engine twice before I was satisfied.
Once the silver paint was dry, I masked off the intakes and prepared to spray MM Acryl Aircraft Grey (FS16473.) I had gone to the M2 forum because one paint line suggested that FS16473 was the same as RLM76 (it isn’t) and this threw me off plus I’m not very good with gloss coats. Our editor, DaBoss, suggested that I use MM Enamel FS16473. I checked out the color, but the problem is that I don’t use enamel paint (inside the house) so I opted for MM Acryl while going under the blindly stupid assumption that it was the same color. Under certain lighting conditions it can be. After I sprayed it on, I was disgusted to find out that MM Enamel and MM Acryl FS16473 was not the same (see I told you I was dumb.) Acryl FS16473 was too green and I realized that I needed a darker less green version of FS16473 acrylic. I ended up using Gunze Aqueous H57 Aircraft Grey which is a touch lighter than the MM enamel equivalent.
I decided to try something new on this particular model. I had recently purchased a set of micromesh sanding pads to smooth out my paint surfaces (in anticipation of a building a car model where the sanding pads are a necessity) and wanted to see how they work on a acrylic paint surface after using it on a lacquer based surface for a recent Nieuport 17 build (I spray rattle cans outside in the garage or at least I could till winter finally arrived.) I followed the instructions and sanded the surface smooth while try to avoid destroying the raised detail and discovered why many serious modelers avoid raised detail like the plague. If I were much less lazy then I’d remove the raised detail and rescribe the surface, but I am not so I worked around it best as I could.
 At same time, I masked off the
canopy parts and sprayed the insides with Poly Scale Dark Gull Grey and then
when it was fully dry (Gunze and Testors paints do not work well together when
wet) I sprayed on Gunze Aircraft Grey.
At same time, I masked off the
canopy parts and sprayed the insides with Poly Scale Dark Gull Grey and then
when it was fully dry (Gunze and Testors paints do not work well together when
wet) I sprayed on Gunze Aircraft Grey.
It took three coats of paint with wet sanding to get the surface finish I wanted. It is not perfect (due to raised detail) but I can live with it. I did some final polishing on the model with a used Bounce sheet to get that luster before decaling.
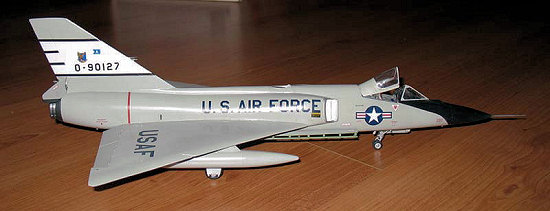
I masked off the tail and white strip was sprayed on with three coats (with repeated fine sanding) of Gunze Gloss White. The instrument panel cover and nose cone were masked off and sprayed with Gunze Flat Black.
The final area of the plane that needed to be painted was the external portion of the nozzle. Masking the nozzle to took some more Tamiya and 3M Blue Tape, plus shoving wet tissue paper into the nozzle to prevent overspray as I used Gunze Steel (which would show up on an all black burner can and highlight the fact that I wasn’t smart enough or diligent enough to deal with the burner can seams.)
Decals
I used the kit decals for the 48th FIS from Langley AFB which was the 2nd scheme that came with this boxing. These aren’t like the old Monogram uber gloss and thick decals so they were useful. It isn’t the most interesting scheme, but I chose it because it didn’t have those annoying bands running around the fuselage which are okay if one kept the missile bay closed—I guess it must be the AMS talking that I preferred to build an open missile bay rather than fiddle with a fuselage band decal. I used Microscale Sol and Set for the initial stuff and Solvaset for when I had some issues with decals not conforming.
There was one glitch in the decal application. Apparently Microscale Set sometimes melts paint and I had a couple of spots where the paint dissolved which needed to be touched up. This never happened to me before so I found it rather annoying.
| FINAL CONSTRUCTION |
Once the decals dried and the model was washed to remove the decal solution, I finished gluing in all the bits of the missile bay including the missiles.
The photos I’ve seen of F-106s showed
them very clean with very little of the panel lines showing so I passed on
weathering or even using a wash on the Delta Dart.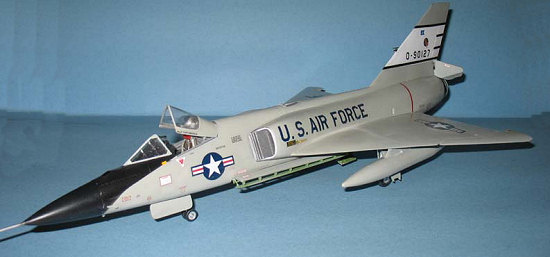
For a final coat, I mixed 90% Future and 10% Tamiya Flat base and sprayed it over the F-106. I wanted a glossy coat, but I didn’t want it to look like a showroom car and my bottles of premixed semi gloss was too flat so this was a compromise like that 3rd bowl of porridge that Goldilocks ate.
I then glued the final bits on from antenna to landing gear to fuel tanks to finally missile bay doors. The nose gear was a touch fiddly and fragile so I ended up gluing it on with CA glue.
Unfortunately, I had some problems with polishing the finish (micro mesh and Future do not mix) and had to redo an entire panel of the portside wing. This took me a while to fix as I had to repair all my damage layer by layer. Grrrrrr.
| CONCLUSIONS |
In my
finish-way-after-the-contest-is-done habit, this F-106 was supposed to be ready
in time for the M2 NORAD competition,
 despite the fact that I gave
myself two months to build one! As it is pretty obvious from what I’ve
described above, the major reason why it took so long was that the F-106 is not
the easiest kit in the world to build and my issues with the paint. The RM
F-106 is one of those kits that will test your skills and if you like a
challenge then this is a kit for you (plus it is cheap to replace if you screw
it up.)
despite the fact that I gave
myself two months to build one! As it is pretty obvious from what I’ve
described above, the major reason why it took so long was that the F-106 is not
the easiest kit in the world to build and my issues with the paint. The RM
F-106 is one of those kits that will test your skills and if you like a
challenge then this is a kit for you (plus it is cheap to replace if you screw
it up.)
I like the “faster than a speeding bullet” look of this nuclear armed lawn dart so I’m glad I build one. However, I doubt that I will build another unless there is a particular scheme I really really really like. If you want to build the Century Series in 1/48 then these 1980s Monogram kits are the only ones available (as mentioned by other reviewers.)
May 2007
If you would like your product reviewed fairly and fairly quicklyh, please contact the editor or see other details in the Note to Contributors.