Hobby Boss 1/48 F-105D Thunderchief
| KIT #: | 80332 |
| PRICE: | $79.95 MSRP |
| DECALS: | Two options |
| REVIEWER: | Dan Lee |
| NOTES: | AMS resin cockpit set used. |
| HISTORY |
The Republic F-105D Thunderchief was designed by Alexander Kartveli (one of the great airplane designers and the brains behind the P-47) in the 1950s as a low level nuclear armed Mach 2 supersonic strike fighter for the USAF. It achieved this performance in large part to the aerodynamic revolution spurred on by the area rule (leading to wasp waisted/coke bottle shaped fighters) and a very sophisticated variable intake system that changed shape to improve airflow at lower altitudes and higher speed done so at a huge cost in maneuverability. One of the other major drawbacks of the F-105 was it s need for huge runways (a common criticism of Republic aircraft) and huge size as at the time it was the largest single engine fighter ever produced.
When the F-105 went to war and sent to Vietnam and
Thailand in 1965, it was used in a completely different manner than which it was
designed for--high altitude subsonic conventional strike plane. It became the
primary strike plane for the USAF into what was designated as Route Package 6
aka Hanoi and surrounding area. From 1965 to 1968, when President Johnson
ordered a 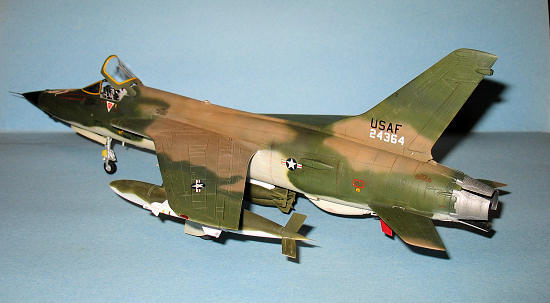 bombing halt north of the 17th parallel, the F-105s carried the war to
the North Vietnamese. They did so at huge cost with over 1/2 of the total
F-105Ds built lost in combat or operations losses and many of the pilots
KIA/MIA/POW. Many squadrons suffered over 100% casualties leading the USAF to
cull SAC and MAC squadrons of pilots and transferred them to TAC to fill up the
casualty depleted rosters.
bombing halt north of the 17th parallel, the F-105s carried the war to
the North Vietnamese. They did so at huge cost with over 1/2 of the total
F-105Ds built lost in combat or operations losses and many of the pilots
KIA/MIA/POW. Many squadrons suffered over 100% casualties leading the USAF to
cull SAC and MAC squadrons of pilots and transferred them to TAC to fill up the
casualty depleted rosters.
What the USAF also found was that the F-105 was really not the best plane for a conventional war despite performing well in a difficult role. The sophisticated intake system proved to be more of a hinderance in it s new role as a high altitude subsonic strike fighter and was a major headache for maintenance crews. Plus the huge size, poor pilot visibility, smokey jet exhaust and poor maneuverability proved to be a hinderance when attacked by NV SAMs and Migs. One advantage, the F-105 did have over the F-4 was that it had a 20mm cannon with radar gunsight and was used to kill 24.5 of the F-105 s 27.5 Mig kills.
By the 1970s, the F-105Ds were rotated out of Vietnam/Thailand to be replaced by the more versatile F-4 Phantom and used by AF Reserve and Air National Guard Units till the early 80s when the airframes were too worn out to continue. The two seater F-105Gs Wild Weasels served in Vietnam till the end of the war.
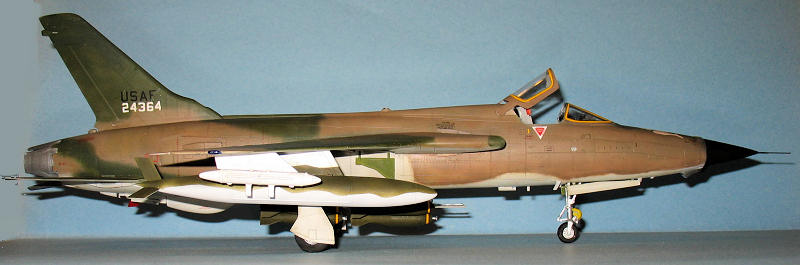
The Pussy Galore was a short lived but legendary F-105D marking. Originally conceived as a joke on KC-135 tanker crews who had trouble hooking up their fueling booms, it became a welcome morale booster for tanker crews. The original Pussy Galore was painted over and later shot down in 1967. The Pussy Galore II marking was used between Oct 1966 and Dec 1966 by Capt. Victor Vizcarra till an uptight USAF senior officer decided that putting naked women markings on his unit aircraft was a no-no.
| THE KIT |
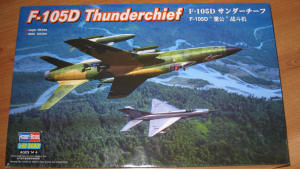 The kit comes in a sturdy cardboard box and consists
of 245 parts on 8 parts gates of soft light grey plastic, one clear parts gate,
a decal sheet, color/marking guide and instruction booklet. The parts are flash
free, very clean, and small parts are rather delicate so be careful removing
them from the parts gates. The parts gates are organized for each sub assembly
from the wings, fuselage to the internal details such as the engine and 20mm
Gatling Gun.
The kit comes in a sturdy cardboard box and consists
of 245 parts on 8 parts gates of soft light grey plastic, one clear parts gate,
a decal sheet, color/marking guide and instruction booklet. The parts are flash
free, very clean, and small parts are rather delicate so be careful removing
them from the parts gates. The parts gates are organized for each sub assembly
from the wings, fuselage to the internal details such as the engine and 20mm
Gatling Gun.
The instruction booklet is just a series of unnumbered assembly diagrams that show where the parts go. I found that the instructions for the landing gear to be vague and I wished they showed the proper angle.
The surface of many of the parts are covered by rivets courtesy of the mad Chinese riveter. I don t mind a certain amount of detail, but there is a thing as too much especially for rescribing and decals. Otherwise, the panel lines are decent and sharp. I m no expert on the F-105 so I can t say much about the accuracy other than it looks like a Thunderchief to me.
The marking guide lists all the colors in Gunze Sanyo paint and their FS equivalents for those who don t have access to stocks of their currently unavailable (at the time of the writing) acrylic paint.
| CONSTRUCTION |
After cleaning the parts with dish soap and warm water, it all begins with the cockpit. The Hobby Boss (HB) cockpit is not the best and I really didn't want to use it. At the time I only had the True Details (ex-KMC) F-105D set for the Monogram version, but I spent a couple of hours trying to figure out what work was required. It turns out that there was a lot of work required that I really didn't want to do. Normally, this would be an OOB review, but I m not going to be making many F-105s so I opted to build this kit with as much detail as possible.
 One thing that became quite obvious as I was looking
over the parts in comparison to the KMC resin pit was the kit cockpit was pretty
weak in detail and seemed a bit shallow in depth. Fortune smiled on me when I
was looking for an F-5 replacement cockpit and discovered that AMS Resins (aka
Harold Offield) did a replacement pit for the HB Thunderchief as well. The
detail level on the resin is amazing and the casting has few if any flaws. I
really do like the way it was designed so that it was mostly a drop-in
replacement with little of the frustrating tweaking (sanding/shaving/swearing)
that one needs to do with an aftermarket cockpit. The resin parts were secured
in place with CA glue on the starboard side and test fitted to make sure that
the fuselage halves went together before the glue hardened. One minor fit issue
was that I had to trim the left sidewall so that it could fit against the
throttle. There were some small gaps that required some filler (Vallejo Plastic
Putty.) Then the parts were painted Gunze Aircraft gray and hand painted with
Citadel paints.
One thing that became quite obvious as I was looking
over the parts in comparison to the KMC resin pit was the kit cockpit was pretty
weak in detail and seemed a bit shallow in depth. Fortune smiled on me when I
was looking for an F-5 replacement cockpit and discovered that AMS Resins (aka
Harold Offield) did a replacement pit for the HB Thunderchief as well. The
detail level on the resin is amazing and the casting has few if any flaws. I
really do like the way it was designed so that it was mostly a drop-in
replacement with little of the frustrating tweaking (sanding/shaving/swearing)
that one needs to do with an aftermarket cockpit. The resin parts were secured
in place with CA glue on the starboard side and test fitted to make sure that
the fuselage halves went together before the glue hardened. One minor fit issue
was that I had to trim the left sidewall so that it could fit against the
throttle. There were some small gaps that required some filler (Vallejo Plastic
Putty.) Then the parts were painted Gunze Aircraft gray and hand painted with
Citadel paints.
The two issues I had with the cockpit:
1) Self inflicted: I removed too much of the instrument panel coaming and had to fill it in with putty and plastic strip to secure it in place.
2) Part of the HUD broke off during shipping. I replaced it with a piece of plastic card.
It seems to me that kit had an issue in the way the forward landing gear was designed. The landing gear needs to be added during construction before you close up the fuselage, but I have usually found that it does not end well as I ve broken off pre-assembled bits off during the filling/sanding phase of construction. What I did was to add the parts that needed to go in the bay (two struts) and assemble the rest later.
 The HB is apparently a pantographed version of the
Trumpeter 1/32 F-105D which means that it includes a lot of parts for the
interior. Being a lazy guy and not going to open the plane up, I opted not to
install them including most of the engine detail, the 20mm Vulcan, the
refueling probe and the radar.
The HB is apparently a pantographed version of the
Trumpeter 1/32 F-105D which means that it includes a lot of parts for the
interior. Being a lazy guy and not going to open the plane up, I opted not to
install them including most of the engine detail, the 20mm Vulcan, the
refueling probe and the radar.
Fortunately, unlike many models with open features, the doors fit without many issues although I had to use a lot of glue and a gentle touch to fit the refueling probe doors in place.
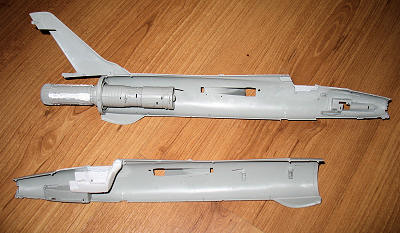
The nose was an issue because it was designed to show off the radar and not enclosed as I wanted it. Before I added the nose, I glued a 1/2oz lead fishing weight inside just to be on the safe side. The nose needed a lot of filling and sanding. One thing that should be noted is that the plastic for the nose is very thin so don t over do the sanding. I eliminated most of the gaps and the need for sanding by using Vallejo Plastic putty and removed most of the excess with wet Q-Tips. A couple of areas that needed sanding were the parts gate attachment points mostly because I wasn t as careful removing the parts from the parts gate as I should have. Some gentle sanding with 400 grit, smoothed down any obvious minor step between the nose cone and forward fuselage.
Be prepared to do a lot of filling, sanding and rescribing due to poor fit of the tail to the rest of the plane. If I was smart, I d have attached the tailplane pieces to the main fuselage halves before assembling the fuselage. Another problem area is the upper spine on the fuselage.
 The wings assembled together easy. No easy way to
sand/fill the obvious seam in the intake. There are also ejector pin marks that
need to be filled in. Just be careful as the plastic is thin in this area.
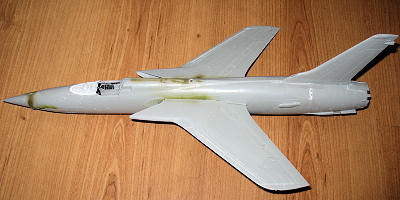
Gluing the wings to the fuselage? It required a lot of eyeballing to get the
wing angle right. I hoped I got it right or I would have one lopsided looking
Thud. I added the flaps and the flap doors (?). The fit of the wing to fuselage
is okay.
The wings assembled together easy. No easy way to
sand/fill the obvious seam in the intake. There are also ejector pin marks that
need to be filled in. Just be careful as the plastic is thin in this area.
Gluing the wings to the fuselage? It required a lot of eyeballing to get the
wing angle right. I hoped I got it right or I would have one lopsided looking
Thud. I added the flaps and the flap doors (?). The fit of the wing to fuselage
is okay.
The pitot tube they provide is way too thick and looks awful so I decided to use Mini-Mecha tubing instead. I drilled a 0.8 mm hole into the tip, inserted a CA covered 0.8mm diameter piece of tubing at the correct length. I would add a 0.5mm piece of tubing later.
One problem I discovered was that the windscreen doesn t fit over the AMS instrument panel coaming well. I had to shave the coaming down a 1mm to get the canopy to fit.
I left the stabs off till I was done filling/sanding the seams.
Otherwise no other major issues with the assembly.
| COLORS & MARKINGS |
Paint
I preshaded the plane with flat black before spraying
on light coats of Gunze FS36622 Light Grey, Tamiya XF-52 Dark Earth (FS30219),
Tamiya XF-58 Olive Green (FS34102) and Poly Scale FS34079 in the camo pattern
instructions. I noticed that the instructions were incorrect on the paint (the
lighter green was listed as the darker color and visa versa.) I free handed the
pattern 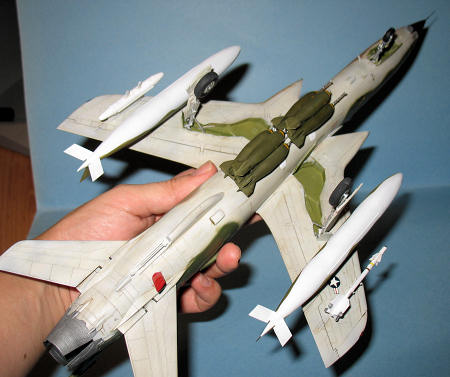 instead of using masks, using low pressure and keeping the airbrush
close to the model to keep the overspray down to a minimum.
instead of using masks, using low pressure and keeping the airbrush
close to the model to keep the overspray down to a minimum.
I painted the canopy at the same time using XF-19 Sky grey for the interior and the exterior colors as per the instructions.
Once the paint was dry, I sprayed on a thin coat of Future for the decals.
Decals
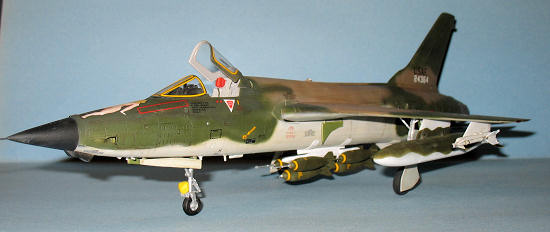
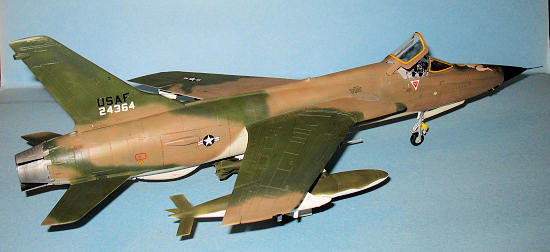
The Hobby Boss kit comes with two markings. One is a AF Reserve F-105D in SE Asia camo and the other is Pussy Galore II. It s not that hard to figure out which one I selected.
Hobby Boss decals are okay, but not great. Once they are on the surface, it takes a lot of effort to move them around because they stick to the surface. One other annoyance with rivet detail is that you need to use a bit of MicroSet and/or Solvaset to get the decals to settle into the rivets. I was not really happy about that.
The Pussy Galore decal, aka the naked lady, was a bit fragile as I accidently ripped off one of her legs as I was positioning it. No harm no foul.
The canopy was unmasked and I added the tape decals for the windscreens. The decals work okay and were a touch oversized in relation to the canopy. Still worked out better than trying to paint them myself so I don t have that much to complain about.
Weathering
I used a dirty watercolor wash to reflect the operational conditions of SE Asia, but tried to keep it from being too dirty. There were some problems with the seams that I had to sand away so I ended up doing some post shading and fading it a little in places. I hopefully kept it from looking over done.
| FINAL CONSTRUCTION |
The landing gear doors lack any detail and ejector pin marks for both the forward and rear landing gear. I ended up having to cut some 10 thou plastic card into shape and glue them in. At the same time, I glued in the landing gear and added some 30 gauge wire to represent brake lines as based on walk around photos. The rear doors were painted FS3622 on both sides while the forward landing gear door interiors were painted interior green. I ve found that the colors of the interior doors differ based on walk around photos.
The landing gear for the F-105 is spindly and rather
awkward. If I had the choice, I d rather use white metal replacements. The nose
landing gear went together okay and I hand painted it with Citadel Mithril
Silver. One piece was painted white then yellow as
 per photos and not kit
instruction. The wing landing gear proved to be more awkward as I attached I
ended up hand painting the gear with Mithrill Silver. The wheels were sprayed
silver, masked and then painted NATO black. Touch up done with a paint brush. I
carefully glued the wing landing gear in with slow setting CA glue and had make
some adjustments to avoid a lame legged F-105D.
per photos and not kit
instruction. The wing landing gear proved to be more awkward as I attached I
ended up hand painting the gear with Mithrill Silver. The wheels were sprayed
silver, masked and then painted NATO black. Touch up done with a paint brush. I
carefully glued the wing landing gear in with slow setting CA glue and had make
some adjustments to avoid a lame legged F-105D.
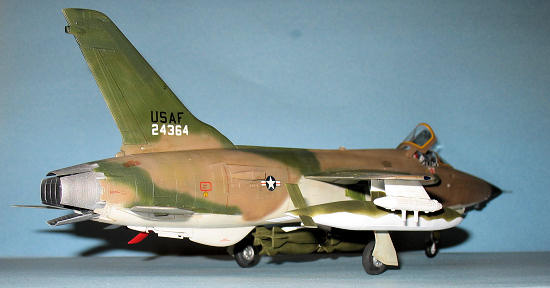
One of the issues with the Hobby Boss kit is that the F-105 s weapons load is not the typical warload for a F-105. Instead of Mk82s and Bullpup ASMs, the F-105 usually carried a MER of 6 M117 750lb bombs (two with extended fuses) on the centerline pylon (which was apparently reinforced), two fuel tanks on the inner pylons and one jammer pod and one AIM-9 Sidewinder on the outer pylons. The yellow markings on the bombs are the Hobby Boss Mk82 bomb decals which fit perfectly. I managed to scrounge up everything I needed from the various Hasegawa weapons sets. The jammer pod I used is the ALQ-87 which is incorrect as it came into service long after the Pussy Galore II markings were removed.
I used the kit tanks. These did not have the best fit and required a bit of filling to deal with the gaps. Once the tanks were buffed with sanding cloths, the tanks were sprayed gloss white. When the gloss white dried, I added hard masks cut from painter s tape to cover the gloss white portions and sprayed OD.
The MER was taken from the Hasegawa Weapons set. I had to scratch build a pylon for the MER using a 3/16 width plastic strip and it was sanded down on an angle. I also cut some 10 thou plastic card to represent the centerline reinforcement braces. These were all painted gloss white. I did not realize this till later, but the centerline plyon is actually too narrow as the bombs are too high off the ground compared to photos of the real thing. The bombs were glued on using CA glue applied with a toothpick.
 I cut off the rail from an unused F-86 Sabre
Sidewinder pylon and glued it to a HB outer wing pylon. The jammer was filled
and sanded several times before it was glued to the other outer wing pylon. Both
the jammer and Sidewinder were painted with a coat of flat white and gloss
white.
I cut off the rail from an unused F-86 Sabre
Sidewinder pylon and glued it to a HB outer wing pylon. The jammer was filled
and sanded several times before it was glued to the other outer wing pylon. Both
the jammer and Sidewinder were painted with a coat of flat white and gloss
white.
Hobby Boss has separated engine exhaust feathers. These were painted with burnt metal on the inside, metallic grey/light steel on the outside and weathered with a light faint airbrushed lines of flat black. These were glued in without much trouble, but be careful as these feathers are rather fragile (I broke the bottom feather twice.)
Apparently there are pieces A17 and A18 that go on the wingtips. I did not see them at all in the parts guide or on the parts gates themselves. I substituted globs of Krystal Kleer to replace the wingtip lights.
I added some scratch built detail (mirrors and HUD console(?)) to the forward canopy using white glue. I cut a piece of clear acetate for the HUD glass and attached it to the resin HUD with clear acetate.
Final bits were added including the red painted fuel dump, canopy and the lights on the fuselage and the landing gear.
| CONCLUSIONS |
The HB F-105D makes into a nice model, but my experience showed that it does need a fair amount of work. Here is a list of issues/gripes that I encountered (none “fatal”, but need to be careful about):
1) The fit is not great in the tail area.
2) The whole rivets trend on Chinese made kits made rescribing detail a pain in
the butt.
3) Accuracy problems with the war load (M117s, not Mk82s and Bullpup ASMs)
4) Parts that are supposed to be there (A17/A18) but are not.
5) The cockpit/seat is pretty weak and at the very least needs a replacement
seat.
6) One thing that is unavoidable is the wobbly land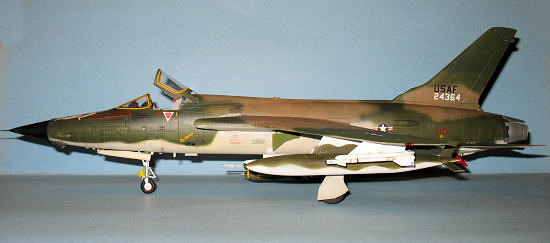 ing
gear. Be very careful installing and handling the landing gear. Metal
replacements might be required.
ing
gear. Be very careful installing and handling the landing gear. Metal
replacements might be required.
7) Door detail lacking and pitot tube too thick
8) Paint instructions omitted tiny details or incorrect on things such as wing
tip lights and certain landing gear part colors.
Over all, the kit goes together fine (not Tamigawa, but not a huge amount of
work like short run kits) finished product does look like an F-105 which is what
counts. It might not replace the RM F-105 in the hearts of 1/48 modelers, but
it is a newer mold and does not have the raised panel lines shunned by many
modelers and has many internal details if you so choose to use them. However,
the HB kit is also considerably more expensive than the older F-105D kit so it
might not fit in the budgets of many modelers.
In conclusion, whether or not a modeler purchases this kit depends they want to
do with a F-105D model and what their budget can afford.
August 2009
Copyright ModelingMadness.com. All rights reserved. No reproduction in part or in whole without express permission.
If you would like your product reviewed fairly and quickly, please contact the editor or see other details in the Note to Contributors.