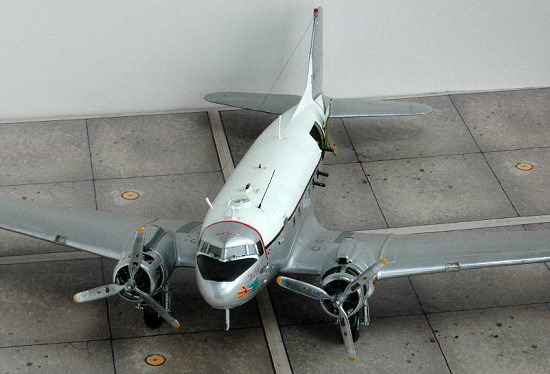
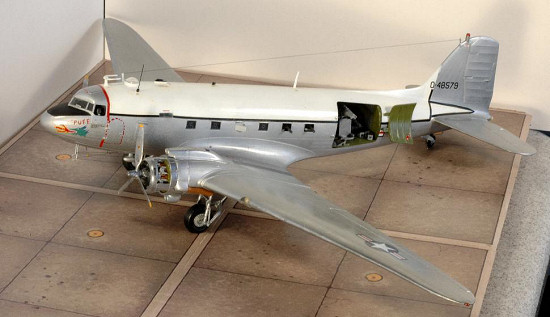
Monogram 1/48 FC-47D Skytrain
| KIT #: | 5607 |
| PRICE: | $24.98, now OOP |
| DECALS: | See review |
| REVIEWER: | Andrew Garcia |
| NOTES: | Cutting Edge and Aires resin sets used. |
| HISTORY |
The C-47 was America’s military version of the Douglas DC-3. Like many other aviation breakthroughs’, the new Pratt & Whitney and Wright engines under development in the 1930’s permitted new aircraft designs to become a reality and resulted in the DC-1. Testing in 1933 revealed the aircraft; a DC-1, reached 227 mph – the same performance achieved by contemporary racing aircraft! The U.S. Army Air Corps bought a single DC-2 for evaluation in 1935. This led to some production orders and modifications such as the rear cargo-loading door. The evolution continued until the first DC-3 was delivered to American Airlines on the 18th of August 1936. By 1937 Douglas was turning out 36 units a month. The need for greater load carrying resulted in the C-47 military transport specification requiring Pratt & Whitney R-1800-92 engines. Production of these aircraft totaled 5,253 during the WWII years. The last production C-47 was delivered to the USAAF on the 13th of October 1945. Although built as C-47B’s, the vast majority were converted to C-47D’s by the simple process of removing the engine blowers when it was determined their engine troubles were cured by this change. This venerable aircraft can still be found flying today.
 The FC-47D and AC-47D gun-ships were a
conversion of the C-47 Skytrain using a variety of weapons from an early adopter
of the then new GE Gatling Gun to a battery of ten .30-caliber M2 machine guns
as its armament. The USAF first used the more advanced Vulcan Gatling gun
(GAU-2B/A) in an early SUU-11A/A (XM18E1) pod in its first trials of the
dedicated orbiting gunship concept. The first phase that is modeled here was an
effort to get experience with the novel concept of a side-fire gunship to U.S.
troops in Vietnam. Unfortunately there were large demands for the gun and it
took some time for the Vulcan minigun production output to catch up with the
Vietnam War demands. The version modeled here was one of the earliest versions
of USAF gunships.
The FC-47D and AC-47D gun-ships were a
conversion of the C-47 Skytrain using a variety of weapons from an early adopter
of the then new GE Gatling Gun to a battery of ten .30-caliber M2 machine guns
as its armament. The USAF first used the more advanced Vulcan Gatling gun
(GAU-2B/A) in an early SUU-11A/A (XM18E1) pod in its first trials of the
dedicated orbiting gunship concept. The first phase that is modeled here was an
effort to get experience with the novel concept of a side-fire gunship to U.S.
troops in Vietnam. Unfortunately there were large demands for the gun and it
took some time for the Vulcan minigun production output to catch up with the
Vietnam War demands. The version modeled here was one of the earliest versions
of USAF gunships.
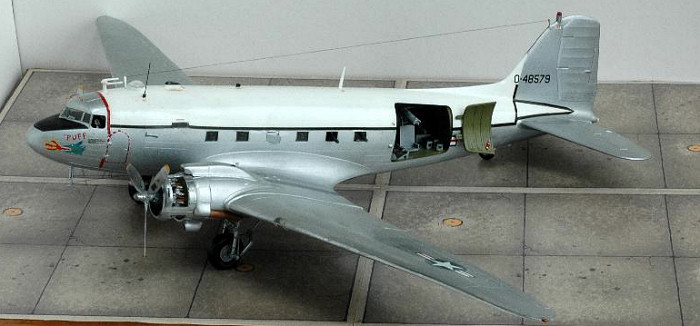
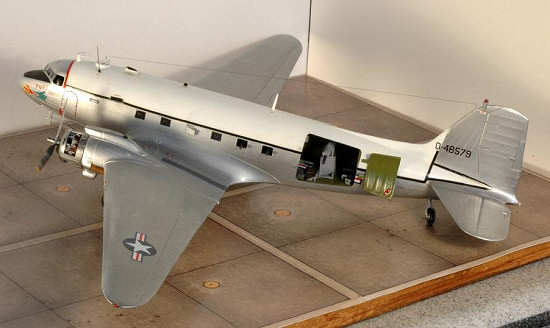
FC-47D S/N 43-48579 was among the first operational gunships in Vietnam. It’s pilot, Capt. Jack Harvey flew this aircraft out of Da Nang, Vietnam in 1965. This aircraft wore three different color schemes while providing gunship support. This model exhibits the first paint scheme. Color photos and references were found in International Airpower Review Vol. 4 “USAF Gunships in Vietnam Part 1” page 114 and in Gunships – A Pictorial History of Spooky – Squadron Signal publications # 6032 on pages 5, 25 and 28. Both references are authored by Larry Davis.
| THE KIT |
First released in 1978 as a USAAF paratrooper model (Kit # 5607) complete with a group of jump-ready troopers, the kit has been a good seller but only a few completed models have appeared at shows and contests. It was re-released in 1989 and also released as a civilian airliner version with the rear-cargo door eliminated as is appropriate for this version. I was fortunate to see one built by Rodney Williams at a San Jose, California IPMS contest in the mid-1980’s as a D-Day paratrooper transport and knew one day I would be building a D-Day invasion model like his. This resulted in the fortunate purchase and storage of a few Monogram C-47’s for future use.
 A terrific kit build of a Revell-Monogram
Do-217E-5 by Nick J. Wigman featured in the April 2002 Scale Aviation Modeler
International (Vol. 8 Issue 4) issue was the final impetus to my starting a C-47
project with exposed engines. Nick had done what I was thinking about doing –
incorporating the Aires resin engines into a kit build. The Aires - # 4032
Pratt & Whitney R-1830 Late Version engines are little gems. They are exquisite
in detail, easy to construct and stunning when finished.
A terrific kit build of a Revell-Monogram
Do-217E-5 by Nick J. Wigman featured in the April 2002 Scale Aviation Modeler
International (Vol. 8 Issue 4) issue was the final impetus to my starting a C-47
project with exposed engines. Nick had done what I was thinking about doing –
incorporating the Aires resin engines into a kit build. The Aires - # 4032
Pratt & Whitney R-1830 Late Version engines are little gems. They are exquisite
in detail, easy to construct and stunning when finished.
I had been thinking about building the C-47 in D-Day markings and incorporating the Aires resin engines into a building project for some time. In 2001 my eldest son graduated from the U.S. Army Airborne School and I knew the time had come to get this project underway after hearing many stories about his experiences. He had a touching story about three men who were in the first graduating class of the U. S. Army Airborne school, during WWII, addressing his graduating class at Ft. Benning, on the day he received his Airborne wings. After this memorable story, the Monogram C-47 came down from the “pending” shelf and research started. However, after studying a number of references I decided to build the three AC-47 gunships on the Microscale decal sheet and postpone the C –47 Paratrooper D-Day kit for the a future building cycle. The photos in International Airpower Review Vol. 4 “USAF Gunships in Vietnam Part 1” were so fantastic, I decided to build the AC-47’s to get some C-47 building experience before I build the D-Day Paratrooper version. By the way, my son is still in the U.S. Army but is now riding around in an M1A2 Abrams tank as the TC. He still enjoys airborne jumping but armor came a calling and he went for the ride in the TC seat for now.
The Monogram kit builds easily out of the box. It does have a few construction challenges such as the wing to fuselage join and the closing of the two fuselage halves due to a slightly oversized internal component. The next most important part of the building effort, after the Monogram kit, is the Meteor Productions Cutting Edge Modelworks CEC48040 AC-47D Gunship Conversion Set, Spooky/Puff the Magic Dragon. This made it all possible. It is typical Cutting Edge quality – that is, superb bubble-free resin, incredible detail and ease of construction with a very clear and content rich instruction sheet (Thank you Meteor!).
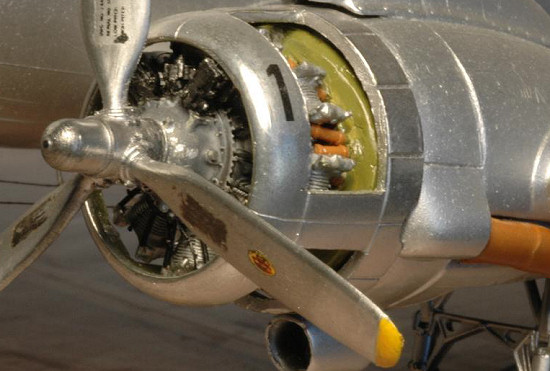
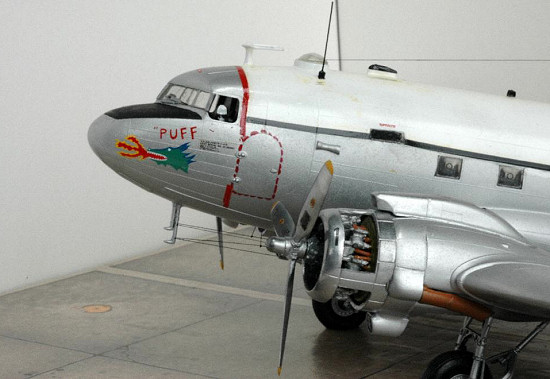
 The Aires - #4032 Pratt & Whitney
R-1830 Late Version resin engines were easy to build and have incredible detail.
I cut away the side access panels on the engine cowlings to expose the beauty of
the Aires engines. This left me with the problem of mounting the engines. I
researched the C-47 on the internet and books in my home library. I found a few
superb cutaway drawings showing good views of the engine mounts. The references
were so good I realized it would be best left up to Aires Resin who have the
talent to craft such components. I opened a hole inside the cowling and
firewall and used Milliput epoxy putty for a mounting ring. It worked despite
not being the most elegant solution. I would love to see the likes of Cutting
Edge, Aires, CMK or Verlinden provide C-47 engines and mountings for a future
build.
The Aires - #4032 Pratt & Whitney
R-1830 Late Version resin engines were easy to build and have incredible detail.
I cut away the side access panels on the engine cowlings to expose the beauty of
the Aires engines. This left me with the problem of mounting the engines. I
researched the C-47 on the internet and books in my home library. I found a few
superb cutaway drawings showing good views of the engine mounts. The references
were so good I realized it would be best left up to Aires Resin who have the
talent to craft such components. I opened a hole inside the cowling and
firewall and used Milliput epoxy putty for a mounting ring. It worked despite
not being the most elegant solution. I would love to see the likes of Cutting
Edge, Aires, CMK or Verlinden provide C-47 engines and mountings for a future
build.
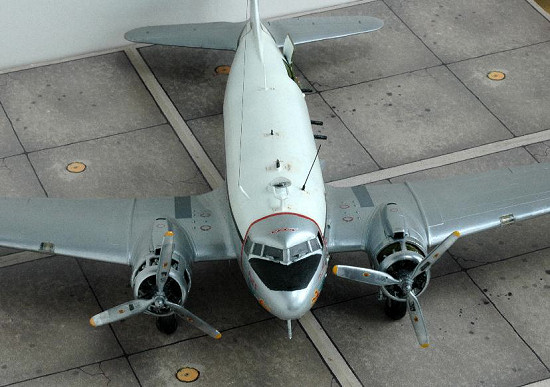
Additional components I added were the Squadron - #48052 resin wheels, modified props and a navigator window. I had to modify the kit props since the kit provided WWII style thin props. This gave way to a full paddle blade prop in the 1950/60’s. The reference texts clearly show these and they are natural metal on the planes featured on the Microscale sheet and not the traditional flat black props. For the gunship version I also had to add a side Navigation window since it is not part of the Monogram C-47 fuselage configuration.
The initial props I used were a temporary fix using the kit props as a foundation. I added some evergreen plastic, cyano glue and Milliput epoxy putty to rough out some paddle shaped blades using photos from the reference books. The props were painted aluminum per color photos on pg. 120 + 122 International Air Power Review. I wound up removing them and replacing them with new props from the Monogram B-17 kit. The cockpit has no etched metal seatbelts, which I always add to a kit, because they can’t be seen. The most important cockpit area enhancements are the Cutting Edge resin gunsight and some scratchbuilt (using metal from the Aires P & W engine etched metal fret) metal wiper blades on the front cockpit windows. The wiper blades have a thin black blade behind the air dam on the wiper blade. It may not be easily visible in the photos. This is an example of what I would like to see in an Eduard etched set for the C-47.
There are many, many antennas on the top and bottom of the FC/AC-47 aircraft with no one standard so you need to study your reference photos. Cutting Edge though provides most of the needed antennas in their resin set.
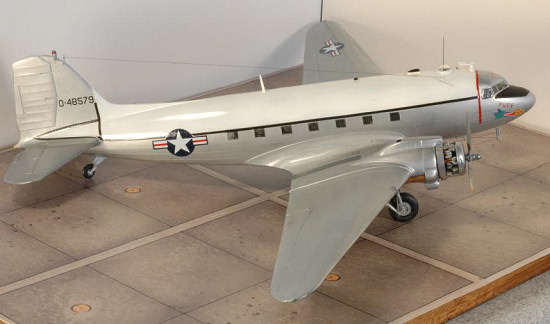
 The aircraft for which the “Puff the
Magic Dragon” nickname was first carried was 43-48579, one of a trio of original
FC-47D’s operated by the 1st ACS. This aircraft was built during
World War II as a C-47B-5-DK. The aircraft was later modified to C-47D standards
(its superchargers having been removed). The conversion was done by Air
International, Inc. in Miami, to a FC-47D standard. When 43-48579 was assigned
to the 1st ACS, this airframe was a mail courier aircraft (in early
1964) and initially maintained its gloss white upper fuselage with natural metal
finish on the rest of the airframe.
The aircraft for which the “Puff the
Magic Dragon” nickname was first carried was 43-48579, one of a trio of original
FC-47D’s operated by the 1st ACS. This aircraft was built during
World War II as a C-47B-5-DK. The aircraft was later modified to C-47D standards
(its superchargers having been removed). The conversion was done by Air
International, Inc. in Miami, to a FC-47D standard. When 43-48579 was assigned
to the 1st ACS, this airframe was a mail courier aircraft (in early
1964) and initially maintained its gloss white upper fuselage with natural metal
finish on the rest of the airframe.
By late 1965 “Puff” had been re-sprayed in SEA camouflage, over which its nose art was reapplied. Also, the aircraft had been initially officially designated “FC-47” for Fighter/Cargo-47, but after an outcry from some pilots, the nomenclature was changed to “AC-47” representing the “attack” designation. Approximately 53 FC/AC-47D gunships were built.
White “ballistic cloth”, which was a kevlar tarp, was hung on the “gun” side of later aircraft to prevent AA fire from hitting the ammunition supply. It was not in use at the time this model represents.
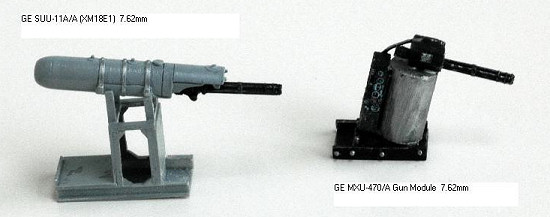
The aircraft is outfitted with three SUU-11A 7.62mm minigun pods with GAU-2B/A guns fitted to the late production racks. They are from the Cutting Edge resin update set. There is some mention in the CE instructions that if demand warrants the final version of the minigun (ie the MXU-470 big drum gun) could be released. I waited a couple of years and had to scratch build one in order to complete the trio of C-47 based gunships for my collection.
The other two AC-47’s from the Microscale decal sheet are FC-47D S/N 44-8991 “The ‘.30-Caliber Kit” Gunship (Bien Hoa, Vietnam 1965) and the third is AC-47D S/N 43010, 432nd TRW “Spooky” from the 4th SOS, Udorn RTAB Thailand 1969 in SEA camouflage.
 S/N 43010 aircraft was one of the
last AC-47 gunships. It wears the final SEA camouflage paint scheme and was
armed with SUU-11A 7.62mm minigun pods with GAU-2B/A guns fitted to the late
production racks and then converted tot he final GE MXU-470/A Gun Module in its
final configuration. An extra window was cut in front of the rear access doors
for the third minigun to provide unrestricted access through the rear doors.
This was accomplished by moving the third gun from the doorway exit into a new
“window” opening. This required an additional cut into the Monogram kit o
replicate this change.
S/N 43010 aircraft was one of the
last AC-47 gunships. It wears the final SEA camouflage paint scheme and was
armed with SUU-11A 7.62mm minigun pods with GAU-2B/A guns fitted to the late
production racks and then converted tot he final GE MXU-470/A Gun Module in its
final configuration. An extra window was cut in front of the rear access doors
for the third minigun to provide unrestricted access through the rear doors.
This was accomplished by moving the third gun from the doorway exit into a new
“window” opening. This required an additional cut into the Monogram kit o
replicate this change.
The best color photos and references were found in International Airpower Review Vol. 4 “USAF Gunships in Vietnam Part 1” page 114. A color profile of this aircraft can be found in Gunships – A Pictorial History of Spooky – Squadron Signal publications # 6032 on page 25, and a photo on page 5. Both references are authored by Larry Davis.
As more f the next generation gunships, the AC-119K Stinger and AC-130A Spectre Gunships became available the AC-47D was phased out of USAF inventory. The final AC-47D mission was flown on 30 November 1969. This was the final mission for the 4th SOS and ended USAF AC-47 operations in South Vietnam.
| CONSTRUCTION |
I used two of the Aires resin engines
in this AC-47 kit build. The Aires #4032 Pratt & Whitney R-1830 Late Version
resin engine added an interesting look and enhanced the final gunship. The Aires
- #4032 Pratt & Whitney R-1830 Late Version resin engine was easy to build and
has incredible detail. I cut away the side access panels on both engine cowlings
to expose the beauty of the Aires engine. I used the Milliput epoxy putty
“donut” and seated the engine into it after cutting a hole in the kit plastic
firewall.
 Additional components that I added were the Squadron - #48052 resin wheels,
Monogram B-17 replacement props and a cut into the fuselage for a navigator
window. For the AC-47 gunship aircraft I had to add a side Navigation window
since it is not part of the Monogram C-47 fuselage. The resin wheels were
attached using a metal rod (using a straightened paper clip). I drilled through
the Monogram kit landing gear where the kit wheels attach and used the metal rod
as an axle for strength and to eliminate any gear to resin wheel contact issues.
Additional components that I added were the Squadron - #48052 resin wheels,
Monogram B-17 replacement props and a cut into the fuselage for a navigator
window. For the AC-47 gunship aircraft I had to add a side Navigation window
since it is not part of the Monogram C-47 fuselage. The resin wheels were
attached using a metal rod (using a straightened paper clip). I drilled through
the Monogram kit landing gear where the kit wheels attach and used the metal rod
as an axle for strength and to eliminate any gear to resin wheel contact issues.
I had to modify the kit props since the C-47 kit provides only one style of WWII
thin props. The reference texts clearly show the use of paddle shaped props on
Vietnam era AC-47’s. They are finished in natural metal on the planes featured
on the Microscale decal sheet and not the traditional flat black C-47 props
found on most aircraft. The props were painted Alclad II duraluminum per color
photos on pg. 120 + 122 International Air Power Review.
The most important cockpit area enhancements were the Cutting Edge resin
gunsight and some scratchbuilt (using metal from the Aires P & W engine etched
metal fret) metal wiper blades on the front cockpit windows.
| COLORS & MARKINGS |
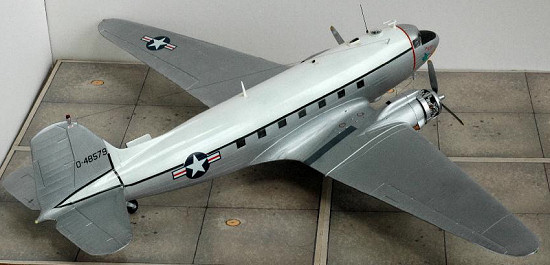
The top of the fuselage is Gunze flat white. I used several shades of Alclad II and Testors Metalizer for the natural metal finish. I sealed this version with Future floor wax in an attempt to get a good gloss finish on the white area and to improve the durability of the natural metal finish. Use of a Future floor wax coating had the unwanted side-effect of lessening the metallic lustre of an aluminum finish and creating a monotone metallic finish. The cockpit and internal fuselage were painted Zinc Chromate Green using Gunze acrylics.
The propellers were natural metal
based on color reference photos from International Airpower Review Vol. 4 “USAF
Gunships in Vietnam Part 1”. I used Alclad II duraluminum for the props. The
antenna wire was made from invisible sewing thread painted with Tamiya flat
black.
Decals:
The decal is a Microscale (pre-Superscale)
48-251 sheet, Gunships AC-47’s and AC-130A, decal # 3.
Some stencils were taken from the Monogram C-47 kit and my spares box which were
mostly Aeromaster decals.
| FINAL CONSTRUCTION |
 I created a list of detailing items
for the last part of construction. I epoxied the wing spar for strength; and
filled in the gap in the wheel well. I epoxied the windows to ensure they did
not fall out and also epoxy glued miniguns onto the floor.
I created a list of detailing items
for the last part of construction. I epoxied the wing spar for strength; and
filled in the gap in the wheel well. I epoxied the windows to ensure they did
not fall out and also epoxy glued miniguns onto the floor.
As mentioned before I used aluminum for the props per color photos on pages 120 + 122 International Air Power Review with yellow tips. The props may keep the black rubber boot on the leading edge per photo on page 122 but some do not have this due to the tropical configuration of the gunships used in Vietnam.
A white “ballistic cloth” is seen through the windows on the left (gun side) side of the airframe covering three of the windows – see page 8 Gunships-Spooky book Squadron 6032 for photo in my AC-47 painted in SEA camo. The ballistic cloth was not used in this early version. Field experience with anti-aircraft fire hitting an aircraft heavily loaded with ammunition led to installation of the kevlar tarpaulin.
A close up photo of the GE SUU-11A/A miniguns shows 3 metal straps hold it or secure it to the gun racks, see page 8, Gunships-Spooky book Squadron 6032 for photo. Also, International Airpower Review Vol. 4 “USAF Gunships in Vietnam Part 1” page 117 has a detail photo of the SUU-11A/A mounts.
I painted the fuel filler caps red on the wings near the fuselage per photo on International Airpower Review Vol. 4 “USAF Gunships in Vietnam Part 1” page 123.
 I added a “drop” power line from the
ceiling of the airframe to the minigun as a power source since they are
electrically powered guns. I painted the landing lights silver with a White
Center dot then epoxy glued the light before placing the outer clear plastic
cover. It creates a nice effect for lights if you are patient and hold it in the
correct position for a dome to form.
I added a “drop” power line from the
ceiling of the airframe to the minigun as a power source since they are
electrically powered guns. I painted the landing lights silver with a White
Center dot then epoxy glued the light before placing the outer clear plastic
cover. It creates a nice effect for lights if you are patient and hold it in the
correct position for a dome to form.
I dry brushed the engines and Gatling guns with Testors Chrome to bring out highlights and texture. If you use the Aires resin engines you must cut through to the wheel well. The Aires engine is a well made complete engine and not just a front piece. Thus, the rear section extends into the wheel well.
I was concerned about the delicate resin pilots gunsight from the CE resin set so I drilled small holes through the gunsight horizontal resin carrier to attach it to the inside of the cockpit. I used thin copper wire through the hole for secure attachment then epoxy glued this before closing the two fuselage halves.
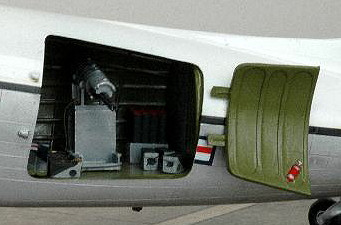
I thought of adding a fire extinguisher to the door using a piece from the Aires Ju-87 resin set since it would give a three-dimensional look but I opted to just use the kit part painted red and it can be seen attached to the inside of the large rear cargo door.
| CONCLUSIONS |
 It was very satisfying to have all the pieces come
together. First, Monogram’s fine and reasonably priced model in 1/48th
scale of the C-47. Next in line was the Microscale/Superscale decal of an
aircraft that was not “available” in 1/48th scale, unless you
converted it. Meteor Productions stepped up to the challenge by releasing a
terrific resin set for the AC-47. I just tossed in some modeling effort and it
was a very satisfying project. It was so easy that I added some of the Aires
engines to feed my “need for speed”, as was often said in Top Gun, The Movie.
It was very satisfying to have all the pieces come
together. First, Monogram’s fine and reasonably priced model in 1/48th
scale of the C-47. Next in line was the Microscale/Superscale decal of an
aircraft that was not “available” in 1/48th scale, unless you
converted it. Meteor Productions stepped up to the challenge by releasing a
terrific resin set for the AC-47. I just tossed in some modeling effort and it
was a very satisfying project. It was so easy that I added some of the Aires
engines to feed my “need for speed”, as was often said in Top Gun, The Movie.
I hope more decals are released like this one to allow modelers to produce some interesting builds. Now that we have color printing of the instruction and color guide sheet it would be even better. How about the AC-119K Stinger gunship as a new project? Now that we have the Trumpeter FW-200 Condor maybe the C-119 will be next – in 1/48th scale of course!
| REFERENCES |
1. International Airpower Review Vol. 4 “USAF Gunships in Vietnam Part 1 pages 112- 125.
2. Gunships – A Pictorial History of Spooky – Larry Davis - Squadron Signal publications # 6032 , 1982.
3. American Warplanes of World War II – Douglas C-47 Skytrain - David Donald -- -AIRtime Publishing Ltd. 1995 pgs. 102 – 109.
4. Replic No. 121 September 2001 DC-3 Dakota with color photos in photoscope section pages 24- 34.
 5.
C-47 In Action Squadron Books # 1149 by Larry Davis
– Squadron/Signal Publications 1995
5.
C-47 In Action Squadron Books # 1149 by Larry Davis
– Squadron/Signal Publications 1995
6. Forge of Freedom – V. Dennis Wrynn Motorbooks International 1995, pages 120-124.
7. WWII Pacific War Eagles – Jeff Ethell – has many color photos of C-47’s.
8. WWII Eagles In Original WWII Color – Jeff Ethell
9. The Mighty Eighth in Color – Freeman - color photos of C-47’s and some with D-Day markings
10. The Ninth Air Force in Colour - Freeman – many color C-47 photos.
11. Aircraft Profile No. 96 Douglas DC-3
12. Douglas DC-3 The Survivors – Kengo Yamamoto Airlife Publishing 2000 - all color photos
13. Douglas DC-3 Dakota Super Profile – M.J. Hooks – Haynes Publications 1985 Pages 6-7 have a two-page cutaway drawing of the interior components including engine mounts.
Kit, resin and decals courtesy of my stash.
March 2006
Copyright ModelingMadness.com.
If you would like your product reviewed fairly and fairly quickly, please contact the editor or see other details in the Note to Contributors.