| KIT: | Monogram 1/48 FC-47D 'Spooky' gunship conversion |
| KIT #: | 5607 |
| PRICE: | $24.98 MSRP on standard C-47 kit |
| DECALS: | Superscale 48-251 used |
| REVIEWER: | Andrew Garcia |
| NOTES: | Conversion to 10 gun FC-47D using a TON of aftermarket! |
| HISTORY |
The C-47 transport was converted in the USA and used in Vietnam as a gunship. The second version of the C-47 used as a gunship, was assigned the classification FC-47D. This gunship used a battery of ten .30-caliber M2 machine guns for its armament The USAF initially used the more advanced Vulcan Gatling gun (GAU-2B/A) in an early SUU-11A/A (XM18E1) pod in its first trials of the dedicated orbiting gunship concept. The next phase that is modeled here was an effort to get the benefit of a side-fire gunship to beleaguered troops while awaiting the Vulcan minigun production output to catch up with the Vietnam War demands.
The second series of C-47 gunships were classified as the FC-47D armed with ten .30-caliber machine guns. This was one of the earliest versions of USAF gunships. It was a stopgap attempt to implement the gunship concept and utilize old military surplus hardware – the M2 .30 caliber machine-guns and ammunition left over from WWII. I wondered why not use the more powerful .50 caliber gun? None of my reading turned up an answer other than availability and cost. There were many guns and ample .30 caliber ammunition supplies available and they were put to use. Also, regarding the use of the term “M2” for these guns at first I thought I uncovered a typo or mistake in texts which called the .30 caliber machine gun an “M2” machine gun. I thought this was only used for the big brother, the .50 caliber MG. I found the original technical manual for the gun on the Internet and there it was “M2 .30 caliber” issued by the U.S. Army technical office. End of story on the term M2 that appears to have been used for the .50 caliber and .30 caliber machine guns.
 Capt. Ron Terry designed several
“kits” for installation of the M2 0.30-inch machine guns in the FC-47D gunship
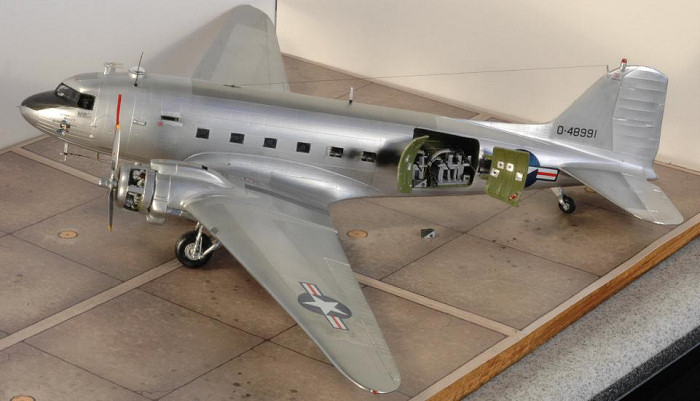
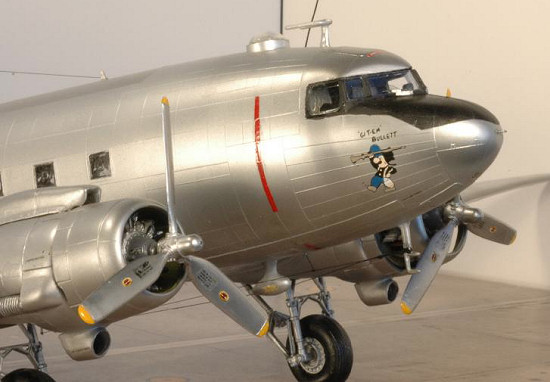
aircraft. This model is of “Git-Em Bullett”; one of five FC-47D’s armed with ten
.30-caliber machine guns. Each gun had 5,000 rounds. Color photos and
references were found in International Airpower Review Vol. 4 “USAF Gunships in
Vietnam Part 1” page 116 and in Gunships – A Pictorial History of Spooky –
Squadron Signal publications # 6032 on page 7. Both references are authored by
Larry Davis.
Capt. Ron Terry designed several
“kits” for installation of the M2 0.30-inch machine guns in the FC-47D gunship
aircraft. This model is of “Git-Em Bullett”; one of five FC-47D’s armed with ten
.30-caliber machine guns. Each gun had 5,000 rounds. Color photos and
references were found in International Airpower Review Vol. 4 “USAF Gunships in
Vietnam Part 1” page 116 and in Gunships – A Pictorial History of Spooky –
Squadron Signal publications # 6032 on page 7. Both references are authored by
Larry Davis.
During construction and kit research I found a discrepancy in the serial number shown in one of the color profiles. I contacted the author, Larry Davis, regarding the color profiles appearing with tail code “0-48991”. My research led me to believe the actual serial number should be 0-48491. The wrong serial number was apparently introduced during the painting of the color profiles, which were used in the two Squadron texts, Gunships #6032 and C-47 In Action. These may have been the sources used for artwork used in the Microscale decal sheets. Researching information on aircraft for accuracy is both satisfying and at times inconclusive. This in no way detracts from Larry Davis’ work, which was outstanding. His books and articles on the AC-47 Gunship are authoritative and the best I have found.
The building dilemma I faced while reviewing photos in the cited references is I noticed the aircraft serial number in the photo for “Git-Em Bullett” is 0-48491 (pg. 7 Gunships Squadron # 6032). The page 25 color profile in the Squadron # 6032 book shows the aircraft with serial number 0-48991 and this is what appears in the Microscale decal sheet. The photos in International Airpower Review Vol. 4 “USAF Gunships in Vietnam Part 1 page 116 do not show the tail markings of “Git-Em Bullett”. Since there were four of the 10-gun gunships in Vietnam perhaps there was a 0-48991. The photo references I have only show 0-48491 and 43-48471. Was there actually a 0-48991 and was it also marked “Git-Em Bullett”? Did the aircraft actually have the passenger door removed exposing the two rear gun racks but kept the cargo door closed during flying operations? Were both doors on and closed while flying as depicted by the color profile on page 25?
 Here’s my conclusion on the serial
number, which may be right or wrong. Most of my sources indicated there were
five Ten-Gun .30-caliber Gunships. I identified a set of five aircraft serial
numbers used by the Ten-Gun aircraft and assumed four went to or were modified
in South Vietnam by the 1st ACS and one aircraft remained in the USA
at Forbes AFB in Kansas for training purposes. There were three of the Ten-Gun
aircraft flying at Forbes AFB in August of 1965.
Here’s my conclusion on the serial
number, which may be right or wrong. Most of my sources indicated there were
five Ten-Gun .30-caliber Gunships. I identified a set of five aircraft serial
numbers used by the Ten-Gun aircraft and assumed four went to or were modified
in South Vietnam by the 1st ACS and one aircraft remained in the USA
at Forbes AFB in Kansas for training purposes. There were three of the Ten-Gun
aircraft flying at Forbes AFB in August of 1965.
The serial numbers of AC-47D’s using the Ten-Gun kits, which I gleamed from my reading, were:
0-48471 photo on page 115 International Air Power Review Vol.4
0-48491 photo on page 116 International Air Power Review Vol.4
0-48579 text mentions this aircraft on pages 116 – 119 International Air Power Review Vol.4
0-49274 photo on page 122 International Air Power Review Vol.4
0-49495 photo page 53 C-47 In Action Squadron Pub. #1149
Despite this information I still used the Microscale decals – it’s a hobby after all!
| THE KIT |
The kit I used for this conversion
was the Monogram 1/48 C-47 Skytrain (Dakota IV). It is unchanged from its first
release in 1978 as a USAAF paratrooper model (Kit # 5607). This kit provides a
very satisfying building experience if you can tolerate some fit
 problems. I
rectified the fit issues which were along the fuselage joins with some styrene
plastic shims covered by cyano glue filler.
problems. I
rectified the fit issues which were along the fuselage joins with some styrene
plastic shims covered by cyano glue filler.
The shape and features of this kit are very accurate and it looks like the C-47 when finished. By building several of the same kit you can get a feel for some of the building challenges that are part of the kit design and not the result of your building technique errors. I built three of them in order to model the three versions of C-47 gunships found on the Microscale/Superscale decal sheet.
I used two of the Aires resin engines in the first C-47 converted to an AC-47 that I built. In this version I used one Aires #4032 Pratt & Whitney R-1830 Late Version resin engine and used one of the Monogram kit engines to see how it looked. I dressed up the Monogram kit engine with some copper electrical wire connected to the ignition harness to portray the spark plug wires. I used the Meteor Productions Cutting Edge resin AC-47 gunship set for a variety of components except for the gun racks and .30 caliber M2 guns. I created the gun racks using a combination of Verlinden for the .30-caliber guns and scratch built from Squadron styrene sheet the components for the racks.
| CONSTRUCTION |
I followed the kit building instructions. It was a very straightforward build with some minor fit in the form of gaps in the fuselage. I used some styrene strips as shims with some cyano glue to fill the gaps. A sanding with the Squadron tri-grit sanding stick and I was done. I used some aluminum from a beverage can to form the wind deflectors that were used for the twin .30 caliber guns that protrude through the windows. I used this same material for the “patches” seen on the inside of the cargo doors.
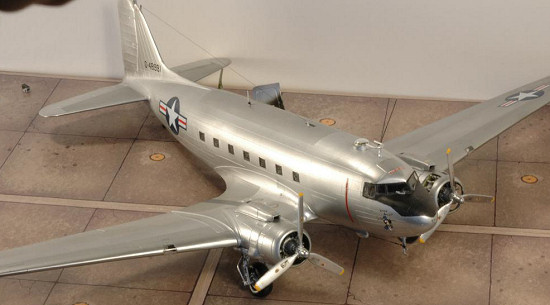
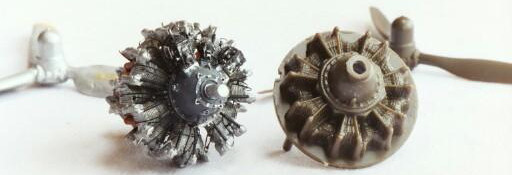 The Aires - #4032 Pratt & Whitney
R-1830 Late Version resin engine was easy to build and has incredible detail. I
cut away the side access panels on one engine cowling to expose the beauty of
the Aires engine. I used the same method of mounting the engine as in my first
FC-47, using a Milliput epoxy putty “donut” and seated the engine into it. By
painting the Milliput green it just looks like the firewall at the rear of the
engine. I thought of a complete rebuild of the engine area building an engine
mount from styrene rods but realized I was losing my focus of building a gunship
using the Microscale decals. One of my references, Douglas DC-3 Dakota
Super Profile – M. J. Hooks – Haynes Publications 1985 has on pages 6-7 a
two-page cutaway drawing of the interior components including engine mounts. I
would like to see Aires come out with this since they have done a great job with
the Spitfire, Bf-109, FW-190 and Mustang exposed engine resin detail sets. A
C-47
The Aires - #4032 Pratt & Whitney
R-1830 Late Version resin engine was easy to build and has incredible detail. I
cut away the side access panels on one engine cowling to expose the beauty of
the Aires engine. I used the same method of mounting the engine as in my first
FC-47, using a Milliput epoxy putty “donut” and seated the engine into it. By
painting the Milliput green it just looks like the firewall at the rear of the
engine. I thought of a complete rebuild of the engine area building an engine
mount from styrene rods but realized I was losing my focus of building a gunship
using the Microscale decals. One of my references, Douglas DC-3 Dakota
Super Profile – M. J. Hooks – Haynes Publications 1985 has on pages 6-7 a
two-page cutaway drawing of the interior components including engine mounts. I
would like to see Aires come out with this since they have done a great job with
the Spitfire, Bf-109, FW-190 and Mustang exposed engine resin detail sets. A
C-47 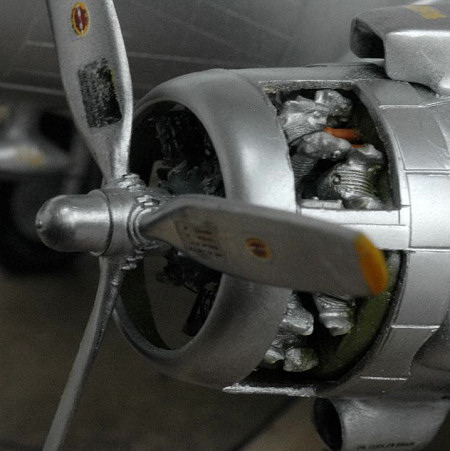 with a pair of fully
exposed engines on well made mounts – that’s a pretty sight!
with a pair of fully
exposed engines on well made mounts – that’s a pretty sight!
Additional components that I added to the Monogram C-47 were the Squadron - #48052 resin wheels, replacement props from a Monogram B-17 and a cut into the fuselage for a navigator window. For the AC-47 gunship aircraft I had to create a side Navigation window since it is not part of the Monogram C-47 fuselage. The resin wheels were attached using a metal rod (made from a straightened paper clip). I drilled through the Monogram kit landing gear where the kit wheels attach and used the metal rod as an axle for strength and to eliminate any gear to resin wheel contact issues.
I initially tried to modify the kit props since the C-47 kit provides only one style of WWII props, which were the “thin” variety. The reference texts clearly show the use of paddle shaped props on Vietnam era AC-47’s. I tried to use some putty and sheet styrene to re-contour the C-47 kit props and they just did not look good. I searched for some resin or white metal replacements – no luck. A look into my fabulous stash and there, in the Monogram B-17 box I found what I was looking for – the “fat” props. Although I know my prop types for P-47’s and P-51’s the C-47 technical manufacturer names for the varieties escaped me. The props are finished in natural metal. This is an interesting difference of the planes featured on the Microscale decal sheet. They do not use the traditional flat black C-47 props found on most C-47 aircraft. The props were painted Alclad II duraluminum per color photos on pg. 120 + 122 International Air Power Review.
| COLORS & MARKINGS |
Painting:
Alclad
II duraluminum was mainly used overall. I added some Testors metalizer exhaust
to some Alclad for a darker tone in some spots. I sprayed this on a number of
panels for some metallic variety. I used several shades of Alclad II and
Testors Metalizer for  the natural metal finish. I did not seal this version with
Future floor wax in an attempt to get a different natural metal finish compared
to my first AC-47D. I prefer the unsealed metallic look than the one achieved
with a future coat. The cockpit and internal fuselage were painted Zinc Chromate
Green using Gunze acrylics.
the natural metal finish. I did not seal this version with
Future floor wax in an attempt to get a different natural metal finish compared
to my first AC-47D. I prefer the unsealed metallic look than the one achieved
with a future coat. The cockpit and internal fuselage were painted Zinc Chromate
Green using Gunze acrylics.
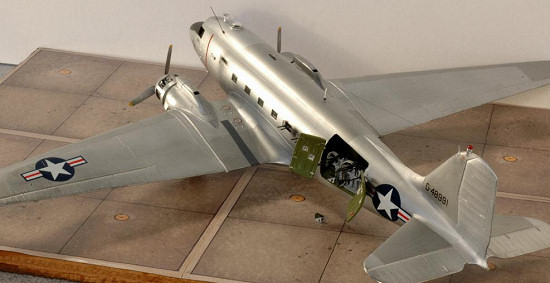
The exterior of the model was sprayed with three different Alclad II metallics, Aluminum, Duraluminum and Chrome Plate. I buffed the Aluminum with Aluminum SnJ powder. The upper nose was painted flat black using Tamiya paints. The propellers were natural metal based on color reference photos from International Airpower Review Vol. 4 “USAF Gunships in Vietnam Part 1”. I used Alclad II duraluminum for the props. The antenna wire was made from invisible sewing thread painted with Tamiya flat black.
Decals:
The decal is a Microscale (pre-Superscale) 48-251 sheet, Gunships AC-47’s and AC-130A, decal # 2. It was re-issued by Superscale as well. This is a great sheet covering several attractive varieties of gunships. Some stencils were taken from the Monogram C-47 kit and my spares box which is mostly from Superscale and Aeromaster decals.
| FINAL CONSTRUCTION |
The most important cockpit area enhancements were the Cutting Edge resin gunsight and some scratchbuilt (using metal from the Aires P & W engine etched metal fret) metal wiper blades on the front cockpit windows.
There are many antennas on the top
and bottom of the FC/AC-47 aircraft with no one standard so you need to study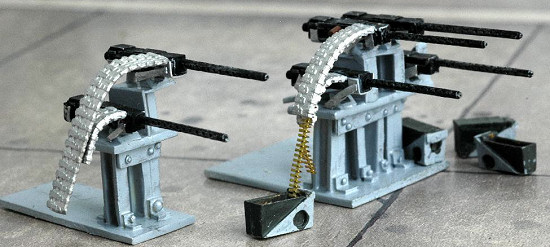 your reference photos. Cutting Edge though, provides most of the needed
antennas in their resin set. Page 10 of the Gunships – A Pictorial History of
Spooky – Larry Davis - Squadron Signal publications # 6032 book has an excellent
diagram of where you need to look on your reference photos for antennas and
other components that attach to the fuselage. For example, if you look closely
at the nose of the aircraft you will see a small metal loop that appears to be a
tow hook. It is actually the Glide Path Indicator Sensor. I made this from some
metal wire. The other parts are resin from the Meteor detail set or from
reshaping resin pour stubs.
your reference photos. Cutting Edge though, provides most of the needed
antennas in their resin set. Page 10 of the Gunships – A Pictorial History of
Spooky – Larry Davis - Squadron Signal publications # 6032 book has an excellent
diagram of where you need to look on your reference photos for antennas and
other components that attach to the fuselage. For example, if you look closely
at the nose of the aircraft you will see a small metal loop that appears to be a
tow hook. It is actually the Glide Path Indicator Sensor. I made this from some
metal wire. The other parts are resin from the Meteor detail set or from
reshaping resin pour stubs.
The ten .30 caliber guns are from a
Verlinden set, #1267 WWII Aircraft Guns. I scratchbuilt the four-gun and
two-gun mounts adding some caliber35 and Verlinden Resin Nuts and Bolts (#0075)
as these are very prominent in the photos of the actual racks. There are
differences in the racks used for the FC-47D’s so again reference photos are a
must. The finished racks (gun mounts) and guns are visible in the doorway. The
two dual .30’s in the windows are also on a scratchbuilt stand. A close look at
the references also shows square aluminum patches on the inside of the fuselage
used to strengthen the areas where ho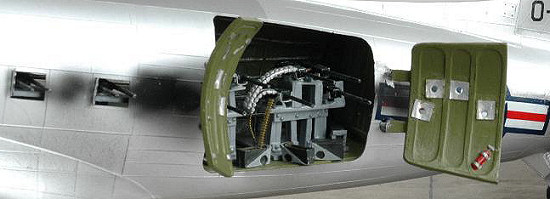 les
were put through the fuselage to allow the gun-barrels to exit the fuselage for
firing. This is visible on the cargo and passenger doors in some of the aircraft
photos.
les
were put through the fuselage to allow the gun-barrels to exit the fuselage for
firing. This is visible on the cargo and passenger doors in some of the aircraft
photos.
Additional detailing parts incorporated into the kit build were:
1) Sheet metal taken from aluminum beverage cans for the fuselage patches and gun exhaust deflectors on the two window .30-cal openings. As an afterthought the cargo door patches could have been better done using aluminum foil.
2) M.V. Products Light Lens for the wing landing lights
3) Squadron True Details #26008 Authentic Ammo Belts in 1/48th scale attached to Meteor ammo boxes.
The Squadron #30505 Tri-Grit sanding stick was extensively used as well for surface preparation for metallic painting. It was especially useful for the Meteor Productions Cutting Edge Modelworks CEC48040 red plastic tail beacon and other clear parts such as the navigator dome. Using the tri-grit followed by a bath in Future floor wax worked very well for transparent parts.
The best color photos and references were found in International Airpower Review Vol. 4 “USAF Gunships in Vietnam Part 1” page 116. A color profile of this aircraft can be found in Gunships – A Pictorial History of Spooky – Squadron Signal publications # 6032 on page 25, and a photo on page 7. Both references are authored by Larry Davis. These references made this kit build possible.
| CONCLUSIONS |
This
was a fun build. It started with the first time I saw the Microscale 48-251
sheet, Gunships AC-47’s and AC-130A. When I first saw this sheet I thought “Wow
– how can I build these kits – they look like great projects?” This is a perfect
example of the 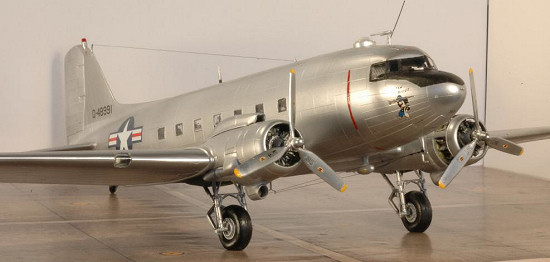 innovation and creativity Microscale and Superscale had years
ago. Some aftermarket resin maker would supply the missing components, as Meteor
did in this instance, and I would have a wonderful time with a project that was
“too cool”. You start with a decent kit like the Monogram C-47, add a great
decal and some resin aftermarket conversion bits and time to have some fun.
innovation and creativity Microscale and Superscale had years
ago. Some aftermarket resin maker would supply the missing components, as Meteor
did in this instance, and I would have a wonderful time with a project that was
“too cool”. You start with a decent kit like the Monogram C-47, add a great
decal and some resin aftermarket conversion bits and time to have some fun.
I find too many of the newer Superscale releases to be re-issues of old stuff I already have or the decal release lacks sufficient content (ie only one or two aircraft on a decal sheet with a lot of empty space) to make every release a must buy. For many years I bought every Microscale or Superscale release even for aircraft I had no immediate interest in building. I found that eventually a kit would be released or I would find some great reference or see some one else’s build of a kit and I would start a new build using the Superscale decals in the stash. I was kept a busy and happy man.
Lately I have become very selective of Superscale decals and only buy a must have issue since there is too much empty space, too little content and the prices are too high to just purchase and salt away every release like I used to do. I would like to see four or five aircraft on one sheet. I still love my Superscale decals though for application performance. They are thin and easy to apply. They worked great on this project. My comments should be taken as constructive concerns from someone who appreciates the seminal role Microscale and Superscale have played in making projects like this possible in the past. If they would occasionally come out with releases like this one it would be appreciated and purchased in multiples!
March 2006
| REFERENCES |
1. International Airpower Review Vol. 4 “USAF Gunships in Vietnam Part 1 pages 112- 125.
2. Gunships – A Pictorial History of Spooky – Larry Davis - Squadron Signal publications # 6032 , 1982.
3. American Warplanes of World War II – Douglas C-47 Skytrain - David Donald -- -AIRtime Publishing Ltd. 1995 pgs. 102 – 109.
4. Replic No. 121 September 2001 DC-3 Dakota with color photos in photoscope section pages 24- 34.
5. C-47 In Action Squadron Books # 1149 by Larry Davis – Squadron/Signal Publications 1995
6. Forge of Freedom – V. Dennis Wrynn Motorbooks International 1995, pages 120-124.
7. WWII Pacific War Eagles – Jeff Ethell – has many color photos of C-47’s.
8. WWII Eagles In Original WWII Color – Jeff Ethell
9. The Mighty Eighth in Color – Freeman - color photos of C-47’s and some with D-Day markings.
10. The Ninth Air Force in Colour - Freeman – many color C-47 photos.
11. Aircraft Profile No. 96 Douglas DC-3
12. Douglas DC-3 The Survivors – Kengo Yamamoto Airlife Publishing 2000 - all color photos
13. Douglas DC-3 Dakota Super Profile – M.J. Hooks – Haynes Publications 1985 Pages 6-7 have a two-page cutaway drawing of the interior components including engine mounts.
Review kit, and decals courtesy of my stash.
If you would like your product reviewed fairly and quickly by a site that has over 300,000 visitors a month, please contact me or see other details in the Note to Contributors.