| KIT #: | ? |
| PRICE: | £6.99 MSRP |
| DECALS: | Two options |
| REVIEWER: | Julien Dixon |
| NOTES: | Microscale decals and PJ Production pilot. |
| HISTORY |
For some reason for a boy from the UK who’s Father was career Army I have always had a fascination with the Navy and in particular US and UK Naval Aviation. My Father mumbles something about dropping me on my head!
Out of all the Naval Aircraft I have always had a thing for F-8 crusaders of all types, I think the F-8C is one of the most aesthetically pleasing, it just looks like a fighter should do, and it looks built for speed. This liking for the F-8 and my getting hold of decals in 1/72 for VF-84 (who had in my opinion some of the best schemes ever to grace a USN fighter) lead to me making this model.
The F8U-2 later to be designated the F-8C was the first true fleet Crusader fighter.
In 1953 the F8U-1 Crusader won the Navy competition for the new carrier-based day fighter. This lead to the first in a series of modern Naval fighter aircraft.
The
development of the Pratt and Whitney J57P-16 engine, which delivered 13,000
pounds of static thrust at sea level and 17,500 pounds in afterburner, resulted
in a request from the Navy for a further modification of the Crusader series.
The fourth production F8U-1, BuNo 140477, was reworked as the prototype for this
modification, designated as the F8U-2. It made its first flight on 20 August
1957 at NAS Dallas. The first production F8U-2 (BuNo 145546) made its first
flight one year later, on 29 August 1958 with Vought test pilot John Omvig at
the controls. A total of 187 F8U-2s were delivered to the Navy between January
of 1959 and September of 1960. The first unit to use the F8U-2 was VF-84,
entering service in Janua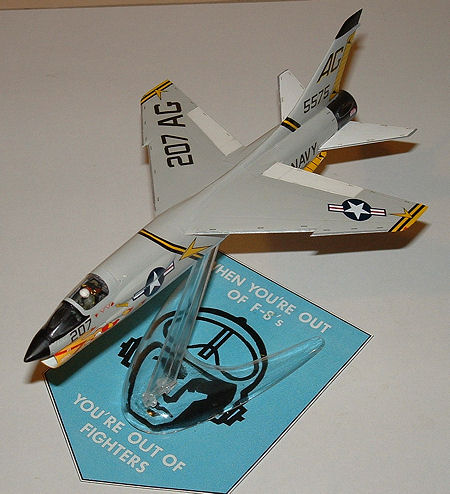 ry of
1959. It later joined VF-24, VF-103, VF-194, and VF-211, and served with the
Marine Corps squadrons VMF-212, VMF-232, VMF-235, and VMF-333.
ry of
1959. It later joined VF-24, VF-103, VF-194, and VF-211, and served with the
Marine Corps squadrons VMF-212, VMF-232, VMF-235, and VMF-333.
The performance of the F8U-2 was impressive, having an initial climb rate of more than 25,000 feet per minute and a maximum speed of Mach 1.7. The F8U-2 was redesignated F-8C in September of 1962 in accordance with the new Tri-Service designation scheme. The increased thrust offered by the P-16 resulted in an increase in the maximum speed of the aircraft to 960 knots. This, combined with a nagging yaw problem at high altitude experienced on the earlier F-8’s, required a change to increase directional stability. These problems lead to two solutions which make the F-8C stand out from those which preceded it.
The cure to the stability issues was to add two short stabilizing ventral fins to the lower aft fuselage, which solved both problems beautifully. In addition, the wing span was reduced by removing three inches from the end of each outer panel, resulting in a new wing span of 35 feet 2 inches. A characteristic of the new more powerful version of the engine was a significantly higher afterburner tailpipe exhaust temperature. To cool the structure in this area, two low-profile scoops were added to the upper aft surface of the titanium tail cone directly aft of the four existing flush oval spring-loaded cooling doors. In flight, ram air was ingested by the scoops, while during ground operations, and at some low power settings, negative pressure in the engine bay forced the spring-loaded doors to open and admit cooling ambient air.
To upgrade the combat capabilities a Y-shaped missile rack was added to each side, making it possible for the Crusader to carry four Sidewinders rather than just two. However, the four-missile armament was only very rarely carried in combat, since pilots felt that the extra weight and reduction in fuel load was not worth the two extra missiles.
A second prototype, more representative of the production model, flew in January of 1958. The first true production F8U-2 flew on August 20, 1958.
It is interesting to note also in 1957 the Crusader won the Collier Trophy for its contributions to the advancement of aviation science. In 1958 Vought received the first Certificate of merit ever awarded an aircraft manufacturer by the Navy Bureau of Aeronautics for the design, development and production of a US Navy aircraft. In the Vietnam conflict the Crusader had the highest kill ratio over communist jets of any Navy aircraft. The F8U series enjoyed a long service life which was extended in the 1960s by remanufacturing and updating existing aircraft. Crusaders flew in Navy reserve units until 1987, and the French navy flew its Crusaders well into the 1990’s.
CRUSADER - LAST OF THE GUNFIGHTERS !!!
| THE KIT |
If you want to build an F-8C from the box then I am sorry but you can’t. You need to start with a kit for the F-8 and do a little work yourself. Kit assemblers need to turn away at this point J
 My kit which was sourced from
ebay is the 1980’s issue in the old style Hasegawa box which opens at the end.
The kit is now available retail with the same decals for £6.99, and in two
“Limited editions” (Double Nuts & Sundowners) for £9.99. Now if you want to
spend the extra money, unless you particularly want one of these decals options
spend the extra £1 and get yourself an Academy F-8E. Now the Hasegawa kit
despite the advent of the Newer Academy kit is still worth the money and makes
into a good model of the F-8E; it’s also a great kit to practice conversions etc
on, especially when it is available for ½ the retail price.
My kit which was sourced from
ebay is the 1980’s issue in the old style Hasegawa box which opens at the end.
The kit is now available retail with the same decals for £6.99, and in two
“Limited editions” (Double Nuts & Sundowners) for £9.99. Now if you want to
spend the extra money, unless you particularly want one of these decals options
spend the extra £1 and get yourself an Academy F-8E. Now the Hasegawa kit
despite the advent of the Newer Academy kit is still worth the money and makes
into a good model of the F-8E; it’s also a great kit to practice conversions etc
on, especially when it is available for ½ the retail price.
Who out there amongst us modelers, can not say that they have got a decal sheet, and then gone out to buy and build the kit for that sheet. Well that’s what happened here. Somewhere among a few deals on ebay and the modeling websites I acquired the old Microscale decal sheet for F-8 Crusaders. One of the schemes on the sheet was for VF-84 and as they only flew C models then I was going to have build my own C.
| CONSTRUCTION |
Construction of the Hasegawa F-8 is fairly easy. As it’s an aircraft I first started with the cockpit, boring I know but there you go. This was basically glued into place; no painting was done at this stage as the consol sides and instrument panel are decals. At this stage I also put in a blanking plate behind the cockpit, so that you can not see all the way into the body as no form of intake trunking is provided. With the cockpit inside the fuselage was closed up.
Next area to tackle as the main wing,
this is where one of the main changes to make the F-8C takes place. You have to
remove the fairing on top of the centre of the wing, this was called the
shoehorn as Project Shoehorn was the name of the
project to greatly enhance aircraft ECM capabilities based on experience with
SAMs and radar guided AAA. Here I removed the fairing with a pair of side
cutters leaving a hole which I made flush with the sides. The hole was then
filled with Milliput. Milliput is my choice of filler for large jobs as you get
no shrinkage, and you can mould it with a wet finger or other appropriate tool.
Before the Milliput was 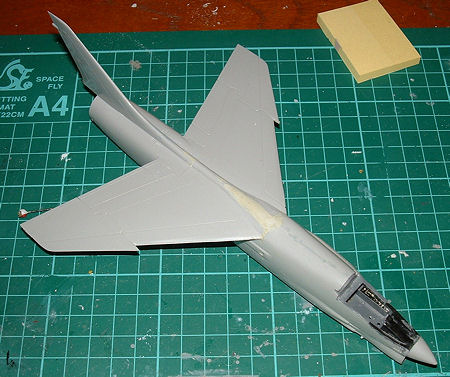 completely
dry I was able to do a good job making it the exact shape of the rest of the
aircraft, only a little sanding was need afterwards.
completely
dry I was able to do a good job making it the exact shape of the rest of the
aircraft, only a little sanding was need afterwards.
With the wing fixed I now decided that I would do the model “in flight” as I think the Crusader looks much better this way than in it ground mode. For this I glued the wing in its down position and glued all the landing gear doors shut.
The basic airframe was then painted the standard US Navy Colours. One advantage of the Hasegawa Kit (even over the new Academy kit) is that you can leave the jet nozzle off at this point and paint it separately, which saves you having to mask it. The jet nozzle was painted with Humbrol Metalcote Steel. After the main airframe had dried the jet nozzle was then attached.
With most of the airframe now
done it was time to finish the front of the aircraft. The cockpit interior was
painted dark grey and the decals attached to the side consoles and the
instrument panel. At this point the instrument panel fell out (insert relevant
expletive here!) then about 30 mins were spent getting it back into place
through the cockpit opening. As I had decided to do the aircraft “in flight”
this called for a body in the driving seat so to speak. Now the Hasegawa seat is
not much but perfectly acceptable if you are going to sit a pilot in it. The
seat was painted black with a little
 drybrushing of silver to bring
the detail & edges out; then a pair of ejection handles were made from thin fuse
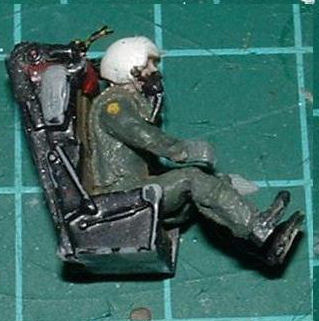
wire, painted black/yellow and attached. Now onto the pilot figure, as my supply
of old airfix pilots (all in the same pose) was gradually drying up I was
looking for a new source of figures. A friend of mine pointed me in the
direction of PJ productions resin figures. Now at £3.40 for two they seem a bit
expensive but they are of very good quality and even a ham fisted figure painter
like myself can make them look good.
drybrushing of silver to bring
the detail & edges out; then a pair of ejection handles were made from thin fuse
wire, painted black/yellow and attached. Now onto the pilot figure, as my supply
of old airfix pilots (all in the same pose) was gradually drying up I was
looking for a new source of figures. A friend of mine pointed me in the
direction of PJ productions resin figures. Now at £3.40 for two they seem a bit
expensive but they are of very good quality and even a ham fisted figure painter
like myself can make them look good.
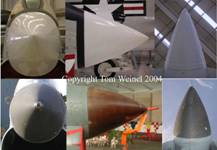
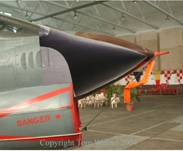
Now the other major difference for a C model (apart from the shoehorn faring) is the nose. For the E model Crusaders the nose is like a cone with curving sides, however on the C model the nose is more of a pointed cone with flat sides, these photos from Ex USN Crusader Driver Tom Weinel illustrate the differences.
Many thanks should go to Tom for the numerous Crusader questions he answered and for the pictures he supplied to me other than these.
 Now
to fix the nose you also have to fair in the canopy as well as it extends into
this area. First you need to fill the hole where the E model IR sensor goes. In
preparation for some serious sanding of the nosecone I filled it with milliput
to give it some substance, a little tamyia filler was used at the bottom of the
windscreen. To sand/file down the nose you can use you tool of choice, mine is
something called a sandvik sanding tool. I got this from a DIY store years ago
and it features little metal sanding blades which stick to a plastic handle, I
have not seen any replacements for a few years, however it shows no signs of
wearing out! To get the new nose profile I just generally sanded away the curve
in the kit part to give an approximation of the C nose, it’s not perfect but I
think it looks pretty close, as close as I will be able to get it!
Now
to fix the nose you also have to fair in the canopy as well as it extends into
this area. First you need to fill the hole where the E model IR sensor goes. In
preparation for some serious sanding of the nosecone I filled it with milliput
to give it some substance, a little tamyia filler was used at the bottom of the
windscreen. To sand/file down the nose you can use you tool of choice, mine is
something called a sandvik sanding tool. I got this from a DIY store years ago
and it features little metal sanding blades which stick to a plastic handle, I
have not seen any replacements for a few years, however it shows no signs of
wearing out! To get the new nose profile I just generally sanded away the curve
in the kit part to give an approximation of the C nose, it’s not perfect but I
think it looks pretty close, as close as I will be able to get it!
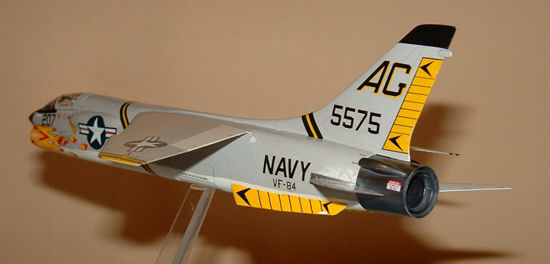
| COLORS & MARKINGS |
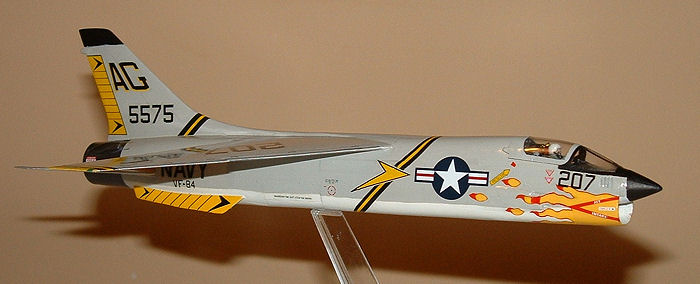
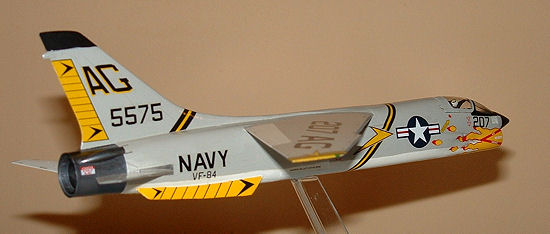
As already mentioned the decal sheet
for the VF-84 Crusader was my motivating factor in doing this build. The flame
decals of VF-84 are just too cool and look great on the sleek F-8 Airframe. The
basic airframe was painted Standard US Navy colours of Light Gull Grey over
white, with white control surfaces. A base coat of Humbrol semi matt white was
followed by coats of Xtracolor white and light gull grey. Once the main colour
was on I then had to mask and paint the leading edges of the wings & tail
planes. Some 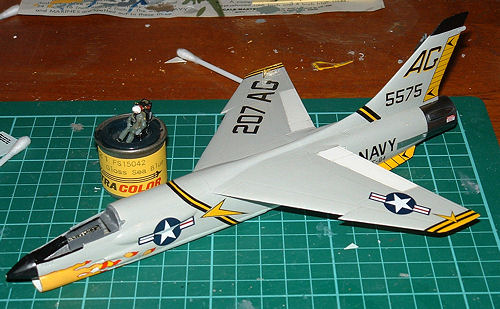 instructions would
have you do these in bare metal finish, however this is not correct. These were
in fact painted with something called CORROGARD, this was an anticorrosion paint
with a metallic sheen. For this I used Humbrol Metal cote matt aluminum as I
have been told that the Corrogard was flat in finish. Corrogard was also used on
USN aircraft on the leading edge of the fin, however I could not see it applied
there on the few VF-84 pictures I had so I left it off.
instructions would
have you do these in bare metal finish, however this is not correct. These were
in fact painted with something called CORROGARD, this was an anticorrosion paint
with a metallic sheen. For this I used Humbrol Metal cote matt aluminum as I
have been told that the Corrogard was flat in finish. Corrogard was also used on
USN aircraft on the leading edge of the fin, however I could not see it applied
there on the few VF-84 pictures I had so I left it off.
A test of a decal which was not to be used of the old microscale decal sheet saw it shatter as soon as the water hit it. Therefore a coat of decal fix over the whole sheet was applied with a wide flat brush. Even after this some of the decals refused to behave. The large nose decal would not conform at all and started to crack, in the end most of the yellow portion was cut away and painted in. Most of the other decals behaved OK, the decals for the ventral strakes however were designed for the Heller kit and needed some trimming to fit the Hasegawa kit.
| FINAL CONSTRUCTION |
 Finishing touches were to
Place the PJ Pilot and his seat into the cockpit and attach the main canopy. A
small piece of Bare metal foil was added to the area where the rear tail planes
move, this was followed by a couple of coats of Klear (future) and then the tail
planes were then pushed into place. Finally the model was mounted onto an old
airfix stand, these can still be found in the shops with a bag of three costing
£0.75, (well worth it), thus we have our F-8C in full flight mode. My final
touch was to scan in the “Last of the Gunfighters” badge and print it out to
display the completed model on.
Finishing touches were to
Place the PJ Pilot and his seat into the cockpit and attach the main canopy. A
small piece of Bare metal foil was added to the area where the rear tail planes
move, this was followed by a couple of coats of Klear (future) and then the tail
planes were then pushed into place. Finally the model was mounted onto an old
airfix stand, these can still be found in the shops with a bag of three costing
£0.75, (well worth it), thus we have our F-8C in full flight mode. My final
touch was to scan in the “Last of the Gunfighters” badge and print it out to
display the completed model on.
| CONCLUSIONS |
I am pleased with the way this build went, the finished article looks great to me. If anyone want to make a C model in 1.72 then it’s a fairly easy job to do this. The steps here would work with any of the F-8 kits however I am saving my Academy kits for a couple of USMC F-8E’s.
October 2006
Copyright ModelingMadness.com. All rights reserved. No reproduction in part or in whole without express permission.
If you would like your product reviewed fairly and fairly quickly, please contact the editor or see other details in the Note to Contributors.
Back to the Review Index Page 2021