
ICM 1/32 AH-1G (late)
| KIT #: | 32061 |
| PRICE: | $128.00 SRP |
| DECALS: | Three options |
| REVIEWER: | Dan Lee |
| NOTES: |
Made own paint mask for teeth. Kelik 3D Cockpit decal set, ASK Decal and Mask Set, SAC landing skids, Metallic Details M28 Turret used. |
| HISTORY |
The US Army had done a lot of planning and doctrine development for Air Mobile forces built around the heavy use of choppers in the 1960s. One of the things the more astute planners realized (based on the French experience in Algeria) they needed was an armed chopper to provide escort and close air support.
In the early 60s, Bell Helicopter experimented with the Bell 207 Sioux Scout which was a two man helicopter based on the Model 47 armed with a gun turret and had stub wings to carry weapons. However, it lacked the speed and size required for the mission and the US Army said thanks but no thanks.
As the military advisory role in Vietnam escalated into a full scale war, the various air mobile operations such as Ia Drang and Dak To showed the need for these air mobile infantry units to have “organic” close air support as the US Army was less than impressed with what the USAF called close air support at the time. The US Army would start the AAFSS (Advanced Aerial Fire Support System) program in 1965 with many competitors including Bell.
 Bell's submission was
the Model 209 which was based on the tail rotor and transmission of the UH-1C,
but with elements from the Sioux Scout design including a sleeker fuselage,
tandem cockpit, stub wings to carry more firepower than existing Huey gunships
and a gun turret slaved to the gunner's helmet. It still had a lot of
compatibility with about 80% of parts being the same as the Huey slicks. The
Model 209 was demonstrated to US Army officials in late 1965 and Secretary of
Defense Robert McNamara was impressed with the result.
Bell's submission was
the Model 209 which was based on the tail rotor and transmission of the UH-1C,
but with elements from the Sioux Scout design including a sleeker fuselage,
tandem cockpit, stub wings to carry more firepower than existing Huey gunships
and a gun turret slaved to the gunner's helmet. It still had a lot of
compatibility with about 80% of parts being the same as the Huey slicks. The
Model 209 was demonstrated to US Army officials in late 1965 and Secretary of
Defense Robert McNamara was impressed with the result.
In 1967, the Hueycobra was selected/ordered by the Army as an interim design while the technical bugs were to be worked out of the winner of the AAFSS competition, the AH-56 Cheyenne. An evaluation squadron of Hueycobras was sent to Vietnam in June. By October 1967, the Hueycobra aka Snake was in full operation with the US Army where it would serve the rest of the Vietnam War till the last units were pulled out in 1973.
The Late production AH-1Gs had some major differences than the ones first fielded in 1967. The most obvious was the different type of skids (the early landing skids were reinforced, but they went to a thinner skid in later versions) as well as the tail rotor was repositioned on the starboard side as opposed to the initial production being placed on the port side. One major crew improvement was the introduction of an actual air conditioning unit as opposed to just having blower fans cooling the cockpit. The blower fans proved to be inadequate for the tropical heat of Vietnam hence the need for an AC. There were also changes in armament for the chin turret as the 7.62mm Minigun and/or 40mm automatic grenade launcher didn't have enough firepower leading to upgrading the chin turret with the M197 tri-barrel 20mm Gatling Gun. Finally, the exhaust had to be changed to direct exhaust heat away from the engine using a specially designed upward vent (and later the disco IR jammer) to keep MANPAD SAMs such as the SA-7 Grail from locking onto the engine exhaust.
| THE KIT |
 The ICM 1/32 AH-1G
Hueycobra comes with seven very large sprues of parts (one duplicate for the
weapons and small parts including landing skids.) The plastic is soft and
flexible with the parts free of flash but all have mold markings that need to be
cleaned up. I noticed that it contains all the parts to do an early as well as
late Hueycobra AH-1G including TOW missile racks.
The ICM 1/32 AH-1G
Hueycobra comes with seven very large sprues of parts (one duplicate for the
weapons and small parts including landing skids.) The plastic is soft and
flexible with the parts free of flash but all have mold markings that need to be
cleaned up. I noticed that it contains all the parts to do an early as well as
late Hueycobra AH-1G including TOW missile racks.
Sprue A contains the fuselage minus the tail rotor.
Sprue B contains tail rotor pieces as well as main fuselage parts/turret
Sprue C contains the cockpit parts and fuselage small parts including the skids
Sprue D has the weapons and other miscellaneous parts X2
Sprue E is the clear parts
Sprue F has the 20mm fixed Vulcan mount
It comes with a decal sheet with markings for three Cobras, but they have some issues as I discovered later.
| CONSTRUCTION |
FYI, I used CA glue for the visible seams and Tamiya extra thin cement for the interior attachment points for the entire model.
The ICM Hueycobra is a pretty easy kit to build. I started by building the various stub wings and winglets. One thing I had to deal with replacing the sanded away raised rivet detail with engraved rivets and fix any panel lines lost during sanding.
 Next I built up the
engine and interior parts. I then added the basic cockpit tub, but kept off both
IPs for gunner and pilot, various control sticks, collective, rudder pedals and
seats because they tend to fall off during the sanding/filling stage. I primed
the interior with Grey Stynylrez primer then when it was dry I painted the
interior with Xtracrylic dark gull grey.
Next I built up the
engine and interior parts. I then added the basic cockpit tub, but kept off both
IPs for gunner and pilot, various control sticks, collective, rudder pedals and
seats because they tend to fall off during the sanding/filling stage. I primed
the interior with Grey Stynylrez primer then when it was dry I painted the
interior with Xtracrylic dark gull grey.
At this point, I started to run into the first of many issues I had with this kit. I didn't want to do open panels so I closed up the engine panels on both sides. I found that the doors were a bit smaller than the openings and required some filling with plastic putty to seal up the gaps. I used some CA glue to fill in certain gaps and had some fine sanding to do to smooth it out.
I added a big 1 ounce steel weight in the nose (but it wasn't necessary and it would later cause me an issue) and put the whole fuselage together. I added the tailplane parts to each half of the fuselage so that it would line up with the rest of the fuselage. The clear cockpit pieces were removed from the sprue tree, cleaned up and then masked using the Special Hobbies tape masks.
| COLORS & MARKINGS |
 The exterior was
primed first with Grey Stynylrez primer. It was then painted using a combination
of Gunze H-52 Olive Drab and H78 Olive Drab 2 (US Army vehicles.) Once it was
dry, I masked off various areas and painted them flat black as per the color
scheme I wanted to do.
The exterior was
primed first with Grey Stynylrez primer. It was then painted using a combination
of Gunze H-52 Olive Drab and H78 Olive Drab 2 (US Army vehicles.) Once it was
dry, I masked off various areas and painted them flat black as per the color
scheme I wanted to do.
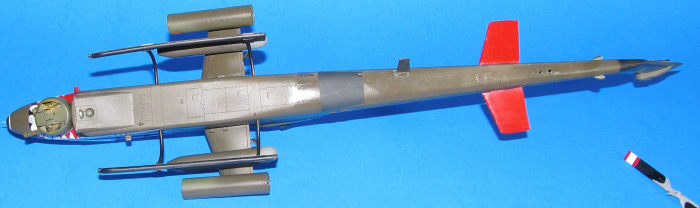
I painted the tail rotor black with red and white warning stripes and the main rotor neutral grey based on photos and comments from the forum. Meanwhile I sprayed the glass parts black as per the paint scheme I was going to use.
Once everything was dry, I sprayed on Vallejo gloss in preparation for the decals.
I started off doing the stencils, but I had a hard time with them as they were fragile and didn't glide like the Cartograph decals I was used to. I had a number of them break. Out of frustration I decided to try the bigger decals and that got worse. I manged both shark mouths trying to get them around certain details including the crew steps. ICM could have broken up the shark mouth into smaller pieces, but the one big decal was a mess because it ripped at the crew steps which are molded onto the fuselage and jut out from the fuselage. I think the big shark mouth decal could have worked if they made the crew steps separate pieces from the fuselage. I got really frustrated and threw the kit back into the box to figure what I could do. So much for a “quick and easy” build.
 I ordered an
aftermarket decal set with shark mouth decals similar to the ICM kit and was
going to use those to replace the ruined ones. However I found out later that
the ASK decals have similar issues to the ICM decals so there went plan B, but I
would use most of the stensils.
I ordered an
aftermarket decal set with shark mouth decals similar to the ICM kit and was
going to use those to replace the ruined ones. However I found out later that
the ASK decals have similar issues to the ICM decals so there went plan B, but I
would use most of the stensils.
I turned to Plan C, which I swore I wouldn't do because only crazy people do that, which was to make masks to paint on the shark mouth. First thing I did was cut off the crew steps to help make painting easier. I wish I thought of that first with the decals. It took a couple of weeks to design the masks then to cut them into shape. I first painted on white base for the mouth then masked off the teeth and sprayed the remaining areas gloss red. Next I masked off the red and white areas and sprayed on the black outline for the various portions of the teeth and lips. I tried to feather the colors rather than spray them into a solid uniform color to give it a worn look. For a first attempt at doing my own markings via mask, it worked out... kind of.
I used whatever stencils I could as well as the remains of the kit markings to finish the decals. I thought about weathering, but opted not to and just wiped down the model of whatever setting solution I used then applied two light flat coats.
| FINAL CONSTRUCTION |
The weapons (two 19 rocket rocket pods and two mini gun pods) were assembled and painted as per instructions. Some stencil decals were added and then glued in place on the winglets.
I glued on the painted crew steps I cut off. The various probes, cutters, handles and antennas were painted and added. Next the cockpit details that I omitted during the build were added. I included the seats and IP for both the pilot and the gunner. The Kelik 3D decals were more impressive than the not so good ICM IP panel decals.
 The Metallic Details
turret detail is much nicer than the kit parts especially the mini-gat and
grenade launcher hollow muzzles. Only one glitch was that if I had added the
turret interior before sealing up the fuselage then I could have had a moving
turret, but I ordered it after I glued the fuselage together so instead I
removed enough of the resin of the turret ring so that the M28 turret would fit
into the hole. I painted the various bits gunmetal or OD then assembled the
interior before gluing the turret into a fixed position.
The Metallic Details
turret detail is much nicer than the kit parts especially the mini-gat and
grenade launcher hollow muzzles. Only one glitch was that if I had added the
turret interior before sealing up the fuselage then I could have had a moving
turret, but I ordered it after I glued the fuselage together so instead I
removed enough of the resin of the turret ring so that the M28 turret would fit
into the hole. I painted the various bits gunmetal or OD then assembled the
interior before gluing the turret into a fixed position.
I found that the big glass canopy was fiddly. I had similar problems with open hatchways on my Hasegawa AH-64 Apache many many moon ago (the weight of the hatch piece was too much for the PVA aka white glue I was using) so I decided to close it all up. I still had some issues keeping the clear bits in place so I used Tamiya extra thin where I could instead of white glue.
That big fishing weight came back to bite me in the butt when I glued the plastic landing skid in place and when it was dry I put the model resting on its skids. To my horror that the landing skids flexed a bit due to the amount of weight of the model. I ended up swearing nonstop for about 15 minutes mostly at myself. In the end after some humming/hawing I bought the SAC white metal landing skids for the late production Cobra a few weeks later. These were primed and painted flat black. I lightly coated the pins with CA glue and inserted them into the mounting holes. When I put the fully equipped HueyCobra on its skids, the model didn't flex.
| CONCLUSIONS |
The ICM Hueycobra kit is a very nice kit, but hampered by its not so great decal set. I think I made a lot of mental mistakes with this kit, but if you avoid making the mistakes I did then this kit can be built into a very good model. However, a small amount of aftermarket does make it a lot better and fixes a lot of the missing details especially around the cockpit.
I recommend this kit for intermediate and experienced modellers and maybe a talented beginner.
19 August 2024
Copyright ModelingMadness.com. All rights reserved. No reproduction in part or in whole without express permission.
If you would like your product reviewed fairly and fairly quickly, please contact the editor or see other details in the Note to Contributors.