| KIT #: | 26101 |
| PRICE: | $ |
| DECALS: | Two options |
| REVIEWER: | Will Alcott |
| NOTES: |
| HISTORY |
Ed Heinemann’s A-4 Skyhawk, was
a model of robust and lightweight design that would prove time and again its
ability to carry a heavy bomb load into the face of heavy air defenses and
make it back bruised and battered to fight another day.
The design was not
revolutionary, but flew in the face of the trend towards every heavier and
more complex aircraft.
Skyhawks were in action over
 The earliest Skyhawk model to
see action in
The earliest Skyhawk model to
see action in
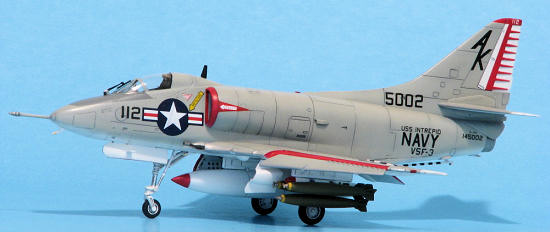
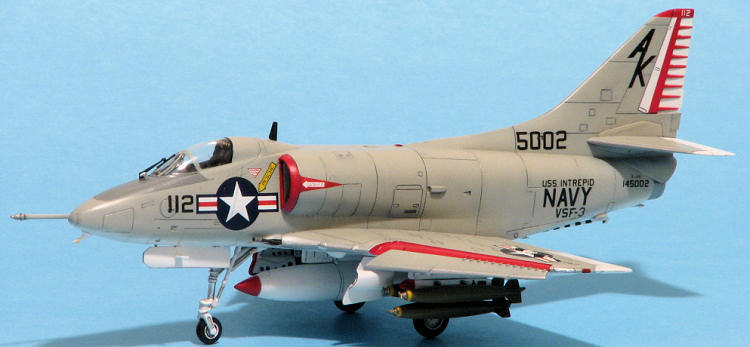
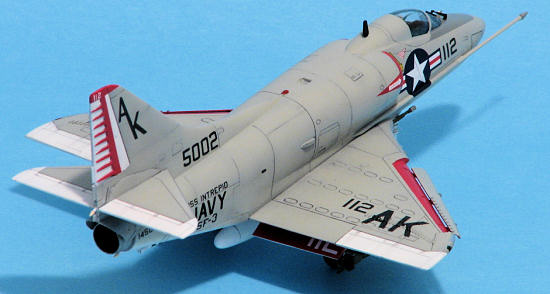
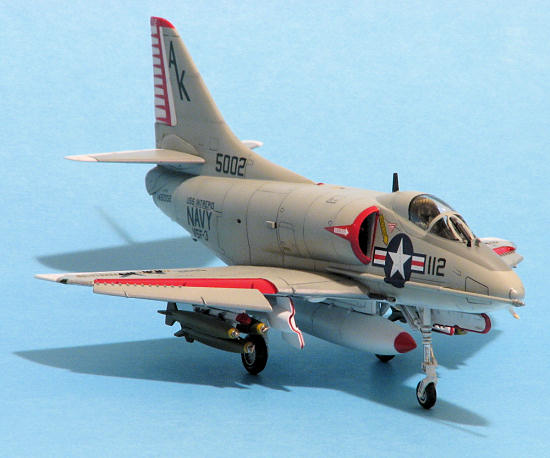
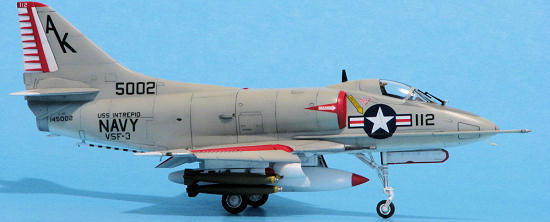
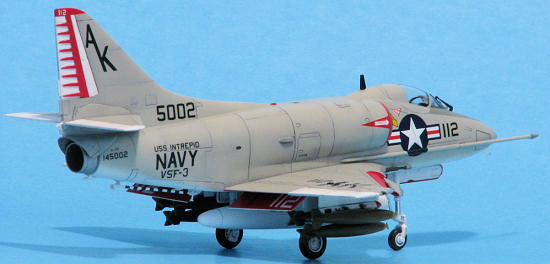
One of more unusual roles assumed by the A-4 was that of providing air cover for anti-submarine carriers. The compact A-4 could easily operate from the smallest carrier decks, and 4 plane detachments served alongside the S-2 Tracker and H-3 Sea King squadrons. The Navy formed a small number of dedicated “Anti-Submarine Fighter” squadrons to fill this role, including the Chessmen of VSF-3.
In May of 1967, VSF-3 deployed
to the
| THE KIT |
It’s hard to believe that the Fujimi Skyhawks have been out for more than 20 years! – I still remember Paul Boyer’s review of the A-4C from the October 1988 issue of Fine Scale Modeler, one of the first model magazines I bought. At the time these kits were very well received – not only did Fujimi offer pretty much the full range of Skyhawk variants (B, C, E/F, M, TA-4F/J and OA-4M), but the kits featured excellent detail, including separate slats (Aside from Blue Angel A-4s, slats were normally down on the ground, although they could be manually retracted).
To allow for the multiple
versions, the kits are modular – all kits shared a common rear fuselage,
wing and empennage, to which are added different noses, intakes and canopy
parts.
A nice touch with the kits is
the inclusion of ordnance, either Bullpups or Zuni rockets, depending on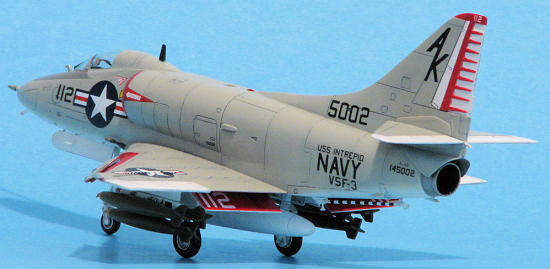 the
version, along with a full set of drop tanks.
the
version, along with a full set of drop tanks.
The A-4B seems to be one of the rarest of the family. My kit came is a slightly different sized box that the other versions in my stash, and included only two sets of decals – one for the Mavericks of VA-152 aboard USS Forrestal, and a second set for an Argentine Navy bird. The Argentine version requires you to scratch-build several antennae, drawings for which are included in the instructions.
I’ve always liked the box art
for the B model, though I’ve also wondered about it.
The illustration seems to show
a VA-152 A-4B bearing down a VPAF or Chinese MiG-17.
The
strange thing is that VA-152’s only deployment on Forrestal with A-4Bs was
to the
The main drawback of the Fujimi A-4s has been their high prices and inconsistent availability. The kits have been reissued from time to time, and I have recently seen secondhand examples at model shows going for quite reasonable prices.
| CONSTRUCTION |
I’m not going to give blow-by-blow details on the construction of the kit, but rather highlight a few areas that I’ve found require additional attention, based on the three Fujimi A-4s I’ve built to date.
 Step 1 covers the construction
of the cockpit, which features nice raised detail on the instrument panel
and side consoles.
All versions share the same
panel, which is more appropriate for the later radar-equipped versions than
the B.
Decals are provided for the
panels, but I carefully painted the kit parts.
The seat is a basic
representation of the Douglas ESCAPAC.
Belts are moulded-in, but I
replaced these with lead foil.
Step 1 covers the construction
of the cockpit, which features nice raised detail on the instrument panel
and side consoles.
All versions share the same
panel, which is more appropriate for the later radar-equipped versions than
the B.
Decals are provided for the
panels, but I carefully painted the kit parts.
The seat is a basic
representation of the Douglas ESCAPAC.
Belts are moulded-in, but I
replaced these with lead foil.
In Step 2, Fujimi would have you assemble the forward fuselage sections. I choose to assemble the front section of each fuselage half to the rear, and then assemble complete left and right halves. This allows you to minimize the seam clean-up required at the front-rear joint. Note the instruction to remove the rectangular baffle above the gun – this should be removed from the B (although it is shown in the box art). I missed this until after I’d started painting, but I was able to remove these plates without causing too much damage. The hump moulded in front of the windscreen is the rain removal system fitted to the A-4E and later models. This should be removed and replaced by a scratch-built windscreen wiper for most B and C models.
In Step 3 the rear fuselage halves come together. As noted, I assembled complete halves. The kit includes the engine intake and a section on intake trunking. The breakdown of this part is unfortunate, as it leaves a visible seam inside each intake which can be tricky to clean up. Before assembling the halves, don’t forget plenty of nose weight (I used fishing sinkers). I also found the instrument panel slightly too wide for the inside of the coaming, so test fit this section to avoid problems. I left out the jet exhaust, as this can be added at any time, and the hole in the fuselage provides a convenient place to insert a piece of tubing as a handle during painting. Fujimi also tell you to remove several protuberances from the tail section at this point. Check your references carefully, as in the case of the aircraft I was building, the ‘spike’ antenna was fitted. To help clean up the fuselage seam, I’d suggest removing the arrestor hook and hold back fitting. The seam inside the compressor bleed air outlet duct on the spine of the fuselage is a bear to clean-up, so I cut this open and added a strip of plastic to form a new outlet ramp.
In Step 4 the fuselage sections
and wing are joined.
If you want to depict the flaps
deployed, there are recessed lines inside the lower wing to aid in cutting
them out.
Note that on the upper wi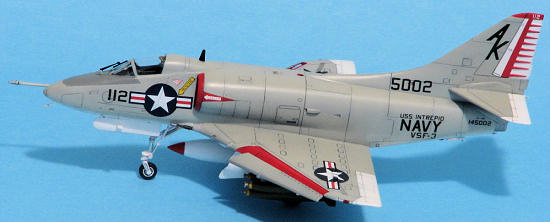 ng,
there appears to be a hinge line above the flap.
A-4A through A-4E models had
split flaps, with fixed upper sections, so this hinge line shouldn’t really
be present.
The A-4F introduced a hinged
upper spoiler section above the split flap, and the kit wing is accurate for
this case.
The slat rails are mounting to
the wing, and take care not to break any off (or break two off, in my case).
The slat rails are too long, so
I’d suggest trimming them carefully to mount the slats with a small gap
ahead of the leading edge.
There should be a groove in the
area underneath the slats into which the slat rails retract.
Once again, study the
instructions to find several holes to be opened – three sets for the wing
and centerline pylons, and a set in the port wing tip.
These holes are for the radar
altimeter fairing (part 89).
The only problem is that part
89 is not included in the A-4B or A-4C kits!
I carved the fairing from scrap
plastic, using the part from an A-4E/F for reference.
ng,
there appears to be a hinge line above the flap.
A-4A through A-4E models had
split flaps, with fixed upper sections, so this hinge line shouldn’t really
be present.
The A-4F introduced a hinged
upper spoiler section above the split flap, and the kit wing is accurate for
this case.
The slat rails are mounting to
the wing, and take care not to break any off (or break two off, in my case).
The slat rails are too long, so
I’d suggest trimming them carefully to mount the slats with a small gap
ahead of the leading edge.
There should be a groove in the
area underneath the slats into which the slat rails retract.
Once again, study the
instructions to find several holes to be opened – three sets for the wing
and centerline pylons, and a set in the port wing tip.
These holes are for the radar
altimeter fairing (part 89).
The only problem is that part
89 is not included in the A-4B or A-4C kits!
I carved the fairing from scrap
plastic, using the part from an A-4E/F for reference.
Step 5 installs the intakes, tail planes, forward tip of the vertical fin (separate to accommodate the A-4F’s avionics hump) and canopy. The kit provides one piece and two piece canopies, which are very thin, clear and fit very well.
In Step 6, the slats and speed brakes are added. I couldn’t find any photos of A-4s with their speed brakes deployed when parked, so I fitted them closed. Because they don’t quite fit closed, I added a blob of Miliput inside the speed brake well to support them and keep them flush with the fuselage skin. I also found sink marks on one of the speed brakes, which are difficult to eliminate without losing the faintly moulded RATO attachment points. I’d recommend leaving the slats off until after painting, taking care to shorten their attachment rails as noted above.
 In Step 7, the landing gear,
doors, flaps and fuel dump are installed.
Again note the instruction to
remove the baffle above the starboard gun, as mentioned in step 2.
In Step 7, the landing gear,
doors, flaps and fuel dump are installed.
Again note the instruction to
remove the baffle above the starboard gun, as mentioned in step 2.
Step 8 covers final assembly, including the drop tanks and ordnance, refueling probe, and radar altimeter fairing. Check your references concerning the RHAW spike antennae (parts 3 & 4). The instructions tell you to install one under the rear fuselage, and show another already in place. In my case, the aircraft carried five – one at the tip of the nose, one to either side of the rear of the nose gear bay, one alongside the arrestor hook, and one at the tip of the tail below the exhausts. In the case of the nose mounted antenna, I needed to rebuild the piece to correct its angle.
| COLORS & MARKINGS |
I wanted to build an A-4B that saw combat, and I found all the photos I needed at the A-4 Skyhawk Association website (www.a4skyhawk.org). This included a number of colour photos of VSF-3 Skyhawks aboard the Intrepid.
The USN gull grey and white
scheme is colourful but tedious to mask and paint.
After painting the underside
white, I masked off sections of the rudder and sprayed the red rudder
markings,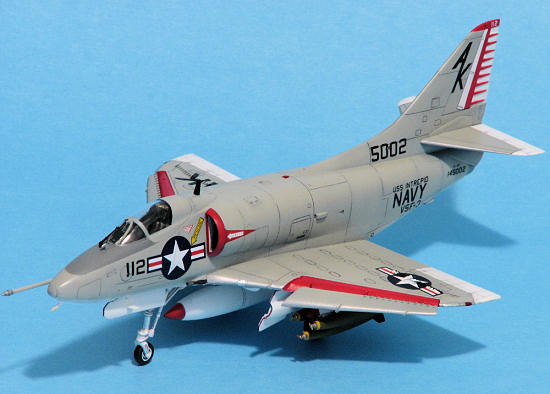 along with the areas covered by the slats, flaps and intake lips.
I then masked of the elevators,
ailerons, rudder, fin tip, area under the slats and intake lips, and sprayed
gull grey.
After that, another round of
masking for the corroguard leading edges (a mix of chrome silver and dark
gull grey) to the wings and horizontal stabilizers, and finally the dark
gull grey anti-glare panel.
Once all this was touched up to
my satisfaction, I sprayed a coat of Micro Gloss.
I applied a Paine’s grey
watercolour wash, removing excess dried paint with a dampened paper towel,
and then applied a second coat of gloss.
along with the areas covered by the slats, flaps and intake lips.
I then masked of the elevators,
ailerons, rudder, fin tip, area under the slats and intake lips, and sprayed
gull grey.
After that, another round of
masking for the corroguard leading edges (a mix of chrome silver and dark
gull grey) to the wings and horizontal stabilizers, and finally the dark
gull grey anti-glare panel.
Once all this was touched up to
my satisfaction, I sprayed a coat of Micro Gloss.
I applied a Paine’s grey
watercolour wash, removing excess dried paint with a dampened paper towel,
and then applied a second coat of gloss.
Most of the markings came from Scale Master US Navy/Marines lettering sheets, along with Microscale US Navy Insignia and some smaller markings from a selection of A-4 decal sheets. The AK tail codes were cut from solid black decal film. The national insignia on the port wing and the AK code on the starboard wing go over the raised vortex generators. I used a couple applications of Solvaset to settle these down, and then touched up the markings as necessary. The starboard national insignia goes over the refueling probe. I used sections of a spare insignia to fill in as needed.
Once the decals were complete, I finished up painting with a coat of ModelMaster Acryl clear flat.
| FINAL CONSTRUCTION |
 Final construction involved
adding all the landing gear parts, doors, slats, flaps and pylons.
I used the TERs from the kit
along with some Hasegawa Mk 82 bombs for the wing stations, and the
centerline tank from the kit.
I find the kit pylons fit
poorly to the wing – next time I’ll install these before painting.
Final construction involved
adding all the landing gear parts, doors, slats, flaps and pylons.
I used the TERs from the kit
along with some Hasegawa Mk 82 bombs for the wing stations, and the
centerline tank from the kit.
I find the kit pylons fit
poorly to the wing – next time I’ll install these before painting.
Small details, such as the windscreen wiper and RHAW antennae were added at this stage, along with the tailpipe. I touched in the navigation lights and anti-collision lights with Tamiya clear colours, and painted the approach light and clear wingtip lights silver. One big improvement would be to cut these last items out and replace them with clear plastic sanded to shape. The kit is also missing the prominent landing light which should be present on the starboard main gear door.
| CONCLUSIONS |
It’s been more than 10 years since I last built a Fujimi Skyhawk, and I’d forgotten just how much fun these kits are! I managed to throw this one together in the space of 10 days, and I was strongly tempted to immediately grab another from the stash and get started. If you see one of these kits at a good price, pick it up – you won’t be disappointed.
| REFERENCES |
A-4 Skyhawk, Detail & Scale Vol. 32, Bert Kinzey
USN Aircraft Carrier Air Units, Vol III 1964-1973, Duane Kasulka
December 2008
Copyright ModelingMadness.com
If you would like your product reviewed fairly and fairly quickly, please contact the editor or see other details in the Note to Contributors.