
| KIT #: | 4805 |
| PRICE: | $75.00 |
| DECALS: | options |
| REVIEWER: | Torben Plesberg |
| NOTES: | Short run. Standard trainer of Flygvapnet 1971-1987. |
| HISTORY |
During the sixties Beagle Aircraft developed the Beagle Pup as a modern successor to the De Havilland Tiger Moth and the Piper Super Cub. The Pup was an expensive plane to build, however it was popular in flying clubs and flying schools. The Pup was a two seat cabin monoplane powered by a Continental four cylinder horizontally opposed engine of 100 hp. The Pup 150 was a four seater powered by a Lycoming engine of 150 hp. This aircraft was shown at the Farnborough Exhibition in September 1968, and the basic price was 4.700 £. Later Beagle Aircraft developed the Bulldog, a military version of the Pup.
There are some differences between the original civil Pup and the military Bulldog: The overall dimensions of the Bulldog are slightly larger, especially the span. The rudder is larger and there are anti spin fins in front of the elevator. The canopy is much larger and opens rearwards. The engine has 200 hp, the empty weight is some 275 kg heavier, and the max. take off weight 340 kg more. The rate of climb is more than doubled: from 500 ft./min to 1100 ft./min.
 Beagle Aircraft never put the Bulldog in production,
because the firm got financial problems and went into liquidation. Scottish
Aviation purchased the rights for production of the Bulldog, and this firm got
its first large order for the Bulldog from the Swedish Air Force – Flygvapnet.
Altogether, 78 aircraft were produced for Sweden, and later the RAF ordered 130
aircraft for elementary pilot training.
Beagle Aircraft never put the Bulldog in production,
because the firm got financial problems and went into liquidation. Scottish
Aviation purchased the rights for production of the Bulldog, and this firm got
its first large order for the Bulldog from the Swedish Air Force – Flygvapnet.
Altogether, 78 aircraft were produced for Sweden, and later the RAF ordered 130
aircraft for elementary pilot training.
The Swedish Bulldogs, which replaced the SAAB Sk 50 Safir, got the designation Sk 61 A. The Sk 61 B differed from the A model by the ability to be armed with Robot 53 missiles for training of AJ 37 Viggen pilots - as a cheaper alternative to the Robot 05. Both types of missiles were wire controlled by the pilot. The Sk 61 D and E had different avionics for training of commercial pilots.
Twenty Bulldogs were in service with “Arméflyget”, the Swedish army under the designation Fpl 61 C. (Fpl = flygplan = aircraft). The aircraft of this service were all splinter camouflaged in the four color pattern scheme, which later became the standard colors of the Viggen. The Bulldogs replaced the Piper Super Cub, however, they did not possess the slow flying and turning capabilities of the Super Cub, and therefore, the profile of operations had to be changed after four fatal accidents. The Bulldogs of ARMÉN were replaced by HKP5B (Hughes 300) in 1990, and the aircraft were transferred to Flygvapnet.
By 1987, it was decided that the pilot training with F 5 started directly on jet planes – the SAAB Sk 60. Therefore, the Bulldogs were transferred to other Flygvapnet units as liaison planes, or were civil registered, since the training of commercial pilots also was the responsibility of Flygvapnet, Trafikflygarhögskolan at Ljungbyhed, the base of F 5, Krigsflygskolan.
There was a long tradition with F 5 that the elementary trainer aircraft were painted yellow. Since the Bulldogs were able to carry bombs or missiles, they were painted dark green on the upper sides and light grey on the under sides as other combat planes.
The last Bulldogs were retired in 2001, and that was the end of the era of single engine propeller aircraft in Flygvapnet.
| THE KIT |
The kit comes in a very nice box with a first class photo of a flying Bulldog on the lid, showing one of the options of the decal sheet. On the bottom, there are side view drawings of the three options of the kit: Two different Sk 61 A from F 5 in different color schemes, and a Fpl 61 C of ARMÉN in the four color splinter camouflage pattern reminding of a Viggen. The box opens in the ends and therefore less suitable as a base for the construction.
 The instructions is an A 5 leaflet with ten pages. Page
one is a very short history of the Bulldog. Page two shows the parts with
numbers, a color guide, and a symbol code. Besides the two first steps of
construction are shown. Pages three to nine show steps three to twenty – how to
assemble the model. Page six also shows the correct dihedral, and page nine
shows the exact position of the undercarriage as seen from the front. On top of
page eight there is a sketch showing the exact position of some under wing
detailing. However, not all distances shown are correct! The position of the
necessary nose weight is not shown in the instructions. This should have been on
the framed sketch page seven!
The instructions is an A 5 leaflet with ten pages. Page
one is a very short history of the Bulldog. Page two shows the parts with
numbers, a color guide, and a symbol code. Besides the two first steps of
construction are shown. Pages three to nine show steps three to twenty – how to
assemble the model. Page six also shows the correct dihedral, and page nine
shows the exact position of the undercarriage as seen from the front. On top of
page eight there is a sketch showing the exact position of some under wing
detailing. However, not all distances shown are correct! The position of the
necessary nose weight is not shown in the instructions. This should have been on
the framed sketch page seven!
The decal sheet has three options as mentioned above, and the quality is OK. The extra A 5 sheet comes with the decal sheet, and shows the colors and decaling, including stenciling of the three options of the kit. The color reference guide is for Gunze Sangyo and Humbrol colors.
There is one large sprue of grey green styrene, and one fuselage half is separated from the sprue to fit the size of the box. Also separated is a spruelet containing some small parts. The clear sprue contains the enormous canopy + the smaller windows and lights.
| CONSTRUCTION |
It is a short run kit and the missing locating pins means, that extra care must be taken during the construction. The instructions does not solve all problems and creates furthermore new problems! In the following, I shall give some advice from my experiences during my construction of the model:
 Step 6. I did not apply part 45. It was replaced by a lead
plate, which I scribed in the ends to simulate the cooling ribs of the
cylinders. A lead plate is a good material to use, because you don’t know yet
how much nose weight is needed to avoid tail sitting. The lead does not need to
be painted. It looks very much like metal.
Step 6. I did not apply part 45. It was replaced by a lead
plate, which I scribed in the ends to simulate the cooling ribs of the
cylinders. A lead plate is a good material to use, because you don’t know yet
how much nose weight is needed to avoid tail sitting. The lead does not need to
be painted. It looks very much like metal.
Step 7. The room between part 5 and the lead plate (part 45) is suitable for 22 g of lead, the necessary weight to avoid tail sitting.
Step 10. The anti spin fins are too long, and 3 mm must be removed in the front to get the right length.
Step 13. It is a good idea to make a jig to secure the right dihedral of the wing, when gluing the wings to the fuselage. If not, you may end up with a different dihedral for each wing!
Step 15. The nose wheel leg is too long by 3 mm. It is important to get the right length of the nose wheel leg to obtain the right sit of the model.
Step 16. It is a good measure to place a 0.75 mm thick plastic disc between part 44 and part 11, because there should be a small gap between the propeller and the engine front.
 Step 17. Be careful about the distance between parts 49
and 47. The distances shown in the frame on top of page eight are not all
correct!
Step 17. Be careful about the distance between parts 49
and 47. The distances shown in the frame on top of page eight are not all
correct!
Step 18. It is difficult to glue the main wheel legs in place with the wheels on – they are rather heavy. I did not glue the wheels in place, until the legs were glued in place and set.
Step 20. The framed drawing on bottom of page nine shows the angle of the main wheel legs and the wheels.
The large canopy needs some care to fit properly. It seems to be a little too broad to the rear. On the other hand, the hood slides rearwards to open. The canopy is simply far too thick in scale. This is rather obvious, if the finished model is seen from behind! A vac canopy would certainly solve this problem. If you want your model with an open canopy, you will have to separate the windscreen from the hood. This is a very delicate operation with a very fine razor saw. I prefer a closed canopy – no dust in the cockpit!
| COLORS & MARKINGS |
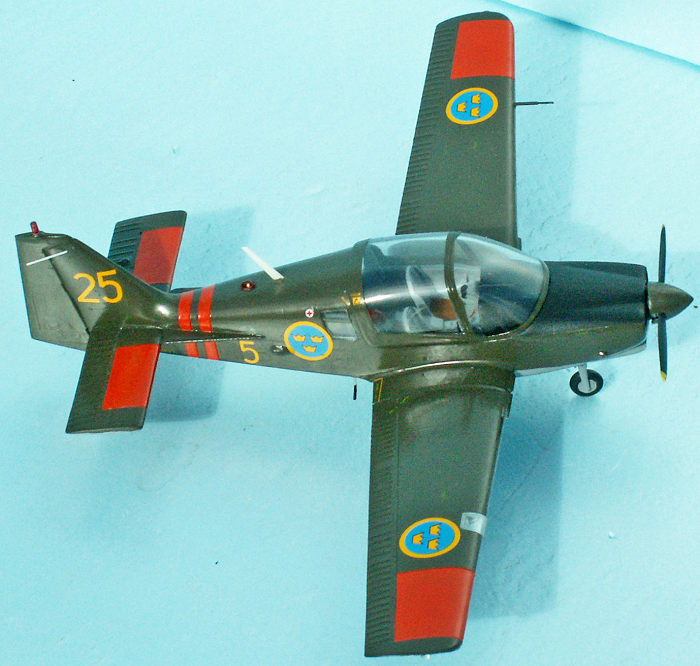
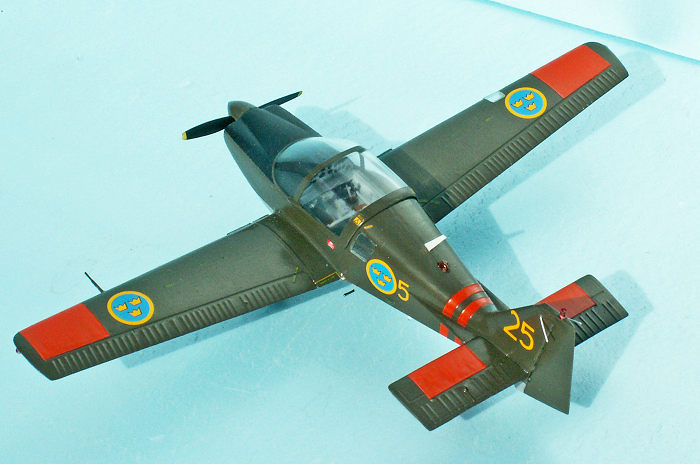
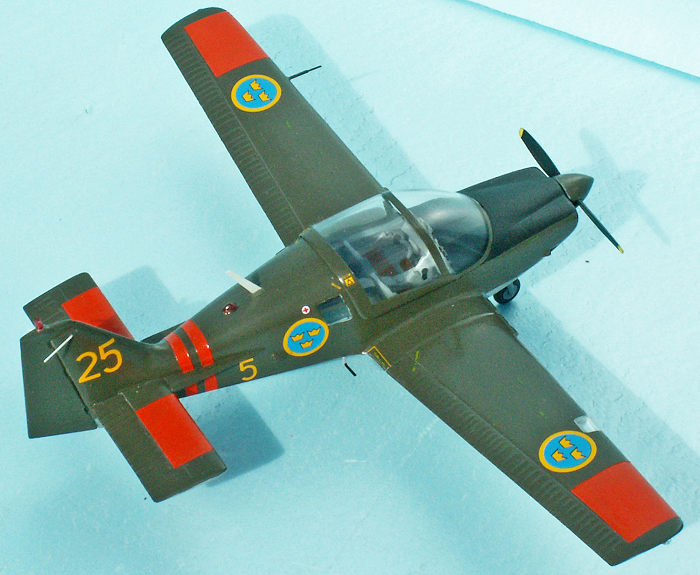
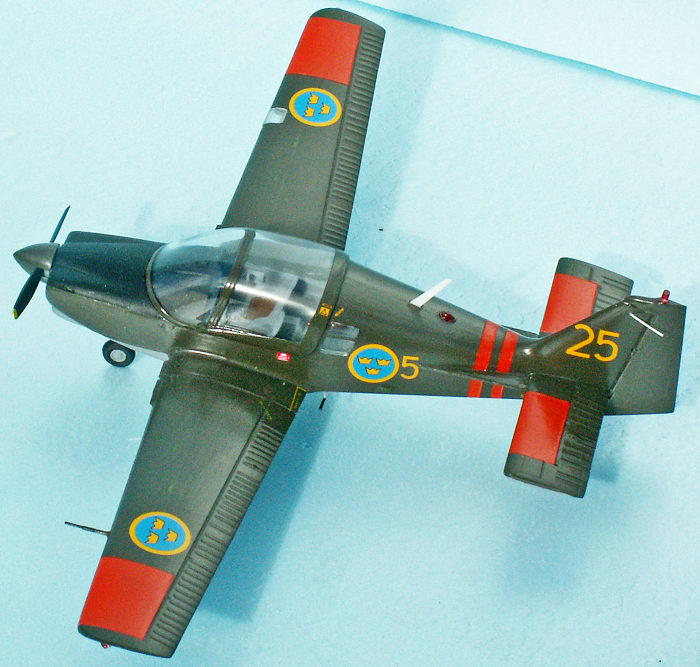
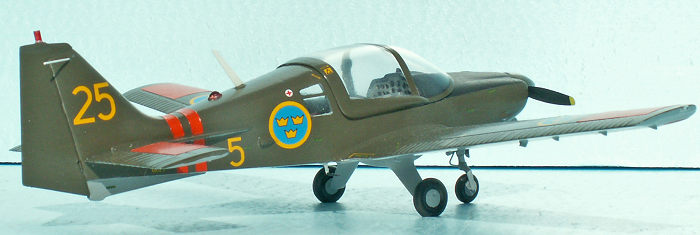 The option chosen for my model is the “25” from F 5. The
upper sides - including spinner - are olive green, HB 86. The under sides -
including landing gear - are light grey, HB 64. There are red areas on the wings
and on the rear fuselage, Revell Aqua Fire Red 31 + 10 % Orange 30. The
anti-glare area in front of the windscreen, the propeller and the tires are matt
black, Model Master Engine Black 4888. The propeller tips are yellow. Most
difficult painting job was the vertical red stripes on the rear fuselage,
because the masking was almost impossible.
The option chosen for my model is the “25” from F 5. The
upper sides - including spinner - are olive green, HB 86. The under sides -
including landing gear - are light grey, HB 64. There are red areas on the wings
and on the rear fuselage, Revell Aqua Fire Red 31 + 10 % Orange 30. The
anti-glare area in front of the windscreen, the propeller and the tires are matt
black, Model Master Engine Black 4888. The propeller tips are yellow. Most
difficult painting job was the vertical red stripes on the rear fuselage,
because the masking was almost impossible.
The decals were all with the kit, first class quality and easy to apply. There were a few stencils and smaller markings, and they look well on an otherwise dull color scheme.
| CONCLUSIONS |
The Tarangus Sk 61 Bulldog is an expensive short run kit, however, it is the only game in town in scale 1/48. It is recommendable to all modelers, who fancy trainer aircraft. There is a second Tarangus Bulldog kit release with markings for RAF aircraft, if you prefer a British aircraft instead.
| REFERENCES |
Wikipedia article on the Scottish Aviation Bulldog.
My own photos of Swedish Sk 61 aircraft.
6 July 2020
Copyright ModelingMadness.com. If you would like your product reviewed fairly and fairly quickly, please
contact
the editor or see other details in the
Note to
Contributors. Back to the Main Page
Back to the Review
Index Page
Back to the Previews Index Page