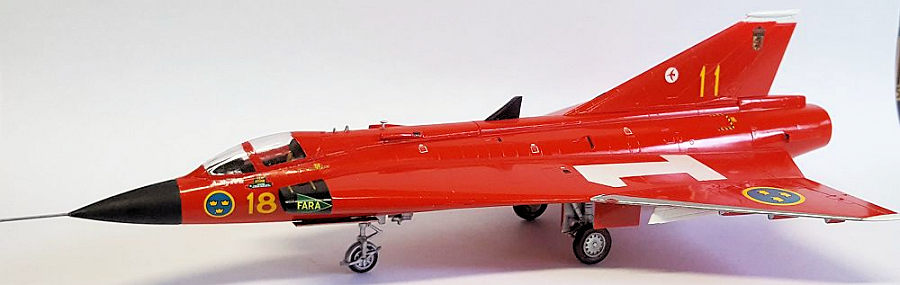
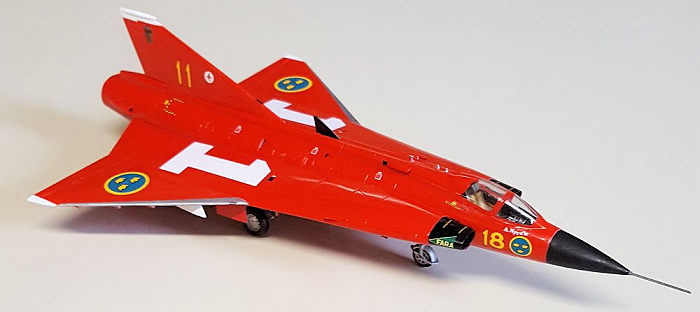
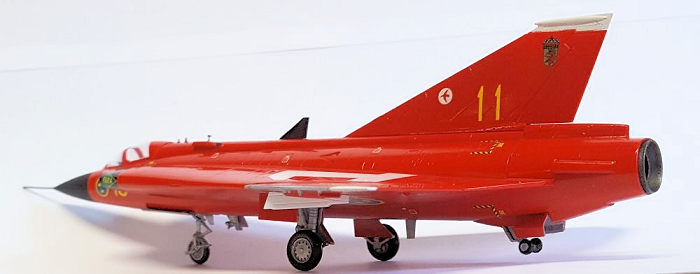
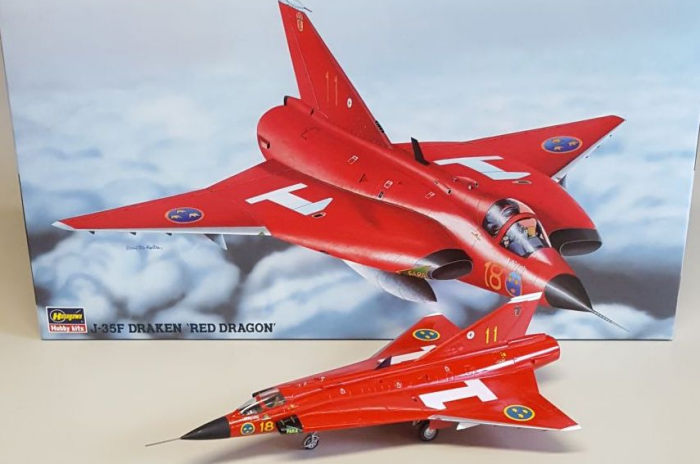
Hasegawa 1/72 J.35F Draken 'Red Dragon'
| KIT #: | 51461 |
| PRICE: | $20.00 or so |
| DECALS: | one option |
| REVIEWER: | Chris Mikesh |
| NOTES: | Out of box – but you don’t need much more! |
| HISTORY |
 From
instruction sheet (edited).
From
instruction sheet (edited).
In 1949 the Swedish military submitted a request to their aircraft industry, requesting a new fighter. They wanted this new fighter to have a ceiling of 14,000 meters, climb to 10,000 m in 25 minutes, top speed of Mach 1.7, plus short take-off and Landing ability so it could operate from existing Swedish roads. These were very sophisticated requirements for 1949 and their industry opted for a double delta type wing. With the data gathered from the Saab 210 flights they produced the J-35 Draken and test flew it on October 25, 1955. In 1956 it flew faster than Mach 1 in level flight without afterburner, and in August of the same year it was ordered into mass production. The J-35F is the most widely produced version and is expected to be operational well into the twentieth century.
| THE KIT |
 The kit
looks remarkable simple in the box on the sprues. My example is molded in Grey
plastic and looks really straight forward. Recessed panel lines and clean large
pieces tell me this is not going to be a major multi-week construction unless
you want it to be. But there are wonderful clean detail pieces as well.
The kit
looks remarkable simple in the box on the sprues. My example is molded in Grey
plastic and looks really straight forward. Recessed panel lines and clean large
pieces tell me this is not going to be a major multi-week construction unless
you want it to be. But there are wonderful clean detail pieces as well.
Don't shy away from this kit! It has recessed panel lines and has excellent surface detail. Prior to building the kit, I read the kit review from several years ago written by Scott Van Aken. It pointed out that the engine and afterburner, as well as the nose cone had minor flaws with fit. I was prepared for that when I started to assemble the model.
| CONSTRUCTION |
 The
construction is very straightforward and simple as is typical with Hasegawa. The
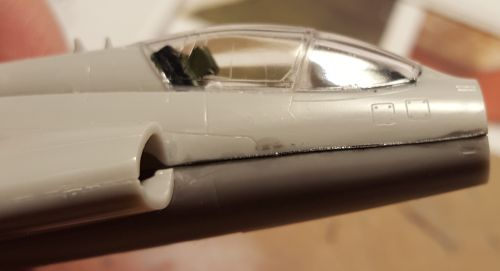
interior is primarily decals, lacking in surface texture. However, in this scale
you cannot see those details anyway unless you open the canopy. If you go that
route, I recommend replacing with a resin upgrade and Photo Etch (PE), but the
out of box option is not bad. I added seat belts and a little color as needed.
The
construction is very straightforward and simple as is typical with Hasegawa. The
interior is primarily decals, lacking in surface texture. However, in this scale
you cannot see those details anyway unless you open the canopy. If you go that
route, I recommend replacing with a resin upgrade and Photo Etch (PE), but the
out of box option is not bad. I added seat belts and a little color as needed.
The fuselage is 4 pieces with the cockpit, and superb fit except around the nose and forward fuselage. However, these are easily overcome. Lots of space for nose weight, but you will not need much.
Let me dwell on gap filling a moment. For small gaps like the forward fuselage seam of the J-35, I glued a string of stretched sprue into the gap. Make sure it is larger than the gap so when it is cured, you can sand it down flush to the fuselage. Now you are sanding a very small surface and less damage overall. This will not shrink, and paints will adhere better than some putties. Try to use the same color as your plastic for undersurface consistency when painted. Also, protect the surrounding surface with tape as you are sanding. You will be surprised how quickly and cleanly that gap will be cleaned up and all details preserved. (Thank you IPMS Northern Virginia)
 Two other
gaps to be ready for (also noted in Scott’s Review) is the disappointing fit of
the nose cone and the exhaust assembly. But you CAN get around it. Both will
rock up and down in dry fit by a hair. You can’t easily fix it. Both parts will
fit flush at the top, and a small gap at the bottom. I used more stretched sprue
in these gaps again and resolve the problem with no cracks on both sides.
Two other
gaps to be ready for (also noted in Scott’s Review) is the disappointing fit of
the nose cone and the exhaust assembly. But you CAN get around it. Both will
rock up and down in dry fit by a hair. You can’t easily fix it. Both parts will
fit flush at the top, and a small gap at the bottom. I used more stretched sprue
in these gaps again and resolve the problem with no cracks on both sides.
The Delta wings will need a little attention on the sanding block at the glue/attachment points. Otherwise, a near perfect fit. This is where dry fitting your parts will really pay off.
The canopy is a near-perfect and a tight fit. You have the option of open or closed. With that said, be cautious about using an adhesive that will mar or craze the clear canopy. I’d suggest something water based like Elmer’s Glue used sparingly.
Construction is remarkably easy and you will keep the momentum going through the entire build. All other parts are also an outstanding fit. I can't say enough good things about this model except that you need two of them in different styles. When you build one, you will be addicted and will need to build another!
| COLORS & MARKINGS |
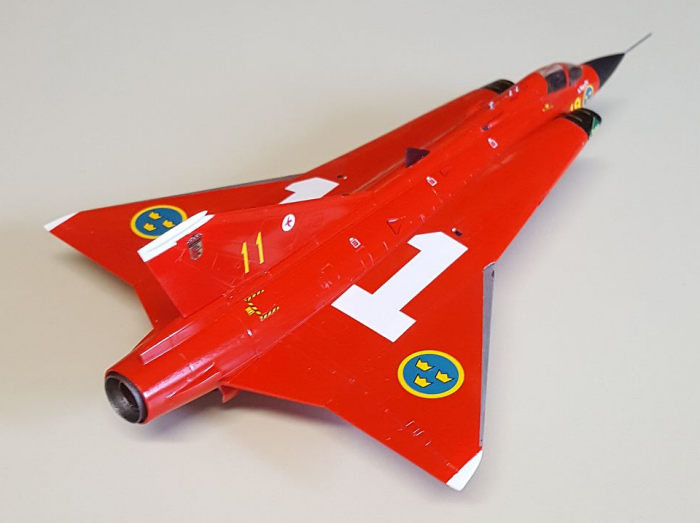
This particular issue (51461) of the J-35 is all red. But painting is not as easy as you may think. Like many modelers, I’m lazy and trying to ‘git er done’. This is where most builders ruin a beautiful build. Slow down!
White wing tips and rudder tips. DON’T hand brush or rattle can white. The paint is too thin and will run or build up too much long before good coverage. I airbrushed all white parts with Tamiya X-2 Gloss White, then after it dried, I masked off the tips. I also removed as much white paint from the areas where red will be (consistent under-color). Check your surface carefully. Many paints will amplify surface irregularities.
 What I
DIDN’T do but now wish I did, was after masking the canopy, was to put down an
interior gray before the red. Red is thin and is near-clear when looking through
the canopy. Don’t hand paint it – you’ll be sorry!
What I
DIDN’T do but now wish I did, was after masking the canopy, was to put down an
interior gray before the red. Red is thin and is near-clear when looking through
the canopy. Don’t hand paint it – you’ll be sorry!
The nose and air intakes are black with Tamiya X-1 (Gloss) and XF-1 (Flat) when needed. I glued these items on after painting all the red so I did not need to mask. Please note also that the instructions call for Steel paint on the air intakes. I have to question this, as my Steel paint was so flakey, I opted for flat black with a gloss black forward edge.
Tamiya TS-86 Aerosol ‘Pure Red’ was the primary paint. 18” from the surface using 2 to 3 coats evenly. No runs, smooth as silk and glossy. Don’t touch it for a day. Finger prints in uncured paint will really ruin the finish. Finger print oils will not help either (right after a KFC Chicken feast you will really be sorry).
I’m in love again!! Glossy and sexy, I can’t wait to get the markings on. But first are some details. The leading edge of the wings are silver. Black is going to be needed for the many air vents and scoop openings all over the plane. I suggest an ultra-fine point black Sharpie to gently touch these openings. It will make a big difference in a mono-colored plane, giving the surfaces depth and detail.
The Hasegawa decals were better than expected. Not too thin, so the red does not show through obviously. Start small and work to the bigger ones. The glossy red surface is an excellent medium for the decals. Use a lot of surface water, as they tend to slide easily, then stick unexpectedly. I had excellent results using a combination of Micro-Sol and Micro-Set.
| FINAL CONSTRUCTION |
 Everything
else that breaks off easily is now added. The nose cone, air intakes and little
antennas are super glued on, (use glue sparingly). Many of these need to be
pre-painted like landing gear, doors, shark fins, and weapons pilons.
Everything
else that breaks off easily is now added. The nose cone, air intakes and little
antennas are super glued on, (use glue sparingly). Many of these need to be
pre-painted like landing gear, doors, shark fins, and weapons pilons.
Coulda – Woulda – Shoulda (Specific to this kit)
Use Bare Metal Foil on the leading edges. (I might go back and do it anyway.)
Paint the white rudder tip separately, paint the model, and add the tip in final steps.
Pre-drill the holds for the drop tanks before closing the fuselage. Optional in step 3. The white tanks would be a nice contrast to all red.
Undercoat the canopy before painting frame red.
Consider Mr. Surfacer 1500 (or similar) as an undercoat before painting. Tamiya red paint is thin and will show irregularities and scratches.
Use less Micro-Sol on decals (or dilute). The decals tend to stretch if overworked.
Paint is surprisingly thick sometimes. Dry fitted parts don’t fit with paint on them!
| CONCLUSIONS |
This is my favorite build of 2020. Even if you are not ready to build it – get it while you can. On a scale of 1 to 10, this is easily a 9+. Would I build one again? I’ve already ordered one.
If you are looking for an easy build that is not ‘fiddly’ with a million little parts, good detail, and pretty on your shelf – this is it! I usually build classic kits, but occasionally (when I can afford it), I want a good build. For an end of the year kit, I leave 2020 a little less disappointed. Completed December 29, 2020.
Don’t play with your red too long – you might go blind!
26 July 2021 Copyright ModelingMadness.com.
All rights reserved. No reproduction in part or in whole without express
permission. If you would like your product reviewed fairly and
fairly quickly, please
contact
the editor or see other details in the
Note to
Contributors.