Italeri 1/72 F-100F Super Sabre
|
KIT # |
003 |
|
PRICE: |
$14.00 |
|
DECALS: |
Three Aircraft |
|
REVIEW & |
|
|
NOTES: |
` |
|
HISTORY |
Lee Kolosna has listed his top ten list of modeling drudgeries in one his more recent modeler´s musings; a list of avoided subjects or techniques might be equally interesting. Apart from biplanes in general and those nasty german „meander" camo schemes sported by torpedo bombers, I´ve hitherto shrunken back from natural metal finishes. I´ve done some experimenting with metalizer as an undercoat for the „chipped paint" look yet when meditating on building, say, a B-17, I´d immediately decide on an OD over Neutral Grey ship.
|
THE KIT |
 A few months ago, a local
hobby shop had to close, offering a 30% discount. I bought a mere two kits, one
of them a Revell 1:32 RF-4E, the other the subject F-100F. I pretty soon
commenced the F-100 since it looked such a neat build, which it was. The kit is
a relatively recent offering, molded in the standard medium grey plastic on two
sprues plus a transparent sprue. Panel lines are clear, yet not too deep in my
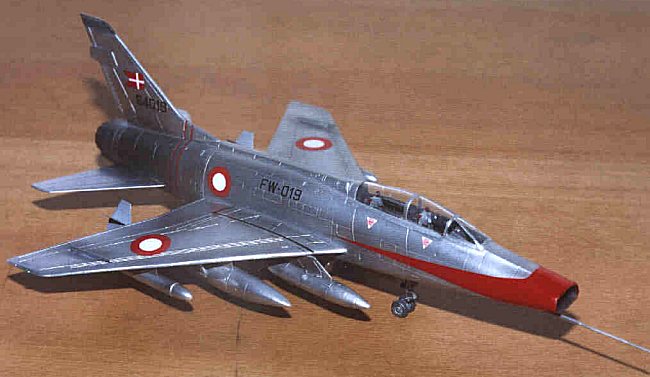
eyes and recessed. Three versions are covered by the excellent decal sheet: One
USAF bird in quite a gaudy „star-spangled" finish, a French plane plus a Danish.
The versions differ in air-to-air-refueling equipment plus in the suggested
payload, as with many early jets there are quite some external fuel tanks
anyway. Having just spent my 7th holiday in Denmark and really loving
the country and its people, the decision was easy.
A few months ago, a local
hobby shop had to close, offering a 30% discount. I bought a mere two kits, one
of them a Revell 1:32 RF-4E, the other the subject F-100F. I pretty soon
commenced the F-100 since it looked such a neat build, which it was. The kit is
a relatively recent offering, molded in the standard medium grey plastic on two
sprues plus a transparent sprue. Panel lines are clear, yet not too deep in my
eyes and recessed. Three versions are covered by the excellent decal sheet: One
USAF bird in quite a gaudy „star-spangled" finish, a French plane plus a Danish.
The versions differ in air-to-air-refueling equipment plus in the suggested
payload, as with many early jets there are quite some external fuel tanks
anyway. Having just spent my 7th holiday in Denmark and really loving
the country and its people, the decision was easy.
I don´t have to say much about the F-100, knowing infinitely less than our editor and only quoting him: „There is little that I can add to the reams of paper that have been printed on the Hun." A detailed account is to be found in Roger Jackson´s review of his marvelous 1:48 Monogram F-100D on this webzine.
|
CONSTRUCTION |
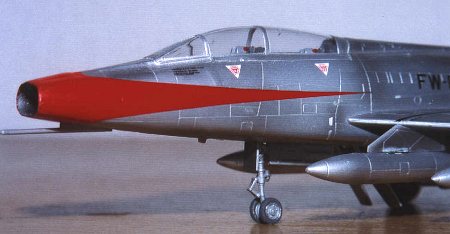
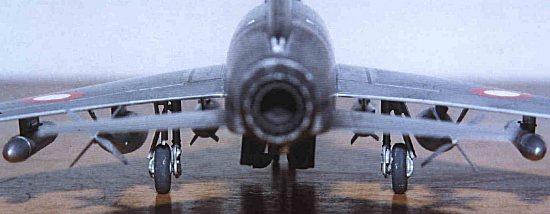
I just encountered one problem during the build, and that was the gunsight. When I had come so far as to glue it to the front of the cockpit area as indicated in the instructions, the canopy wouldn´t fit over the part. I have the feeling I simply glued the cockpit assembly too high inside the fuselage, yet didn´t have the heart to rip the plane´s belly open again and decided on omitting the part. Let me just say that in that moment, I was far more interested in how to cope with the metalizers than in anything else... The canopy was masked with Parafilm M, cut with a fresh #11 blade, since I found this method to work fastest and the most secure.
 Apart from that, it was an
easy build, little or no filler had to be used, yet there was a good degree of
sanding involved, especially with the metalizers in mind. After my usual back
and forth (sanding, spraying, detcting glitches, more sanding) I primed the
entire plane with a matte Testor´s medium gray. I preshaded the panel lines with
a darker gray, and after sufficient drying time, I used the metalizers as per
instructions. The plane was sprayed in aluminum metalizer save the rear part
which was sprayed burnt metal. I also did some postshading with burnt metal and
steel metalizer just for fun. Hat applied especially for the wheel wells. Having
photographed an F-100 hanging from a museum ceiling I know about the frightening
amount of detail in that area, but I just shaded and drybrushed for the above
reasons.
Apart from that, it was an
easy build, little or no filler had to be used, yet there was a good degree of
sanding involved, especially with the metalizers in mind. After my usual back
and forth (sanding, spraying, detcting glitches, more sanding) I primed the
entire plane with a matte Testor´s medium gray. I preshaded the panel lines with
a darker gray, and after sufficient drying time, I used the metalizers as per
instructions. The plane was sprayed in aluminum metalizer save the rear part
which was sprayed burnt metal. I also did some postshading with burnt metal and
steel metalizer just for fun. Hat applied especially for the wheel wells. Having
photographed an F-100 hanging from a museum ceiling I know about the frightening
amount of detail in that area, but I just shaded and drybrushed for the above
reasons.
I used a new glue for the first time on this project: I bought a little bottle of Ethylacetate at the local pharmacy, a very thin liquid that can be applied with a very small brush, effectively dissolves the styrene and makes stable, yet to-the-point bondings possible. It was very helpful especially when gluing external stores, the refueling probe and the like.
|
PAINT & DECALS |
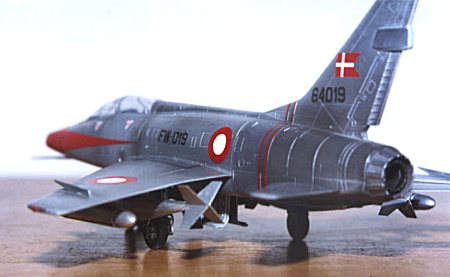
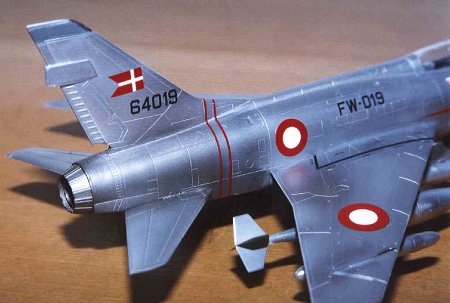
The whole spraying process was easy and fast, since the metalizers dry in a considerably shorter time than other paint does. Basically, they aren´t paint at all, but metal dust suspended in a solvent. I buffed the plane with paper towels and made sure I only touched it with rubber gloves afterwards, since I didn´t use the provided sealer as I have the feeling that it takes away the cool metal look of the surfaces. The inside of the air intake was sprayed dark gray, and the top part of the rudder was sprayed gray as per instructions.
 Then came the decals, and
this is another instance I have to praise Italeri for their outstanding decals.
They simply didn´t cause trouble and did what I wanted them to – and since they
snuggled well to the surface and didn´t play tricks with silvering, I can´t
think of a higher praise. Especially the potentially nasty big red double decal
for the Hun´s distinctive snout was fun working with.
Then came the decals, and
this is another instance I have to praise Italeri for their outstanding decals.
They simply didn´t cause trouble and did what I wanted them to – and since they
snuggled well to the surface and didn´t play tricks with silvering, I can´t
think of a higher praise. Especially the potentially nasty big red double decal
for the Hun´s distinctive snout was fun working with.
Lastly I glued bits and pieces plus a lot of underwing stores to the model – now it´s a pefectly acceptable representation of what was the typical „Duesenjaeger" of my childhood days, and a memorable plane that still looks great 50 years after its construction.
After I took the pics, I showed the model to a friend of mine who calmly advised me to glue the „Grenzschichtzaeune" (those blade-like things on top of the wings whose English name I don´t know) the other way round. OK, I´m normally not in for things without props, so the sillyness didn´t occur to me in the first place and I obeyed.
|
CONCLUSIONS |
Even when built straight from the box and deliberately without deeper commitment, this kit is fun, and I´m sure that when some of you superdetailing buffs lay your hands on it, it´ll be a jewel. Highly recommended.
If you would like your product reviewed fairly and quickly , please contact me or see other details in the Note to Contributors.