
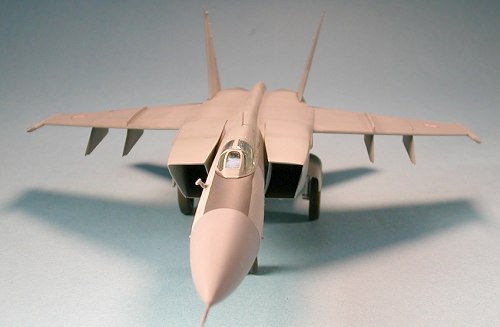
Hasegawa 1/72 Mig-25 'Foxbat'
|
KIT # |
00434 |
|
PRICE: |
$10.00 |
|
DECALS: |
See review |
|
REVIEWER: |
|
|
NOTES: |
High Decal 72-028 used |
|
HISTORY |
 highly specialized design, capable of
intercepting high speed, high altitude American aircraft, such as the canceled
B-70 bomber, but not capable of much else. It was armed strictly with
missiles, with no capacity for a gun, and the airframe was optimized for
supersonic flight, lacking the maneuverability necessary for dog-fighting at
lower speeds.
highly specialized design, capable of
intercepting high speed, high altitude American aircraft, such as the canceled
B-70 bomber, but not capable of much else. It was armed strictly with
missiles, with no capacity for a gun, and the airframe was optimized for
supersonic flight, lacking the maneuverability necessary for dog-fighting at
lower speeds.
The aircraft's exceptional high altitude performance made it ideal for use as a reconnaissance platform. Soviet recon variants were deployed in Egypt under the fictional designation X-500, and carried out over-flights of Israel with impunity in the early 1970's. A successful family of electronic warfare and strike/recon variants grew out of those early reconnaissance aircraft. Some of them are still in Russian service today, long after the Foxbat interceptor was phased out.
Syrian and Iraq are the only nations to have used the Foxbat in combat. A Syrian MiG-25P interceptor downed an Israeli F-15 in February 1981, in response to the earlier destruction of another Syrian Foxbat. The Iraqi air force made a number of successful bombing strikes against Iran using MiG-25RB's. In the 1991 Gulf War, an Iraqi MiG-25P shot down a U.S. Navy F/A-18. However, U.S. Air Force fighters later downed three Iraqi Foxbats in air-to-air combat, and destroyed numerous others on the ground.
|
THE KIT |
In the box you get 53 pieces molded in gray, with a single piece clear canopy.
My example was from a 1970's release of the kit and showed a small amount of
flash on some parts. This kit has been re-released many times since then, and
may be showing some wear by now. There are prominent ejector pin marks on a
number of parts, including the main gear doors and
 landing gear struts. Panel
lines are represented as finely raised lines, as is typical of 1970's Hasegawa
kits.
landing gear struts. Panel
lines are represented as finely raised lines, as is typical of 1970's Hasegawa
kits.
Hasegawa's kit engineers based their design on first-hand observations and measurements of Belenko's Mig-25P, and the outline and dimensions are therefore very accurate. However, some details appear to have been simplified. For example, the panel lines provided are essentially accurate, but incomplete. Reference drawings reveal that there should be numerous additional panel lines not depicted on the kit. I chose not to rescribe the panel lines, but those who do should consult photos and a good set of drawings to determine where lines should be added.
The decal sheet is basic, with Soviet red star insignia and red "31" numerals appropriate for Viktor Belenko's aircraft. Later releases of the kit have a larger sheet, with a full set of red and blue numerals.
|
CONSTRUCTION |
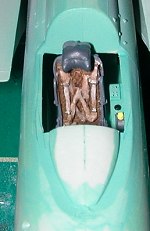 I began work with the cockpit. Although the raised detail on the side consoles
is not completely accurate compared to photos of the Foxbat cockpit, it is
adequate for 1/72 scale, in my opinion. The main instrument panel is
represented by a decal. The kit's ejection seat is totally devoid of decal, so
I replaced it with a True Details resin KM-1 seat. I highly recommend True
Detail's Soviet ejection seats. They are a quick and inexpensive way to
improve a lackluster cockpit like the one in this kit. I used Aeromaster
Acrylic Soviet Interior Blue Green for the main cockpit color. The seat frame
is Pollyscale RLM 66 Black Gray with a Tamiya Khaki cushion, and details
picked out in various shades of gray and tan.
I began work with the cockpit. Although the raised detail on the side consoles
is not completely accurate compared to photos of the Foxbat cockpit, it is
adequate for 1/72 scale, in my opinion. The main instrument panel is
represented by a decal. The kit's ejection seat is totally devoid of decal, so
I replaced it with a True Details resin KM-1 seat. I highly recommend True
Detail's Soviet ejection seats. They are a quick and inexpensive way to
improve a lackluster cockpit like the one in this kit. I used Aeromaster
Acrylic Soviet Interior Blue Green for the main cockpit color. The seat frame
is Pollyscale RLM 66 Black Gray with a Tamiya Khaki cushion, and details
picked out in various shades of gray and tan.
The cockpit floor attaches to the forward wheel well, and this assembly is
trapped between the right and left fuselage halves. The two main halves went
together very well, with only a small amount of gap filling super glue and
some minor sanding necessary to address the seam. Unfortunately, this was not
the case with the other major fuselage assemblies. Parts 35 and 36, which are
the top and bottom rear fuselage sections, fit horribly. The extensive putty
work and sanding resulted in the destruction of much of the raised panel
detail in these sections. Part 34, the rear fuselage fairing, did not match up
well to the fuselage, requiring more heavy sanding. I chose not to attach the
stabilators , vertical stabilizers or
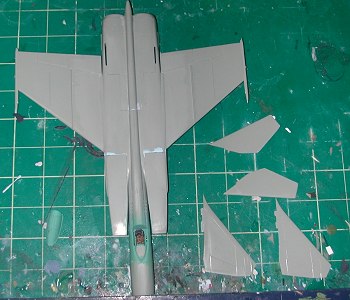 ventral fins at this point in order to
facilitate painting of the rear fuselage bare metal section.
ventral fins at this point in order to
facilitate painting of the rear fuselage bare metal section.
The intake assemblies lack positive placement indicators, and have only a very thin mating surface, so patience and care are required (along with yet more seam filling work). Comparing the two outer sections (parts 10 and 11) on my example lead me to the conclusion that they were not symmetrical. One side was slightly wider and they are shaped slightly differently. The difference is minute, but noticeable if you check the finished model closely. Other than this symmetry problem, the intakes are handled well, with a blanking plate at the front of the wheel wells to prevent "see through" problems. I painted these black, maintaining the deep, cavernous look of the original.
I glued a lead fishing weight inside the nose cone, and attached the nose probe before painting and attaching it to the fuselage. The nose probe is fragile, and I broke it off multiple times. I would have left it off until the final assembly steps, but the very front of the nose cone is molded as part of the probe, so I wanted to attach it and fair it into the nose cone before painting.
Stretched sprue was helpful in filling the gaps between wings and fuselage. More careful puttying is necessary to blend the intakes into the fuselage. I restored the destroyed raised panel lines by scribing with a No. 11 Exacto blade.
|
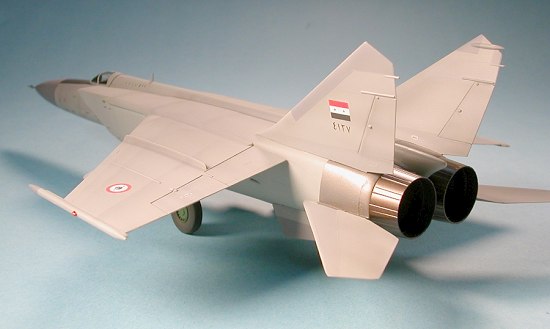
CAMOUFLAGE & MARKINGS |
 Once the body work and panel details were cleaned up, I masked off the canopy
and attached it for painting. The model's overall color is Gunze Sangyo
Acrylic Flat Light Gray. I painted the dark gray trim with Gunze Sangyo
Acrylic Gray FS 36118 lightened with a very small amount of Flat White. I have
had no success using my usual weathering technique of artist's oil paint
washes on models with raised panel lines. So instead, I accentuated the panel
lines with Tamiya Acrylic Sky Gray darkened slightly with Flat Black. I
thinned my paint heavily, so that it would be semi-translucent, and airbrushed
it along the trailing edges of the panel lines. The front edges of the panels
were masked with Post-it Notes, Tamiya masking tape, or note cards. This gives
a good representation of the streaky look often seen on photos of Foxbats. I
coated the entire model with Future. I applied decals from High Decal sheet
No. 72-028 for a Syrian aircraft. Although this sheet has several great
schemes for the Foxbat beyond the usual Soviet red stars, those considering
using it should be ready to deal with potential silvering problems. Despite my
clear gloss coat, and use of several setting solutions, I could not get them
to go on without silvering.
Once the body work and panel details were cleaned up, I masked off the canopy
and attached it for painting. The model's overall color is Gunze Sangyo
Acrylic Flat Light Gray. I painted the dark gray trim with Gunze Sangyo
Acrylic Gray FS 36118 lightened with a very small amount of Flat White. I have
had no success using my usual weathering technique of artist's oil paint
washes on models with raised panel lines. So instead, I accentuated the panel
lines with Tamiya Acrylic Sky Gray darkened slightly with Flat Black. I
thinned my paint heavily, so that it would be semi-translucent, and airbrushed
it along the trailing edges of the panel lines. The front edges of the panels
were masked with Post-it Notes, Tamiya masking tape, or note cards. This gives
a good representation of the streaky look often seen on photos of Foxbats. I
coated the entire model with Future. I applied decals from High Decal sheet
No. 72-028 for a Syrian aircraft. Although this sheet has several great
schemes for the Foxbat beyond the usual Soviet red stars, those considering
using it should be ready to deal with potential silvering problems. Despite my
clear gloss coat, and use of several setting solutions, I could not get them
to go on without silvering.
After the primary painting and decaling, I masked and painted the rear fuselage section with Alclad Steel. I attached the various tail parts without incident, and was pleased to find that they are all keyed with different sized tabs, so it is impossible to attach a left-side part on the right side, or vice versa. The right and left afterburners were primed with Polly S Engine Black and painted with Alclad Jet exhaust. These parts are devoid of any internal detail, and are unacceptably shallow. I chose the easy route and left them black on the inside, rather than attempt to bore them out and scratchbuild the internal engine detail.
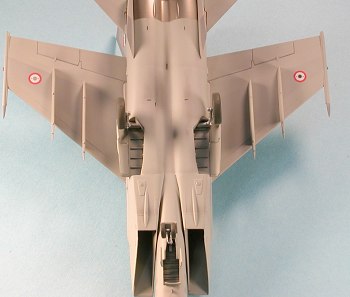
 Construction continued with the landing gear, which are acceptably
detailed, but are marred by ejection pin marks and mismatched mold halves. The
forward gear strut on my example is slightly warped, and I was unable to
completely straighten it, for fear of bending it too far and breaking it. The
landing gear doors also show large ejection pin marks. MiG-25 gear struts
appear to be painted with a silver-gray paint or lacquer, which I simulated
with Floquil Platinum Mist. I painted the tires Polly S Grimy Black, and the
hubs Aeromaster Acrylic Soviet Hub/Radome Green. I replaced the upper and
lower blade antennas (which were broken off earlier) with pieces cut from thin
plastic sheet. I The final details were the wing missile pylons, which went on
well, and were much easier to align than I feared.
Construction continued with the landing gear, which are acceptably
detailed, but are marred by ejection pin marks and mismatched mold halves. The
forward gear strut on my example is slightly warped, and I was unable to
completely straighten it, for fear of bending it too far and breaking it. The
landing gear doors also show large ejection pin marks. MiG-25 gear struts
appear to be painted with a silver-gray paint or lacquer, which I simulated
with Floquil Platinum Mist. I painted the tires Polly S Grimy Black, and the
hubs Aeromaster Acrylic Soviet Hub/Radome Green. I replaced the upper and
lower blade antennas (which were broken off earlier) with pieces cut from thin
plastic sheet. I The final details were the wing missile pylons, which went on
well, and were much easier to align than I feared.
I chose to leave the aircraft clean rather than attaching the AA-6 Acrid missiles provided, but I did test-assemble them. Fit is good, but they have some nasty ejection pin marks. It appears that the missiles were designed with sketchy information gleaned from fuzzy photos of operational aircraft. As a result, the missiles are accurate in size and outline, but lacking in specific details. The most notable omissions are the two auxiliary booster engines that should be on either side of the main missile body between the fins.
|
CONCLUSIONS |
In recent years, kit manufacturers have introduced more modern kits of other Cold War era Soviet aircraft, such as the MiG-15 and -21. However, the only MiG-25 in this scale is still Hasegawa's. This kit's instruction sheet proudly notes that Hasegawa released it only 100 days after Viktor Belenko's defection to the West on September 6, 1976. This is a 25-plus year old kit, after all, and it presents all the challenges typical of a kit of that era, such as raised panel lines, mediocre fit, and simplified details. Provided the modeler is ready to accept these challenges, careful work will be rewarded with a fine, accurate model of an important Soviet aircraft.
Mike Rybak April 2003
Copyright ModelingMadness.com. All rights reserved. No reproduction in
part or in whole without express permission from the editor.
If you would like your product reviewed fairly and fairly quickly, please contact the editor or see other details in the Note to Contributors.