Roden 1/72 AN-12BK
| KIT #: | 5002 |
| PRICE: | @$40.00 when new |
| DECALS: | Two options |
| REVIEWER: | Spiros Pendedekas |
| NOTES: | Xtradecal 48151 |
| HISTORY |
The Antonov An-12 “Cub” is a four-engine turboprop transport aircraft designed in the Soviet Union. It is the military version of the Antonov An-10 and has many variants. For more than three decades the An-12 was the standard medium-range cargo and paratroop transport aircraft of the Soviet Air Forces. It might be regarded as the Soviet equivalent of the C-130. A total of 1,248 were eventually built.
| THE KIT |
 For a detailed look at the kit contents, as well as a
nice history of the specific type, please check Scott’s thorough preview in the
archives.
For a detailed look at the kit contents, as well as a
nice history of the specific type, please check Scott’s thorough preview in the
archives.
This kit made quite an impact upon its initial (and so far only) triple release
back in 2003. Inasmuch as I could restrain myself from getting the transport and
civil versions, I succumbed without a fight to the mean ECM version, with the
dramatic boxart of a -PPS banking to the right (and slightly downwards) towards
the sea, “escorted” by a Starfighter. My excitement continued, as I saw the vast
amounts of (“close tolerance” - CAD designed?) engraved styrene in the box, with
the fuselage halves provided in two parts, indicating the (then?) Roden’s
molding machine limitation. I was less excited to notice the slightly pebbly
plastic surface areas, but, (since the detailing is engraved) that’s one of the
reasons 1000 grit sandpaper exists, so no harm done, right?
| CONSTRUCTION |
If, like yours truly, like doing subassemblies, then
this kit is definitely for you! I went on putting together as many subassemblies
as I could, starting with the 14-piece cockpit. Its basic color (as per
instructions) was Hu121 Pale Stone, seats were dark gray (with brown leather
cushions), instrument panel, consoles, steering columns and bombsight were
black. I then assembled the 9-piece fuselage rear part, the 2-piece main wings
and tail planes. Then were the four engines (each a 9-piece affair), followed by
the four 6-piece propellers, the ten 2-piece wheels and the two pairs of 4-piece
front and rear ECM pods. Subassembly heaven!
Convinced that nothing could be visible through those tiny cabin windows, I
glued the two fuselage halves together, trapping only the assembled cockpit and
its rear bulkhead between them, followed by attachment of the already assembled
tail at the back. Fit was good. I did not install the tiny circular cabin
windows, as they looked a tad cloudy and deformed, planning to replicate them
with Humbrol Clearfix at end stages.
 The assembled engines were then attached at the wings, with the resulting gaps
(not that many, actually) filled and sanded. Then the wings and tail planes were
attached, followed by the front under fuselage bulge (a radar, I think), where,
just in case, I stuffed as much lead weight as I could. Having a complete basic
structure, and before adding the smaller and at cases delicate external add-ons
of the -PPS variant, I performed an initial coarse sanding, then filling and
finally fine sanding. As stated before, kit surfaces are on the pebbly side, so
a thorough fine sanding is needed, in order to achieve a smooth result.
The assembled engines were then attached at the wings, with the resulting gaps
(not that many, actually) filled and sanded. Then the wings and tail planes were
attached, followed by the front under fuselage bulge (a radar, I think), where,
just in case, I stuffed as much lead weight as I could. Having a complete basic
structure, and before adding the smaller and at cases delicate external add-ons
of the -PPS variant, I performed an initial coarse sanding, then filling and
finally fine sanding. As stated before, kit surfaces are on the pebbly side, so
a thorough fine sanding is needed, in order to achieve a smooth result.
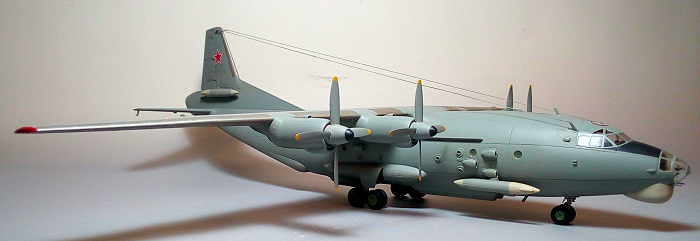
Deeming the result “smooth”, I proceeded and added all the above mentioned
“add-ons”. Those included nine 2-piece cooling inlets (presumably to cool the
ECM equipment), two big underbelly ECM platforms, two top aerodynamic fillets,
and about thirty (!) mini antennas, spread all over the fuselage area! Most of
them are butt fitted, with the nice and clear instructions being very helpful as
to what goes where. Thank goodness almost all would be painted fuselage color.
To my joy, apart from wheel rims in light green, instructions called fuselage
color for all landing gear components, including wheel wells and door innards!
Calling the per instructions suggested “one shade” coloring totally acceptable
(and utterly comforting!), I happily assembled and attached into place all
landing gear struts and doors. After aligning everything, I let this beautiful
giant rest on itself, for the glue to cure, frequently checking alignment. I
then stuffed wet tissue to blank the cockpit and headed to the paint shop!
| COLORS & MARKINGS |
 With my Revell Vario (which actually is a version of Thayer & Chandler Vega
2000) at medium settings, I bravely gave the whole machine a good overall
coating of Hu128 Compass Gray, which, as usual, behaved excellently, with the
characteristic gorgeous Soviet mean gray looks emerging. The props had their
hubs and blade front faces painted the same color too (with the hub tip black).
The blade rear faces were painted blue aluminum resp, with yellow tips.
With my Revell Vario (which actually is a version of Thayer & Chandler Vega
2000) at medium settings, I bravely gave the whole machine a good overall
coating of Hu128 Compass Gray, which, as usual, behaved excellently, with the
characteristic gorgeous Soviet mean gray looks emerging. The props had their
hubs and blade front faces painted the same color too (with the hub tip black).
The blade rear faces were painted blue aluminum resp, with yellow tips.
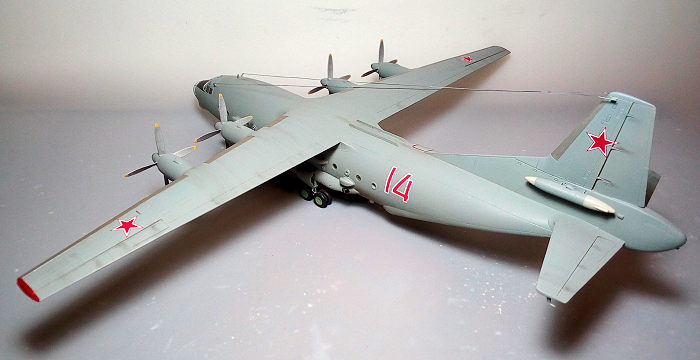
Engine exhausts were painted Testors Burned Metal. Front radar bulge and all ECM
dielectric panels were hand painted Hu196 Light Gray (which actually is sort of
“off white”). Wings and fin leading edges were painted aluminum, and the wing
tips red. The wheels were painted a handy light green shade with black tires.
The front anti glare panel was also painted black (though you have the option of
using a decal provided). I then gave the model a protective and decal
preparative coat of Future.
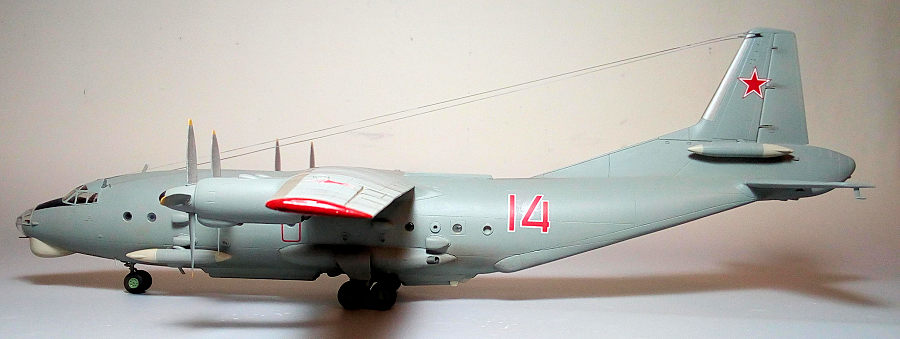
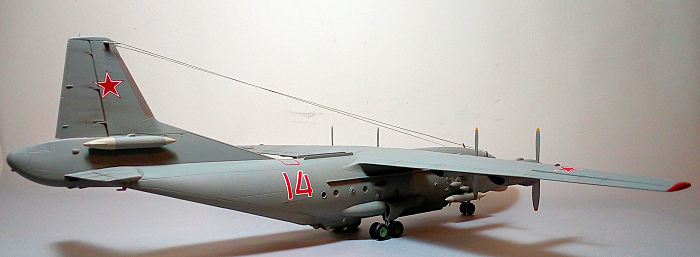
I used the kit decals, in order to depict the “Red 14” machine, as it stood in
Levashovo airfield in 2001. Though the decals seemed cautiously thin and
sensitive, they were opaque and behaved nicely. A bit of side stenciling is
provided, adding interest at places to the monotonous gray. A coat of Future
sealed the decals.
| FINAL CONSTRUCTION |
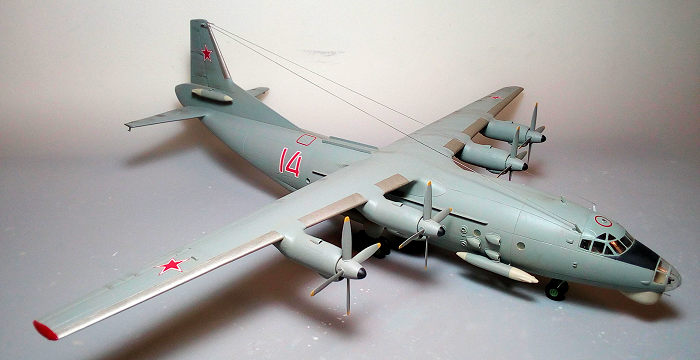
 I attached the four props and the two pairs of front/rear ECM pods. After
painting the oleos silver (with my Pilot fine pen), I attached the 10 wheels
and, upon aligning and ensuring all of them touched the ground, I left again the
giant rest on them for the glue to cure, frequently checking for any
misalignments.
I attached the four props and the two pairs of front/rear ECM pods. After
painting the oleos silver (with my Pilot fine pen), I attached the 10 wheels
and, upon aligning and ensuring all of them touched the ground, I left again the
giant rest on them for the glue to cure, frequently checking for any
misalignments.
I did not apply too much weathering, just some engine staining, grease/oil
leaking and general dirtying, performed with dark dry pastels and some black
wash. Then, a final coat of almost matt coating (70/30 matt/gloss) was applied
at the entire aircraft, for its final finish.
The canopy and bombardier’s transparencies were carefully hand painted and
attached. Fit was good (could be better at the top canopy joint area), with the
mini gaps faired with white glue. I used white glue (which dries “almost”
transparent) to make the side windows, (I should have used the amazing Humbrol
Clearfix, which dries crystal clear, but I had forgotten my bottle open, with
the Clearfix solidified, and I was impatient to finish the build…). Using net
pics for exact positioning, two pieces of silver stretched sprue were run from
the fin to the two front antenna masts.
I then called this mean looking giant of the skies done!
| CONCLUSIONS |
Till 2003, modelers had been praying for a mainstream 1/72 An-12, with their
only option being the very difficult 1996 Sanger multimedia vac kit, equally
difficult to find. Then Roden came to the rescue, offering not one, but three
different versions of this iconic plane, practically covering all
variants, the ECM version being surprisingly one of them. They are really good
kits, definitely of the “modern”, mainstream type, with correct general shape,
nice details and good fit (provided that parts are carefully cleaned, as of the
close tolerance CAD kit design).
 Due to the many parts (especially true for the ECM version with the bazillion
fuselage external “add-ons”), they are complex kits, but not complicated, only
requiring patience and time. Decals are great, too, as are the instructions,
with the only “complaint” being the styrene pebbly surface, easily remedied by
light sanding (and strongly advised to do so, as to not take risks of final
finish looks).
Due to the many parts (especially true for the ECM version with the bazillion
fuselage external “add-ons”), they are complex kits, but not complicated, only
requiring patience and time. Decals are great, too, as are the instructions,
with the only “complaint” being the styrene pebbly surface, easily remedied by
light sanding (and strongly advised to do so, as to not take risks of final
finish looks).
Apart from the detailed rear ramp innards, no cargo/passenger internal details
are provided. If you decide to go “all shut”, nothing is visible inside, so all
is good. However, should you decide to open the rear ramp, quite a bit of work
would be ahead of you, with some nice PE aftermarket in existence, promising to
help you busy up that large interior.
I haven’t seen that many An-12s built (let alone with open cargo compartments).
Looks like the kit did not sell like madness, becoming a shelf sitter, easily
found even today (as of 2021) at the same very nice prices offered almost 20
years ago. This is contradicting the eagerness that this kit was expected from
the modeling world and the not extreme difficulty that it can be put together.
Consequently, that these kits have not been reissued since their 2003 initial
release, comes not as a surprise.
If you are an intermediate modeler, provided that you take your time, you can
efficiently tackle this kit. Should you decide to build it (and you are
wholeheartedly advised to do so!), please keep in mind that the finished model
is as big as a C-130, so some space has to be allocated for it. Even right out
of the box, you will definitely come up with a most impressive model, a jewel to
proudly exhibit in your showcase.
Happy modeling!
Spiros Pendedekas
29 November 2021 Copyright ModelingMadness.com. All rights reserved. No
reproduction in part or in whole without express permission. If you would like your product reviewed fairly and fairly quickly, please contact the editor or see other details in the
Note to
Contributors.