
Trumpeter 1/32 FT-5
| KIT #: | 02203 |
| PRICE: | AUD $17.00 |
| DECALS: | One aircraft |
| REVIEWER: | Jamie McIntyre |
| NOTES: | Difficult at times, but an ulitmately rewarding build. |
| HISTORY |
The Chinese Licence-Built MiG-17F (J-5 in Chinese service, F-5 export) was originally produced by the Shenyang Aircraft Factory, but later derivatives were developed and constructed by Chengdu.
The most successful of these was the JJ-5 (FT-5 export), a two-seat trainer derivative. This had a slightly lengthened fuselage, and the nose intake and jetpipe were refined.
Development began in 1965, when it was becoming clear that the MiG-15UTIs (JJ-2) then in use lacked performance and had some unacceptable handling characteristics. The JJ-5 first flew on 8 May 1966, and 1,061 had been built by 1986, when production ceased. It was powered by a Wopen WP-5D Turbojet.
FT-5s were exported to Pakistan, Albania, Bangladesh, Sri Lanka, Sudan, North Korea, Tanzania and Zimbabwe, and many of these are still in use.
Mikoyan Gurevich never designed or produced a two-seat MiG-17 variant themselves, since the Soviet & Warpac Air Forces regarded the MiG-15UTI as being adequate for the training of MiG-17 & MiG-19 aircrew.
| THE KIT |
– An in-box preview by Scott Van Aiken can be viewed here - http://www.modelingmadness.com/scotts/viet/ft5preview.htm
As indicated by Scott, this kit is copied from the Tamiya 1/48 MiG-15bis, as are all of Trumpeter’s 1/32 MIG-15s & 17s. These kits were some of the first, if not THE first, of Trumpeter’s products to be retailed outside China.
The ailerons, elevators and rudders are all separate unlike the Tamiya kit, but as they have square leading edges they cannot be posed in any position but neutral without considerable work, negating any benefits! All of the parts are styrene apart from the rubber wheels, with no P/E or the film instrument panel now pretty much standard in Trumpeter’s larger kits.
| CONSTRUCTION |
 This was the first
kit I have built since 2000. As I am in the Royal Australian Navy I move about a
fair bit, and the breakage of my built kits over my first 10 years of service
led me to swear I wouldn’t build another until we purchased and settled in our
own home post-Navy. But a bunch of friends decided on a Group Build, and as I
was fairly influential in having the subject as “Made In Russia” (one of my
favourite subjects) I thought it only fair I joined in! They kindly over-looked
the fact that THIS aircraft was actually only made in China, thanks guys! I also
wanted to prove to myself that I could still do it, and “Keep my hand in” so to
speak. I could have picked a small “Shake n’ Bake”, but what would I learn from
that? So the FT-5 it was.
This was the first
kit I have built since 2000. As I am in the Royal Australian Navy I move about a
fair bit, and the breakage of my built kits over my first 10 years of service
led me to swear I wouldn’t build another until we purchased and settled in our
own home post-Navy. But a bunch of friends decided on a Group Build, and as I
was fairly influential in having the subject as “Made In Russia” (one of my
favourite subjects) I thought it only fair I joined in! They kindly over-looked
the fact that THIS aircraft was actually only made in China, thanks guys! I also
wanted to prove to myself that I could still do it, and “Keep my hand in” so to
speak. I could have picked a small “Shake n’ Bake”, but what would I learn from
that? So the FT-5 it was.
The cockpit is fairly basic, consisting of the tub itself, two 2-part seats, two instrument panels, two control sticks and a hood over the back-seater’s instrument panel. I missed the last part until after the forward fuselage halves were together, when it was too late, DOH!
I painted the tub, seat frames and control columns in Tamiya XF-24 Dark Grey (all paints used were acrylics), with the instrument panels & small side consoles in Heller Black. Various switches were picked out in red & yellow, although my original plan of undercoating the instrument panels in white and then scratching away the black from the instrument details to reveal the white underneath was let down by the soft detail. The three coats required obscured pretty much all of it! The edges of the seat frames adjacent to where the pilot’s knees would be were painted Humbrol Red to represent the ejection handles located there, and the seat cushions in Testors FS34079 Dark Green.
The nice intake splitter was painted Heller Light Ghost Grey, with the landing light located at its top painted Heller Silver. This is supposed to have a clear cover, but while this is present on the clear sprue of the single-seater kits Trumpeter forgot it on the twin sprue!
The forward fuselage halves were then closed up, with the cockpit tub & splitter trapped inside. I painted most of the insides of the halves in XF-24, as much is visible through the intake. The fit wasn’t great, hampered by the confusing locating points for the tub.
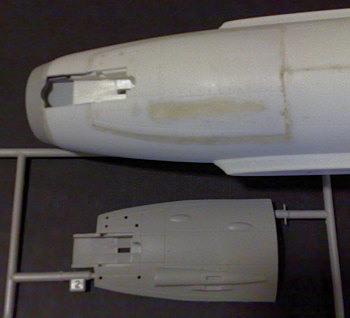 Then the separate
gun bay panel was fitted, again a poor fit. It over-hung on both sides, leaving
a lip that required much filling. Only after it was fitted and faired in did I
realise that it is unchanged from the single-seater panel. The twin only has a
single 12.7mm MG, so the attaching holes and bulges for the two 23mm Cannon had
to go, as did the fairing that forms the rear three-quarters of the 37mm Cannon.
The latter is hollow, so its removal leaves a long, narrow triangular hole. I
backed this with packing tape inserted through the open rear of the forward
fuselage, and flooded it with filler. The photo shows the modified panel next to
an unmodified one from a single-seater kit.
Then the separate
gun bay panel was fitted, again a poor fit. It over-hung on both sides, leaving
a lip that required much filling. Only after it was fitted and faired in did I
realise that it is unchanged from the single-seater panel. The twin only has a
single 12.7mm MG, so the attaching holes and bulges for the two 23mm Cannon had
to go, as did the fairing that forms the rear three-quarters of the 37mm Cannon.
The latter is hollow, so its removal leaves a long, narrow triangular hole. I
backed this with packing tape inserted through the open rear of the forward
fuselage, and flooded it with filler. The photo shows the modified panel next to
an unmodified one from a single-seater kit.
The two-seater specific nose ring was the last part of this section, and again fit was appalling. It was higher at the top than the fuselage section it mated to, leaving a lip, and narrower on the sides, leaving lips again. I’m running out of filler!
Examination of
photos of Albanian FT-5’s stored in caves on Airliners.net showed that the nose
is far too sloped in profile – it should run almost in a straight horizontal
line from the windscreen to the intake ring. These photos also showed that the
intake splitter should be further forward, blending into the intake ring and
with no landing light. Oh well!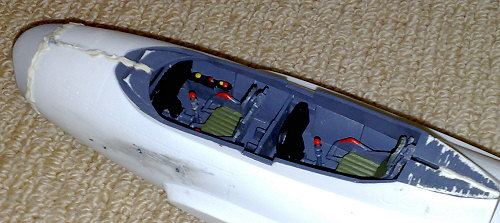
The rest of the main assembly was a breeze by comparison, with the rear fuselage, wings, horizontal tails, ailerons, elevators and rudders all only requiring a swipe of filler on the joins followed by a quick rub with wet n’ dry. I planned to have the aircraft “complete”, with the removable rear fuselage glued in place, so only used the jet-pipe and rear turbine from the engine sprue. The airbrakes fit well in the closed position after a quick scrape along their bottom edges.
The long, thin
ventral fin is missing, with just a small rectangular fairing and circular tail
bumper represented ala MiG-15. Copied from the Tamiya kit remember? But as this
fin is just sheet metal on the real thing it was easy to replicate with some
Evergreen .020 inch (0.5mm) thick plain styrene sheet cut & sanded to shape.
It’s a bit too long & deep, and a tad too far forward on the fuselage (should
run from in-line with the front of the fin to
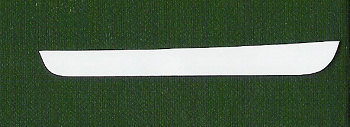 the
rear of the airbrake actuators), but still better than what the kit provides!
the
rear of the airbrake actuators), but still better than what the kit provides!
The undercarriage is a real mixed bag, with nice gear legs counter-balanced by wheels with one side hollow, rubber tyres, and main gear doors that have their locating holes opposite to the locating lugs on the gear legs size wise. Once together they look OK, but the wheels & tyres really need replacing with resin items. I painted the legs Heller Silver, wheel hubs Testors FS34079 Dark Green and main gear doors Heller Light Ghost Grey.
Many long sessions followed sanding the now-dry filler on the forward fuselage, painting over it to check for flaws, touching these up with more filler, sanding, check-painting etc, until finally all was ready. Hang on, nose weight, argh! You can tell it’s been a while! Luckily I managed to cram 3 large lead fishing sinkers into the hollow rear of the splitter plate through the ever-handy open rear of the forward fuselage, tight squeeze between the bottom of the cockpit tub & top of the nose gear well but I got them in! Turned out to not be enough, but at least I tried!
The main assembly was fairly easy, with only a touch of filler needed on the forward-rear fuselage join and a decent amount on the wing roots.
Main
Assembly photo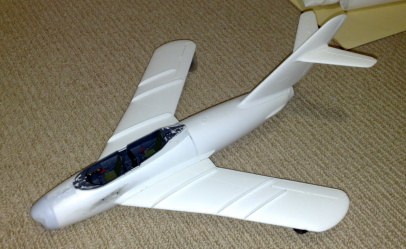
I also fitted the large wing-tip pitots which are forced into the correct position by their locating holes, the small wedge that makes up the rear of the cockpit fairing, the arch that forms the centre of the cockpit itself, the inner & outer main gear doors, nose gear doors and gun.
The large whip aerial on the right forward fuselage has its locating hole far too low and aft, above the wing root when it should be below the cockpit arch. So I filled the hole, cut off the locating lug and butt-mounted it below the cockpit arch, about an inch above and forward of the original hole.
The intake ring is missing a gun camera fairing on the right side, I managed to carve the one off the top of the spare single-seater intake ring provided in the kit and fit this and whilst a little small it is at least something!
Also missing is a small pitot mast on the upper right nose, about halfway between the back of the intake ring and the front of the cockpit fairing and located on the upper panel line situated there. Luckily I found a suitable replacement in my spares box.
| COLORS & MARKINGS |
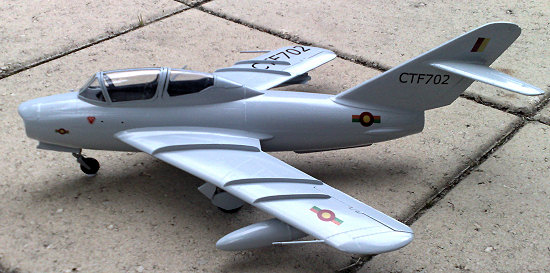
I wanted to do a Sri Lankan FT-5, one of two used by 5 Jet Squadron at Colombo-Katunayake AFB for jet conversion training before being replaced by Hongdu K-8 Karokorums. So the overall scheme was easy, Heller Light Ghost Grey. I had never used this before and was most impressed, as I’m a brush-painter and three coats produced a beautiful satin finish, with no visible brush marks. No decals exist, so I made my own using MS Powerpoint. The black serials were done on a HP Colour Laserjet 5500DN using Novascale (Aussie Decals) Clear A4 Laser Decal Sheet, and the coloured markings on a HP PSC 1210 All-In-One using Testors Clear Inkjet Decal Sheet. A LOT of trial and error was required, but I’m happy with the result. The large CTF-702 on the upper right wing had to be cut to match the wing fence. The ejection seat triangles are from the spares box.
A coat of Microscale Micro Flat finished off the paint work, but for some reason this dried like a Gloss!
| CONSTRUCTION CONTINUES |
Final Construction – I now added the landing gears, which mount fairly solidly. The main landing gears have large retraction arms, but smaller arms which run from the upper gear leg to the small outer gear doors are missing. These small doors should angle outwards from the top, towards the wingtips, but their thick locating lugs negate this and it’s a tight squeeze between them and the gear leg mounted doors! As a result the gear legs are forced inwards, leaving the kit rather knock-kneed! This is extenuated by the retraction arms, which by their attachment angle & length only fit when the legs slant inwards.
The drop tanks & underwing ILS aerials had been assembled and painted separately so they could be fitted at this stage over the underwing serial. The rear mounts for the drop tanks are flat on top, I sanded these to match the angle required against the wing.
The clear parts are a poor fit, with the aft section not matching the canopy arch piece or the shape of the rear cockpit fairing very well at all.
| CONCLUSIONS |
Despite the struggles with the forward fuselage I really enjoyed this build. It forced me to re-learn forgotten skills, and learn some new ones along the way. Most of the problems were fixed with filling & sanding, if I couldn’t do that I’d take up knitting! For the price (less than many Hasegawa 1/72 kits!) it represents excellent value for money, with the finished article being of a size large enough to be impressive but not too big to display, and it captures the unique wing planform of the MiG-17 family very well. Considering it’s one of Trumpeter’s first mainstream kits, and the first of theirs I’ve built, I’m most impressed although I would still only recommend it to modellers who want a JJ-5/FT-5 and don’t mind a bit of work to get there.
| REFERENCES |
The Encyclopaedia Of World Military Aircraft, Aerospace Publishing Ltd 2000.
The Naval Institute Guide To World Military Aviation 1995
World Air Power Journal Volume 13 Summer 1993, Aerospace Publishing Ltd
February 2008
If you would like your product reviewed fairly and fairly quickly, please contact the editor or see other details in the Note to Contributors.