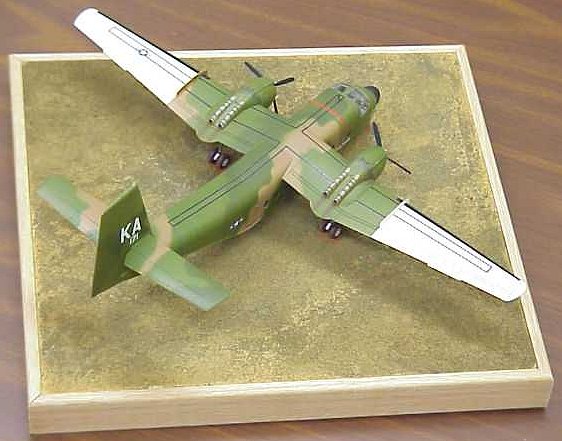
DeHaviland C-7 Caribou
457th Tactical Airlift Command
Tra Bong, Vietnam, 1970
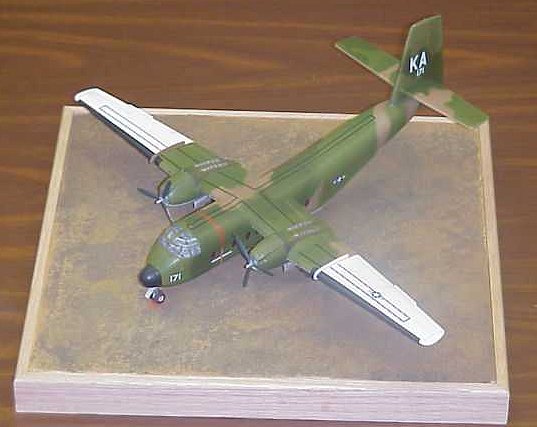
Hobbycraft 1/72 C-7A Caribou
|
KIT # |
1343 |
|
PRICE: |
$29.98 |
|
DECALS: |
Three aircraft |
|
REVIEW : |
Mark Mallinson |
|
NOTES: |
` |
|
HISTORY |
During the 1950’s, DeHaviland/Canada (DHC) developed a series of short
take-off and landing (STOL) aircraft, which the US Army used as troop support
craft. The Caribou was designed in response to an Army requirement for an
aircraft that could haul the same payload as a C-47 Dakota, but still achieve
the STOL characteristics of their earlier planes like the Beaver and Otter.
Several design iterations and power plant options were studied before DHC opted
for the tried and true Pratt & Whitney R-2000 double row, air-cooled radials
of 1450hp. The first prototype flew in 1958, and a series of
pre-production aircraft revealed shortcomings that led to progressive
modifications to the fuselage, wings and flight controls. To improve its
STOL abilities, prominent wing fences were added outboard of the engines.
After the crash of the first prototype, orders for their new plane were rather
sluggish. So DHC took the aircraft on a 40+ nation tour with flight
demonstrations which led to some of the largest Caribou orders.
The US Army tested the plane in 1961 and the Caribou passed its rigorous field
tests with “flying colors”. It would fly with the US Army until 1966
when the feud between the Army’s “air mobility” capabilities and Air Force
dominion over all fixed wing aircraft came to a head. While US-built
aircraft like the C-123 Provider could transport greater payloads, faster and
for longer distances, none could match the Caribou’s ability to land and take
off on rough and relatively short runways, making it the perfect choice for
supplying forward bases. As the Vietnam War wound down for US operations,
the Caribous were either given to the South Vietnamese Air Force or ferried back
to the US where they were eventually replaced by C-130’s in the late 1970’s.
|
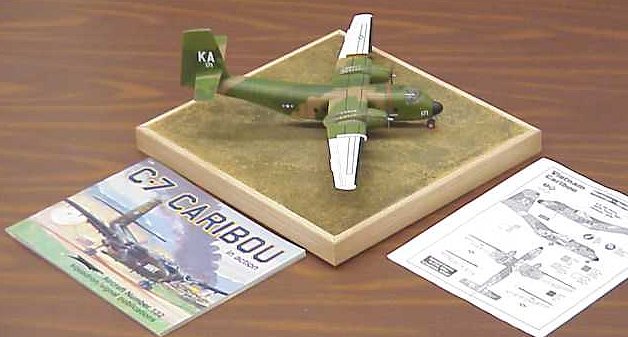
THE KIT |
The model depicted here is a 1/72nd scale Hobbycraft C-7 Caribou. After finishing Tamiya’s 1/48 Lancaster, I went through a long “modeler’s block” where I accomplished little. To get out of this rut, I decided to do a model that would be neither accurate, technically challenging nor one of my usual scales. So started this easy kit that I thought I’d use as a ‘skills building’ project. With this little plane, I had opportunity to practice my inept dry brushing, clumsy photo-etch and sloppy and unconvincing washing techniques.
To this end, I purchased the Edward 1/72nd C47 Dakota photo-etch set, which I figured was close enough (they’re both twin engine flying trucks, right?). With Squadron’s C-7 Caribou In Action booklet and some .jpg’s from the US Air Force’s Caribou/Otter Association web page, I had some fairly good period photos of this great aircraft that still flies with some air forces.|
CONSTRUCTION |
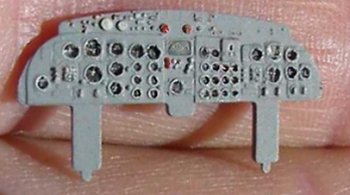
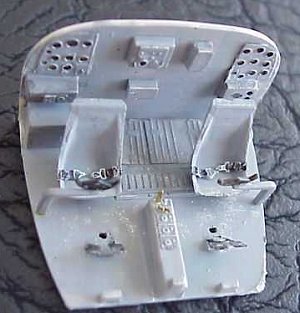 The cockpit interior was the first subassembly I worked on and the main
recipient of the Eduard photo-etch. Hobbycraft gives you a fairly good
instrument panel, but the rest of the cockpit is quite spartan, missing
important details like the crew access door to the cargo bay. Not being
too concerned with accuracy, I just played with the photo-etch by adding seat
belts, boxes, erroneous instrument and floor panels and didn’t bother to cut
out the rear cabin bulkhead door. These details provided some practice in
manipulating the metal and with dry-brushing the worn areas. Without the
Eduard set, the cockpit would appear quite sparse, which is quite noticeable
through the large greenhouse canopy.
The cockpit interior was the first subassembly I worked on and the main
recipient of the Eduard photo-etch. Hobbycraft gives you a fairly good
instrument panel, but the rest of the cockpit is quite spartan, missing
important details like the crew access door to the cargo bay. Not being
too concerned with accuracy, I just played with the photo-etch by adding seat
belts, boxes, erroneous instrument and floor panels and didn’t bother to cut
out the rear cabin bulkhead door. These details provided some practice in
manipulating the metal and with dry-brushing the worn areas. Without the
Eduard set, the cockpit would appear quite sparse, which is quite noticeable
through the large greenhouse canopy.
 Hobbycraft does this by an application of two decals: the first
decal is a red mesh that represents the cargo netting and the second is a flat
black decal that hides the interior. My approach for handling the windows
was to first bathe them in Future acrylic floor polish. After the Future
was dry, each of the oval raised windows was individually masked with Tamiya
tape and closely trimmed with some needle-nose scissors. With the masked
windows facing down, the modeler first applies the red mesh decal with some
setting solution and allows it to dry. Then the black background decals
are laid over the mesh decal and also treated with setting solution. When
completely dry, the rows of windows can be glued onto the inside of the fuselage
with the aid of clamps.
Hobbycraft does this by an application of two decals: the first
decal is a red mesh that represents the cargo netting and the second is a flat
black decal that hides the interior. My approach for handling the windows
was to first bathe them in Future acrylic floor polish. After the Future
was dry, each of the oval raised windows was individually masked with Tamiya
tape and closely trimmed with some needle-nose scissors. With the masked
windows facing down, the modeler first applies the red mesh decal with some
setting solution and allows it to dry. Then the black background decals
are laid over the mesh decal and also treated with setting solution. When
completely dry, the rows of windows can be glued onto the inside of the fuselage
with the aid of clamps. |
PAINT & DECALS |
Painting
The South East Asia US Airforce camouflage chosen for this aircraft was
taken from the kit instruction sheet and Squadron In Action photos. The
instruction’s paint scheme plans were blown up to the scale of the kit and
paper masks were cut out. These were taped to the fuselage and inner wing
area in a series of successively darker shades of Model Master enamels
(tan/medium green/dark green). Chips on heavily worn areas were created
using a PrismaColor silver pencil while oil leaks
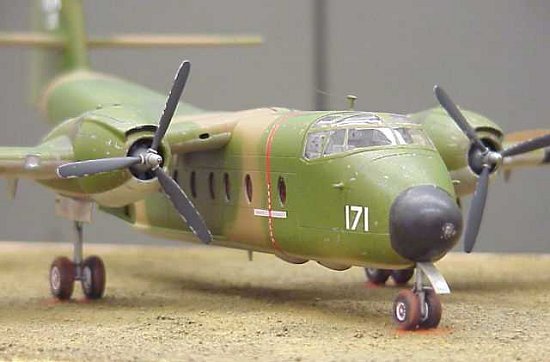 of thinned black enamel were
applied to the engine and brushed in the airflow direction using a fan brush.
Hobbycraft’s two radial engines have adequate surface detail and were
carefully painted, washed and dry-brushed, only to find them almost disappear
deep within their nacelles.
of thinned black enamel were
applied to the engine and brushed in the airflow direction using a fan brush.
Hobbycraft’s two radial engines have adequate surface detail and were
carefully painted, washed and dry-brushed, only to find them almost disappear
deep within their nacelles.
|
CONCLUSIONS |
In the unlikely event I’d ever do another one of these, I would build a diorama depicting the cover of Squadron’s in Action booklet: the US Army’s “Snake Eater 2” performing a Low Level Extraction (LOLEX) with a load of ammunition into a remote base under fire in Vietnam. There’s plenty of room to cut out and deploy the cargo bay doors and detail the interior. Some 1/72nd scale photo-etch PropBlur’s, a scratch-built cargo pallet with a vac-formed parachute and there you have it. If this option were too difficult, the Caribou also had a novel plug-in boom hoist for performing engine change-outs in the field. This would offer the modeler the chance to do some simple scratch-building and show-off one of the engines.
Copyright ModelingMadness.com
If you would like your product reviewed fairly and quickly, please contact the editor or see other details in the Note to Contributors.
Back to Reviews Page 2020