|
KIT: |
Testors 1/48 RF-4 Phantom II |
|
KIT # |
582 |
|
PRICE: |
$6.00 (1981) |
|
DECALS: |
Two Aircraft |
|
REVIEW: |
|
|
NOTES: |
` |
|
HISTORY |
As the Phantom II fighter program progressed from prototype to production, engineers at McDonnell Aircraft Company, at the behest of the Air Force, optimized an F-4B airframe for the tactical reconnaissance role. A lengthened and redesigned nose was fitted, capable of carrying a wide array of cameras, while fairings housing electronic sensors covered the forward Sparrow missile wells. The aft wells were faired over and all weapons capability, save for the ‘special store’ option on the centerline pylon, was deleted.
A pair of photoflash cartridge dispensers were installed on the aft fuselage forward of the stabilator to facilitate nighttime photography, while early production aircraft were equipped with an on-board film processing system and aerial film cassette delivery via parachute. The new AN/APQ-99 search radar was optimized to provide terrain avoidance and electronic mapping functions. The remainder of the non-optical sensors consisted of infra-red detection equipment, a laser imaging system, and side-looking airborne radar (SLAR).
The initial customer was the Air Force, and after extensive flight testing, finalized the airframe configuration in 1965 and placed its first order. To maintain logistical compatibility, the new aircraft was built on the F-4C platform with the wider tires, bulged wings, and cartridge-start provisions for the engines. To allow for upgrades and modifications, most of the reconnaissance equipment was installed in modular fashion to tailor the aircraft for the specific sortie tasked.
 The Navy and Marine Corps were johnny-come-latelys to the RF-4
program, following the Air Force by some sixteen months. A joint-effort contract
would have provided RF-4Bs for both services, but in the end, funding
constraints limited the buy to the Marine Corps only. This aircraft was built on
standard F-4B hardware though combat attrition in Vietnam forced the Corps to
procure ten non-standard airframes (the last ten RF-4Bs produced) to maintain
squadron strength.
The Navy and Marine Corps were johnny-come-latelys to the RF-4
program, following the Air Force by some sixteen months. A joint-effort contract
would have provided RF-4Bs for both services, but in the end, funding
constraints limited the buy to the Marine Corps only. This aircraft was built on
standard F-4B hardware though combat attrition in Vietnam forced the Corps to
procure ten non-standard airframes (the last ten RF-4Bs produced) to maintain
squadron strength.
As production lines had long since converted to the F-4J (with the wider tires and bulged wings), these final RF-4Bs became somewhat of a ‘bastard stepchild’, utilizing the F-4J wing, RF-4C aft fuselage and vertical fin, and some RF-4C nose sections. They can be instantly recognized by the third digit in the BuNo—those with a seven are these last ten aircraft.
As a companion-piece to the international FMS/MAP Phantom II program, McDonnell developed and marketed an export-only reconnaissance model designated the RF-4E. This aircraft started as a basic ‘C’ model with the more powerful J-79-GE-17 engines, a somewhat standardized sensor fit, and deletion of the nuclear capability. Most end-user countries operating the F-4 also received the RF-4E, with the notable exception of Great Britain who developed a sensor pod to be fitted externally to standard F-4K/M airframes.
The RF-4B/C served with distinction for nearly thirty-five years, from service in Southeast Asia through the Gulf War. By the end of the century, scarcity of replacement parts and airframe fatigue problems sounded the death knell for the RF-4. The Marines wisely chose to add a recon capability to their F/A-18s via the TARPS pod while the Air Force hitched its wagon to the TR-1 and unmanned drones. Full production and deployment of the new Aurora will soon rectify this oversight. Surviving Photo Phantoms were placed in ‘non-flyable’ storage at Davis-Monthan AFB to await their fate. Production figures totaled 46 RF-4Bs, 505 RF-4Cs, and 160 RF-4Es.
|
THE KIT |
Testor’s RF-4B/C kit consists of sixty-three silver-gray parts, nine clear pieces, and a multi-page instruction manual offering a recommended assembly sequence, color specifications geared to the Modelmaster paint line, and a short history of the aircraft. Decals are furnished for both RF-4B and RF-4C variants.
Surface detail is raised and generally correct (though neither form of aerial refueling equipment is evident) while the speedbrakes and movable control surfaces are well-delineated by recessed reveals. Unlike other Phantom models in this scale, the BLC vents on the upper and lower surfaces of the intakes and the LOX overflow vent on the bottom of the fuselage are depicted with decals instead of the more preferable engraved louvers.
The airframe is broken down conventionally with right/left fuselage halves, a three-piece bulged wing which effectively eliminates dihedral difficulties, tailplanes which fit snugly to the fuselage, separate splitter plates and intake ducts, and a three-piece nose assembly with the individual air conditioning ducts offering a recessed lip at the fronts.
The cockpit is a sixteen-piece affair, and aside from the control yokes and front instrument panel coaming, IS TOTALLY BOGUS! The three-piece seats are the most specious examples of ‘creative engineering’ ever seen in a kit. Side console detail, while in raised relief is, for the most part, fictitious as well. Decals are provided for both the pilot and RSO instrument panels.
 The landing gear is acceptable and with careful clean-up and assembly looks
the part. Separate retraction jacks for the main struts are provided but the
nose unit has been over-simplified by a one-piece molding. All eight doors are
present with a clear insert for the landing/taxi light bezel. No provisions are
made, however, for the RF-4B nose door with its specific shipboard approach
lights, nor for the catapult bridle attachment points.
The landing gear is acceptable and with careful clean-up and assembly looks
the part. Separate retraction jacks for the main struts are provided but the
nose unit has been over-simplified by a one-piece molding. All eight doors are
present with a clear insert for the landing/taxi light bezel. No provisions are
made, however, for the RF-4B nose door with its specific shipboard approach
lights, nor for the catapult bridle attachment points.
The clear parts are not as polished as they could be and there is a proportion problem with the windscreen and front canopy. A two-position option is offered for both cockpits, though if the ‘open’ position is selected, a rebuild of the hinge area is mandated—like the cockpit, the hinges are also nebulous.
No interior is provided for the camera nose though clear panes are included for all the ports. The rotating prism window will need reshaping and over-painting for an accurate representation. An exposable photoflash cartridge bay is molded into the left fuselage half, combined with a separate one-piece door which must be bisected if the bay is to be displayed open. Detail on the afterburner inserts is extremely crisp while the tailpipes themselves are relatively featureless and murky. A two-piece arresting hook may be attached in the deployed position.
External stores consist of a pair of 370-gallon wing tanks with separate pylons, a 600-gallon centerline tank, and the correct Navy-style pylons for stations 2 and 4. All will need corrective action or replacement. The wing tanks have too much taper at the front and should exhibit a blunt ogive tip, the centerline gasbag is not ‘plump’ enough and lacks the stabilizing fins at the rear, and the inboard pylons are too short in height and too thin to be of practical value.
The decals are printed by ScaleMaster and on three individual sheets examined were off-register, rendering the Air Force markings un-usable. The schemes offered are: BuNo 153094, an RF-4B assigned to VMFP-3 at MCAS El Toro, CA (this BuNo is clearly inappropriate for this airframe); and 65-8594, an RF-4C assigned to the 33rd TRTS, 363rd TRW at Shaw AFB, SC. A modest amount of service stenciling is provided, though conspicuously absent are the red pyrotechnic warning triangles for the photoflash cartridge bays.
Addendum: there are four extra parts in this kit which give the modeler the unadvertised option of building an RF-4E, specifically a pair of longer tailpipes loosely resembling those used with the –17 engine, and the curved inboard pylons. An alternate instrument panel decal is furnished, though modelers choosing this variant will need to procure exterior decals and painting information from aftermarket sources.
|
CONSTRUCTION |
 Assembling this kit SOB will yield a passable ‘four footer’ who’s
deficiencies will be glaringly apparent when displayed next to comparably-built
F-4s from Monogram or Hasegawa. Having previously inspected an assembled (but
unpainted) example given to me by Dana Bell, I was well aware of this kit’s
shortcomings. I decided to pirate components from various other Phantom kits to
hold scratch-building to a minimum.
Assembling this kit SOB will yield a passable ‘four footer’ who’s
deficiencies will be glaringly apparent when displayed next to comparably-built
F-4s from Monogram or Hasegawa. Having previously inspected an assembled (but
unpainted) example given to me by Dana Bell, I was well aware of this kit’s
shortcomings. I decided to pirate components from various other Phantom kits to
hold scratch-building to a minimum.
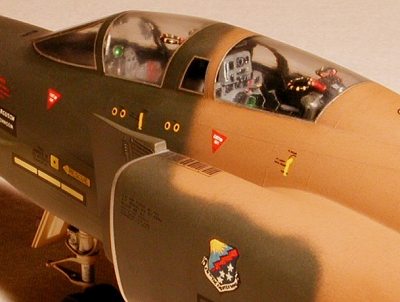
The first order of business was replacing the joke under the canopies with a modified Monogram cockpit. A relatively simple operation, the only monkey in the wrench was the necessity to thin the pilot’s floorboard and the top of the nose gear well so the module would slide into position. After adding the canopy actuators behind the seats I turned my attention to the nose.
 After installing and polishing the panoramic camera ports I assembled the
nose halves with the radome and glued the remaining windows into place. I
constructed a modular pallet to fit into the nose from the rear with multiple
compartments to mount some scratch-built cameras to. Careful modification of the
rotating prism resulted in an appearance closer to the prototype. A stainless
steel pitot tube completed the basic assembly then I moved to the belly.
After installing and polishing the panoramic camera ports I assembled the
nose halves with the radome and glued the remaining windows into place. I
constructed a modular pallet to fit into the nose from the rear with multiple
compartments to mount some scratch-built cameras to. Careful modification of the
rotating prism resulted in an appearance closer to the prototype. A stainless
steel pitot tube completed the basic assembly then I moved to the belly.
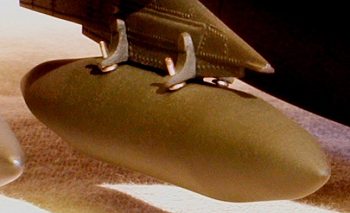
After assembling the fuselage components, I test-fitted the wing and spotted
one of this kit’s biggest gaffs. The nose gear area between the SLAR fairings
should be concave to well beyond the intake trunks. Testor’s has depicted this
area as totally flat, so Plastruct sheet and CA were used to build up the
fairings so they stood proud from the bottom of the wing. A large gap between
the bottom of the 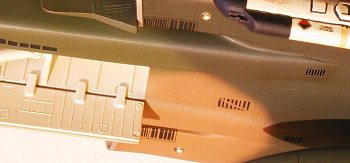 fuselage and the front of the wing bottom was filled with a
solid shim of .015" sheet styrene. I opened up the bell-mouth scoop at the base
of the fin and re-installed a new diffuser vane made from .010" sheet aluminum.
fuselage and the front of the wing bottom was filled with a
solid shim of .015" sheet styrene. I opened up the bell-mouth scoop at the base
of the fin and re-installed a new diffuser vane made from .010" sheet aluminum.
After filling the rectangular recesses on the back sides of the splitter plates I mated these to the intake ducts with CA and allowed them to dry. The insides were sprayed Modelmaster gloss white, while polished black styrene baffles were installed at the rear to give them the appearance of depth and prevent see-through to the tailpipes.
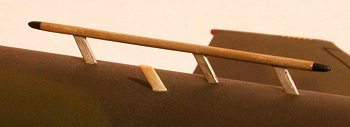
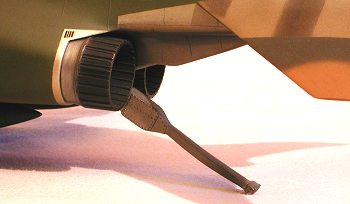 I installed a nitrogen fill gauge and witness port on the aft fuselage then
replaced the anemic kit arresting hook with the equivalent Monogram unit,
installed with a scratch-built hinge. The molded-on fuel dump mast, always a
delicate proposition for any F-4 model, was removed and replaced by a new
all-metal unit made from aluminum tubing. Likewise, I installed a stainless
steel tube on the leading edge of the fin, replicating the stability
augmentation sensor.
I installed a nitrogen fill gauge and witness port on the aft fuselage then
replaced the anemic kit arresting hook with the equivalent Monogram unit,
installed with a scratch-built hinge. The molded-on fuel dump mast, always a
delicate proposition for any F-4 model, was removed and replaced by a new
all-metal unit made from aluminum tubing. Likewise, I installed a stainless
steel tube on the leading edge of the fin, replicating the stability
augmentation sensor.
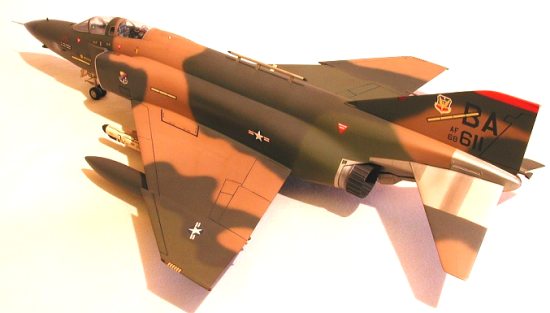
Red and blue-green Plexiglas chunks were installed at the front and rear of the wingtips, while a piece of clear sprue was used for the rear position light. Yellow styrene was laminated to the outer wing to depict the "slimelights" while red Plexiglas was fitted into the leading edge of the fin, replicating the anti-collision beacon. I attached the intakes to the fuselage then glued the upper wing panels into position, completing the basic airframe assembly. After sanding and dressing the seams I rescribed the surface detail and turned my attention to the external stores.
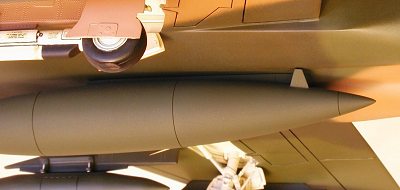 After assembling and correcting the wing tanks, I added sway braces and brass
mounting pins to the pylons and glued them to the tanks. The hopelessly
under scale centerline tank was replaced by the equivalent unit from the ESCI
F-4C/D kit, after first adding the missing tail fins and a set of mounting pins.
I replaced the inboard pylons with modified Monogram F-4J pieces, removing the
integral TERs and detailing the sway brace assemblies. An AN/ALQ-119(V) ECM pod,
light-fingered from the Monogram F-15, was mounted on station 2, while a baggage
blivet, liberated from Hasegawa’s F-16A, was hung on station 4 to provide visual
symmetry.
After assembling and correcting the wing tanks, I added sway braces and brass
mounting pins to the pylons and glued them to the tanks. The hopelessly
under scale centerline tank was replaced by the equivalent unit from the ESCI
F-4C/D kit, after first adding the missing tail fins and a set of mounting pins.
I replaced the inboard pylons with modified Monogram F-4J pieces, removing the
integral TERs and detailing the sway brace assemblies. An AN/ALQ-119(V) ECM pod,
light-fingered from the Monogram F-15, was mounted on station 2, while a baggage
blivet, liberated from Hasegawa’s F-16A, was hung on station 4 to provide visual
symmetry.
 I rebuilt the lackluster tailpipes by sectioning the outer diaphragm
assemblies from the Monogram F-4C pieces and carefully attaching them to the
smooth sections of the Testor’s parts. When they had dried I glued the
afterburner inserts to the insides with Weld-On #3 and set them aside.
I rebuilt the lackluster tailpipes by sectioning the outer diaphragm
assemblies from the Monogram F-4C pieces and carefully attaching them to the
smooth sections of the Testor’s parts. When they had dried I glued the
afterburner inserts to the insides with Weld-On #3 and set them aside.
The wheels, while acceptable, were replaced with Monogram F-4C pieces, carefully adapted to fit the Testor’s struts. The nose gear retraction jack was rebuilt and the strut detailed with bits of wire, closely approximating the appearance of the Monogram strut. A major challenge was the landing/taxi light assembly behind the glass bezel on the front door. After gluing the bezel to the door I drilled holes in the rear and inserted a pair of MV lenses, filled the resultant depressions with bits of sprue, and sanded the back smooth.
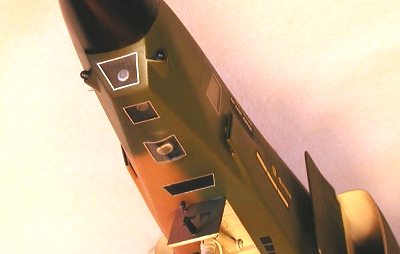
 Final detailing and assembly consisted of carving an exhaust vent forward of
the windscreen, adding omni antenna elements to the nose RHAW fairings,
installing some photo-etched vents at the rear of the SLAR fairings, and adding
blade antennas to the top of the nose and aft fuselage. An ARN-92 towel rack
antenna was scratch-built from aluminum tubing and installed in the appropriate
location on the fuselage. Underneath, I carved out the outlet ducts adjacent to
the arresting hook claw and added a pair of up-lock assemblies. Depressions were
drilled behind the canopy and below each intake to receive MV lenses,
replicating the fuselage lights.
Final detailing and assembly consisted of carving an exhaust vent forward of
the windscreen, adding omni antenna elements to the nose RHAW fairings,
installing some photo-etched vents at the rear of the SLAR fairings, and adding
blade antennas to the top of the nose and aft fuselage. An ARN-92 towel rack
antenna was scratch-built from aluminum tubing and installed in the appropriate
location on the fuselage. Underneath, I carved out the outlet ducts adjacent to
the arresting hook claw and added a pair of up-lock assemblies. Depressions were
drilled behind the canopy and below each intake to receive MV lenses,
replicating the fuselage lights.
The canopy glass was carefully pre-fitted and tacked into position with Testor’s liquid cement. After a week of drying time I filled the seams with gap-filling Hot Stuff, then filed and sanded the canopies to shape. A power buffing with a Dremel tool and jeweler’s rouge restored the clarity. An AOA transducer and outside air temperature probe were fabricated from steel pins and attached to the nose, while the air conditioning ducts were carefully cemented into place with Crazy Glue. Following an inspection of all seams and a final light sanding, it was off to the paint shop.
|
PAINT & DECALS |
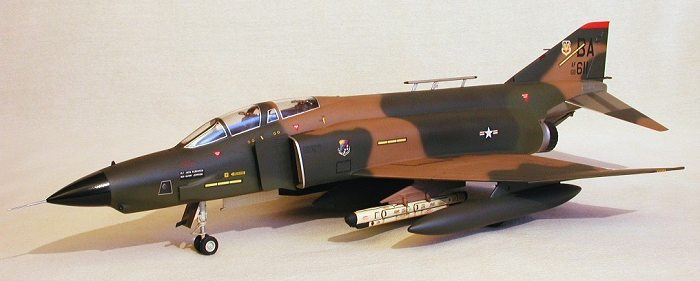
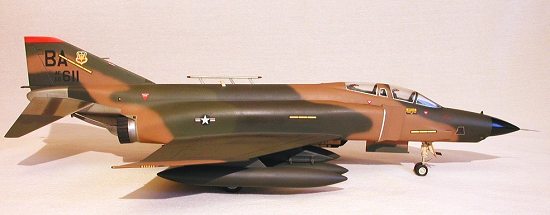
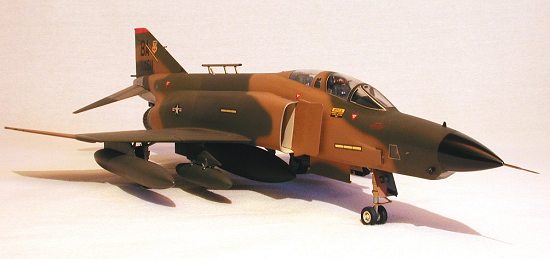
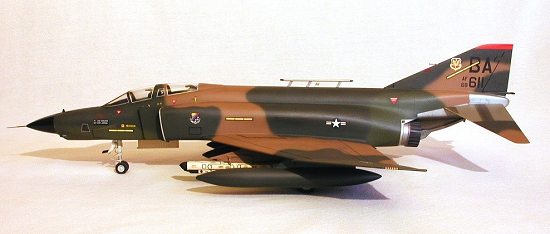
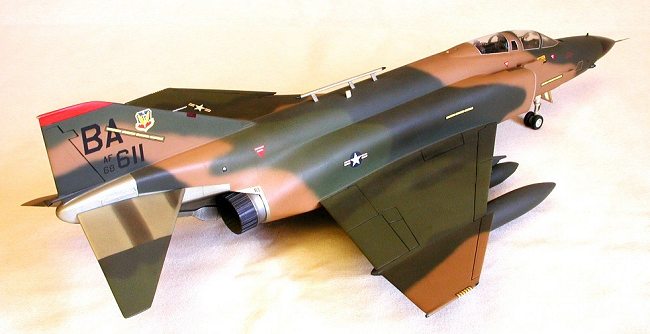
The wrap-around SEA camouflage scheme was sprayed on using Modelmaster enamels, after first masking off the canopy frames and undercoating with flat black. Bare metal area were shielded with masking tape while the exterior lights were covered with white glue. Insignia red was used over a white undercoat on the fin tip, while gloss black thinned with Micro-Gloss was used on the radome. After painting the gear wells, struts, inner door surfaces, and the wheel hubs in gloss white I attached these pieces and shot several coats of Testor’s GlossCote to prepare for decaling.
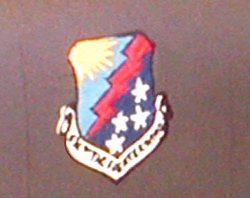 Due to the specific LORAN antenna fit and the wrap-around paint, I decided to
mark the aircraft as 68-611, the last RF-4C-40-MC built. A photo of this plane
appears on page 2 of Aerophile, Volume 2 Number 4, my main reference for
this project. Decals were cobbled together from the spares box, with the
exception of the wing badge, which was hand-painted, and the pyrotechnic warning
triangles taken from MicroScale 48-110..
Due to the specific LORAN antenna fit and the wrap-around paint, I decided to
mark the aircraft as 68-611, the last RF-4C-40-MC built. A photo of this plane
appears on page 2 of Aerophile, Volume 2 Number 4, my main reference for
this project. Decals were cobbled together from the spares box, with the
exception of the wing badge, which was hand-painted, and the pyrotechnic warning
triangles taken from MicroScale 48-110..
During this timeframe most of the service stenciling typical of the F-4 was deleted during depot level IRAN repaints due to the man-hours required to apply and maintain these markings. Accordingly, this aircraft carried only basic emergency egress instructions, photoflash bay warnings and the ubiquitous data block. Slime lights on the fuselage and fin were robbed from the old Revell F-4E/F sheet, while black decal stripe was applied over the yellow styrene laminations on the wingtips.
 The radome was masked with 3M "post-it" notes then the model was sprayed with
DullCote to seal the decals. Liquitex watercolor was used as a wash to highlight
the movable control surfaces, then a final coat of flat lacquer sealed the wash.
The radome was masked with 3M "post-it" notes then the model was sprayed with
DullCote to seal the decals. Liquitex watercolor was used as a wash to highlight
the movable control surfaces, then a final coat of flat lacquer sealed the wash.
The masking tape was removed from the un-painted rear fuselage and stabilators, then I used buffable Spray ‘n’ Plate aluminum here. Powdered graphite was used to tint the panels and provide some soot and grime to the concave areas below. Silver Rub ‘n’ Buff, applied with a Q-Tip and polished with my Dremel tool, was used on the forward portions of the afterburner, while the feathered part of the diaphragm was painted flat black, then burnished with powdered graphite.
The remaining masks were removed and silver decal, cut into thin strips, was used to simulate the window seals around the Plexiglas areas. I tacked the tailpipes on with small drops of Hot Stuff, popped the stabilators into position, then plugged the stores underneath in their respective positions.
|
CONCLUSIONS |
The RF-4B/C is no longer cataloged by Testor’s though it still may be found in abundance in the larger, more well-stocked shops or on swap-meet tables. Numerous errors and deficiencies relegate it to well below the realm of today’s shake-and-bake wunderkits, though any modeler comfortable with common hobby tools and scratch-building experience may find the challenge rewarding.
 This kit was re-released at least once with an ersatz RF-4B on the box top
featuring the Bi-Centennial "Spirit Of America" markings which once were worn by
BuNo 153107. Printed by ScaleMaster, every sheet I examined was off-register
(doesn't surprise your editor) and in any event, the markings do not belong
on this airframe due to the model’s bulged wing and wider tires.
This kit was re-released at least once with an ersatz RF-4B on the box top
featuring the Bi-Centennial "Spirit Of America" markings which once were worn by
BuNo 153107. Printed by ScaleMaster, every sheet I examined was off-register
(doesn't surprise your editor) and in any event, the markings do not belong
on this airframe due to the model’s bulged wing and wider tires.
A quicker and more accurate road to a Photo Phantom is probably to use one of the aftermarket resin conversion sets by High Flight or Paragon in conjunction with Hasegawa’s F-4B or F-4C/D. It’s a more accurate airframe to begin with and the level of detail out of the box is outstanding in most regards. If memory serves, the Paragon set offers both flat and curved noses, providing the modeler with yet more options.
|
REFERENCES |
1. Aerophile, Volume 2 Number 4; Jay Miller, et al; Aerophile, Inc
2. Koku-Fan: Illustrated—F-4 Phantom II
3. Phantom II: A Pictorial History – Lou Drendel, Squadron/Signal Publications
4. USAF Phantoms: In Combat – Lou Drendel, Squadron/Signal Publications
5. F-4 Phantom II: In Action – Larry Davis, Squadron/Signal Publications
6. F-4 Phantom II: In Detail And Scale – Bert Kinzey, Kalmbach Publications
7. T.O. 1RF-4C –1: USAF Technical Order – Government Printing Office, 1966
Ó September 2001 by Roger M. Jackson
First Time North American Rights To Scott Van Aken and ‘Modeling Madness’
If you would like your product reviewed fairly and quickly by a site that averages thousands of visits a day, please contact me or see other details in the Note to Contributors.