|
KIT: |
Monogram 1/48 F-4E Phantom II |
|
KIT # |
5800 |
|
PRICE: |
$5.50 (1979) |
|
DECALS: |
Three aircraft |
|
REVIEW: |
Roger Jackson |
|
NOTES: |
F-4C/D kit converted to F-4E-48 MC |
|
HISTORY |
With so much information regarding the McDonnell-Douglas F-4 Phantom II already available in print, one would be hard-pressed to discover anything substantially new about this remarkable aircraft. Rendering outstanding service to three branches of the United States of America’s armed forces and eleven other countries, this aircraft was perhaps the consummate example of engineering adaptability ever produced by an aerospace company.
Originally designed to meet the U.S. Navy’s requirement for a single-seat ground-attack aircraft to equip the new Forrestal-class supercarriers, the concept gestated into a two-seat, missile-armed, all-weather, fleet defense interceptor. In mock-combat trials against front-line fighters of both the Navy and Air Force, the prototype F-4s quickly demonstrated their mettle.
The performance of the new McDonnell aircraft could not be ignored, and while the Navy began deploying the F-4B, Air Force planners conducted a series of feasibility studies with an eye on developing and procuring a new multi-mission F-4 to replace several different ‘Century Series’ models. In one of the wisest corporate decisions ever made, McDonnell engineers had retained the original design’s five wing hardpoints, though they were not specified by contract for the Navy’s fleet defense interceptor. This gave the airframe an enormous payload potential which was not lost on the headquarters staff of the Air Force’s Tactical Air Command (TAC).
Twenty-seven F-4Bs were ‘borrowed’ from the Navy for suitability trials under operational conditions. Initially, these ‘loaners’ were re-designated as the F-110A and named Spectre as a sop to the Air Force’s vanity at having a ‘Navy’ plane foisted upon them. Pride notwithstanding, TAC staff and aircrew personnel liked the new aircraft and its capabilities, and after some modifications the design was adopted by the Air Force and placed into production.
 In one of his rarer moments of cogitative brilliance, Secretary of Defense
Robert S. McNamara (fresh from a victorious stint with the Ford Motor Company,
where he ‘invented’ the Edsel and ‘re-engineered’ the Thunderbird into a
four-seater), decreed that military aircraft used by multiple services would
have but one designation. Henceforth, the F-110A Spectre became known as the
F-4C Phantom II.
In one of his rarer moments of cogitative brilliance, Secretary of Defense
Robert S. McNamara (fresh from a victorious stint with the Ford Motor Company,
where he ‘invented’ the Edsel and ‘re-engineered’ the Thunderbird into a
four-seater), decreed that military aircraft used by multiple services would
have but one designation. Henceforth, the F-110A Spectre became known as the
F-4C Phantom II.
With production orders firmly in hand, McDonnell’s manufacturing facility, adjacent to Lambert Field in St. Louis, Missouri was never idle. As U.S. involvement in the Vietnam War escalated, activity at the plant rose to fever pitch as hundreds of F-4s (583 of them ‘C’ models) were built and delivered to the Navy, the Marine Corps, and the Air Force.
After evaluating the combat performance of its F-4Cs in Southeast Asia, the Air Force asked McDonnell to further refine the design, requesting some additional avionics and enhanced reliability. Engineers in St. Louis responded with the F-4D, substantially improved over the original model but externally similar. 793 were built for the USAF with an additional 32 units constructed for the Foreign Military Sales program.
Combat experience over the skies of North Vietnam had, from the outset, highlighted perhaps the one glaring deficiency of the Phantom II—the lack of an internal gun. The original design, dating back to the mid-fifties, reflected an overly-confident infatuation with the then-new technology of air-to-air missiles, starting with the infrared-guided short-ranged AIM-4s and –9s and later with the beyond-visual-range (BVR) AIM-7 Sparrows.
One of the more lethal adversaries the Phantom faced in Southeast Asia was the Soviet-built MiG-17, a subsonic holdover from the post-Korean War era. Small, highly maneuverable, and equipped with cannon, it proved quite a handful when engaged. The space-aged, wizmo-gizmo guided missiles carried by the F-4 were often useless in tight-turning, low-altitude dogfights that regularly occurred and missile's reliability was marginal at best.
A stop-gap solution saw externally-carried 20 millimeter gun pods added to the F-4’s already-large arsenal, reducing the aircraft’s available hardpoints to four when carried. Though modestly successful, what was clearly needed was an internally-fitted cannon with a sufficiently-large ammo drum to permit close range engagements in a ‘snap-shoot’ environment.
To reconcile this dilemma, Westinghouse engineers developed a new solid-state radar system requiring less interior volume than the previous vacuum-tube unit, while McDonnell lengthened and tapered the Phantom’s nose to allow for the installation of an M-61A1 cannon and a 639-round magazine. To maintain the aircraft’s center-of-gravity, several avionics systems were re-arranged within the fuselage to allow for an additional fuselage fuel cell located aft.
General Electric’s up-rated J-79-GE-17A engines were fitted to compensate for the higher gross, take-off, and combat weights. Slotted stabilators, originally developed for the Naval variants, were installed to provide added directional stability during low speed/high alpha maneuvers, while the hydraulic wing-fold mechanisms and pyrotechnic cartridge start provision for the engines were deleted as non-essential redundancies.
 This new version was designated the F-4E and was a big hit with aircrews who
readily appreciated the ‘up-close-and-personal’ touch that twenty mike-mike
is known for. As an aside, the F-4E’s advanced capabilities encouraged
McDonnell (now McDonnell-Douglas) to explore the possibility of substantial
export sales under the burgeoning Foreign Military Sales/Military Assistance
Program (FMS/MAP) to governments friendly the United States and its interests.
USAF orders for the ‘E’ model totaled 812 aircraft
This new version was designated the F-4E and was a big hit with aircrews who
readily appreciated the ‘up-close-and-personal’ touch that twenty mike-mike
is known for. As an aside, the F-4E’s advanced capabilities encouraged
McDonnell (now McDonnell-Douglas) to explore the possibility of substantial
export sales under the burgeoning Foreign Military Sales/Military Assistance
Program (FMS/MAP) to governments friendly the United States and its interests.
USAF orders for the ‘E’ model totaled 812 aircraft
In 1969 the F-4E replaced the F-100D as the Thunderbirds’ demonstration aircraft. Modifications to the airframe included deletion of all combat-related equipment, a smoke-generating system fed by oil tanks disguised as Sparrow missiles, throttle modifications to permit afterburner engagement at 89% of mil power, VHF radios to allow communications with civilian airports, and the flamboyantly magnificent red, white, and blue paint scheme. F-4E’s served the team until replaced by T-38 Talons at the start of the ’73 show season.
At the conclusion of the Vietnam War F-4Es were fitted with a new wing-slat system to cure a potentially fatal stall problem occurring during high-G turns at low altitude. Though reducing the top speed from Mach 2.4 to Mach 2.24 (a seldomly-used capability in any case), the new wing slats made the E model a stand-out performer in the dogfight arena. Later on, several new avionics and electro-optical systems were added to allow delivery of the new generation of air-to-ground missiles and so-called "smart bombs" while 116 airframes would be modified into F-4G Wild Weasel air defense suppression aircraft.
Ironically, the Navy (McDonnell-Douglas’ original customer) got out of the Rhino business in the early ‘80s but the Air Force, along with many Reserve and Guard units, maintained a sizable Phantom force up through and including service in the Gulf War. Sadly, Desert Storm would be the F-4’s swan song, as shortly thereafter these aircraft were retired and sent to Davis-Monthan AFB to be beaten into plowshares. Many were unceremoniously converted to QF-4 drones and destined to be blasted into smithereens during weapons tests over the skies of Point Mugu, China Lake, and White Sands, New Mexico.
The F-4E epitomized the multi-mission aircraft, defining the concept in every sense of the cliché. Performing MIGCAP, point defense interceptor, close air support, deep strike, and interdiction sorties, the ‘E’ model did it all. Soldiering for more than twenty years, the F-4E delivered outstanding service in peace and in war, truly a class act by anybody’s reckoning, and as of yet, unequalled.
|
THE KIT |
Monogram’s F-4C/D kit consists of 79 plastic parts, 75 of which are molded in dark olive green with the remainder transparent. A fold-out instruction pamphlet contains a brief history of the Phantom, sequential assembly steps, a painting guide referencing generic colors, and a multi-view drawing of the standard Southeast Asia camouflage pattern.
The surface detailing is in raised relief with various vents and grills recessed. Panel lines are generally correct with the exception of the stabilators, which should be re-scribed. The sheet metal depiction of the afterburner area is particularly realistic. The front nose gear door is solid with no clear landing light bezels or lenses provided.
 The cockpit is a nine-piece affair and rather poorly detailed. Seat bottoms
are molded integral to the cockpit tub while the separate backs lack any method
of positive location. Instrument panels and side consoles feature raised relief
and appear correct for a ‘C’ or early ‘D’. Properly shaped control
sticks are provided for both offices, though rudder pedals are missing.
The cockpit is a nine-piece affair and rather poorly detailed. Seat bottoms
are molded integral to the cockpit tub while the separate backs lack any method
of positive location. Instrument panels and side consoles feature raised relief
and appear correct for a ‘C’ or early ‘D’. Properly shaped control
sticks are provided for both offices, though rudder pedals are missing.
The BLC vents on the tops of the intake ducts are very poorly done, with a massive assembly seam running right through the vents. The air conditioning intake ducts are merely shapeless blobs. Further aft, the huge tailpipes have no interior detail whatsoever. Conversely, the arresting hook, molded integral with the fuselage halves, is extremely well depicted.
The three-piece wing features adequately detailed gear wells and optional-position speedbrakes. The ailerons are separate items designed to be installed in the ‘drooped’ position while the auxiliary air doors are molded slightly ajar. The attachment method of the stabilators is flimsy at best, with ill-fitting, structurally weak tabs providing very limited support.
The landing gear comprises 23 parts with separate doors, door actuators, retraction jacks and correct wheel hubs for the variant. The struts are well detailed, presenting the beefy appearance typical of the prototype. Attaching the main struts will require a slight modification to the mounting tabs to achieve the proper forward angle relative to the ground reference line.
Ordnance and external stores consist of 4 AIM-7E Sparrow missiles, 4 AIM-9 Sidewinders of indeterminable sub-type, pylons and Aero 3B launch rails for the Sidewinders, an SUU-23A 20mm gun pod with Aero 27A mounting pylon, two 370 gallon drop tanks, ALQ-87 and ALQ-101 ECM pods, and a strike camera pod (which displaces a Sparrow missile).
The glass is a four-piece affair, somewhat thick but extremely clear with correctly-molded framing. Either or both canopies may be attached in the open position, though no actuators, rear-view mirrors, or other accouterments are furnished. The windscreen has too much taper at the forward edge and is a little short in overall length.
Parts are included to allow for assembling a ‘D’ model, specifically the extra fairing to be installed at the bottom of the nose-mounted IR sensor and the ARN-92 ‘towel rack’ LORAN ‘D’ Chelton antenna (fitted only to certain ‘D’ and RF-4C aircraft—the modeler should check the available references for specific usage).
Two figures are provided; one seated, to be installed in the cockpit, and the other standing (this figure first made his appearance in Monogram’s F-5E Tiger II kit released in the summer of 1978 although he is wearing an F-4-specific chute harness!). An embossed ‘F-4 Phantom II’ nameplate rounds out the hardware.
The three-scheme decal sheet includes markings for: 63-7680, an 8th TFW F-4C-21-MC flown by Colonel Robin Olds; 66-7463, a 432nd TRW F-4D-29-MC flown by Captains Steve Ritchie and Chuck DeBellevue; and an F-4D-33-MC assigned to the 52nd TFW at Spangdahlem, West Germany, circa 1976. A modest amount of service stenciling is provided, but as the sheet is typical Monogram quality, most modelers are bound to seek alternatives amongst the myriad of available aftermarket decals.
|
CONSTRUCTION |
This model would require numerous modifications to convert it to a late F-4E and as I had previously built a couple of these kits SOB (Straight Out of the Box), I was already familiar with the manual-of-arms vis-à-vis the basic assembly sequences. Consequently, I began by heaving the instructions into the FOD can (Hey…when in doubt, throw ‘em out—We don’ need no steenking instructions!).
Construction proceeded on several fronts simultaneously so off we go…(the "Air Corps Song" wafting softly in the background as Clark Gable and Walter Pidgeon gaze solemnly towards the PSP-covered flightline…).
I assembled the three-piece wing with Crazy Glue, then removed the bottoms of the intake ducts with a razor saw (more on this later). Sockets made from 1/16" K & S aluminum tubing were installed at all wing hardpoints to facilitate pylon and ordnance installation (for more on this technique, see my F-4G Wild Weasel review).
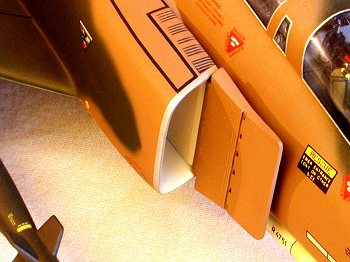
As I wanted as clean an airframe as possible, I glued the speedbrakes into the wells in the ‘closed’ position with CA, then scribed uniformly-sized reveals around both pieces. The auxiliary air intakes were similarly treated by removing the molded-on kit doors and building new ones from sheet styrene, then sanding the area flush.
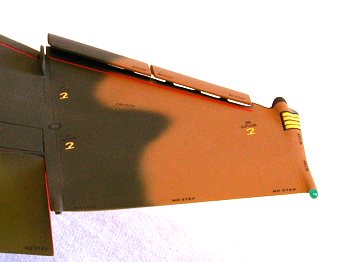
A pair of modified Monogram A-4 Skyhawk slats were drafted for the Phantom’s new outboard units. Prior to adding them I cut a slot in each wing top slightly inboard of the fold line and mounted vortex-stabilizing anti-stall fences made from .015" sheetstock. With the slats solidly attached to the wings, I added the inboard slat actuators from the Testor’s/Italieri F-4G Wild Weasel kit. The inboard slats were then scribed in, as well as the spoilers on the upper wing. To complete this assembly I carved a notch on the leading edge of the port wing and installed a TISEO unit, scratch-built from various sizes of K & S aluminum tubing, a piece of clear sprue, and a large blue/green-tinted MV lens.
The intakes are one of the more troubling aspects of this kit since a major construction seam bisects the upper BLC vents. I taped the intake duct pieces to the corresponding sections removed from the lower wing then slid the backing plates into position to maintain the ducts’ correct cross-sections. I glued the duct sections together with gap-filling Hot Stuff, and when dry, carefully removed the backing plates.
 Using the bottom BLC vents sectioned from two spare lower wings (which are
gems relative to the top vents), I rebuilt the upper vents using these new
pieces. When they were solidly glued into position I sanded and polished the
insides of the ducts. Mold release plug marks on the inside of the splitter
plates were treated in similar fashion.
Using the bottom BLC vents sectioned from two spare lower wings (which are
gems relative to the top vents), I rebuilt the upper vents using these new
pieces. When they were solidly glued into position I sanded and polished the
insides of the ducts. Mold release plug marks on the inside of the splitter
plates were treated in similar fashion.
I made a pair of baffles to be installed at the rear of the ducts from black sheet styrene, polished them with Brasso and a T-shirt, then test-fit them to the ducts. When an acceptable fit had been achieved I painted the insides of the intakes and splitter plates with gloss white. As all the BLC vents were perilously close to the edge of the duct/splitter plate joint, I used Elmer’s white glue to mask the vents prior to assembling the ducts with Hot Stuff.
When the CA had dried, I removed the Elmer’s ‘masks’ and cleaned up the seams in the conventional manner. The baffles were teased into position from the rear and solidly anchored with small drops of Crazy Glue applied with a piece of .013" guitar string.
 I taped the fuselage halves together and turned my attention to the nose.
After removing the kit radome with a razor saw I test-fitted the nosecone and
extension from Revell’s F-4E/F (one of that lackluster kit’s few usable
parts). It fit with little problem so I glued the Revell radome to the extension
and installed a stainless-steel pitot tube. After examining the
integrally-molded Revell gun fairing I deemed it to be too narrow and too
shallow. In true "Pit And The Pendulum" fashion, I razor-sawed the
fairing off and replaced it with the better ESCI part. The ‘Midas 4’ muzzle
brake from the ESCI kit was also used, as the Revell part, molded to the radome,
was poorly defined. Photo-etched stainless-steel grating from the model railroad
shop was used to replicate the gas purge vents on the underside of the gun
fairing.
I taped the fuselage halves together and turned my attention to the nose.
After removing the kit radome with a razor saw I test-fitted the nosecone and
extension from Revell’s F-4E/F (one of that lackluster kit’s few usable
parts). It fit with little problem so I glued the Revell radome to the extension
and installed a stainless-steel pitot tube. After examining the
integrally-molded Revell gun fairing I deemed it to be too narrow and too
shallow. In true "Pit And The Pendulum" fashion, I razor-sawed the
fairing off and replaced it with the better ESCI part. The ‘Midas 4’ muzzle
brake from the ESCI kit was also used, as the Revell part, molded to the radome,
was poorly defined. Photo-etched stainless-steel grating from the model railroad
shop was used to replicate the gas purge vents on the underside of the gun
fairing.
With the nose roughed in, I started on the cockpit. The major difference between the ‘C/D’ and ‘E’ versions is the wizzo’s instrument panel. I modified mine to the approximate configuration and added the rear panel combing from the ESCI kit. New throttles and some seat details were made, then the remainder of the office was assembled, painted, and installed into the left fuselage half.
 After mating and gluing the fuselage halves together I attached the Revell
nose and faired it into the airframe. On most parked F-4Es and Fs, the gun gas
scavenger door is slightly ajar so I cut a rectangle into the nose extension and
used a piece of 3/32" K & S square brass channel for the door. A small
slot was cut into the top of the nose just forward of the windscreen to serve as
a rain removal nozzle.
After mating and gluing the fuselage halves together I attached the Revell
nose and faired it into the airframe. On most parked F-4Es and Fs, the gun gas
scavenger door is slightly ajar so I cut a rectangle into the nose extension and
used a piece of 3/32" K & S square brass channel for the door. A small
slot was cut into the top of the nose just forward of the windscreen to serve as
a rain removal nozzle.
The F-4E’s air conditioning ducts are different from the C/D models so I built new ones using modified parts from the Revell kit and flattened pieces of K & S aluminum tubing for the intake lips. To install them I sanded the lumps off the Monogram fuselage and used repeated applications of CA to blend the new scoops to the nose.
Moving aft, I opened up the ram air cooling inlet at the front of the fin and added a diverter vane. Anti-collision and position lights were installed on the fin using red and clear Lexan, respectively. A new fuel dump mast was fabricated from aluminum tubing and attached at the base of the rudder while a short piece of #20 hypo needle was used for the stability augmentation sensor on the fin’s leading edge.
Additions to the arresting hook system included the uplock latches flanking the claw and the nitrogen fill gauge on the right side of the fuselage above the afterburner. I also opened up the outlet vents aft of the tailpipes and on the drag chute door.
At this time I decided to build the model with the canopies closed as I had never done one this way and I liked the clean lines this configuration afforded. I used a modified Testors/Italieri Wild Weasel gunsight up front, dummied up a pair of actuators for the canopies, then installed the glass with Testor’s liquid cement. After a week of drying I filled the canopy gaps with CA, sanded the seams flush, then polished the transparencies with Bare Metal Compound and a Dremel-powered buffing wheel to restore the clarity.
The stabilator attachment on these Monogram F-4s has always proved
troublesome so I re-engineered the installation by inserting .005" strips
of the old Mattel vacuform plastic into t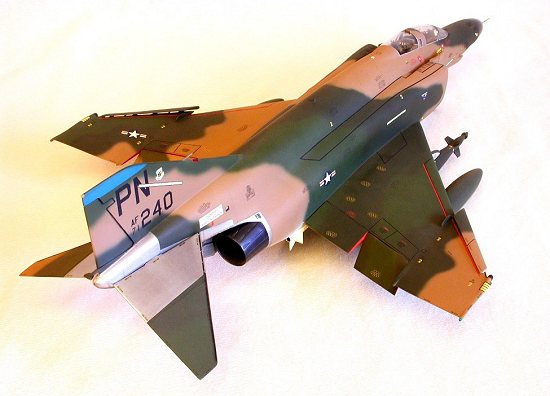 he slots, front and rear, top and
bottom, thus creating a ‘box’ extending all the way through the aft
fuselage. After gluing the pieces solidly with CA, I removed the excess plastic
and sanded the ‘box’ flush with the surface. The stabilators themselves were
pirated from Monogram’s F-4J kit as they were the correct slotted style and
fit into the ‘box’ snugly after slight modifications.
he slots, front and rear, top and
bottom, thus creating a ‘box’ extending all the way through the aft
fuselage. After gluing the pieces solidly with CA, I removed the excess plastic
and sanded the ‘box’ flush with the surface. The stabilators themselves were
pirated from Monogram’s F-4J kit as they were the correct slotted style and
fit into the ‘box’ snugly after slight modifications.
I attached the intakes to the fuselage with Crazy Glue, and after dressing the seams, added the wing. On the bottom near the wing roots I added a pair of combat documentation camera fairings made from a couple of spare Tamiya ammo cans, with the starboard unit facing forward and the portside one aimed aft.
Initially I had hoped to use the afterburners from the Monogram F-4J as the ‘E’ model’s tailpipes are similar, but after eyeballing them I dismissed the idea as the F-4J pieces looked pitiful and fit just as dismally as the original F-4C parts. A search for alternatives yielded an unusual solution. I had recently had a horrible ground-handling accident (a ‘Tom Dunbar’, if you will) with a built-up Fujimi F-15A. After recovering and cataloging the wreckage I noticed the Eagle’s tailpipes, unscathed and usable. A quick test-fit was all it took—they were a perfect match for the fuselage’s dimensions and looked substantially better than the F-4J pipes.
With ‘flyable’ airframe in hand, I logged a few training sorties while I pondered the load-out. I wanted the configuration to reflect the F-4E’s multi-mission capability and that meant a missile-and-bomb combo. I assembled the wing tanks, installed brass pins in the pylons to facilitate attachment to the wing at stations 1 and 9, then moved inboard.
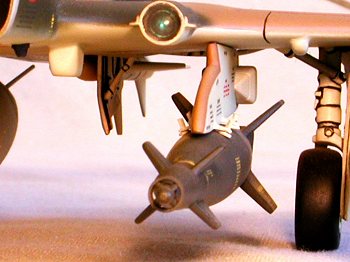 I robbed a pair of laser-guided two-thousand pound GBUs from Monogram’s
F-5E Tiger II and rebuilt the gimbaled seeker heads using a pair of Sidewinder
missile steering-fin assemblies from the Monogram Snap-Tite 1/100th
scale F-15 and thin rings of K & S aluminum tubing. Brass pins were added to
the bomb casings to be press-fitted to corresponding holes drilled in the
bottoms of the inboard pylons.
I robbed a pair of laser-guided two-thousand pound GBUs from Monogram’s
F-5E Tiger II and rebuilt the gimbaled seeker heads using a pair of Sidewinder
missile steering-fin assemblies from the Monogram Snap-Tite 1/100th
scale F-15 and thin rings of K & S aluminum tubing. Brass pins were added to
the bomb casings to be press-fitted to corresponding holes drilled in the
bottoms of the inboard pylons.
After a couple of bomb-to-pylon test-fits, I installed mounting pins to the tops of the pylons to fit into the sockets installed under the wing at stations 2 and 8. To complete the pylons I built a set of sway braces to mount the bombs to, then detailed the chaff dispensers from the Testors/Italieri Wild Weasel kit and attached them in the proper staggered locations.
After examining virtually every 600-gallon centerline tank available, I chose the ESCI unit as it most closely resembled the prototype in size and shape. After adding the missing stabilizer fins at the rear of the tank I glued a pair of brass pins into the top of the pylon and plugged it into station 5.
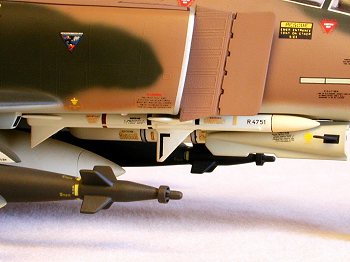
 The Pave Spike laser designator pod and AIM-7F Sparrow missiles were taken
from Hasegawa’s Weapon Set 2 and 3 (respectively) and attached via steel pins
and holes drilled into the missile wells. The pylon adapter for the Pave Spike
pod received a set of sway braces prior to installation.
The Pave Spike laser designator pod and AIM-7F Sparrow missiles were taken
from Hasegawa’s Weapon Set 2 and 3 (respectively) and attached via steel pins
and holes drilled into the missile wells. The pylon adapter for the Pave Spike
pod received a set of sway braces prior to installation.
To complete the airframe detailing, I added a TACAN blade antenna to the spine, an AOA transducer and outside air temperature probe to the right side of the nose, and drilled dimples under the intakes and behind the canopy where I would later install MV lenses to serve as fuselage lights.
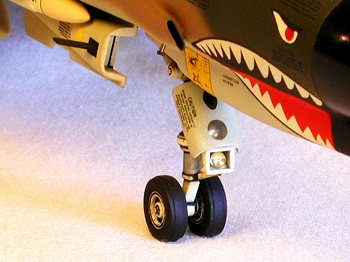 Assembly of the landing gear proved relatively uneventful though I had to
make minor adjustments to the main gear struts to give them the correct forward
angle. I scratch-built a landing/taxi light bracket and mount, using MV lenses
for the sealed-beam lights, while the ESCI nose gear doors were detailed and
modified to fit the forward Monogram well.
Assembly of the landing gear proved relatively uneventful though I had to
make minor adjustments to the main gear struts to give them the correct forward
angle. I scratch-built a landing/taxi light bracket and mount, using MV lenses
for the sealed-beam lights, while the ESCI nose gear doors were detailed and
modified to fit the forward Monogram well.
To eliminate the possibility of a tragic accident with adhesives, I used small bits of brass wire and .013" guitar string as hooks to hang the gear doors in the proper locations. Most of the doors had mold release plug marks on the inner faces so I carefully sanded and filled the flaws. The retraction jacks and inner door actuators for the main gear required some adjustment to correctly attach them.
The completed model was sanded smooth and carefully scrutinized for flaws and glitches. Finding none, I re-scribed the surface detail with an X-Acto knife, lightly buffed the model again with 600-grit, then taxied that big honkin’ mutha over to the paint shop.
|
PAINT & DECALS |
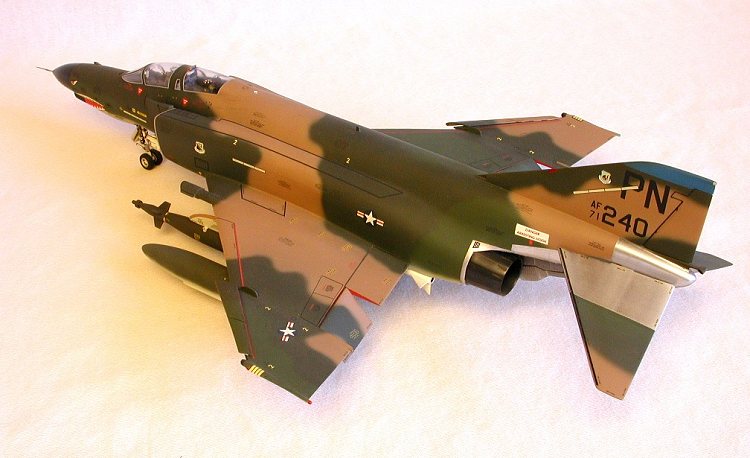
Painting this Rhino posed no particular problems and the standard SEA camouflage scheme was sprayed on with (then newly-released) Modelmaster paints. Prior to the color shoot, I painted the wheels, struts, gear wells, and inner door faces with gloss white, then used black Liquitex tempera watercolor as a wash to highlight detail on these items.
Since the canopy framing had been sanded off during assembly, I re-created the frames with 1 millimeter strips of masking tape. When these strips were correctly positioned, I masked around the new ‘frames’ with additional strips of tape, then removed the original ‘frames’. The result was each pane of glass individually outlined by tape. I filled the centers of the panes with white glue, insuring a complete mask of all the windows. The remaining non-camouflaged areas were masked with tape, including the bare metal areas of the aft fuselage and the radome. Gear wells were protected by small wads of Kleenex stuffed inside, while small drops of white glue were used to shield the exterior lights.
The canopy frames were painted black so they’d show the proper interior color on the inside. Then I primed the entire airframe with neutral gray (FS 36270) to ensure adequate opacity with the colors. To compensate for the scale intensity differential I lightened the tan (FS 30219) with white, and darkened the dark green (FS 34079) with a little black. The pattern was sprayed freehand using the Air Force Technical Order as a guide.
 After painting the undersides with light gray (FS 36622), I masked off the
fin cap and shot a medium blue after first priming the area with flat white. The
masks were removed from the gear wells and undercarriage so the model could dry
right side up without a cradle or other device which might mar the finish. After
a couple of days I sprayed four or five coats of decal primer on the model to
level the paint and once again, let it dry for several days while I painted the
stores, pylons, and tailpipes, then selected the decals.
After painting the undersides with light gray (FS 36622), I masked off the
fin cap and shot a medium blue after first priming the area with flat white. The
masks were removed from the gear wells and undercarriage so the model could dry
right side up without a cradle or other device which might mar the finish. After
a couple of days I sprayed four or five coats of decal primer on the model to
level the paint and once again, let it dry for several days while I painted the
stores, pylons, and tailpipes, then selected the decals.
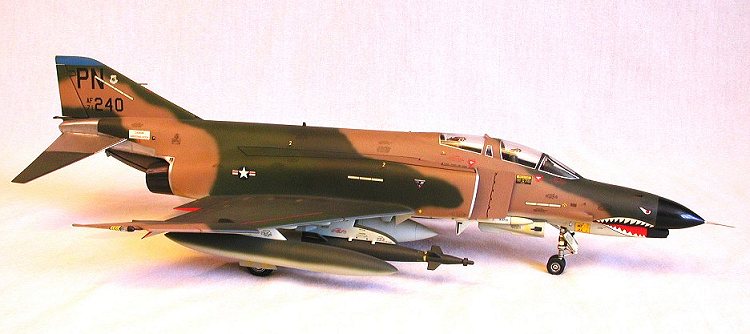
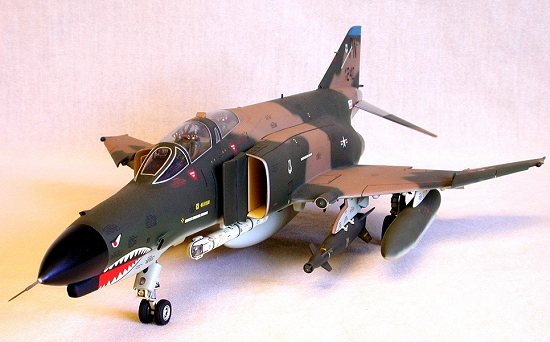
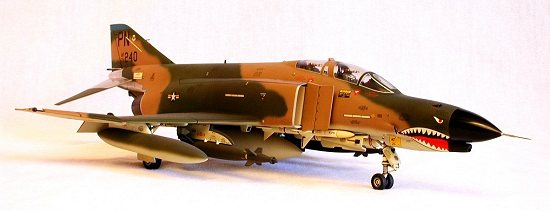
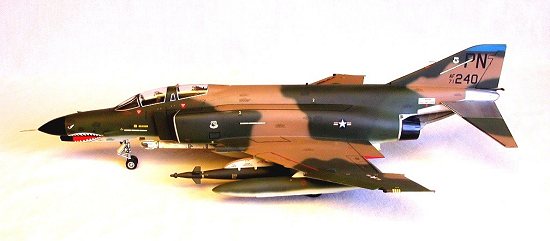
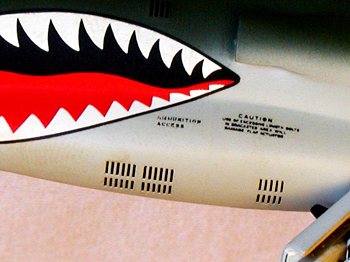
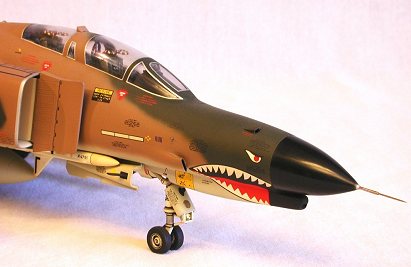
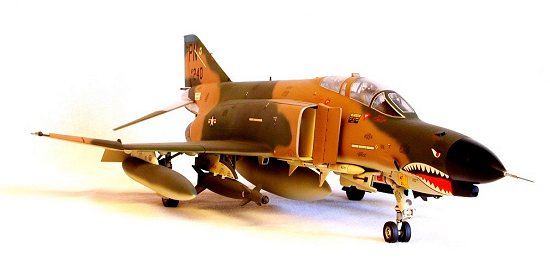
To my way of thinkin’ (admittedly, a wryly twisted exercise in deviancy), an F-4E without a sharkmouth is like ‘I Dream Of Jeannie’ without Barbara Eden, a pizza without pepperoni, or a ’69 SS396 Malibu with an automatic transmission…Numbah Ten! It ain’t happenin’… Phantoms from the 3rd TFW based at Clark Field in the P.I. filled the bill in this regard, with a ferocious-looking set of teeth and black serials and unit codes.
Using photographs in the Koku-Fan F-4 Illustrated Special, I re-created 71-240, an F-4E-48-MC assigned to the 3rd TFS, 3rd TFW. Various Microscale/Superscale decals were used along with the sharkmouths from the Testors/Italieri Wild Weasel kit’s sheet and Scalemaster ‘slime lights’. Thankfully, this aircraft carried minimal stenciling (i.e.: no panel numbers) so I was spared that pleasantry. To get a crisp color demarcation line on the edges of the ailerons and the adjacent areas of the wings, I used red decal material there, cut into finely-tapered wedges.
A medium coat of Testor’s flat lacquer sealed the decals and provided a base for some minimal weathering. Liquitex tempera was again used to highlight the BLC vents and movable control surfaces. Testor’s Dullcote sealed these effects, and when dry, I removed the remaining masks from the radome, aft fuselage, canopies, and lights. Silver decal material, cut into thin strips, was used to simulate the canopy seals around the window glass. Massaging with a small brush and diluted Microsol made this task relatively easy.
I masked the nose off with low-tack drafting tape and painted it gloss black, thinned 50% with Microgloss. The aft areas of the fuselage and the inboard sections of the stabilators were done with Liqui-Plate buffable aluminum. When dry, I polished the areas with a Q-Tip, then tinted some of the panels with powdered graphite, and finally plugged the stabilators in.
The ordnance and fuel tanks were painted in the appropriate colors, then decaled and weathered. When dry, I plugged each item to its respective location and slid the ailerons into position. The Fujimi tailpipes did not fit snugly enough for a permanent, glue-less installation so I used Micro Liquitape and press-fit them to the fuselage.
At this point I thought the model was complete, but as I rechecked my photos of this ship, I discovered that it carried an external mirror and fairing on the wizzo’s canopy. I attached a single mirror from the kit with white glue, brush-painted and detailed with a piece of silver-plated acetate for the glass.
|
CONCLUSIONS |
The release of this kit in the fall of 1979 is considered a Rubicon of sorts among Phantom Phreaks. Prior to this there were no decent F-4 kits of any variant in any scale. Having previously built two of these Monogram Phantoms SOB as ‘C’ and ‘D’ models, I was desperate to have an F-4E as a companion piece. Some feasibility studies and basic construction commenced in the summer of 1980 but the project was soon placed on hold as another mission presented itself.
Bert Kinzey had started research for his F-4 Phantom II: In Detail & Scale trio of volumes and through the members in the IPMS Silver Wings Chapter (Washington D.C.), I was ‘volunteered’ to provide kit reviews of all the then-extant F-4 models for these books. This gave me an excuse to scrutinize all the available Phantom kits and really critique them. Arris Papas, Tom Dunbar, and Dana Bell (all of IPMS Silver Wings) were instrumental in providing kits, insight, and/or inspiration.
 Several other members of the club mentioned a fellow in Minnesota named Tim
McGovern, who was widely considered among F-4 aficionados as ‘da man’. After
several phone conversations with him (nobody had PCs back then—I don’t think
Tandy’s TRS-80 was even in Radio Shack stores yet), I was convinced that Tim
was everything attributed to him and then some, a real "nine-level".
Several other members of the club mentioned a fellow in Minnesota named Tim
McGovern, who was widely considered among F-4 aficionados as ‘da man’. After
several phone conversations with him (nobody had PCs back then—I don’t think
Tandy’s TRS-80 was even in Radio Shack stores yet), I was convinced that Tim
was everything attributed to him and then some, a real "nine-level".
Tim eagerly offered his observations regarding the available Phantom kits and their accuracy (or lack thereof). In passing, I mentioned my plans to convert the Monogram F-4C/D to an all-out slatted-wing F-4E. Tim cryptically wished me luck and hung up. A week later a flat arrived in the mail. In it were a complete set of hand-drawn 1/48th scale plans, scrap views of selected areas, and extensive notes on the F-4E and its variant-specific systems.
Armed with this info, I resumed and completed construction of my gun-nosed Rhino. Additional calls and letters to Tim were always cheerfully answered with accurate intel and advice. At the time, Tim was hip-deep in Revell’s 1/32nd "Braille-scale blivet-of-a-kit" (his words) F-4E, tryin’ to make a go of it as an Israeli Air Force bird (it would later be a show-stopper and prizewinner every time it was displayed). The research that Tim amassed for that project could literally fill a book (and later would).
He always had time for me (and other fellow modelers)…quick with a joke and even quicker to help…a gentleman if ever there was one. Sadly, Tim passed away well before his time due to cancer. Though missed by family, friends, and the scale modeling fraternity, he left a legacy for us to enjoy and reminisce upon…his models, his outstanding aviation artwork, and a comprehensive volume in the Aerofax Minigraph series of reference works covering the F-4E. To those of us who knew him personally, that camaraderie made Tim a very special man indeed. Goodbye my friend…Rest In Peace.
This kit has since been eclipsed by the release of Hasegawa’s excellent series of Phantom offerings, including an F-4C/D. With the problematical areas difficult to correct by all but the most die-hard Phantom ‘Phans’, I would not recommend this model unless the "Prime Directive" were economy of purchase.
Its overall lines are good (maybe even superior to the Hasegawa offering in some respects), but the cockpit is lackluster, the intakes a horrible excuse, the tailpipe fit total lunacy, and warpage with the wing may dim the honeymoon prospects for many. Take my advice—spend a little more money and get the Hasegawa kit (even Rockefeller couldn’t take his dough with him).
Ó April 2001 by Roger M. Jackson
First Time North American Rights To Scott Van Aken and ‘Modeling Madness’
If you would like your product reviewed fairly and quickly by a site that averages over 2,200 visits a day, please contact me or see other details in the Note to Contributors.