|
KIT: |
Monogram 1/48 F-104C Starfighter |
|
KIT # |
5455 |
|
PRICE: |
$7.50 in 1988 |
|
DECALS: |
Two Aircraft |
|
REVIEW: |
Roger Jackson |
|
NOTES: |
'Nam: Tour of Duty' Boxing |
|
HISTORY |
The F-104 Starfighter was the most enigmatic combat aircraft ever designed, developed, and deployed. Like its contemporary, the North American Aviation Super Sabre, the F-104 began life as a series of Lockheed-funded design studies, initiated at the bequest of Clarence "Kelly" Johnson, head of the company’s "Skunk Works" design division.
Johnson and a team of engineers had journeyed to the Far East in November of 1951 and interviewed fighter pilots of the 5th Air Force who had flown combat missions against Soviet-built MiG-15s. They returned with a lot of solid, anecdotal testimony regarding the next generation of jet fighter design and capabilities.
Johnson learned that while the tactics of aerial combat had not changed substantially since WWII, technological advances had driven (and would continue to drive) performance parameters to previously unattainable extremes. The Holy Grail of acceleration, rate-of-climb, combat service ceiling, roll rate, and effective weapons continued to prevail: Pilots just wanted more.
 Armed with slide-rules and notebooks, and doubtless fueled by copious
quantities of coffee, Kelly and his team set out to design a fighter of
unmatched (or unmatchable) capability. Several new powerplants were considered,
notably General Electric’s J-79 and the Pratt & Whitney J-75. Both engines
produced similar amounts of thrust but the GE offering was slightly smaller in
diameter (affording a smaller frontal area to the aircraft’s overall design)
and was due to be certified for flight sooner. Hence, the J-79 won the nod.
Armed with slide-rules and notebooks, and doubtless fueled by copious
quantities of coffee, Kelly and his team set out to design a fighter of
unmatched (or unmatchable) capability. Several new powerplants were considered,
notably General Electric’s J-79 and the Pratt & Whitney J-75. Both engines
produced similar amounts of thrust but the GE offering was slightly smaller in
diameter (affording a smaller frontal area to the aircraft’s overall design)
and was due to be certified for flight sooner. Hence, the J-79 won the nod.
The design team’s concentrated efforts resulted in the smallest airframe practical to house the pilot, powerplant, armament, and fuel. In response to combat pilots’ requests to adhere to the ‘KISS’ principle (Keep It Simple, uh…Stupid), avionics and gee-whiz gadgets were held to an absolute minimum.
The ultra-thin, short-chord, trapezoidal wings spanned a shade less than twenty-two feet and featured ten degrees of anhedral (negative dihedral) to improve roll control during high-g maneuvers and enhance directional stability at high altitude. Thus, Mach buffet was also minimized. Jettisonable fuel tanks could be fitted at the tips or, alternatively, launch rails for a new generation of air-to-air weapon—the guided missile.
The empennage consisted of a ‘T’ arrangement with the ‘all-flying’ horizontal stabilator mounted atop the vertical fin to allow it access to undisturbed air, preventing anticipated lateral stability problems caused by wing-generated turbulence. The stabilator was hydraulically-powered and electronically-damped and like the wing, ultra-thin and trapezoidal.
These components were fitted to an ultra-tapered, needle-nosed fuselage of extreme fineness ratio, fifty-four feet nine inches in length. The pilot sat under a three-piece canopy, the center section of which was hinged to the left to allow for entry and egress. In another radical departure from convention, nylon letdown (emergency bailout) was to be accomplished via a bottom-firing ejection seat.
Proposed armament was a pair of 30 millimeter cannon mounted in flanking positions adjacent to the cockpit and a pair of Ford-Autonetics-designed AIM-9B Sidewinder missiles. Fire control would be accomplished by means of a simple lead-computing, radar-ranging gunsight with an optical interface mounted on the instrument panel combing.
 Behind the pilot was the nose landing gear well, while further aft resided
the main gear bay. All remaining interior volume was used for fuel tanks. In
another first, Boundary Layer Control (BLC) was incorporated to increase lift at
low speeds and high alpha angles (especially useful on long final
approaches).
Behind the pilot was the nose landing gear well, while further aft resided
the main gear bay. All remaining interior volume was used for fuel tanks. In
another first, Boundary Layer Control (BLC) was incorporated to increase lift at
low speeds and high alpha angles (especially useful on long final
approaches).
The tour-de-force for the package was the shockcone-fitted intake system. The ducts were cheek-mounted forward of the wing roots and featured ballistically-shaped cones to buffer the incoming air and reduce the velocity to approximately Mach 0.7 (optimum for the J-79’s first-stage compressor).
On paper, the concept looked good and in NACA theoretical wind tunnel studies the design promised double-sonic performance. As an added bonus, Lockheed promised a per-unit flyaway cost of less than $1,800,000 (much less than contemporary products from North American, McDonnell, Convair, and Republic).
Bear in mind, all this was dreamed up in 1952 without benefit of computers, electronic calculators, or other devices—nary a nanobyte of digital or analog assistance…they just thought it up and did it. A few years later this engineering team would design and build the SR-71 in similar fashion.
The Air Force liked what it saw, and after reviewing and revising the proposal, issued a contract for two flyable prototypes, wind tunnel models, cockpit and armament mockups, and a static test airframe in January of 1953. Contrary to previously-published accounts, Lockheed engineers knew that the J-79 would not be ready for flight before the prototypes were built.
An interim engine, the Wright J-65, was selected to allow for accelerated flight testing. Two different center and rear fuselage sections were designed and built—one for the J-65-powered XF-104s and one for the J-79-powered prototype and production models. As the J-65 produced significantly less thrust, the shock-cone intakes were not fitted to the XF-104s.
One of the Air Force-mandated revisions called for replacing the proposed dual 30 mm guns with General Electric’s new Vulcan six-barreled 20 mm rotary cannon (an updated version of Dr. Gatling’s original concept). The weapon was mounted on the port side of the fuselage adjacent to the cockpit and fed by flexible track from a 725-round drum.
After a somewhat rocky start, flight testing progressed at a rapid pace. The relatively low-powered J-65 still managed to push the airframe well into the supersonic realm, a tribute to the overall efficiency of the plane’s design. Both XF-104s would eventually be lost in test accidents but by this time the J-79-powered YF-104 prototypes (17 examples) were now carrying the brunt of the flight test regimen.
 Testing with the higher-powered prototypes revealed some directional
stability problems not readily apparent with the two XF-104s. Lockheed engineers
rectified this situation by adding a ventral fin aft of the main landing gear.
This final configuration was approved by the Air Force in March of 1956, with a
production order for 146 aircraft following shortly thereafter. One contractual
stipulation was Lockheed’s responsibility to upgrade the YF-104 prototypes to
production standards and make them capable for regular service deployment.
Testing with the higher-powered prototypes revealed some directional
stability problems not readily apparent with the two XF-104s. Lockheed engineers
rectified this situation by adding a ventral fin aft of the main landing gear.
This final configuration was approved by the Air Force in March of 1956, with a
production order for 146 aircraft following shortly thereafter. One contractual
stipulation was Lockheed’s responsibility to upgrade the YF-104 prototypes to
production standards and make them capable for regular service deployment.
In the interim, the Air Force decided to deploy the Starfighter as a stopgap interceptor until sufficient numbers of F-101B Voodoos became available to the Air Defense Command (ADC). Delays with Convair’s F-106 Delta Dart program further exacerbated this situation. This turnabout in philosophy regarding the F-104 effectively killed it. The plane was designed from the outset as a clear-air dogfighter—not an all-weather point-defense interceptor.
Teething problems continued to plague the J-79-GE 3B engine and GE’s new Vulcan cannon and as a result, the first F-104s were delivered to the Air Force’s 83rd Fighter Interceptor Squadron at Hamilton Field, California in January of 1958 sans the 20 mm gun. Problems with this weapon were not solved until the improved M-61A1 became available in January of 1964.
Ultimately, only four squadrons operated the ‘A’ model Starfighter and in 1960, most of these aircraft were transferred to Air National Guard units in three states: Tennessee, South Carolina, and Arizona. Twenty-four ‘A’ models were converted to QF-104As by the Air Force System Command for use as target drones.
Sporadic duty during the Quemoy situation in Taiwan and the Berlin and Cuban missile crises in the early ‘60s saw many of these ANG aircraft recalled to active-duty service for all-too-brief stints in Regular AF squadrons, but by 1969 the sole remaining F-104A unit, the 319th FIS at Homestead AFB in Florida, folded its tents.
There was another, final chapter to the saga of the Starfighter in active USAF service and it is the subject of this article. Tactical Air Command (TAC), obsessed with its new ‘big stick’ mission, threw its oars into the water in March of 1956 and declared its intention to develop and procure a multi-mission F-104 suitable for conventional and special (read "nuclear") strike and ground attack sorties.
This new variant, to be designated the F-104C, featured air-to-air refueling via a detachable probe (giving the Starfighter at least a modicum of "seven-league boots" capability), additional weapons stations under the fuselage for either bombs, rockets, or air-to-air missiles, and an extra hardpoint under each wing for ordnance or a 160-gallon droptank.
The uprated J-79-GE 7A engine was fitted to support the higher combat and take-off weights, while additional avionics provided enhanced communication, navigation, and weapons delivery capabilities. The downward-firing ejection seat (by all accounts, a widow-maker under any circumstance) was eliminated in favor of a conventional unit of Lockheed design.
Seventy-seven of these ‘C’ models were produced with the entire run delivered in FY 1959 to the 479th TFW at George AFB near Victorville ("Victimville"), California. Per-unit flyaway cost averaged $1,478,402—slightly less than the earlier ‘A’ model. Operational problems continued with this new model, resulting in forty major accidents in less than five years with 9 pilots killed and 24 aircraft totally destroyed.
In April of 1965, the 479th TFW deployed 25 of its aircraft to Danang AB, RVN in support of the growing presence of US forces and interests. Initially tasked with the MIGCAP mission, they subsequently became mud-movers, with Mk 82s, M-117s and napalm among the more common ordnance delivered.
 On 20 September 1965, Major Philip Smith, while flying a MIGCAP sortie in an
F-104C over the Gulf of Tonkin, suffered a navigation equipment failure and
wandered into Communist Chinese airspace. He was shot down over Hainan Island by
a pair of ChiCom MiGs and taken prisoner. Two other Starfighters flying RESCAP
in support of recovery efforts on behalf of Major Smith collided when RTBing
back to Danang AB, killing both pilots. Shortly thereafter, the 479th
rotated back to CONUS.
On 20 September 1965, Major Philip Smith, while flying a MIGCAP sortie in an
F-104C over the Gulf of Tonkin, suffered a navigation equipment failure and
wandered into Communist Chinese airspace. He was shot down over Hainan Island by
a pair of ChiCom MiGs and taken prisoner. Two other Starfighters flying RESCAP
in support of recovery efforts on behalf of Major Smith collided when RTBing
back to Danang AB, killing both pilots. Shortly thereafter, the 479th
rotated back to CONUS.
The unit returned to Southeast Asia in May 1966, based at Udorn RTAFB in Thailand. Now wearing the familiar SEA camouflage scheme, the 479th flew strike and ground attack missions exclusively until July 1967, when the unit stood down and returned to George AFB in California.
Its combat career ignominiously over, the surviving ‘C’ models were given to the 198th TFS, Puerto Rico ANG, replacing that unit’s obsolescent F-86Hs. The Starfighters served in this capacity until supplanted by Vought A-7Ds in the late ‘70s. In a final insult, several of the 198th’s F-104s were destroyed in a flightline terrorist attack by separatist radicals demanding statehood for Puerto Rico.
Extant Starfighters, now a mere handful, were relegated to the boneyard at Davis-Monthan AFB. Some were rescued to soldier on as gate guardians and tributes while NASA inherited a few (mostly ‘A’ models) to serve as research vehicles and chase planes.
|
THE KIT |
This kit was recently previewed by our illustrious Editor-In-Chief himself. For a look at his no-holds-barred commentary regarding this kit’s contents, potential, and the box art image, GO HERE.
|
CONSTRUCTION |
After a cursory reconnaissance of the parts on the sprues, I noted no apparent surprises. A quick mock-up via masking tape confirmed this analysis and I began construction in sub-assembly fashion. The intakes seemed a logical starting point, and after filling and sanding some mold release plug marks on the inner faces of the ducts and shock cone assemblies, I glued them together with Crazy Glue, then sanded and dressed the seams.
Next up was the rear fuselage section. As I prefer a ‘clean’ airplane, I removed the slide hinge brackets from the speedbrakes and installed them closed in their respective wells. Fit was not good (in typical Monogram fashion) and repeated fills with CA were necessary to close up massive gaps around them. When dry, I carved new door reveals around the speedbrakes with a file and X-acto knife.
Detail on the afterburner assembly was weak so I replaced it with a modified Monogram F-4C unit. The kit’s tailpipe attachment points were deep-sixed in favor of a scratch-built engine mount made from .030" Evergreen sheet. Rectangular, with a half-moon arc carved in one end to cradle the tailpipe, it was inserted into a slot cut into the bottom of the aft fuselage and anchored with CA. Excess plastic was removed with a file, then sanded flush with the outer surface.
The mounting point for the horizontal stabilator seemed a mite too delicate for my ham-handed handling, so I beefed up the attachment with a steel pin mounted vertically in the top of the fin to provide additional structural rigidity. After drilling a hole in the bottom of the stabilator, I test-fitted it to the steel pin then removed it for later, permanent installation.
 The cockpit details are the weakest point of this model with very
faintly-molded raised relief on the consoles and no depiction of the sidewall or
canopy rail detail at all. I sanded the side consoles flat, drilled several
holes in each, and used nylon bristles from an old hairbrush inserted into the
holes as knobs and switches. A throttle made from turned sprue was added to the
quadrant on the left console. A basic upward-firing Lockheed C-2 seat is
provided, with poorly-molded lap and shoulder belts. I removed these and
substituted paper belts and a Model Technologies photo-etched buckle set.
Headrest detail is lacking so I gave it a little massaging as well.
The cockpit details are the weakest point of this model with very
faintly-molded raised relief on the consoles and no depiction of the sidewall or
canopy rail detail at all. I sanded the side consoles flat, drilled several
holes in each, and used nylon bristles from an old hairbrush inserted into the
holes as knobs and switches. A throttle made from turned sprue was added to the
quadrant on the left console. A basic upward-firing Lockheed C-2 seat is
provided, with poorly-molded lap and shoulder belts. I removed these and
substituted paper belts and a Model Technologies photo-etched buckle set.
Headrest detail is lacking so I gave it a little massaging as well.
The instrument panel was usable and after trimming it to fit the cockpit tub
squarely, I glued it in with Testor’s liquid cement. When dry, I painted it
and the other interior components in the appropriate colors and assembled them.
As I had sanded the side consoles flat, I used thin strips of silver decal to
simulate the individual chassis panels on the consoles. After gluing the
avionics bay door in the closed position I lined up the
 cockpit tub squarely to
the underside of the forward fuselage top and attached it with gap-filling Hot
Stuff. While this dried, I turned my attention to the lower forward fuselage.
cockpit tub squarely to
the underside of the forward fuselage top and attached it with gap-filling Hot
Stuff. While this dried, I turned my attention to the lower forward fuselage.
It was here that I found Monogram’s most serious gaff. The molds for this kit originally started out as the previously released F-104G. As such, many of the scoops, outlets, and exhaust vents are different from the ’C’ model. Monogram neglected to re-tool the molds to reflect this difference. Even between the block-5 and block-10 F-104Cs there are variations which most reference books fail to differentiate between. In the end, I made an emergency trip to Tucson and examined the ‘C’ model at the Pima Air & Space Museum.
On the right side of the nose above the nose gear strut I carved a flush ‘NACA-style’ scoop for the cockpit refrigeration intake. The smaller outlets aft of the nosecone on the ventral side were molded correctly: I merely drilled them out and added some more definition to them. On the bottom, forward of the main landing gear bay were a pair of scoops that were supposed to be outlets. I cut the whole panel out, reversed it, then re-attached it with CA. When dry I sanded the panel flush and drilled the outlets out then squared them up with a file for a crisper appearance. Further aft, I rebuilt the well for the arresting hook. Finally, I used a piece of 3/32" K & S aluminum tubing for a new gun muzzle fairing.
With the detailing complete, I mated the upper and lower fuselage halves together and glued the assembly with CA. While this adhesive cured I attached the gun bay door in the closed position, then added the aft fuselage and intake ducts.
To simplify painting, I decided to use a gray-molded radome from the old Revell F-104C/G kit. With an issue date of 1978, it was a truly horrid model whose only claim to fame was a release cycle shorter than the real Starfighter’s service life (about two years, according to Revell catalogs of the period). Be that as it may, the Revell nosecone fit the Monogram airframe reasonably well, and prior to actually gluing it on, I built and attached a pitot tube constructed of a #21G hypo needle and a sewing needle (clandestinely purloined from my wife’s sewing box).
 With the radome firmly glued in place, I filed all the seams flush then
sanded the entire model. When smooth, I re-scribed all the surface detail with
an X-acto knife, using the Verlinden photo-etched template set and a
stainless-steel draftsman’s eraser shield as guides.
With the radome firmly glued in place, I filed all the seams flush then
sanded the entire model. When smooth, I re-scribed all the surface detail with
an X-acto knife, using the Verlinden photo-etched template set and a
stainless-steel draftsman’s eraser shield as guides.
The refueling probe and fairing looked anemic, so I built a new probe from K & S aluminum tubing and reshaped a long piece of sprue to serve as a fairing. The probe was made to be removable to facilitate ease of handling during the remainder of the assembly and painting. I decided to use MV lenses as position lights, so I drilled dimples in the appropriate locations where they would later be attached.
I had initially decided to configure this model in ‘ferry’ condition
(four  droptanks). I assembled the tip tanks after correcting the fins to
represent the US-issued equipment (another holdover from this kit’s F-104G
lineage), then built a pair of droptanks to be mounted on modified F-5E pylons.
However, after attaching the tip tanks I decided I liked the simpler lines of
this configuration and proceeded no further (anybody need a pair of 104
droptanks?).
droptanks). I assembled the tip tanks after correcting the fins to
represent the US-issued equipment (another holdover from this kit’s F-104G
lineage), then built a pair of droptanks to be mounted on modified F-5E pylons.
However, after attaching the tip tanks I decided I liked the simpler lines of
this configuration and proceeded no further (anybody need a pair of 104
droptanks?).
After debating on how best to attach the glass, I decided to use flexible hinge pins to hold the canopy in the open position. I drilled holes into the canopy framing on the left side, front and rear at the corners, with a #78 bit. Into each hole I glued a short piece of nylon bristle removed from an M-16 rifle cleaning brush (Ah don’ need no teen-aged queen…).
With a #77 bit, I drilled a hole into the lower left corner of the windscreen and aft glass framing. After attaching the gunsight reflector with white glue, I tacked these parts into position with Testor’s liquid cement and let them dry for a few days.
With the Testor’s solvents fully evaporated, I hard-glued the windscreen and aft glass with CA, sanded the seams flush, then used Bare Metal compound and my Dremel tool with a buffing wheel to restore clarity to the glass. After trimming the canopy’s hinge pins to 1 millimeter I teased them into the holes, aft section first. Mike Alpha (mission accomplished)--it worked!

 The landing gear was next. I flattened all the tires slightly and added brass
tie-down rings and a couple of other doo-dads from .013" guitar string to
the main struts. Missing hinge arms were fitted to the nose doors. As the
struts, gear wells, and inner door surfaces were all aluminum-colored, I
attached them all, leaving the wheels and tires off until after painting. I used
Testor’s liquid cement for the nose gear doors and removable nylon pins for
the main gear covers. Landing and taxi light bezels were built from scratch with
MV lenses used to replicate the sealed-beam bulbs.
The landing gear was next. I flattened all the tires slightly and added brass
tie-down rings and a couple of other doo-dads from .013" guitar string to
the main struts. Missing hinge arms were fitted to the nose doors. As the
struts, gear wells, and inner door surfaces were all aluminum-colored, I
attached them all, leaving the wheels and tires off until after painting. I used
Testor’s liquid cement for the nose gear doors and removable nylon pins for
the main gear covers. Landing and taxi light bezels were built from scratch with
MV lenses used to replicate the sealed-beam bulbs.
I glued the ventral fin on with a thin bead of Crazy Glue, then press-fitted the horizontal stabilator into position atop the fin. A small drop of CA permanently affixed it to the fairing.
I removed the canopy and used the Model Technologies photo-etched F-104 canopy detail set to add a few more bits. This set also includes a canopy breaker for the seat which I folded into shape but held for later installation. I used pieces of the PE fret to fashion a pair of AOA transducers which were attached after painting and decaling. A reshaped pin head was mounted to the right side of the nose to serve as an outside temperature sensor.
A pair of TACAN blade antennas were added to the bottom of the fuselage, one aft of the radome, the other aft of the nose gear well, along with a new link ejection chute made from a section of Plastruct ‘I’ beam. After a final sanding and airframe inspection it was off to the paint shop.
|
PAINT & DECALS |
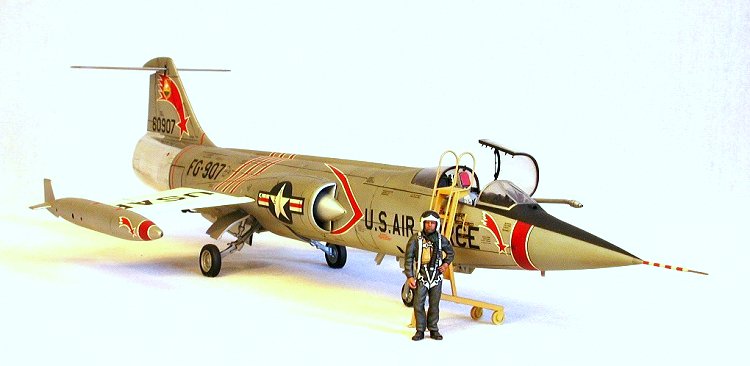
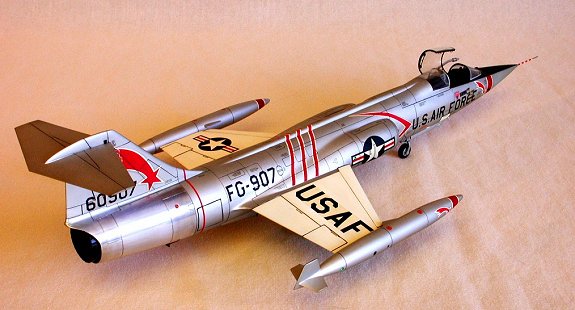
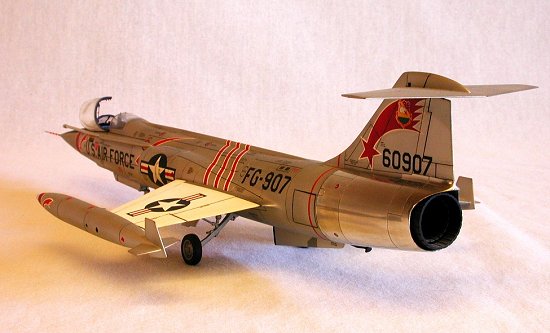
I’ve never had much luck with the buffable metallizers so I decided to use Testor’s silver to simulate a lacquered-aluminum finish which may or may not be correct for the time period. Bare Metal foil was used on the unpainted aft fuselage area to provide some dramatic contrast.
Painting commenced with several coats of Testor’s Modelmaster gloss white on the wings, thinned 50% and shot with low pressure (20 psi) to minimize orange peel. While this dried, I masked off the individual framed sections of the windscreen, the canopy, and aft glass along with the anti-glare panel then shot flat black.
When the black had dried I masked over the anti-glare panel, windows and frames, the wings, and the gray-molded radome and sprayed three coats of Modelmaster silver (FS 17178) over the remaining surfaces. Testor’s lacquer thinner was used to remove silver overspray from the foiled aft fuselage. Removing the masking tape from the nose and wings provided convenient points with which to handle the model during the remaining phases of decaling and final assembly, as all silver paints never seem to fully dry.
 I painted the aft portion of the pitot tube white and used red decal material
to provide the candy stripes. Silver decal cut into 1 millimeter strips was used
as canopy framing over the painted flat black undercoat.
I painted the aft portion of the pitot tube white and used red decal material
to provide the candy stripes. Silver decal cut into 1 millimeter strips was used
as canopy framing over the painted flat black undercoat.
After painting the wheels and tires I glued them on with Testor’s liquid cement then attached the canopy breaker to the seat’s headrest with Elmer’s white glue. The photo-etched AOA transducers were installed into pre-drilled holes on either side of the fuselage and anchored with white glue as well. I painted the afterburner assembly flat black then burnished the exterior with powdered graphite to impart a burnt metal look, then inserted it into the aft fuselage. With the painting complete, I sat the model aside while I decided on markings.
The choices boiled down to the 479th TFW’s red- and white -striped transitional scheme or a generic pre-delivery prototype. The colorful red and white livery had always appealed to me and was offered as an option with the old Revell kit. I had two of those sheets but after a careful assessment discarded the possibility of their use; the red was too orange, the squadron insignia was incorrectly shaped, and both sheets were terribly off-register. For a millisecond or two I considered the kit-supplied markings, but Monogram’s decals being what they are, I DXed that idea most skosh as rampant lunacy.
Incredible as it may seem, no aftermarket sheets for the F-104C were available. MicroScale offered a decal for ‘A’ models while several European-manufactured sheets covered the G/S aircraft. Undaunted, I scoured the universe and found just the solution in my very own backyard. At a contest and swap meet, one of the vendors was selling an odd lot of unused decals from various Testor’s kits. In the pile was a sheet that had been issued in one of the myriad re-releases of the old Hawk F-104. The decal allowed the builder the option of a day-glo orange QF-104A or a silver F-104C from the 479th. The sheet was printed by Scalemaster and included all the red and white stripes for the nose, intakes, tip tanks, and fuselage, the red and white "shooting stars", plus the usual assortment of national insignia, service logos, and warning stenciling. On-register and fully opaque, it was beautiful. The vendor wanted a buck but I conned him down to six bits (I am a cheap SOB, doncha know).
 The Scalemaster decals performed with predictable results, snuggling down
with only a small amount of Solvaset necessary. The national insignia were
ever-so-slightly off-register so I replaced those items with equivalently-sized
units from a RepliScale sheet and supplemented the service stenciling with
additional pieces from my spares inventory. Gray and black decal film were used
for the flush antennas on the ventral fin and IFF/SIF dielectric panels under
the nose. When the decals had fully dried, I washed the excess decal adhesive
off with a Q-Tip and distilled water to prepare it for weathering.
The Scalemaster decals performed with predictable results, snuggling down
with only a small amount of Solvaset necessary. The national insignia were
ever-so-slightly off-register so I replaced those items with equivalently-sized
units from a RepliScale sheet and supplemented the service stenciling with
additional pieces from my spares inventory. Gray and black decal film were used
for the flush antennas on the ventral fin and IFF/SIF dielectric panels under
the nose. When the decals had fully dried, I washed the excess decal adhesive
off with a Q-Tip and distilled water to prepare it for weathering.
Testor’s Dullcote was sprayed over all surfaces except for the canopy glass and foiled areas, and when dry, I used Liquitex dark gray tempera watercolor mixed to a wash consistency to highlight the panel lines, movable control surfaces, and exhaust louvers. The next day I shot another light coat of Testor’s flat lacquer to seal the wash.
Red, green, and white MV lenses were affixed into the pre-drilled dimples in the intake ducts, rear fuselage, and tip tanks with white glue, along with the arresting hook. With the handling-intensive tasks complete, I inserted the refueling probe into the fuselage fairing. As an afterthought, I scratch-built a boarding ladder and modified a Monogram F-86 pilot to serve as a Starfighter jock by substituting the head from the F-102 figure and adding a new right arm.
|
CONCLUSIONS |
Among the Century Series of aircraft, the Starfighter was always my favorite—Sierra Hotel, even parked on the tarmac…like Tina Louise in a two-piece bikini or a ’57 Fender Stratocaster…the aeronautical equivalent of a ’67 big-block Sting Ray roadster with alloy knock-off wheels and outside exhausts…a real heart-stopper built to go fast and kill things. Though the F-104’s combat career was less-than-stellar, it was a true pioneer in every sense of the word. Any collection of modern jet models should include one as so many features on today’s aircraft owe their origins to the Starfighter…"The Missile With A Man In It".
While the recent release of Hasegawa’s outstanding series of "shake and bake" Starfighters may dim the appeal of this kit, it still has a lot of potential to any modeler willing to stretch his or her skills beyond the currently-trendy fad of spending loads and loads of money on the latest wonderkit, more money on the newest resin goodies, and still more money on photo-etched upgrade sets and aftermarket decals. I love high-tech, and I’ve no fundamental objection to spending money, but when the price of the newest state-of-the-art kits approaches (or exceeds) the cost of a new service pistol or a couple of 31x10.50R15 tires for my 4x4, I gotta think about the value. Without a doubt, I still think this kit represents excellent value and if the modeler’s skill are up to the challenge an outstanding replica of a Starfighter can be built.

|
REFERENCES |
Warbird History: Lockheed F-104 Starfighter – Steve Pace; Motorbooks International
F-104 Starfighter: In Detail & Scale – Bert Kinzey; Airlife Publishing, Ltd
F-104 Starfighter In Action – Lou Drendel; Squadron-Signal Publishing
Century Series In Color – Lou Drendel; Squadron-Signal Publishing
U.S. Fighters of the Fifties – Nico Sgarlato & Franco Ragni; Squadron-Signal Publishing
Famous Airplanes Of The World #37; Bunrin-Do Publishing
Vietnam: The War In The Air – Rene J. Francillon; Arch Cape Press
Fighter Interceptors – Rene J. Francillon, Peter B. Lewis & Jim Dunn; Osprey Publishing
Personal Observations, Pima Air & Space Museum, Tucson, Arizona
(And a heartfelt thanks to the staff there!)
Ó March 2001 by Roger M. Jackson
First Time North American Rights To Scott Van Aken and ‘Modeling Madness’
If you would like your product reviewed fairly and quickly by a site that averages over 2,200 visits a day, please contact me or see other details in the Note to Contributors.