
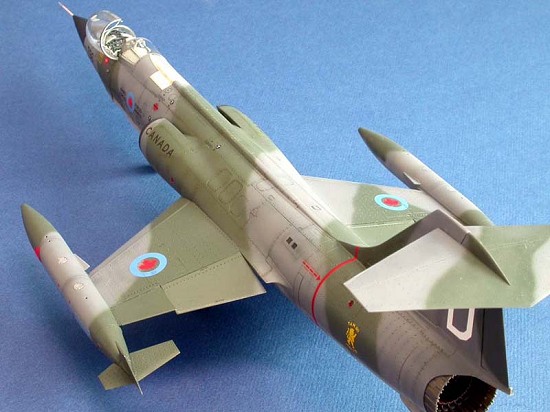
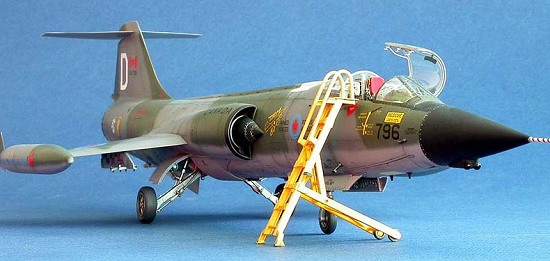
| KIT: | Hasegawa 1/48 CF-104 'Canadian Starfighter' |
| KIT #: | PT-18 |
| PRICE: | CDN $35.00 |
| DECALS: | Two options |
| REVIEWER: | Wayne Hui |
| NOTES: | Leading Edge 42.20 decals. Almost a snap kit! |
| HISTORY |
 I had the Hasegawa F-104J kit sitting
on my shelf since 1999. I had in mind to build this as a CAF bird in
natural metal with the red and white wings. When Dave Koss of Leading Edge
Models asked me to build one to show off his re-released decal sheet for
the Camouflage birds, I hesitated for a few seconds, but quickly decided to
do it to "stretch" myself. I always thought the camouflage CAF birds looked
dark and boring.
I had the Hasegawa F-104J kit sitting
on my shelf since 1999. I had in mind to build this as a CAF bird in
natural metal with the red and white wings. When Dave Koss of Leading Edge
Models asked me to build one to show off his re-released decal sheet for
the Camouflage birds, I hesitated for a few seconds, but quickly decided to
do it to "stretch" myself. I always thought the camouflage CAF birds looked
dark and boring.
For this project, I wanted to build fast but keep up my standards and then some. As such, I kept any aftermarket stuff to a minimum and almost built out of the box. You will see that I obviously failed in the out of the box approach.
| THE KIT |
This model
 was built from the Hasegawa
1/48 scale F-104J kit.
was built from the Hasegawa
1/48 scale F-104J kit.
Overall, this is a fine model kit except for a few problem fitting areas such as the air intakes and the bottom fuselage pieces behind the nose gear well. Other than these areas, everything is pretty much a snap together fit (literally). Ejection pin marks are on key parts such as on all the wing leading edge, flaps, fuel tank fins, and landing gears. The other draw back to this kit are the vast amount of rivets. Recessed details to represent rivets are generally a nice touch when done around access panels and panel joints. It becomes an over kill when done excessively such as rivets all over the wings and stabilizer.
The molding, details, and panel lines are very crisp and very nicely done. It is interesting to note that the "style" and construction design are different from the typical Hasegawa kits. It appears the mold is not a Hasegawa mold. There is talk that Hasegawa bought the mold from a Taiwan company. Regardless, this is fine model kit suitable for beginners to intermediate modelers.
| CONSTRUCTION |
The construction to this kit is very basic. Aside from some small poor fit issues, everything else is a snap together construction. Just follow the instruction sheet and the modeler should have no problems.
One error that should be mentioned is that Part No. R10, in Step 7, should be glued in the opposite direction from what is shown on the instruction diagram.
Note that a F-104 model does not need any nose weight for it sit right.
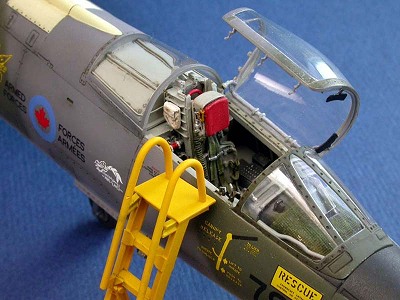
Extra Details
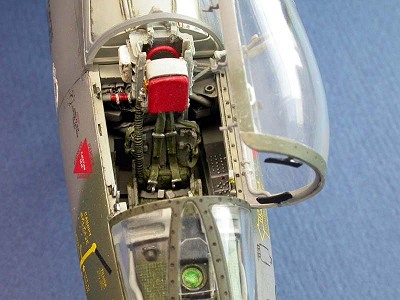 The Aires cockpit tub and seat was
used in this model. The instrument panel is the kit stock part as it is
just perfectly done. To speed up the process, I used the kit instrument
panel decal. It fits perfectly over the raised details and looks great when
done.
The Aires cockpit tub and seat was
used in this model. The instrument panel is the kit stock part as it is
just perfectly done. To speed up the process, I used the kit instrument
panel decal. It fits perfectly over the raised details and looks great when
done.
All scratch built details added to the cockpit are:
All scratch build details listed above were made from styrene sheets and stretched spruce. Canopy defogger piping were made from small diameter soldering wire.
The bag on the edge of the ejection seat frame was made from my kid's Play-Doh.
A pair of photoedge rear view mirrors
from Lions Roar were added to complete the detailing. Lions Roar's PE rear
view mirror is very nice as it comes with a bright chrome finish to r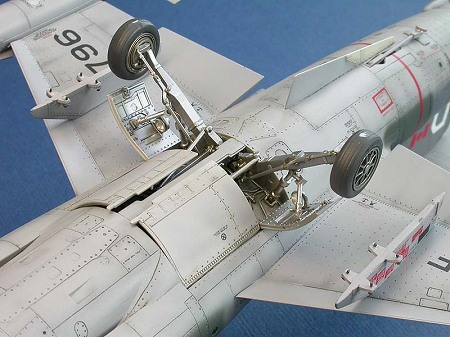 epresent
the mirrors. The draw back is that the heat from the chrome plating process
caused the parts to be brittle and will not stand up to any sharp bending.
epresent
the mirrors. The draw back is that the heat from the chrome plating process
caused the parts to be brittle and will not stand up to any sharp bending.
There was no need to add any additional details to the main wheel bay as one won't see much of it after closing the clam shell.
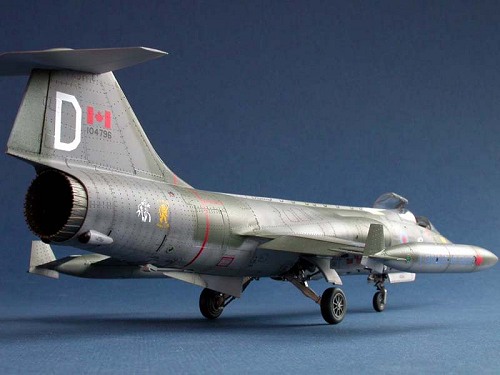
A set of UHF antenna were added to the underside of the front fuselage as typically seen on CAF CF-104. These again were build from just simple styrene sheets cut to shape.
The kit does not come with any under wing stores. I wanted to add the wing pylons. I scaled a photo of the wing pylon and cut the shape out from a styrene sheet. The pylon anti-sway bracing were made from model railroad details.
Whenever possible, I generally like to add a ladder to a model. The kit does not provide any boarding ladder. So I build one out of styrene sheets, rods and C channel structural shapes. I scaled the ladder from photographs of the Canadian style ladders.
| COLORS & MARKINGS |
PAINTING
 Paint used were Gunze Sangyo acrylic
paint. A paint chart is provided below. The color matching was done by
comparing the "relative" paint color against a paint chips book for CAF
aircraft.
Paint used were Gunze Sangyo acrylic
paint. A paint chart is provided below. The color matching was done by
comparing the "relative" paint color against a paint chips book for CAF
aircraft.
| Underside Grey | Gunze H306 + 10% White |
| Upper Grey | Gunze H305 |
| Upper Green | Gunze H309 |
| Cockpit | Gunze H57 (Aircraft Grey) |
For this camouflage bird, I broke out my Iwata Eclipse HP-CS airbrush that I bought in Salt Lake City during the Gathering Model Show. My regular airbrush is a Pasche VL. It has served me well for over 14 years. However, the Iwata HP-CS is far superior when it comes to spraying fine lines. With the Pasche VL, I always had to go back and fix up some over spray. But with the Iwata, I was almost able to spray the camouflage in each single pass without over spray. For the purpose of general overall coverage, the Pasche VL is still the way to go as it has a higher mass flow rate.
After the model was painted, I clear coat the model with Future, straight from the bottle. This provides a clear glossy surface for the decals to go on to and it also seals the acrylic from the enamel wash. Polly Scale Clear Flat was used for the final flat coat.
DECALS
 Decals came from the re-released
Variegated Camouflage Scheme for the
CF-104 (Sheet No. #48.20) from Leading Edge Models. The bonus to this
decal sheet is that it gives you the resin parts for the front and rear
radar receivers. Now what other decal company gives you resin parts, eh?
Decals came from the re-released
Variegated Camouflage Scheme for the
CF-104 (Sheet No. #48.20) from Leading Edge Models. The bonus to this
decal sheet is that it gives you the resin parts for the front and rear
radar receivers. Now what other decal company gives you resin parts, eh?
This sheet provides markings and stencils for you to make 7 different camouflage birds. Dave of Leading Edge Models sure has done a great job because all the fine text are legible and clear. The decal sheet he gave me to use for this demo bird turned out to be an "older" sheet, and as such, some of the decals cracked when released from the backing paper. But, once I got a replacement sheet from the new re-released stock, everything was fine. The Leading Edge Decals went on easy and sit very well with the aid of Gunze Mr. Mark Softer decal solution. After drying and sealed with a flat finish, the decal is almost invisible and the markings looked painted on! It just does not get better than this.
Knowing a little about Dave and his perfectionist approach to his work, the markings, colour, and accuracy is bang on when compared against photos.
| CONCLUSIONS |
Before I built this model, I only wanted to build CF-104 in the natural metal and White wing finish. I always thought that this is the best looking scheme. Now that I built a CF-104 in the camouflage scheme, I changed my mind. I now love both natural metal and the camouflage scheme.
In the next few months, if I am in the mood for it, I may want to build the LAU-3000 rocket launchers and put on some RBF flags to complete the looks.
| REFERENCE |
If you would like your product reviewed fairly and quickly by a site that has nearly 300,000 visitors a month, please contact me or see other details in the Note to Contributors.