Italeri 1/72 Wessex HU.5
| KIT #: | 082 |
| PRICE: | $5.00 'used' |
| DECALS: | Three options |
| REVIEWER: | Christopher Campbell |
| NOTES: |
| HISTORY |
Westland Aircraft already had a relationship with Sikorsky, having built the S.55/H-19 under license quite successfully as the Westland Whirlwind. However, when Sikorsky licensed the production of their newest design, the S-58/H-34, Westland, it could be said, did them one better.
The S-58 was an excellent design and had a long service life with every U.S. military branch. However, it would be one of the last piston engine helicopters in U.S. service, as the age of the turboshaft was dawning and would soon be in full swing. Westland embraced this with their reworking of the S-58 as the Wessex.
 In this form it was initially powered by a Napier
Gazelle engine, fully six hundred pounds lighter than the engine it replaced and
producing more than one hundred horsepower more. Later, this engine would be
replaced with a coupled, twin De Havilland Gnome unit, though power would remain
essentially the same. (Also of note, while initially produced with the same
radial engine as the H-19, later Westland Whirlwinds would also be fitted with
turboshaft units.)
In this form it was initially powered by a Napier
Gazelle engine, fully six hundred pounds lighter than the engine it replaced and
producing more than one hundred horsepower more. Later, this engine would be
replaced with a coupled, twin De Havilland Gnome unit, though power would remain
essentially the same. (Also of note, while initially produced with the same
radial engine as the H-19, later Westland Whirlwinds would also be fitted with
turboshaft units.)
Just like its American cousin, the Wessex would have a very long service life in both the Royal Navy and Royal Air Force. It would be used for antisubmarine duty, rescue work, troop transport, and just about any other duty that a helicopter could perform. This would include serving as the Queen’s Flight transport until 1998, wearing distinctive red and black livery.
They would see combat in the 1962 Brunei Crisis, principally being used for troop transport. It would again see action in this role in the Falklands War of 1982. There it would also fly antisubmarine patrols. Nine aircraft were lost during the conflict to accidents and enemy action.
The Wessex would continue to serve for nearly twenty more years. The last ones were retired by the R.A.F. in 2003, forty-two years after their introduction. As an interesting side note, the Wessex stood in for H-34’s, painted in faux U.S.M.C. markings in the 1987 film Full Metal Jacket. There is a very strong family resemblance.
| THE KIT |
Frog produced the first Wessex kit back in 1963. It was a decent enough model for its day and continues to be produced as the mold floats between various Eastern European manufacturers. Matchbox released a better kit in 1987, though still not without its issues.
In 1996, Italeri issued their UH-34 kit, which was subsequently released by Revell one year later and offered with new parts as a Wessex at the same time. This release of the Wessex by Italeri appeared concurrently with it. Since that time, it has been regularly offered by Italeri in one form or another through 2018. It would seem that we are now due for another release.
 It is clear from the breakdown of the parts that it
had been designed from the onset to that certain sprues could be molded either
for Sikorsky or Westland versions. All parts are nicely molded with no flash on
either this kit or the H-34 that I built shortly before. The principal
difference between the two kits is the nose section and associated components.
There are a few other bits that are specific to the Wessex, though most of them
smaller and not necessarily common to all versions.
It is clear from the breakdown of the parts that it
had been designed from the onset to that certain sprues could be molded either
for Sikorsky or Westland versions. All parts are nicely molded with no flash on
either this kit or the H-34 that I built shortly before. The principal
difference between the two kits is the nose section and associated components.
There are a few other bits that are specific to the Wessex, though most of them
smaller and not necessarily common to all versions.
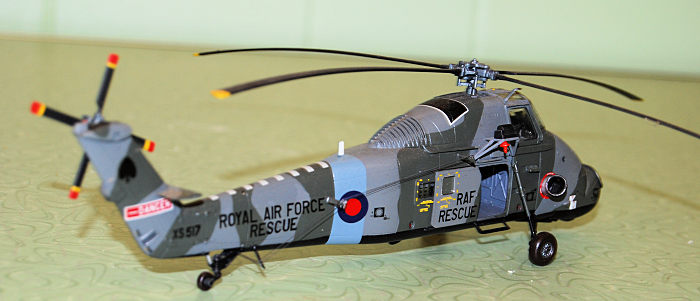
Decals are provided for three aircraft, two Royal Navy and one R.A.F., as illustrated on the box cover which I chose to build. The other two are for a Royal Navy aircraft in overall dark green and one in a camo pattern of sand and dark green. These were well printed and performed quite well.
One thing of note is that the rotors have some droop nicely molded into them. This has become fairly commonplace now on helicopters where it is appropriate. However, when this kit was first offered, it was somewhat novel, though very appreciated.
Interior detailing in both the cockpit and passenger compartment is good for this scale and there is the option of positioning the side door open if one wishes.
Overall, this is a very nice kit. The detail is there, though nothing is difficult to put together. To get a better Wessex kit, you have to go for a bigger scale, though it may not be so easy to assemble.
| CONSTRUCTION |
I do not recall what show I was at when I picked this kit up. However, for $5, that was a no-brainer. I have always loved the Sikorsky designs of this period and all of their offspring. Having just recently built the H-34, I decided that it was time for a Wessex.
The build went quite smoothly and mostly by the instructions. There are some holes to open on the fuselage for the external radio wire posts, so this was done first with a pinvise. This was followed by spraying all of the interior as well as the cockpit components, except for the instrument panel in Testor’s Flat Grey.
While this was drying the instrument panel was painted in Model Master Flat Black. Instruments were picked out by drybrushing with Testor’s Silver. Due to how the panel is located, very little can be seen of it, though. Even so, it is nicely detailed for its scale, light years ahead of the Frog Wessex that I once built.
The sling seats as well as the centers of the crew seats were painted with Model Master Olive Drab. Seat belts were then painted in Testor’s Tan, and the buckles picked out with Model Master Dark Anodonic Grey. The center console and rotor shaft cover were painted in Flat Black per the instructions, as were the grips of the control sticks.
 All of the interior components were glued up with CA
glue with no problems at all. The attachment points were quite positive, and the
fit was excellent. That, in general, is the theme throughout this kit.
All of the interior components were glued up with CA
glue with no problems at all. The attachment points were quite positive, and the
fit was excellent. That, in general, is the theme throughout this kit.
These subassemblies were set aside while I went to work on installing all of the side windows on the fuselage. I elected to leave those of the cockpit out for now, seeing that they could be installed later, after painting. The others were carefully glued in place with thick CA glue (chosen for its hold strength) applied with a toothpick, then set aside to dry for some time.
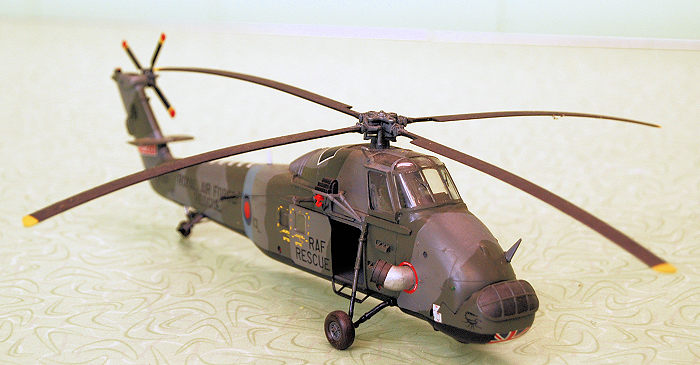
During this time I would paint and assemble the main and tail rotors. These parts were all very nicely molded, requiring only some cleanup with an X-Acto blade. The undersides of the main rotors were painted in Model Master Dark Green which was masked off when dry using Tamiya tape. Model Master Flat Black was then applied and the tail rotor painted in this color at the same time.
Once dry, the rotor tips were painted in Testor’s Flat Yellow, with a combination of Flat Yellow and Flat Red used on the tips of the tail rotor, per images that I reviewed. The rotor heads and actuators were all painted in Model Master Dark Anodonic Grey.
Attention then went back to the helicopter itself and the fuselage was assembled using CA to glue everything. The ventral panel was glued in place, proving mostly a good fit, though a small amount of sanding was needed. This along with some other simple sanding to eliminate the fuselage seam was accomplished with 400 grit sandpaper followed by some polishing with 0000 steel wool.
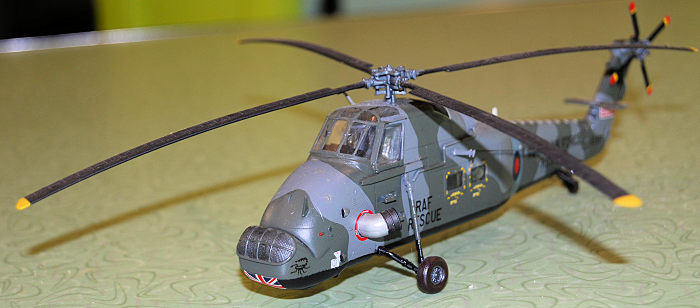
The nose was now assembled and sanded in the same manner, including after mating it to the fuselage. The large, two-piece exhaust pipes were glued up, sanded, and polished, though set aside for later. They would be some of the last pieces installed.
There are numerous small bits to be added to the fuselage and a few were added at this point. However, most, such as the antennas and hoist were saved for later. The steps on the side of the forward fuselage and the landing gear struts were glued in place along with some piping appropriate to the version chosen. With this done, everything was blown off thoroughly and openings stuffed with paper towel bits in preparation for painting.
| COLORS & MARKINGS |
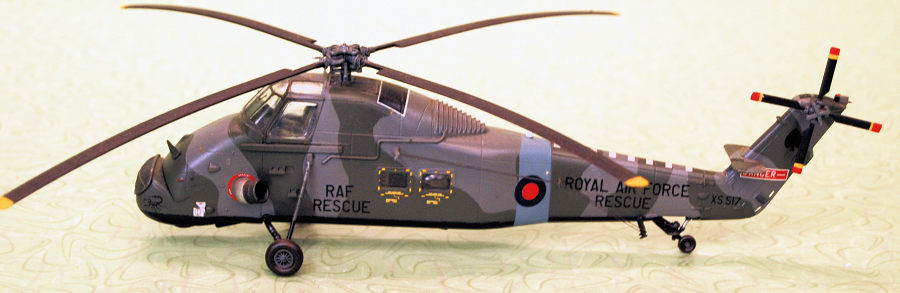
The version that I chose was the R.A.F. Rescue bird from the box cover. This was an aircraft stationed in Cyprus in 1987. I liked the paint scheme and especially the Union Jack on the nose.
Before beginning, the side windows were carefully masked off with Tamiya tape. Then the ventral areas were sprayed in Model Master Flat Black. While this dried, I turned my attention back to the exhausts.
These were painted inside with Model Master Jet Exhaust, as well as on the outer rings. Some light dry brushing was then done to this outer section with Model Master Burnt Iron. The remaining, very shiny portion was painted in Model Master Chrome.
The black undersurface was then masked off with more Tamiya tape after which the model was sprayed in Model Master Dark Gull Grey, per the instructions. While this was drying, I worked on drawing and cutting masks from wider Tamiya tape which was carefully applied and followed by Model Master Dark Green. Masking was then removed, and I was quite pleased with everything until…Oops!
 I had forgotten to paint the light blue fuselage
band. Generally, stripes or bands are the very first thing that I paint and then
mask. I personally find it easier to work this way. Now I had to do it in
reverse.
I had forgotten to paint the light blue fuselage
band. Generally, stripes or bands are the very first thing that I paint and then
mask. I personally find it easier to work this way. Now I had to do it in
reverse.
Still, it was only one band, and it proved fairly simple to mask off, especially given how nice and flexible Tamiya tape is. Satisfied that I had it right, I carefully sprayed this area with Model Master PRU Blue, as this seemed to match the shade indicated. The tape was removed and once again, all was right with my little world.
The model was then shot with Model Master Gloss and set aside to dry so that decaling could begin. While this was drying, I masked off the canopy and painted it to match the rest of the aircraft. A number of the smaller pieces to be attached later were painted during this time as well, including the antennas, hoist, steps, and so on. The tires were painted in Testor’s Rubber with the wheels themselves getting Dark Anodonic Grey.
There were quite a number of decals for a kit this size, though I had no trouble with them. I used Solvaset in applying them, though did so lightly, as the decals are rather thin and required only a little encouragement. These were some of the better kit decals that I had encountered to this point. I find this to be the case in general with Italeri decals, at least since the late 1990’s.
Once these had dried for several hours the model was shot with Model Master Semi-Gloss. This was once again set aside to dry. During this time I busied myself with assembling the rotor head and painting anything associated with it that had not yet been painted in preparation for finishing.
| FINAL BITS |
The cockpit side windows and canopy section went on with no trouble at all using a little carefully applied CA glue. The wheels were glued in place as well as the steps, hoist, and a lot of antennas and such, all using small amounts of CA glue. While not indicated in the instructions, I elected to paint the hoist hook in Model Master Fluorescent Red.
I have seen photos of them painted various colors on helicopters of many nations. However, it seems that those employed in the rescue roll are often painted in some very bright color, often yellow or red. It added a little splash of color to an already colorful aircraft, though I feel that it looks right as well.
 Running lights were picked out and then I set about
rigging the exterior radio wires. This looked like something of a nightmare, as
there are two rows of them running parallel with multiple right angles. This was
before I knew of E-Z line and perhaps before it existed. It was the one thing
about building the kit that had given me pause, and I feared that I was going to
mess up a very nice build here.
Running lights were picked out and then I set about
rigging the exterior radio wires. This looked like something of a nightmare, as
there are two rows of them running parallel with multiple right angles. This was
before I knew of E-Z line and perhaps before it existed. It was the one thing
about building the kit that had given me pause, and I feared that I was going to
mess up a very nice build here.
To accomplish this, I stretched some sprue fairly thin. I then began at the most forward, inner point on one side, attaching it with a small drop of CA, shooting it with accelerator, and then moving on to the next until I had wrapped it all the way around. With the innermost attached, I then reversed the process on the outer wire. To my utter amazement, I got it right on the first try. Breathing a sigh of relief, I then carefully painted it with Model Master Flat Black using a fine brush.
The last thing to do was attach the rotors. The main rotor assembly went on cleanly. I had test fitted this previously and knew that, like the canopy, it would. A little CA glue secured it. The tail rotor was set in place, though not attached. I do this with some helicopter models, as I have noticed some other modelers when I have seen them at shows. It makes it less prone to damage during transport. Now, it was finished.
| CONCLUSIONS |
I cannot recommend this kit highly enough. It builds very easily and cleanly. Anyone with some helicopter experience should have no trouble producing a first class model of a Westland Wessex with this one. (The same can also be said of their H-34 kit.) It would also be an excellent choice for a modeler who wants to try their hand at rotary wing aircraft.
I am not certain if there are aftermarket detail sets available, though it would lend itself nicely to some super detailing if a modeler chose to do so. If not, it is quite nice out of the box.
I kept waiting for something to go wrong, the other shoe to drop, as it were. Yet it never did. The closest thing that I had to a problem was painting the blue band on the fuselage out of my usual sequence. That was my goof. I built the whole thing over a weekend and would estimate my working time at around twelve hours.
I have no doubt that I will build another. I have their HAS.3 version release from 2012 in my stash. I also have one of the 1/48 Revell kits as well and I have previously built their H-34 as a Navy Sea Horse.
In any case, I recommend that any modeler who wants a Wessex or any S.58 series in 1/72 scale have a go at one of the Italeri kits. You will not be sorry.
| REFERENCES |
https://en.wikipedia.org/wiki/Westland_Wessex
https://en.wikipedia.org/wiki/Napier_Gazelle
https://en.wikipedia.org/wiki/Rolls-Royce_Gnome
https://www.scalemates.com/kits/italeri-082-hu-5-wessex--112025/inthebox
https://www.scalemates.com/kits/italeri-082-hu-5-wessex--112025/timeline
Christopher Campbell
17 February 2025 Copyright ModelingMadness.com. All rights reserved. No
reproduction in part or in whole without express permission from the editor.
If you would like your product reviewed fairly and fairly quickly, please
contact
the editor or see other details in the
Note to
Contributors.