
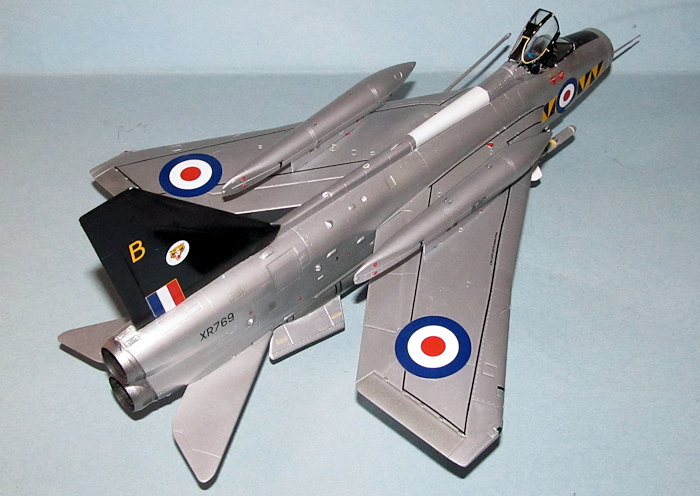
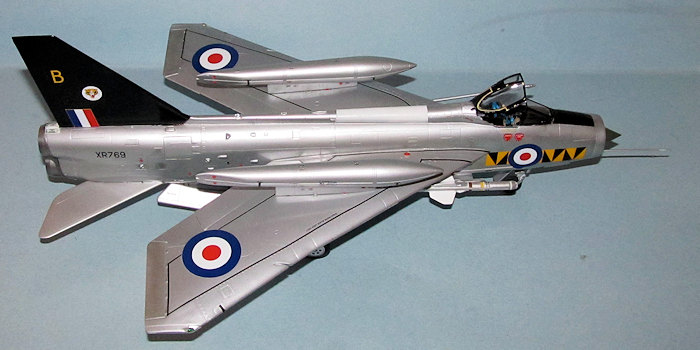
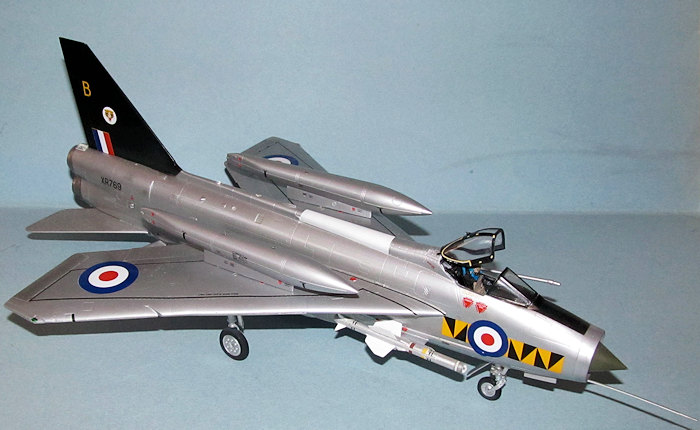
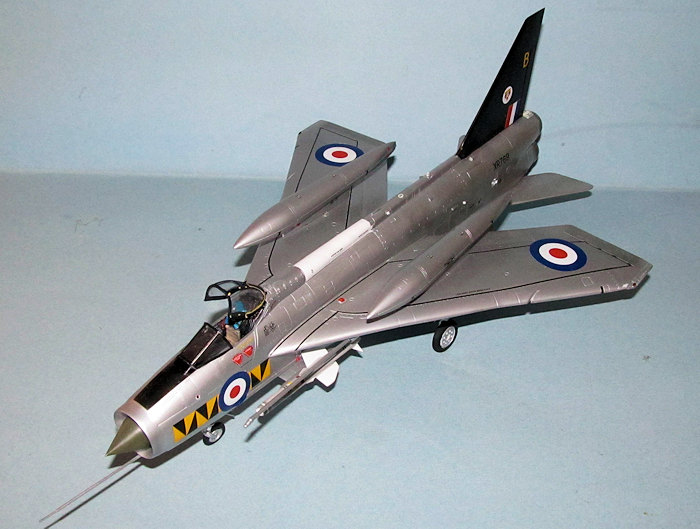
Airfix 1/48 Lighting F.2/6
| KIT #: | 6102ZSA09178 |
| PRICE: | $45.00 SRP |
| DECALS: | Six options |
| REVIEWER: | Dan Lee |
| NOTES: | True Details Resin Cockpit, Aeroclub Landing Gear and Aires Exhausts |
| HISTORY |
The English Electric/BAC Lightning was one Sierra Hotel jet as well as the only all British Mach 2 jet fighter. It's unique top/bottom two engine configuration plus its amazing aerodynamics and speed made it the premier RAF ride of the Cold War, but it was hampered by limited armament and fuel capacity.
The F.6 was the ultimate Lightning version to see
British service. Originally, it was nearly identical to the F.3A with the
exception that it could carry two 260-imperial-gallon (1,200 L) ferry tanks on
pylons over the wings. These tanks were jettisonable in an emergency, and gave
the F.6 a substantially improved deployment capability. There remained one
glaring shortcoming: the lack of cannon. This was finally
 rectified in the form
of a modified ventral tank with two ADEN cannons mounted in the front. The
addition of the cannons and their ammunition decreased the tank's fuel capacity
from 610 to 535 imperial gallons (2,770 to 2,430 L), but the cannon made the F.6
a “real fighter” again.
rectified in the form
of a modified ventral tank with two ADEN cannons mounted in the front. The
addition of the cannons and their ammunition decreased the tank's fuel capacity
from 610 to 535 imperial gallons (2,770 to 2,430 L), but the cannon made the F.6
a “real fighter” again.
The Squadron
No 74 Squadron of the Royal Air Force was known as the Tiger Squadron after an unofficial emblem from WW1. It was formed in 1917 as a training squadron, but soon found itself sent to the front as a fighter squadron flying the SE5a. Among the aces who flew with the Tigers was Mick Mannock.
It was disbanded in 1919 after the war, but was reformed in 1935 at Malta due to the Abyssinian Crisis and given Hawker Demons. By 1937, the squadron was back in England while flying Gloster Gauntlets and assigned to Fighter Command. In 1939, it was assigned Spitfires.
During WW2, the Tigers were in the thick of the fight from France, the Battle of Britain, the Mediterranean, the Middle East and flew with the 2nd Tactical Air Force in France. The most famous pilot who flew with the Tigers in WW2 was Sailor Malan who was their squadron leader during the Battle of Britain.
A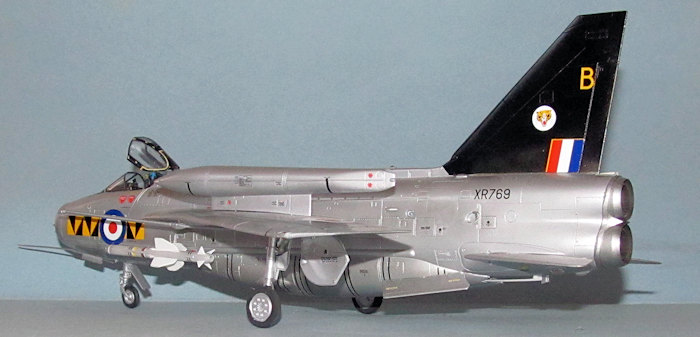 lmost immediately after the war, the Tigers were
re-equipped with the early marks of the Meteor which they flew until 1957 when
the Meteors were replaced by the Hawker Hunter. In early 1960, the Hunters were
replaced by the EE/BAC Lightning. In the late 1960s, the Tigers were deployed to
Singapore to provide air defense at RAF Tengah and they stayed there till 1971.
The Lightnings were then flown to Cyprus and handed over to Number 56 Squadron
and the Tigers were disbanded.
lmost immediately after the war, the Tigers were
re-equipped with the early marks of the Meteor which they flew until 1957 when
the Meteors were replaced by the Hawker Hunter. In early 1960, the Hunters were
replaced by the EE/BAC Lightning. In the late 1960s, the Tigers were deployed to
Singapore to provide air defense at RAF Tengah and they stayed there till 1971.
The Lightnings were then flown to Cyprus and handed over to Number 56 Squadron
and the Tigers were disbanded.
In 1984, the Tigers were reformed to fly the F-4J Phantoms to replace Number 23 Squadron which was deployed to the Falklands. During the draw downs of the Cold War and retirement of the RAF Phantoms in 1992, the Tigers became a training squadron. In 2000, the Tigers were merged into the 4 Flight Training School and disbanded.
| THE KIT |
I will refer/defer to said Tom Cleaver and Grenville Davies said about the kit.
| CONSTRUCTION |
The True Details (ex-KMC) cockpit parts was cleaned up and the casting blocks were removed with a hobby saw. The cockpit was painted flat black and the details were either dry brushed with silver or white It wasn't one of my better painted cockpits.
 After that I added the intake but left off the
shock cone/radome and nose ring to make the filling sanding stage easier to work
with. I added a single 1/8 ounce sinker to the nose shock cone secured with CA
glue to keep the model from being a tail sitter.
After that I added the intake but left off the
shock cone/radome and nose ring to make the filling sanding stage easier to work
with. I added a single 1/8 ounce sinker to the nose shock cone secured with CA
glue to keep the model from being a tail sitter.
I don't like the two piece exhaust tubes so I purchased an Aires exhaust set for the Lightning. The kit outer nozzles were glued onto the resin exhausts and burner cans with CA glue. After that the subassembly was painted with XF-56 Metallic Grey and XF-1 Flat black and then glued in place using CA glue after the fuselage and wings were painted. It was easy to add unlike some of their other exhausts so this was a welcome development.
The wings were glued together then filled/sanded after sitting in the box for a month to prevent the dreaded phantom seam. As I waited for the glue on the wings to cure, I sanded the various seams were filled, sanded and polished. The worst seams of all were the ones on the overwing fuel tanks which gave me many many many fits as I couldn't get rid of persistent seams (a small reason why this review was five years in the making!)
Lastly I added the horizontal stabilizers and nose ring on before it went to the paint shop which happened almost a year after it was all put together.
| COLORS & MARKINGS |
I began the painting of the model by spraying two
coats of Tamiya fine grey primer out of the can. After the imperfections were
dealt (filling and sanding) then it was then polished with various grades
(3000-12000 grit) of sanding pads and cloths to get everything ready for the
aluminum lacquer finish. I sprayed on t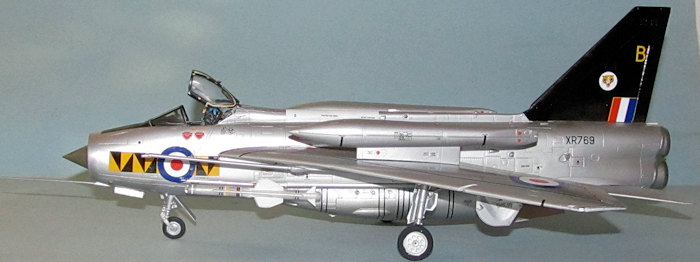 wo (or more I think) coats of Tamiya
TS-30 Silver Leaf while the elevons were masked off and sprayed with Tamiya
AS-12 Bare Metal Silver. Once dried the Lightning was then polished with the
various aforementioned grades of sanding pads/cloths to smooth out any
imperfections. As with all NMF finishes, this took a while (in this case two+
years.)
wo (or more I think) coats of Tamiya
TS-30 Silver Leaf while the elevons were masked off and sprayed with Tamiya
AS-12 Bare Metal Silver. Once dried the Lightning was then polished with the
various aforementioned grades of sanding pads/cloths to smooth out any
imperfections. As with all NMF finishes, this took a while (in this case two+
years.)
Once finished I masked off the tail and the panel on the fuselage spine which was then sprayed gloss black and flat white as per Xtradecal sheet X48099 which was the 74 “Tiger” Squadron markings when 74 Squadron was based out of Singapore in the early 70s. The missile fins were sprayed flat white as well.
I sprayed the missile bodies, Aeroclub landing gear and kit wheels with AS-12 Bare Metal Silver. The shock cone was painted US interior green and the tip was hand painted with Tamiya Chrome Silver. To add a more chrome look to the nose ring, I used SNJ polishing powder to make it look extra shiny. The difference turned out to be way more subtle than I hoped and barely noticeable in the pictures.
 Meanwhile I sprayed on Future straight from the
bottle for the gloss coat. I didn't do so in past NMF builds, but I figured this
wouldn't be a bad idea to protect the paint from the decals solvent. I gently
rubbed down the gloss coat with fine grades of polishing cloths when it was
cured. Easy to do when the task was done almost a year after the gloss coat was
put down!
Meanwhile I sprayed on Future straight from the
bottle for the gloss coat. I didn't do so in past NMF builds, but I figured this
wouldn't be a bad idea to protect the paint from the decals solvent. I gently
rubbed down the gloss coat with fine grades of polishing cloths when it was
cured. Easy to do when the task was done almost a year after the gloss coat was
put down!
The Airfix decals aren't the best but there aren't a lot of aftermarket stencil decals so I went with the kit ones for the stencils and warnings. The Xtradecal decals went on without a problem using Micro Set and Sol. The decals were added on and off over a two year period.
Finally, I wiped off excess decal solution before I sprayed on two thin coats of Future to seal everything in as the final coat.
| FINAL CONSTRUCTION |
The final bits were sprayed TS-30 Silver Leaf including the (much hated due to the issues I had with the seams) over wing tanks, pitot tube, refuelling probe, various other bits including the landing gear doors and Aeroclub retraction arms. The plastic parts (minus the over wing tanks) were later glued on without major or minor issues using Tamiya Extra Thin glue and the metal parts were glued with tiny dabs of CA glue.
The missiles weren't a major problem, but they did take a fair bit of filling, sanding, painting and decals to look decent. After the missiles were added to (and later broken off) the model sat for two more years in a cabinet.
 When I got a chance to build models again, I
discovered I had to make some repairs (nothing major fortunately) and replace
the various bits that had broken off and missing. The new first parts I added
were the completed over wing tanks using CA glue. It turns out the biggest
headache was adding the decals to the canopy. The Airfix canopy markings yellow
is most definitely out of register, but I didn't have any replacements so I used
what I could.
When I got a chance to build models again, I
discovered I had to make some repairs (nothing major fortunately) and replace
the various bits that had broken off and missing. The new first parts I added
were the completed over wing tanks using CA glue. It turns out the biggest
headache was adding the decals to the canopy. The Airfix canopy markings yellow
is most definitely out of register, but I didn't have any replacements so I used
what I could.
Three years earlier I discovered that the windscreen was slightly more narrow than the cockpit as the resin pit made the Lightning slightly wider than expected. I bought the Airwaves vacuform canopy set and used the windscreen, but kept the original kit canopy. Both were painted flat black then gloss black. The decals and small antenna were added to the canopy.
The last thing I did was finish the ejection seat which didn't have the ejection loops at the top. I used fine black wire which was painted yellow at regular intervals instead. I discovered to my dismay that the seat didn't fit all that well entirely because of the bumps and lumps on the side (and not seen) which caused the poor fit. After I angrily removed the various bumps/lumps, I jammed the bang seat into the cockpit. Voila, after almost six years I finally completed my F.6 Lightning.
| CONCLUSIONS |
The Airfix Lightning is a pretty nice kit. It would have been an easier build if I went with a camouflaged scheme instead of NMF, but I like the Lightning in NMF and the 74 Squadron markings made it an easy choice and not so easy do paint.
It looks nice built right out of the box, but I like having certain extra details like an improved cockpit and exhausts which is why I went with the True Details cockpit and Aires exhausts. About the only thing that I would change in my model is going with a metal pitot tube as the kit plastic one isn't all that great (mine is slightly bent from after some rough handling from some inconsiderate jerk.)
8 August 2016
Copyright ModelingMadness.com
If you would like your product reviewed fairly and fairly quickly, please contact the editor or see other details in the Note to Contributors.