Airfix 1/72 Phantom FG.1
| KIT #: | A0616 |
| PRICE: | $ |
| DECALS: | Three options |
| REVIEWER: | Frank Spahr |
| NOTES: | I |
| HISTORY |
Amongst the long history of the Phantom II, the type´s service in the UK is a quite peculiar aspect. I can but recommend reading Damien Burke´s summary on his Thunder&Lightnings website (see references). It´s a pretty good insight into some of the seemingly eternal and undying processes governing military procurement and service.
 In the
mid-1960s, when no homegrown new naval interceptor was available, the
British bought the Phantom II. It seemed like a good and affordable idea at
the outset. Yet buying a proven design „off-the-shelf“, quickly mutated into
a most expensive redesign. On the one hand, the British wanted their new
aircraft to include some British technology, and they somehow had to make
the aircraft compatible with the British aircraft carriers. Those were
smaller all around than their US contemporaries, from the overall dimensions
down to the aircraft lifts. Including the British Rolls Royce engines
amounted to redesigning the better part of the aircraft, and in the event
the greater engine power did not lead to improved performance. The nose
radome needed to swivel to fit onto the aircraft lifts, and to produce
enough lift during takeoff, the nose gear was extended to outright ludicrous
lengths.
In the
mid-1960s, when no homegrown new naval interceptor was available, the
British bought the Phantom II. It seemed like a good and affordable idea at
the outset. Yet buying a proven design „off-the-shelf“, quickly mutated into
a most expensive redesign. On the one hand, the British wanted their new
aircraft to include some British technology, and they somehow had to make
the aircraft compatible with the British aircraft carriers. Those were
smaller all around than their US contemporaries, from the overall dimensions
down to the aircraft lifts. Including the British Rolls Royce engines
amounted to redesigning the better part of the aircraft, and in the event
the greater engine power did not lead to improved performance. The nose
radome needed to swivel to fit onto the aircraft lifts, and to produce
enough lift during takeoff, the nose gear was extended to outright ludicrous
lengths.
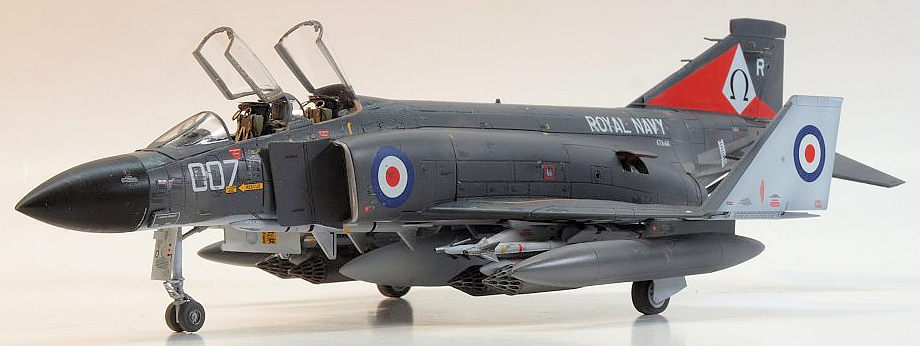
In the end, only one FAA squadron and one carrier was ever equipped with the Phantom. HMS Ark Royal operated the type from 1970 to her decommissioning in 1978. But admittedly, during that time, the mighty fighter made a great impression. The BBC show „Sailor“ portrayed Ark´s 1976 cruise, and is readily available on DVD. It´s still one of my favorites, and I was more than just a bit happy when I saw that Airfix would release a new-tool RN Phantom FG.1.
| THE KIT |
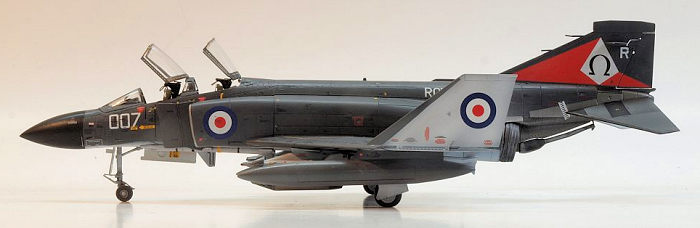
A very full complement of
external stores is provided, which is not always a given. You can build various
options: In flight, ready for launch with extended nosegear oleo, parked with
wingtips and/or nose
 radome
folded. The clear parts in my kit were actually clear and neat. The instructions
are exemplary for „new“ Airfix. They are very clear and logical and easy to
follow. The only thing to really watch out for is which option to take.
radome
folded. The clear parts in my kit were actually clear and neat. The instructions
are exemplary for „new“ Airfix. They are very clear and logical and easy to
follow. The only thing to really watch out for is which option to take.
The large decal sheet contains markings for three aircraft. It is well printed, and comprises a full set of stencils, meaning several hundred of the cute little sweethearts. There is a big colour print for painting and the main markings, and a large and well-done stencil placement sheet. This is a very full and nice kit out of the box in my view.
I had set my sights on the kit as soon as I heard of it, and got mine early in 2018. Pretty soon after, Eduard issued their upgrades for it, and I swallowed them hook, line and sinker, in the shape of their BigEd. That contains two PE sets for the interior and exterior, paint masks, and Remove before Flight tags in coloured PE. As a final touch, I added the very nice Eduard resin wheels for the kit.
| CONSTRUCTION |
 I
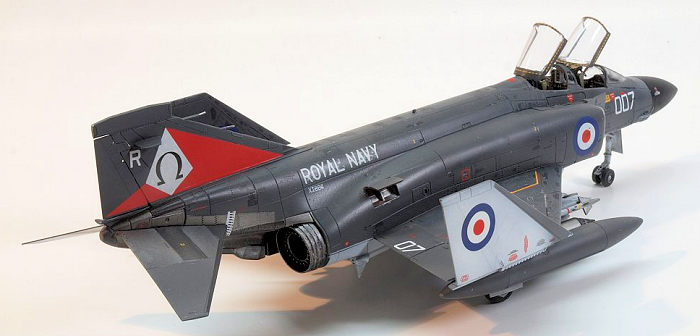
started by deciding which option to take. I chose an aircraft with folded
wingtips, yet un-folded nose, standing with open canopies parked on deck.
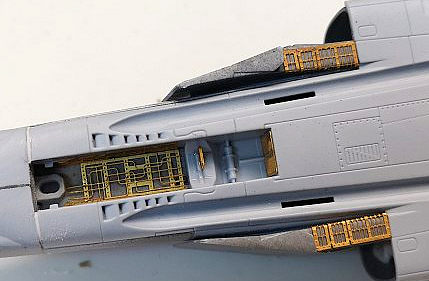
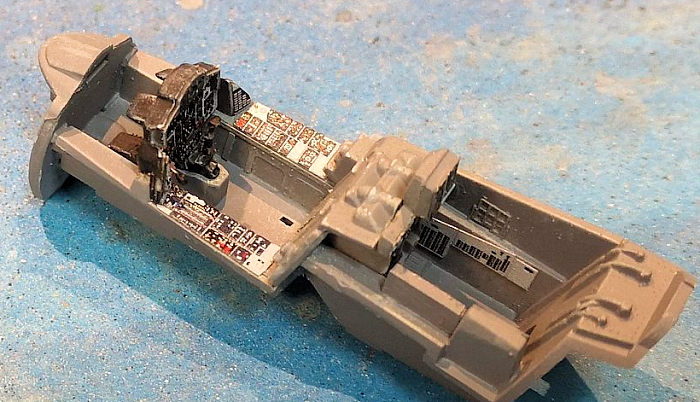
You can see them like that in Sailor. Then I opened the PE sets and chose
the most intimidating single piece, which was the internal ducting detail
for the nose gear bay. I carefully cut it from the fret, folded it and glued
it to the kit part. That successfully done, I started work in earnest,
working my way through the PE sets. Obviously work on the cockpit and
ejection seats had priority, but I also attached whatever other PE detail
that made sense. There is some wheelwell detail that can be added pretty
early on, for instance. It all worked surprisingly fast and hassle-free. I
cut and cleaned as many subassemblies as possible from the sprues and
prepared them for priming, having early on decided on a pretty full payload
of three fuel tanks, SNEB pods and Sidewinders. Work on the exhausts was
complicated by a switch from True Metal to Alclad II during the process, but
it did work out nicely in the end. The coloured PE for the interior looks
very neat and finely detailed, and was quite easy to work with. Luckily I
didn´t have to do too much grinding on the kit parts, and even better: The
cockpit assembly fit quite well inside the fuselage.
I
started by deciding which option to take. I chose an aircraft with folded
wingtips, yet un-folded nose, standing with open canopies parked on deck.
You can see them like that in Sailor. Then I opened the PE sets and chose
the most intimidating single piece, which was the internal ducting detail
for the nose gear bay. I carefully cut it from the fret, folded it and glued
it to the kit part. That successfully done, I started work in earnest,
working my way through the PE sets. Obviously work on the cockpit and
ejection seats had priority, but I also attached whatever other PE detail
that made sense. There is some wheelwell detail that can be added pretty
early on, for instance. It all worked surprisingly fast and hassle-free. I
cut and cleaned as many subassemblies as possible from the sprues and
prepared them for priming, having early on decided on a pretty full payload
of three fuel tanks, SNEB pods and Sidewinders. Work on the exhausts was
complicated by a switch from True Metal to Alclad II during the process, but
it did work out nicely in the end. The coloured PE for the interior looks
very neat and finely detailed, and was quite easy to work with. Luckily I
didn´t have to do too much grinding on the kit parts, and even better: The
cockpit assembly fit quite well inside the fuselage.
 In fact,
despite the fiddly parts breakdown, it all fit very well. Using Tamiya Extra
Thin, the plastic glued well, and in the end I only needed filler in two places.
The first was on the underside of the fuselage right ahead of the nosegear well,
the other a bit later on the wings where the folded wingtip section met the main
wing. In both cases, application of thin plastic sheet sufficed and made up for
a good fit after trimming.
In fact,
despite the fiddly parts breakdown, it all fit very well. Using Tamiya Extra
Thin, the plastic glued well, and in the end I only needed filler in two places.
The first was on the underside of the fuselage right ahead of the nosegear well,
the other a bit later on the wings where the folded wingtip section met the main
wing. In both cases, application of thin plastic sheet sufficed and made up for
a good fit after trimming.
Having closed the fuselage halves, I used the closed canopy part to protect the fiddly interior, adding it to the fuselage with Humbrol Maskol. Successively, the remaining fuselage and wing parts were added. I needed to start painting the intakes before adding their fairings, and had to add the very first decals there. The decals needed a bit more time before they left the backing paper, and they were not as easy to work with as some of the recent sheets I had used, but they did work well on the whole. I also started priming, spraying and masking the metallic areas of the aircraft at that stage, preferring to have that work done before general painting. I also tackled the resin wheels (which came with their own masks) and the canopy masks at that stage. I also masked the undersides of the canopy parts to easy spraying.
Then it was time for painting.
| COLORS & MARKINGS |
The RN Phantoms had a
scheme with white undersides and overall Extra Dark Sea Grey uppers. I did some
preshading with black Stynylrez primer, before switching to white Stynylrez for
the undersides and a succession of three greys ending up with Vallejo ModelAir
EDSG for the uppers. The nose was sprayed black. That obviously involved quite
some masking, but it all was doable. Upon removing the masks, the inevitable
corrections were made. I was quite happy with the metallic areas aroun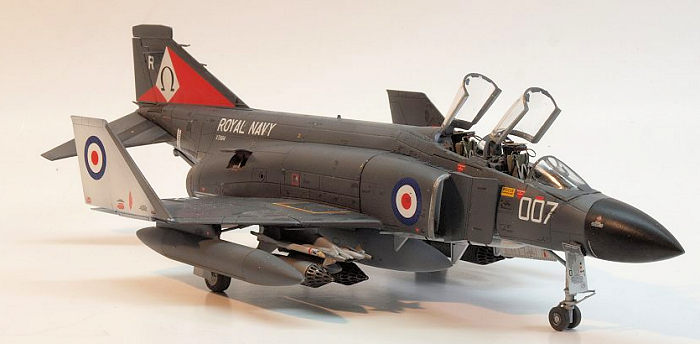 d
the exhausts. I might have made the upperside a bit more varied in shades of
greys, but the real thing hadn´t that much of a variety, so I´m quite OK with
what I got. The entire aircraft was then coated with Future prior to decaling.
d
the exhausts. I might have made the upperside a bit more varied in shades of
greys, but the real thing hadn´t that much of a variety, so I´m quite OK with
what I got. The entire aircraft was then coated with Future prior to decaling.
That turned out to be a major undertaking. I first applied the main decals, which went quite well, even though I had to wait longer than usual between wetting the decal and applying it. The main challenge was to apply the gazillion of stencils, which I did in a number of shorter and longer sessions, working my way through the various areas. In decaling, I tend to take frequent breaks in order to let cure what I have already applied, for fear of inadvertently touching un-cured decals and destroying them. Dont´ask me why …
After quite some time of decaling, I was able to call it quits. Now it was time to add another coat of Future to even things out, and then gradually flatten the finish until it looked credible. Both too glossy and too flat won´t look too hot in my view. I could now add the undercarriage and wheels, and the numerous underwing stores, plus any remaining bits and bobs. The canopies were added last, after another stealthy application of a clear coat.
| CONCLUSIONS |
I really did enjoy building this model. I like its looks, and even from the box, it´s a quite comprehensive kit. I was favourably impressed by the parts fit, and the helpful and clear instructions. I´m currently planning to build more models of the remaining types that constituted Ark Royal´s airwing of 1976, and would like to put them on a common display. I can fully recommend this kit.
| REFERENCES |
https://en.wikipedia.org/wiki/McDonnell_Douglas_Phantom_in_UK_service
https://www.thunder-and-lightnings.co.uk/phantom/index.php
Calvert, Dennis J. / Madgwick, Gary: HMS Ark Royal – Fifty Years of Flight 1955-2005. Wantage 2007
21 May 2019
Back to the Main Page Back to the Previews Index Page
Back to the Previews Index Page