Airfix 1/48 Buccaneer
| KIT #: | 09180 |
| PRICE: | $30.00 |
| DECALS: | Six options |
| REVIEWER: | Torben Plesberg |
| NOTES: | Boxing has two kits |
| HISTORY |
The specification for this aircraft, was known as “NA 39”. The contract for a prototype was won by Blackburn Aviation, which was known for its massive transport plane, the Beverley, and the lesser known Firebrand fighter plane, which was developed during WWII, but came too late to see service in this conflict.
The NA 39 was to be a carrier born twin engined aircraft with a crew of two. Since it should be operated from existing British carriers, this put some limits to the dimensions of the aircraft. The aircraft elevators of the carriers limited the max. length to 15.8 m and the span to 6.2 m (folded wings). In order to minimize the landing speed a Boundary Layer Control system was adapted. The “blown” wing offered a better lift, and the wings could be kept rather small for such a large aircraft. The rear end was a huge two bladed air brake to keep the speed down during landing. The engines had to run at a high output to produce the airflow over the wings, meaning a too high speed. The air brake reduced the speed for a safe landing. If the arrester hook failed to catch the wire, it was easier to go up again, because the engines were already running at a high output. The problem of delivering a bomb load during a high speed run was solved by a rotary bomb bay door. The fuselage was of a very strong construction to deal with high speeds at low altitudes close to the sea or ground. The safety of the crew had a high priority: Martin Baker zero-zero ejection seats and an MDC built into the canopy to facilitate the ejection.
 The
prototype NA 39 flew for the first time 4-30-1958. Its performance more than
fulfilled the expectations. On 01-19-1960 the first arrested landing on a
carrier was performed. The aircraft got the name “Buccaneer” S MK 1, and the
official certification approval followed July 1961, and hence the first
deliveries to the operationel test Squadron: 700 Z.
The
prototype NA 39 flew for the first time 4-30-1958. Its performance more than
fulfilled the expectations. On 01-19-1960 the first arrested landing on a
carrier was performed. The aircraft got the name “Buccaneer” S MK 1, and the
official certification approval followed July 1961, and hence the first
deliveries to the operationel test Squadron: 700 Z.
The first four Squadrons to operate the Buccaneer in service were: NAS 801, 800, 803, and 736. The most important experience learned by the pilots was, that the plane was unable to start from a carrier with a full weapon load and a full load of fuel at the same time. This meant, that the aircraft had to be replenished by a tanker aircraft shortly after take off. The Buccaneer S Mk 1 was underpowered. The engines were two de Havilland Gyron Junior turbojets each rated at 7.000 lb. s. t.
A stronger engine would be the 10.500 lb. s. t. Rolls Royce Spey turbofan engine, which was developed for the commercial airliners, the de Havilland Trident and the BAC one-eleven. The Buccaneer could take this engine with a larger air inlet and a larger jet pipe. The Spey was only a little heavier than the Gyron Junior, however, the power output was 40 % better. The vastly improved Buccaneer got the designation S MK 2, and the prototype flew for the first time in May 1963. Now the Buccaneer was exactly the aircraft needed by the Royal Navy to deal with the Sverdlov heavy cruisers – and other types of ships – including wrecked oil tankers!
In service, the Buccaneer showed up to be the fastest combat aircraft below 100 m. It was even faster than the Phantom, the F-111, the F-15, the SU-24 and the Mirage F 1. The shape of the Buccaneer airframe was more important for high speed than engine power. The Royal Navy operated a really, remarkable plane!
In 1966 the British politicians found, that there was no need for aircraft carriers any more. 1975 became the dead-line for the out phasing of fixed wing aircraft of the Royal Navy. If they only knew, what happened in the South Atlantic in 1982, they might have been of a different opinion. Well, a Labour government is certainly not the best friend of a defense system, unless it is cheap! Carriers are very expensive, to build and operate.
 At the
same time, the RAF had a problem, because the successor to the Canberra, the
TSR-2 was scrapped caused by defense cuts. The alternative to the TSR-2, the
F-111 K was cancelled for the same reason. The RAF did not have a modern and
capable attack aircraft. The problem was solved, as the RAF was offered 43 brand
new Buccaneer S Mk 2. This offer was of course accepted! At the same time, the
Royal Navy was phasing out the Buccaneer, also a result of defense cuts, and
these aircraft were taken over by the RAF.
At the
same time, the RAF had a problem, because the successor to the Canberra, the
TSR-2 was scrapped caused by defense cuts. The alternative to the TSR-2, the
F-111 K was cancelled for the same reason. The RAF did not have a modern and
capable attack aircraft. The problem was solved, as the RAF was offered 43 brand
new Buccaneer S Mk 2. This offer was of course accepted! At the same time, the
Royal Navy was phasing out the Buccaneer, also a result of defense cuts, and
these aircraft were taken over by the RAF.
The first RAF Buccaneer Squadron (no 12) was ready by October 1969 and the second (no 15) one year later. During 1971, the first Buccaneer Squadron was deployed to Germany (RAFG Laarbruch) and the second less than a year later. The Buccaneers were armed with nuclear weapons, when the Cold War was at its peak. The RAF ended up with five Buccaneer Squadrons.
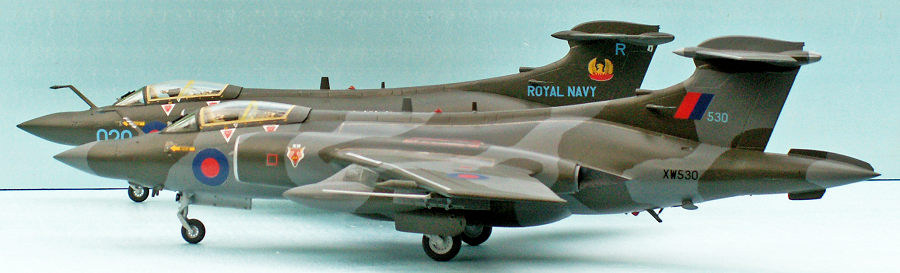
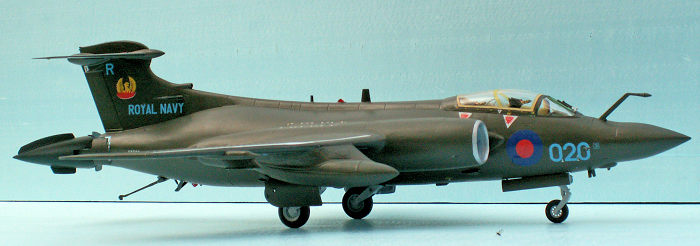
The Royal Navy formed in 1968 an aerobatic team, the “Phoenix Five”, with aircraft drawn from NAS no 809, the Phoenix squadron. The team performed during 1968, and I was lucky enough to watch a performance at the 1968 Farnborough Airshow. I was very surprised, because I had never imagined such a large aircraft performing in an aerobatic team. It was very impressive to watch five Buccaneers in a close formation making their manoeuvers. The subject of one of my models is an aircraft from NAS 809, however, not an aircraft from the aerobatic team.
In 1980 a Buccaneer plunged into the ground killing the crew during a Red Flag exercise at Nellis AFB, Nevada. It was found, that the crash was caused by metal fatigue in the starboard wing spar, and subsequently all Buccaneers were grounded. The 90 aircraft were inspected thoroughly, and two thirds of the aircraft had the same failure as the unfortunate aircraft. It was decided to repair 60 aircraft, and scrap the rest for spare parts. The aircraft were repaired, and the Buccaneers were back in the air by July 1980.
The Hawker Siddeley Group tried to get export orders for the Buccaneer. Especially the West German Marineflieger was a possibility, because they had used British aircraft, since the Bundeswehr was erected in 1957. However, only South Africa bought the Buccaneer S Mk 50, an export version of S Mk 2. 16 aircraft were purchased, 15 were actually delivered, because one aircraft crashed in the sea on its delivery flight to South Africa. South African Buccaneers had a BS.605 rocket engine to boost the start on hot and high airfields. They were prepared for in flight refueling, and had larger under wing tanks. They were armed with AS-30 command guided air-to-surface missiles. The undercarriage was strengthened and the brakes were more powerful. Later, the South Africans wanted a second batch of Buccaneers, however, at that time the British government blocked further orders, because of an arms embargo on South Africa. This was caused by the disapproval of the apartheid politics of the white minority government. The South African Buccaneers were used in anger during the conflicts in Angola and Namibia.
 British
Buccaneers were finally combat active during operation Granby, the British
contribution to Desert Storm, the Gulf war in 1991. The twelve aircraft in the
Gulf area were carrying a laser designator pod for the target designation role,
and bombs of course. An attack formation would typically comprise four Tornados
with laser guided bombs, and two Buccaneers to designate the targets for the
Tornados to bomb. The second Buccaneer was actually a back-up in case of
malfunction of the designator of the first plane. The Buccaneers in the Gulf had
a desert color scheme, and they were marked: Sky Pirates or Desert Pirates + a
Jolly-Roger flag. The individual aircraft were named after well known brands of
whisky, and besides they all had nose art, mostly women without much clothing.
One of the aircraft was XX885, Famous Grouse, and the pin up girl was Caroline,
saying: “Hello Sailor”. The Buccaneers flew 218 missions, designating targets
for other planes and dropping 48 laser-guided bombs without any loss – a great
success.
British
Buccaneers were finally combat active during operation Granby, the British
contribution to Desert Storm, the Gulf war in 1991. The twelve aircraft in the
Gulf area were carrying a laser designator pod for the target designation role,
and bombs of course. An attack formation would typically comprise four Tornados
with laser guided bombs, and two Buccaneers to designate the targets for the
Tornados to bomb. The second Buccaneer was actually a back-up in case of
malfunction of the designator of the first plane. The Buccaneers in the Gulf had
a desert color scheme, and they were marked: Sky Pirates or Desert Pirates + a
Jolly-Roger flag. The individual aircraft were named after well known brands of
whisky, and besides they all had nose art, mostly women without much clothing.
One of the aircraft was XX885, Famous Grouse, and the pin up girl was Caroline,
saying: “Hello Sailor”. The Buccaneers flew 218 missions, designating targets
for other planes and dropping 48 laser-guided bombs without any loss – a great
success.
After the Gulf War, the politicians made major changes in British defense policy – meaning further cuts. The Buccaneers were about to be modified to carry the new Sea Eagle missile, which was the successor to the Martel and with a five times longer range! However, it was decided, that only the Tornados should be modified for the Sea Eagle, meaning, that there was no real need for the Buccaneer any longer. The aircraft were also more than 25 years old, and close to the end of their fatigue life. The last Buccaneer Squadron was no 208, and by March 1994 this Squadron was disbanded.
There are several surviving Buccaneers, one of them – the XX885 – is being rebuild to flying condition by Hawker Hunter Aviation. Other Buccaneers are in a fast taxiing condition, one or two of these might end up with flying condition. In South Africa, it was possible to buy a ride in a privately owned Buccaneer operated from Thunder City. However, it was probably too costly to keep three Buccaneers in flying condition, not to mention a pair of English Electric Lightnings! A Hawker Hunter is more affordable, not to forget a Vampire T 11.
| THE KIT |
The kit comes in a large box with a RAF Buccaneer on the lid. The box is well filled, because there are two complete kits in it. One for a Royal Navy Buccaneer, and one for a RAF ditto. Each kit consists of 8 sprues of a light grey styrene and a clear one for the transparent parts. The detailing is not overwhelming and somewhat crude, especially with the slipper tanks. There is no flash, a few sink marks, some oversize rivets, and engraved panel lines.
The instructions are two A4 booklets, one for the Royal Navy Buccaneer (A), and one for the RAF version (B) called “Notebook H.S. Buccaneer S2B”. The kit # 09180 consists actually of kit # 08100 released in 1994 and kit # 08101 released in 1996.
Instructions A has 28 pages. Page 1 has a photo of a Royal Navy Buccaneer ready for launching from a carrier. Page 2 shows photos of the real thing, important details: air brake, undercarriage and ejection seat. Page 3 gives some advice before the assembly, and explains the symbols used in the steps of construction – in 12 languages. Pages 4 to 15 show in 49 steps how to assemble the model. Pages 16 to 22 show, how to paint, and decal the finished model. Pages 23 to 24 show the options for S2, S2C, S2D and S 50. Pages 25 to 26 give a short history of the Buccaneer in four languages. Page 27 is for your personal notes, and page 28 shows other kits in the range. Instructions B are quite similar, however, the subject is a RAF Buccaneer.
 There are
two very large decal sheets with the kit, one for the Royal Navy Buccaneer with
4 options, and one for the RAF Buccaneer with 2 options. The quality of the UK
national roundels is poor: they all have a white “outline” one third of the
perimeter. Alternative national markings for the RAF Buccaneer is necessary.
This is really too bad! It is very time consuming, if you try to cut away the
outlines. This can only be done, when the decals are in place on the model. On
the decal sheet, you can’t see the outline! You don’t know about the outline
before you have applied one of the roundels, but now I tell you, it is there!
You would need a punch with the exact gauge of the roundel, if you want to get
rid of the outline in a speedy way! The larger decals tends to break into 2 or 3
pieces during application. They seem too brittle. They might be too old, or
stored in a bad way.
There are
two very large decal sheets with the kit, one for the Royal Navy Buccaneer with
4 options, and one for the RAF Buccaneer with 2 options. The quality of the UK
national roundels is poor: they all have a white “outline” one third of the
perimeter. Alternative national markings for the RAF Buccaneer is necessary.
This is really too bad! It is very time consuming, if you try to cut away the
outlines. This can only be done, when the decals are in place on the model. On
the decal sheet, you can’t see the outline! You don’t know about the outline
before you have applied one of the roundels, but now I tell you, it is there!
You would need a punch with the exact gauge of the roundel, if you want to get
rid of the outline in a speedy way! The larger decals tends to break into 2 or 3
pieces during application. They seem too brittle. They might be too old, or
stored in a bad way.
The plastic parts are OK, with one important exception: the large upper and under fuselage halves suffer from a severe warpage, meaning assembly problems! This is a serious flaw of both of the kits. Realizing this fact, I understand better, why Airfix has put two kits into one boxing. This makes the kit look like a good bargain, and people will buy it. I think Airfix should consider a retooling of these kits, because if you really want a Buccaneer in a reasonable large scale, you have no other choice. I had the kits stored for several years, knowing how difficult it would be to assemble the fuselages. Only because I built the Airfix Sea Vixen 1/48, I took up the challenge just to get another Royal Navy aircraft contemporary with the Sea Vix.
| CONSTRUCTION |
Since the two kits are almost identical, I shall only describe the building of one of them – the RAF edition. The first item to deal with is the interior. Most important are the injection seats. These are visible through the canopy and gives an impression of the interior, which is painted flat black. Decals for the instruments might be used as decals. Otherwise, they could simply be cut out, and glued in place with white glue. The ejection shield (part 84) does not need to be glued in place as shown in step 10. The part may be pressed into place, just before the canopy is glued on, my very last step of construction.
Before the fuselage halves are put together, the bomb door (part 88) must be glued in place. The warpage does not allow this operation, unless the lower fuselage half, part 2, is securely clamped in a large vice, and with some weight (1.6 kg) on the door to keep it in place in the fuselage half. (Step 29.)
The assembly of the upper and lower parts of the fuselage – as shown in step 29 – is not possible! The warpage demands a different procedure with an extensive use of strong tape and clamps. A good measure is to cut off the radar nose, and assemble this separately and fill it with lead. Instructions A suggests 20 g, I put 30 g into the radar nose just to be quite sure, not to end up with a tail sitter.
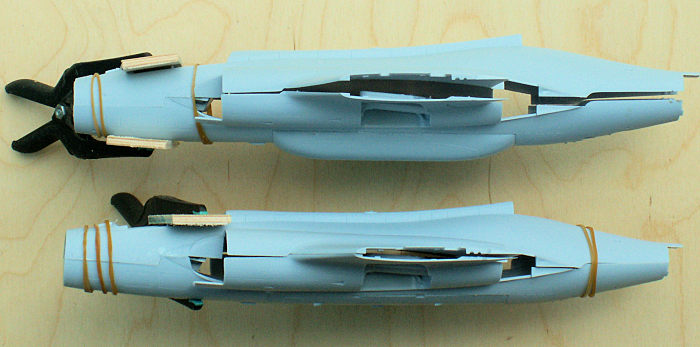 The
assembly of the fuselage took a couple of days. The gluing process was divided
in three sections, and each section had to harden over night, before the next
section was glued. The finished fuselage was not perfect, however, acceptable
enough to go on with the construction. I chose a “clean” aircraft with wings in
flying position and air brake not activated. However, I might have avoided a
dihedral problem, if the wings were folded! When the wing panels were glued in
place –step 35 – it turned up, that the warpage caused an anhedral on the
starboard wing, and a dihedral on the port wing! This is not acceptable for a
front view of the model. Since the Buccaneer has a slight anhedral, I had to cut
off the port wing, sand the joints and glue the wing in place again! In this
way, the model got an acceptable front look with a reasonable slight anhedral of
the wing.
The
assembly of the fuselage took a couple of days. The gluing process was divided
in three sections, and each section had to harden over night, before the next
section was glued. The finished fuselage was not perfect, however, acceptable
enough to go on with the construction. I chose a “clean” aircraft with wings in
flying position and air brake not activated. However, I might have avoided a
dihedral problem, if the wings were folded! When the wing panels were glued in
place –step 35 – it turned up, that the warpage caused an anhedral on the
starboard wing, and a dihedral on the port wing! This is not acceptable for a
front view of the model. Since the Buccaneer has a slight anhedral, I had to cut
off the port wing, sand the joints and glue the wing in place again! In this
way, the model got an acceptable front look with a reasonable slight anhedral of
the wing.
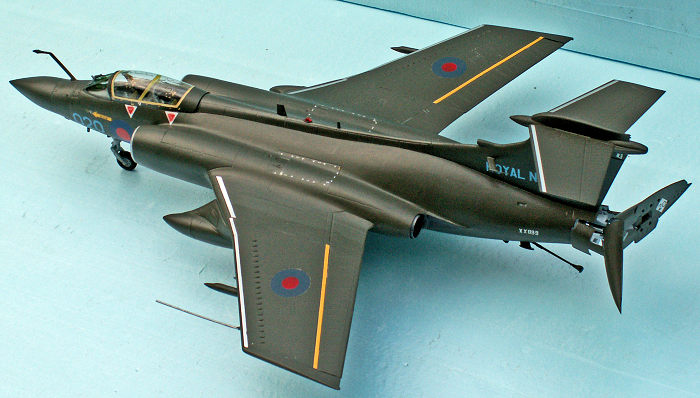
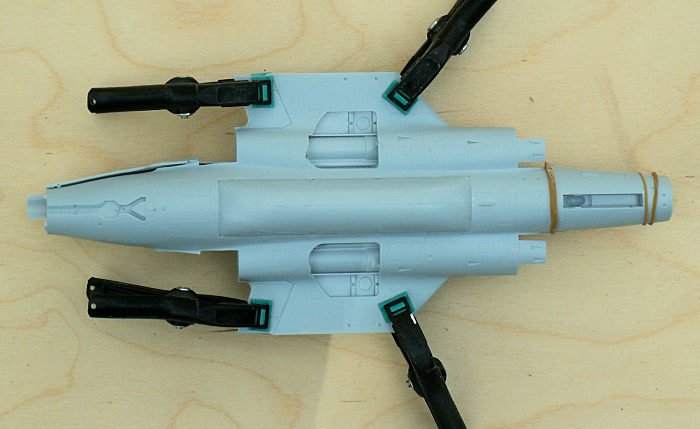
Another difficult item was to glue the slipper tanks together. The parts 15 + 17 + 19 and 16 + 18 +20 were shaped in a way, that made it rather difficult to glue them together – a piece of bad engineering! Besides, there were some oversize rivets to sand away, and an exaggerated inspection door in the front. My model got the slipper tanks, and pylons for the Sea Eagle missile, even if this may not be correct from a historical point of view!
The
canopy has a pair of raised panel lines in the middle. They should not be there,
because the reinforcement of the hood is on the inner side. The raised lines
were sanded away carefully, with a triangular needle file and the canopy was
polished with a grain 8000 polishing stick and regained full
 transparency
– without using toothpaste! To simulate the inner reinforcement I cut a piece of
Tamiya tape in a 2 mm wide curve to match the curving of the canopy. No need to
paint the tape: the color matched the color of the framing of the canopy! Step
30.
transparency
– without using toothpaste! To simulate the inner reinforcement I cut a piece of
Tamiya tape in a 2 mm wide curve to match the curving of the canopy. No need to
paint the tape: the color matched the color of the framing of the canopy! Step
30.
The engine air intakes and the jet pipes all needed some filling and sanding. The shape of the warped fuselage simply did not fit properly to these parts. Step 31. The tail cone (= inactivated airbrake) also needed some filling and sanding. The rear end of the fuselage should be circular, however, the warping spoiled this shape to be irregular. Step 32.
The rest of the assembly implies no problems, if you just follow the instructions.
| COLORS & MARKINGS |
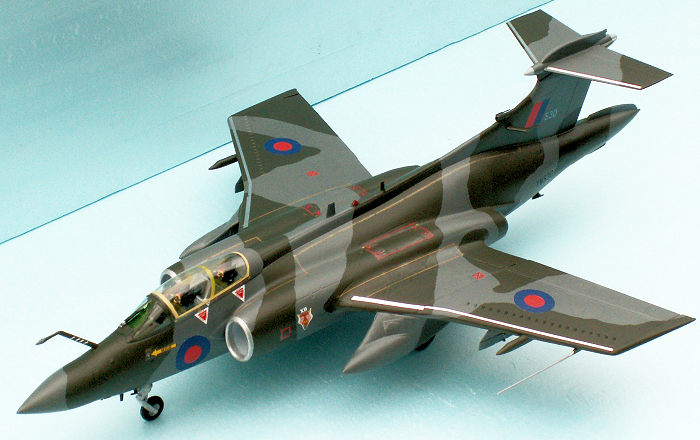
Step 49 “European”. The color scheme of a Buccaneer is a wrap around camouflage of dark sea grey (HB 164) and dark green (HB 163). “Wrap around” means, that the underside also has a camouflage pattern. I painted the whole airframe with the lightest color first, the dark sea grey, and twice to cover. No masking needed, since the canopy was not glued in place. It is a bit more difficult to paint the dark green camouflage pattern without using any templates. However, I think it is not important to achieve a 100% correct pattern according to the drawings of the instructions. The important thing is that the pattern looks right! I don’t feel sure that all Buccaneers of the RAF had exactly the same camouflage pattern. I have in mind the 450 German F-84 F Thunderstreaks, which all had individual camouflage patterns. No Luftwaffe standard or prescription for a pattern, except for the colors to be applied.
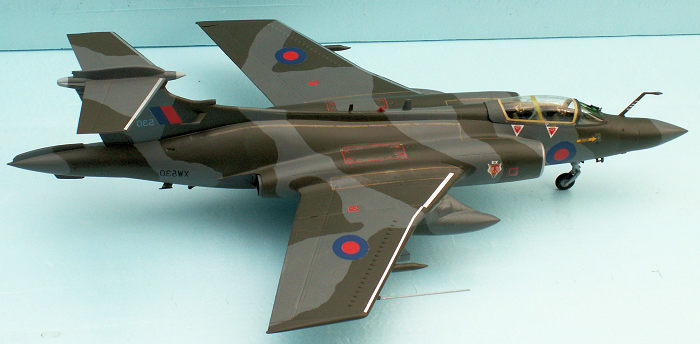 Two layers
of the dark green color were needed to cover properly. The metal stripes along
the leading edge of the wings were cut from a self adhesive vapor sealing tape.
This looks better than painted stripes, and no time consuming masking was
necessary. The front end of the engine intakes were painted with HB 27002
polished aluminium, and these rings were even painted freehand. This was not too
difficult, because there was a tiny edge to paint up to. All other details were
painted according to the instructions and at the right steps.
Two layers
of the dark green color were needed to cover properly. The metal stripes along
the leading edge of the wings were cut from a self adhesive vapor sealing tape.
This looks better than painted stripes, and no time consuming masking was
necessary. The front end of the engine intakes were painted with HB 27002
polished aluminium, and these rings were even painted freehand. This was not too
difficult, because there was a tiny edge to paint up to. All other details were
painted according to the instructions and at the right steps.
The last detailing were the undercarriage doors, which were glued in place with white glue, the model resting up- side down during this process, and using small pieces of modeling wax to support the correct position. The ejection shield was pressed in place, and the canopy was finally glued in place with a clear varnish. There was of course some touch ups to improve the painting job.
The decaling would have been an easy job, if the RAF roundels were OK. The white basic color was out of alignment with the blue discs. It was a painstaking job to cut the less than one mm wide rim away from one third of the perimeter with a sharp scalpel. I wished I had a sheet with RAF B roundels in my stocks!
The other markings and stencils took some time to apply. However, I did by far not use all of them. Only the more spectacular stencils and the colored ones were applied. At last, the whole airframe got a layer of HB Satin Cote to seal the decals and provide a nice finish to the model.
| CONCLUSIONS |
It was a genuine challenge to build the Airfix 1/48 Buccaneers. Thanks to the massive warpage of the fuselage halves, it was not a relaxing job. However, in the end I got what I wanted: A reasonable looking and correct model of a truly remarkable aircraft. The kits are definitely not recommendable for beginners. However, since it is the only game in town in scale 1/48, the kit is recommendable for experienced modelers. If you can find one? I really hope that Airfix is planning to release a new Buccaneer kit soon – and a new tool edition without warpage! Other manufacturers are of course also welcome to release a Buccaneer kit.
| REFERENCES |
Wikipedia article: Blackburn Buccaneer.
Ray Williams: Fly Navy, Aircraft of the Fleet Air Arm since 1945. Airlife Publishing Ltd. 1989 ISBN 1 85310 057 9
My own photos of RAF Buccaneers from 1970 to 1988.
Torben Plesberg
17 December 2018
Copyright ModelingMadness.com
If you would like your product reviewed fairly and fairly quickly, please contact the editor or see other details in the Note to Contributors.
Back to the Main Page Back to the Review Index Page Back to the Previews Index Page