| KIT #: | 09178 |
| PRICE: | GBP 25.00 (£) |
| DECALS: | 7 options |
| REVIEWER: | Patrick Barratt |
| NOTES: | This is the kit's tenth anniversary |
| HISTORY |
I remember the first time I stood next to a Lightning, two things struck me. The first was the shear size of the thing; the second was how small its cockpit was in relation to its size. This was basically a huge air intake feeding two Rolls-Royce Avon 301R, rated at 32,000 lb thrust (in re-heat) the pair in an aeroplane with a dry weight of only 27,000lb…a pair of ultra thin swept wings, and not much else. Even its armament seemed to have been strapped to the side of the fuselage as an afterthought. I will keep the history brief if only because Airfix have supplied a reasonable illustrated history as part of the instruction leaflet.
In 1954 the
prototype lightning took to the air in the form of the English Electric P1. It
was built in response to a perceived need to have a very fast all weather
interceptor capable of stopping a Soviet nuclear bomber at short notice, from
reaching the British Isles 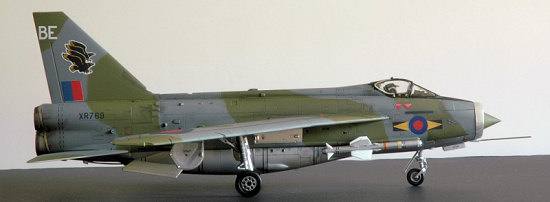 (for obvious reasons). The Production F1 Lightning
was in Squadron service with the RAF by the end of 1960. By 1964 the F1A (with
in-flight refuel capability) was in service along side the F2 and F3, all Mach
2+ capable. As was often the case with RAF aircraft, airframes were updated
rather than replaced so when the final RAF variant arrived in the form of the
F6, only 38 were new built, the rest being upgraded F3’s.
(for obvious reasons). The Production F1 Lightning
was in Squadron service with the RAF by the end of 1960. By 1964 the F1A (with
in-flight refuel capability) was in service along side the F2 and F3, all Mach
2+ capable. As was often the case with RAF aircraft, airframes were updated
rather than replaced so when the final RAF variant arrived in the form of the
F6, only 38 were new built, the rest being upgraded F3’s.
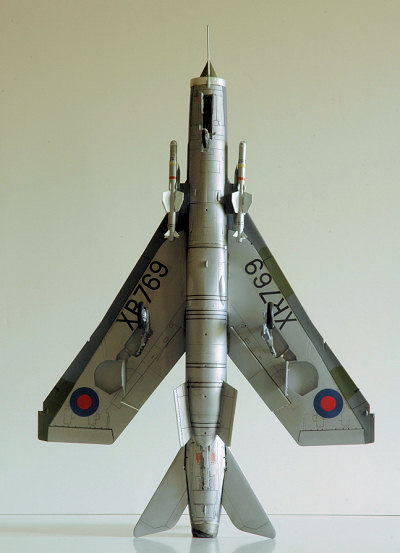
One of the main drawbacks of the Lightning was its short range due to lack of fuel capacity, this problem was partially solved with the introduction of the over wing auxiliary fuel tanks often seen on the later F6.
338 Lightning’s including prototypes and trials versions were built, 54 of these
were T55 and F53 versions exported to Kuwait and Saudi Arabia. The Lightning was
finally retired from the RAF in 1988 nearly 30 years after its introduction, the
same period of time that had seen the RAF go from its front line fighter, the
Vickers Gun bus in 1915…..to its first front line jet, the Gloster Meteor 30
years later!
Such was the pace of change in those days that in 1963, Spitfire XIX PS853 was
called back into service six years after its retirement from the RAF to give
Lightning pilots experience in intercepting piston engine aircraft in their
F3’s. in preparation for a “confrontation” with Indonesia who were still flying
the NA. P-51. By the time of its retirement, it could still beat an F-15 to
30,000ft.
| THE KIT |
The box is huge and you could be forgiven for thinking you have picked up a 1/32 model by mistake. Inside are three main sprues and three smaller sprues as well as one clear sprue totalling approx 120 parts in all. Recessed panel lines and engraving looks to be excellent although maybe a little exaggerated, There are a few minor sink marks in the top wing surface and a total lack of detail on the upper surface of the wheel wells which was in fact, the underside of the upper wing surface.
Why another Lightning review
 Without getting
too political, one small problem I have with reviews of models like this is the
tendency for the reviewer to use the review as an opportunity to show how good
he is at making models rather than actually tackling the problems an
inexperienced (or experienced) modeller might come across. What I am trying to
say (without upsetting too many people) is that if you supplement the cockpit
with a resin replacement, add photo etch instrument panels, bulged tires,
replacement jet nozzles, new undercarriage bay interiors, replacement decals and
so on, are you still actually reviewing the original model? After all, for many
people £25 is a lot of money to spend on a 1/48 model and they should, quite
reasonably expect to be able to get a satisfactory finished article without
further expense (with exception for paint and glue). A quick look at the Hannants site shows you could very easily add another £50 of optional parts to
this kit. I will leave you to judge whether that would be money well spent.
Without getting
too political, one small problem I have with reviews of models like this is the
tendency for the reviewer to use the review as an opportunity to show how good
he is at making models rather than actually tackling the problems an
inexperienced (or experienced) modeller might come across. What I am trying to
say (without upsetting too many people) is that if you supplement the cockpit
with a resin replacement, add photo etch instrument panels, bulged tires,
replacement jet nozzles, new undercarriage bay interiors, replacement decals and
so on, are you still actually reviewing the original model? After all, for many
people £25 is a lot of money to spend on a 1/48 model and they should, quite
reasonably expect to be able to get a satisfactory finished article without
further expense (with exception for paint and glue). A quick look at the Hannants site shows you could very easily add another £50 of optional parts to
this kit. I will leave you to judge whether that would be money well spent.
| CONSTRUCTION |
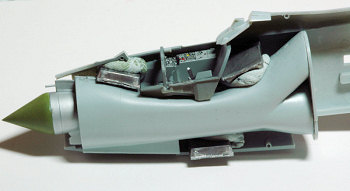
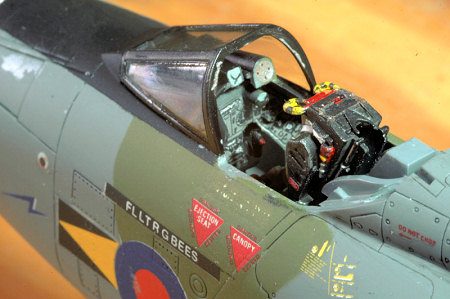
First step is the
seat and cockpit. The seat in the F6 was a Martin-Baker Mk4 BSC and the kit seat
looks to have all the basic ingredients although it’s made up of just four
parts. I added a “masking tape” seat pad and some masking tape seat belts and
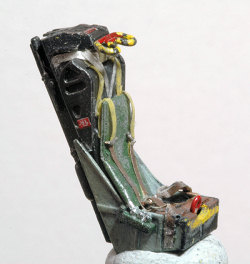 used the “link” at the end of this review for colours.
The next section is the cockpit interior. First I sanded of the surface detail on the instrument panel and side consoles, I could spend hours painting these parts but I would never achieve the finish of the decals. At this point many of you will be reaching for you etch metal price list but hold on! lets see what we can do here with the parts supplied.
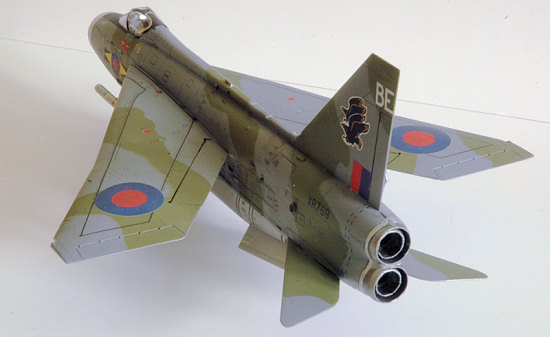
Sections 6-7-8-9 deal with the engine intake and jet pipes. This is all straight forward although there are one or two ejector pin marks just inside the inlet in the nose that you may wish to sand down although it is very doubtful if they will ever be seen once the nose ring is fitted. Later in assembly I had problems fitting the exhaust Nozzle surround over the nozzles that I had fixed to the jet pipes. To get around this problem I prised the nozzles off the jet pipes and fitted then in the surround first, then fitted the surround to the back of the fuselage and the jet pipes together.
 All the sub
assemblies, cockpit, intake and jet pipes are then fitted into the right hand
side of the fuselage prior to joining the two half’s together. Don’t forget you
will need to add about 20g of weight to the nose area to keep the nose wheel on
the ground. Also note that there are several holes that will need drilling out
depending on which variant you are building. Spend a little time test fitting
the cockpit tub, as it is not obvious exactly where it should locate. This is
quite a large kit and I suggest you glue the fuselage together in sections
allowing each bit to dry before moving on to the next bit and use plenty of
rubber bands to keep everything in place. This will minimise the amount of
cleaning up you will need to do along the seam.
All the sub
assemblies, cockpit, intake and jet pipes are then fitted into the right hand
side of the fuselage prior to joining the two half’s together. Don’t forget you
will need to add about 20g of weight to the nose area to keep the nose wheel on
the ground. Also note that there are several holes that will need drilling out
depending on which variant you are building. Spend a little time test fitting
the cockpit tub, as it is not obvious exactly where it should locate. This is
quite a large kit and I suggest you glue the fuselage together in sections
allowing each bit to dry before moving on to the next bit and use plenty of
rubber bands to keep everything in place. This will minimise the amount of
cleaning up you will need to do along the seam.
Section11-12-13-14 covers wing assembly and is straightforward.
Next, depending on which colour scheme your going for, you will need to…Queue theme from Jaws…”mask the canopy and screen”! …
I use Tamiya 6mm masking tape and a very sharp scalpel but really it’s just a case of whatever works for you.
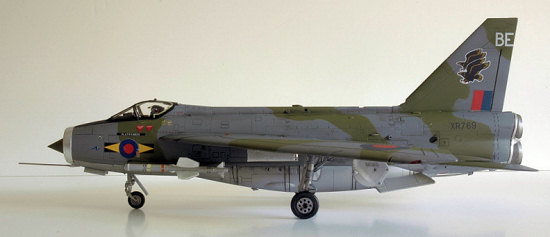 Fit the tail fin,
wings and small ancillary fuselage “bumps” and you ready to spray. I fit the
undercarriage doors and air brakes in the closed position using blue tack so A/
they mask their positions and B/ they get painted the right colour. I sprayed
the underside natural bare metal first then masked this off and sprayed the
camouflage, all over Ocean Grey and then a dark Green pattern to complete. I
then gave it a couple of coats of Future and applied the decals followed by a
coat of flat clear.
Fit the tail fin,
wings and small ancillary fuselage “bumps” and you ready to spray. I fit the
undercarriage doors and air brakes in the closed position using blue tack so A/
they mask their positions and B/ they get painted the right colour. I sprayed
the underside natural bare metal first then masked this off and sprayed the
camouflage, all over Ocean Grey and then a dark Green pattern to complete. I
then gave it a couple of coats of Future and applied the decals followed by a
coat of flat clear.
Once everything is dry you can finish fitting the wheels/undercarriage, canopy and so on…. A bit of fuse wire for brake pipes helps…
Quite how Airfix thought anyone was going to attach the hydraulic rams that raise and lower the undercarriage on this model is not very clear, there are no fixing points and the instructions leave you in the dark. Its almost as if they just gave up at this point and went home for tea…(Its an English thing)
That said, I did not come across anything here that would cause even a new modeller any serious problems; in fact because of its size, simplicity and options for basic colour schemes this would be a good starting point. It’s what I call builder friendly.
| COLORS & MARKINGS |
 Lightning’s wore many
colour schemes in their 30 years. Most will think of them in natural metal
finish or maybe Barley Grey but many German based F2A’s were a unique Dark Green
all over top surface and some later F6’s were given a std RAF grey/green
camouflage towards the ends of their careers.
Lightning’s wore many
colour schemes in their 30 years. Most will think of them in natural metal
finish or maybe Barley Grey but many German based F2A’s were a unique Dark Green
all over top surface and some later F6’s were given a std RAF grey/green
camouflage towards the ends of their careers.
Decals are supplied for
19 Sqn. Germany 1974, 92 Sqn Germany 1973, 56 Sqn Wattisham UK 1976, 11 Sqn Binbrook UK 1986, 5 Sqn Binbrook UK 1984, as well as the Lightning training Flt at Binbrook in 1983 and the personal aircraft of Grp Cpt J Spencer of 11 Sqn
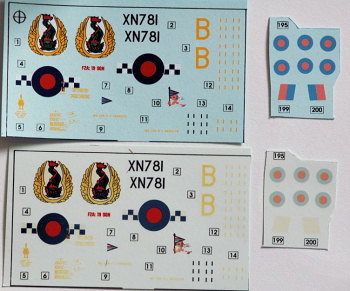 A warning here, if
you are going for the low vis scheme check your decal sheet. I have two sheets,
one left over from a previous build many years ago. My old sheet is a pale blue
colour and the colour register is good and whites are white. The sheet in the
box with this build is an off cream/white and the whites are cream, the register
is not bad BUT…the tail fin flashes (low vis) are just white squares with no
blue/red colour. Also watch out for yellows, which are very weak! This might be
just an odd decal sheet that I have because the earlier one is fine.
A warning here, if
you are going for the low vis scheme check your decal sheet. I have two sheets,
one left over from a previous build many years ago. My old sheet is a pale blue
colour and the colour register is good and whites are white. The sheet in the
box with this build is an off cream/white and the whites are cream, the register
is not bad BUT…the tail fin flashes (low vis) are just white squares with no
blue/red colour. Also watch out for yellows, which are very weak! This might be
just an odd decal sheet that I have because the earlier one is fine.
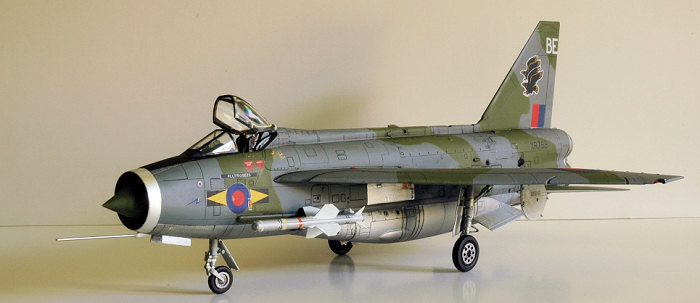
I chose the camouflage scheme for an F6 of 11 Sqn, mainly because it’s a scheme that is not often modelled. A search through the Lightning site (see links) showed that camouflage lightnings were almost a mat finish and very scruffy/dirty with lots of chipped paint. This is probably why people avoid this scheme J
Note: There is a panel on each side of the fuselage under the wing that is chrome silver as well as the nose ring; you might like to consider BMF foil here. I did and once sprayed with a mat clear looks quite convincing.
| CONCLUSIONS |
 Well what a fun
kit this is! Obviously it helps to have soft spot for Lightning’s like me. It’s
a kit you can build from the box with great results, it doesn’t need resin
cockpits or etched instrument panels. Without 20-20 vision, a microscope and a
flashlight you will never see them anyway. It does however lend its self to a
bit of artistic flare which is free. Given some wire and masking tape you can
play around at improving things for yourself if you feel the need and add that
personal touch which will always be more satisfying than simply buying extra
parts. Don’t get me wrong, there is a place for after market parts and some
models need them but lets face it, you could buy two more of these kits for the
price of the std after market set up here,. and is simply buying off the shelf
improvements going to give you satisfaction? Many people will say yes and that’s
fine but I don’t think this kit needs or warrants it. That said, a decent set of
decals would be a must if you get a poor set with your model, you will not know
till you open the box. As for the undercarriage! Well I am sure those with the
dedication could figure it out, its just a shame that Airfix didn’t attach lugs
to the legs and bay so we could make a proper job of it all.
Well what a fun
kit this is! Obviously it helps to have soft spot for Lightning’s like me. It’s
a kit you can build from the box with great results, it doesn’t need resin
cockpits or etched instrument panels. Without 20-20 vision, a microscope and a
flashlight you will never see them anyway. It does however lend its self to a
bit of artistic flare which is free. Given some wire and masking tape you can
play around at improving things for yourself if you feel the need and add that
personal touch which will always be more satisfying than simply buying extra
parts. Don’t get me wrong, there is a place for after market parts and some
models need them but lets face it, you could buy two more of these kits for the
price of the std after market set up here,. and is simply buying off the shelf
improvements going to give you satisfaction? Many people will say yes and that’s
fine but I don’t think this kit needs or warrants it. That said, a decent set of
decals would be a must if you get a poor set with your model, you will not know
till you open the box. As for the undercarriage! Well I am sure those with the
dedication could figure it out, its just a shame that Airfix didn’t attach lugs
to the legs and bay so we could make a proper job of it all.
Some of you who have attempted to make “something” of the Airfix 1:48 Jaguar and 1:48 Tornado will probably have given up with this review some time ago but for those of you still soldiering on to the end, note: although similarly boxed, the Lightning is a far better model, no warped soft plastic and raised panel lines with this one so buy with confidence.
| REFERENCES |
MB MK4 Ejector seat pictures http://www.ejectorseats.co.uk/mkfourpics.html
Cockpit interior http://www.lightning.org.uk/cockpit.html
Everything else you need to know http://www.lightning.org.uk/home.html
Lightning pictures by serial No. http://www.aviation-picture-hangar.co.uk/Lightning.html
PS.For about $14000, Mike Beachy Head will take you up in one of his Lightnings
You get parachute training, a power climb to 50,000ft and full aerobatics. Mike owns the only 4 flying Lightning in the world, F6 XR773, T5 XS452, F6 XP693 and T5 XS451. Put it on your list of 100 things to do before you die…or your list of 100 things that might kill you anyway… http://www.thundercity.com/news.htm
Happy modelling
July 2007
If you would like your product reviewed fairly and fairly quickly, please contact the editor or see other details in the Note to Contributors.