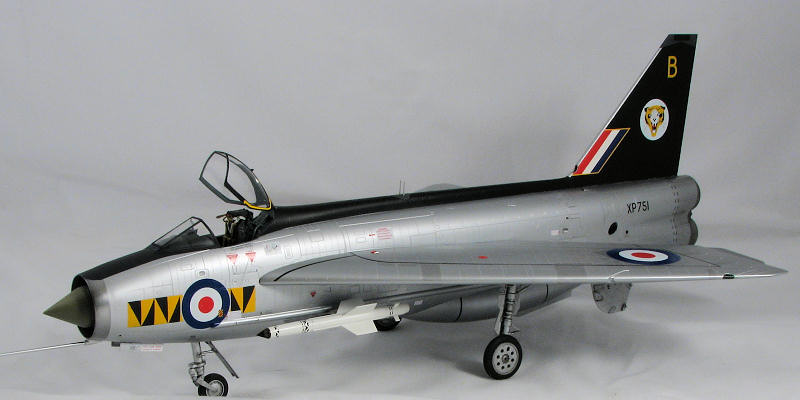
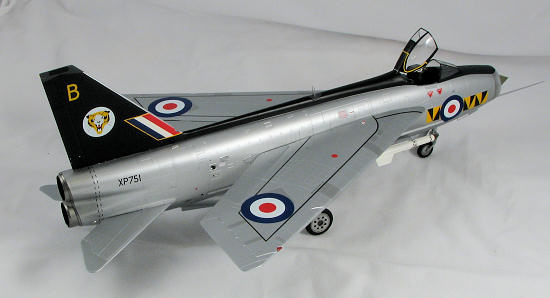
Trumpeter 1/32 Lightning F.3
| KIT #: | 02280 |
| PRICE: | $189.00 MSRP |
| DECALS: | Two options |
| REVIEWER: | Andrew Abshier |
| NOTES: | Includes white metal main gear struts and vinyl tires |
| HISTORY |
The English Electric Lightning was developed as the operational culmination
of research projects in Great Britain into high-speed flight. In 1949 a contract
was awarded to the English Electric Corporation (EEC) to develop a high-speed
interceptor based on the P1 research aircraft. Although development showed great
potential for the Lightning to become a true multirole combat aircraft, the Air
Ministry, believing that the Lightning would be an interim type, stalled
development. What emerged was an austere point-defence interceptor, armed with
just two cannon and two Firestreak missiles. Even still, the Lightnings, upon
entering service in 1960, represented a quantum leap in capability for RAF
Fighter Command over the Hawker Hunters it would be replacing, and
 would serve
the RAF for nearly 28 years.
would serve
the RAF for nearly 28 years.
The first Lightnings in service, the F1s of 74 Squadron, were quickly joined by the improved F1As of 56 and 111 Squadrons. The F1As could be distinguished from the F1s by the external cable conduits on both sides of the fuselage. The F1A, and all subsequent Lightning variants, could also be fitted with an inflight refueling probe underneath the left wing.
In 1964 the more advanced Red Top missile went into service. The differing aerodynamics of the missile necessitated a larger vertical fin on the Lightning. The first Lightnings cleared for the Red Tops, the Lightning F3s, were introduced into service by 74 Squadron in 1964. In addition to the new vertical tails, the F3s also introduced more powerful Mk. 301 Avon engines. This was also the only front-line Lightning to not be equipped with guns. The F3s would replace the earlier Lightning variants in front-line service from 1964, and continued in front-line service until the mid 1970s.
74 Squadron, one of the RAF's most distinguished units, was chosen to introduce the Lightning F1s in 1961. The unit would go on to introduce into service two other marks of the Lightning; the F3 in 1964, and the F6 in 1967. All three marks recieved black tails with the tiger-stripe roundel bars. 74 Squadron stood down as a Lightning operator in 1971, and would not reform again until 1984 with F4J (UK) Phantoms.
| THE KIT |
For a look at what's in the kit, see my preview.
| CONSTRUCTION |
Before starting, I first determined which variant and markings I wanted to
build; there are distinct differences between the F1A, F2, and F3 variants, so I
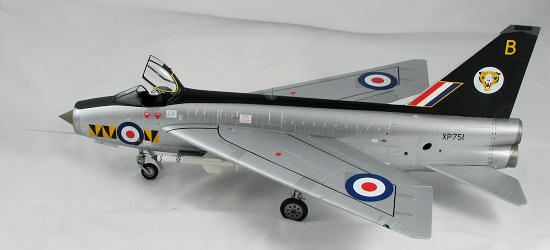
had to plan accordingly. In the end I decided on a Lightning F3 of 74 Squadron,
in part because I liked the markings but also because the F3 was not equipped
with guns, so I wouldn't have to deal with Trumpeter's less-than-exemplary gun
troughs! I had also found a picture of a 74 Sqn. F3 in flight without a
refueling probe fitted, wh ich
was fortunate since Trumpeter completely missed providing one in this boxing
(they do give one in the F2A/F6 boxing).
ich
was fortunate since Trumpeter completely missed providing one in this boxing
(they do give one in the F2A/F6 boxing).
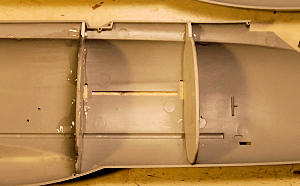
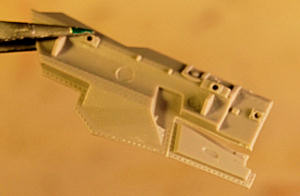
Construction started with the fuselage. The Lightning F3s had longer cable conduit fairings on the sides than the F1As and F2s; unfortunately, Trumpeter did not include the longer fairings for the F3. I fabricated mine using sprue from the kit, sectioned in half and sanded until they matched the molded-on fairings on the fuselage. I then added the rounded forward ends of the cable ducting to my fabricated fairings to finish the work. It took a bit of filling to smooth things in, but it worked fine.
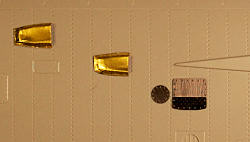 Trumpeter
completely missed the various scoops and outlets on the F3, so I fabricated
these from 0.003" brass foil, bucked over forms made from plastic card. These
scoops were set aside for later installation; I was worried that they would get
damaged or knocked off in handling. Using reference photos as a guide, various
vent holes were opened up on both sides of the fuselage, and the molded-in
outlets we
Trumpeter
completely missed the various scoops and outlets on the F3, so I fabricated
these from 0.003" brass foil, bucked over forms made from plastic card. These
scoops were set aside for later installation; I was worried that they would get
damaged or knocked off in handling. Using reference photos as a guide, various
vent holes were opened up on both sides of the fuselage, and the molded-in
outlets we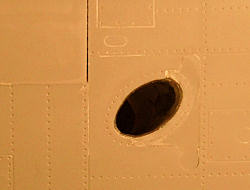 re
hollowed out. The large ATGB exhaust on the left fuselage was molded very
shallowly, so I cut this out and replaced the flat plate with a large-diameter
drinking straw (U.S. builders, the straws from Arby's restaurants are the
perfect diameter). After sanding the straw flush with the fuselage and painting
the inside with Testors Metalizer Exhaust, it looked much better.
re
hollowed out. The large ATGB exhaust on the left fuselage was molded very
shallowly, so I cut this out and replaced the flat plate with a large-diameter
drinking straw (U.S. builders, the straws from Arby's restaurants are the
perfect diameter). After sanding the straw flush with the fuselage and painting
the inside with Testors Metalizer Exhaust, it looked much better.
Turning attention to the inside of the fuselage, I dryfitted the intake trunk
halves together, taped them to their bulkhead, and dryfitted the assembly into
the right fuselage half. I found that
 Trumpeter
had mispositioned the intake trunk, so that it came up about 5mm short of the
intake ring. This left a very large and very inaccessible gap in the intake
area. After some quick consulting with modeler friends, we determined the best
course of action was to move the intake trunk forward so that it met the intake
ring. That was easy enough, but then the nose wheel bay opening had to be moved
forward also, and the radar tower fairings, top and bottom, had to be altered so
that the intake ring would fit. I ended up cementing the intake trunks to each
fuselage half using a slow-setting epoxy; after setting the intake trunks in
place, I taped the fuselage halves together to make sure that the intake trunk
halves would mate correctly once I glued the fuselage halves together.
Trumpeter
had mispositioned the intake trunk, so that it came up about 5mm short of the
intake ring. This left a very large and very inaccessible gap in the intake
area. After some quick consulting with modeler friends, we determined the best
course of action was to move the intake trunk forward so that it met the intake
ring. That was easy enough, but then the nose wheel bay opening had to be moved
forward also, and the radar tower fairings, top and bottom, had to be altered so
that the intake ring would fit. I ended up cementing the intake trunks to each
fuselage half using a slow-setting epoxy; after setting the intake trunks in
place, I taped the fuselage halves together to make sure that the intake trunk
halves would mate correctly once I glued the fuselage halves together.
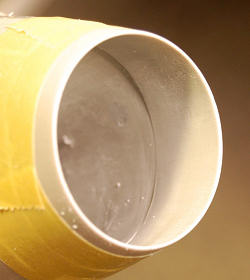 Once the
epoxy had set, I taped the fuselage halves together, then taped the intake ring
into position, and sanded the transition between the intake ring and the intake
trunk as smooth as possible. I didn't entirely succeed, but it still looked a
lot better than the big gap! I then painted the insides of the intake trunks
with Floquil Old Silver.
Once the
epoxy had set, I taped the fuselage halves together, then taped the intake ring
into position, and sanded the transition between the intake ring and the intake
trunk as smooth as possible. I didn't entirely succeed, but it still looked a
lot better than the big gap! I then painted the insides of the intake trunks
with Floquil Old Silver.
 The
fuselage was rather thin-walled and springy, and I worried that there would be
insufficient support for the heavy wings. Using a contour gauge, I drew outlines
for bulkheads to be placed just forward and aft of the wing slots, which I then
made from 3mm sheet plastic. It took some sanding and trial and error even with
the contour gauge, but eventually I got the bulkheads to fit well. After they
were in place, I drilled out slots for spars to support the wings, which I
fabricated from sheet plastic. Since I planned to make the wings removable for
ease of storage, I also made the spars removeable.
The
fuselage was rather thin-walled and springy, and I worried that there would be
insufficient support for the heavy wings. Using a contour gauge, I drew outlines
for bulkheads to be placed just forward and aft of the wing slots, which I then
made from 3mm sheet plastic. It took some sanding and trial and error even with
the contour gauge, but eventually I got the bulkheads to fit well. After they
were in place, I drilled out slots for spars to support the wings, which I
fabricated from sheet plastic. Since I planned to make the wings removable for
ease of storage, I also made the spars removeable.
The last inside alteration I made was the easiest. I wanted to glue my exhaust cones on after painting, to ease masking. To make that easier I wanted to leave the exhaust trunks unglued so that they would "float" inside the fuselage once assembled, and make installing the cones easy. So I set a new bulkhead just behind the exhaust trunk bulkhead, to keep the assembly from moving forward.
 After
all of the structural work, I turned my attention to the cockpit and the wheel
wells. I added parts from the Eduard exterior set to the wheel wells, which
raised the level of detailing in these
After
all of the structural work, I turned my attention to the cockpit and the wheel
wells. I added parts from the Eduard exterior set to the wheel wells, which
raised the level of detailing in these
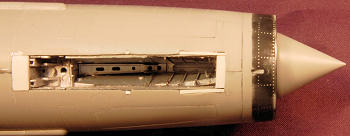 areas
significantly. I painted the nose gear bay in Floquil Old Silver, with a wash of
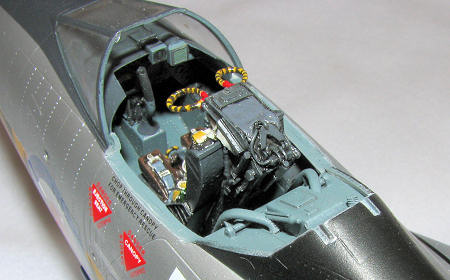
Tamiya Black; I left painting the main gear bays for later. For the cockpit, I
mainly built it stock, though I did use the large instrument faces from the
Eduard cockpit set, which had better detail than the Trumpeter instrument film,
underneath the clear part of the instrument panel. I built the seat using
Eduard's harness set, but
areas
significantly. I painted the nose gear bay in Floquil Old Silver, with a wash of
Tamiya Black; I left painting the main gear bays for later. For the cockpit, I
mainly built it stock, though I did use the large instrument faces from the
Eduard cockpit set, which had better detail than the Trumpeter instrument film,
underneath the clear part of the instrument panel. I built the seat using
Eduard's harness set, but
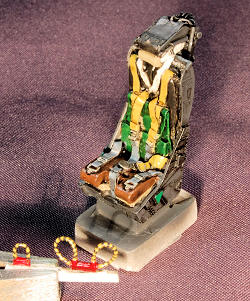 wasn't
satisfied with the results; fortunately I was sent the AMS resin set for this
model, which looked much better, so I used that in my model. The cockpit was
painted in Testor's Ocean Gray with black boxes on the consoles; for the seat, I
used a base coat of Floquil SP Dark Lark Gray, the best near-black color I have
seen on the market. To paint the seat as accurately as possible,
wasn't
satisfied with the results; fortunately I was sent the AMS resin set for this
model, which looked much better, so I used that in my model. The cockpit was
painted in Testor's Ocean Gray with black boxes on the consoles; for the seat, I
used a base coat of Floquil SP Dark Lark Gray, the best near-black color I have
seen on the market. To paint the seat as accurately as possible,
 I used
reference photos found on the Internet; see the link below. After a black wash
and a clear coat, the seat turned out very nice.
I used
reference photos found on the Internet; see the link below. After a black wash
and a clear coat, the seat turned out very nice.
With the intake trunk moved forward, I found that the cockpit sat up too high in the fuselage. After grinding down the intake trunk and the back of the cockpit floor, I was able to get it to just barely fit. Even then it took some finagling to get the back bulkhead to line up with the fuselage half.
After the exhaust trunks were in, the wing bulkheads installed, and the cockpit installed, I glued the fuselage halve together with the exception of the top seam between the cockpit and the nose. Fit was not very good, and it took a lot of coaxing and tape to get the halves together (in fairness to Trumpeter, if you build the fuselage stock, the fit is very nice--I just performed so many changes that it altered the fit).
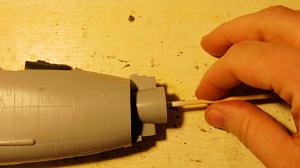 The radar
tower halves were assembled. The area where the radome meets is blanked-off on
the parts, so I opened this up so that I could feed in lead shot for nose
weight, and install a bamboo cocktail skewer. After this was dry, I did a few
practice runs on feeding the radar tower in through the forward fuselage; you
need that top seam uncemented so that the top of the fairing goes through. Once
I did the dry runs to my satisfaction, I then proceeded to epoxy it in. The
skewer was used to lever the radar tower into its final position. Once the epoxy
was dry, I cut the skewer short, and test-fitted the radome to the tower. I
found the radome to be too long, but by cutting away the constant-diameter
section on it, the resultant appearance was much better. I left the radome off
for ease of painting and masking. After the radar tower was fitted, I finished
by cementing the fuselage seam together between the windshield and the radome.
The radar
tower halves were assembled. The area where the radome meets is blanked-off on
the parts, so I opened this up so that I could feed in lead shot for nose
weight, and install a bamboo cocktail skewer. After this was dry, I did a few
practice runs on feeding the radar tower in through the forward fuselage; you
need that top seam uncemented so that the top of the fairing goes through. Once
I did the dry runs to my satisfaction, I then proceeded to epoxy it in. The
skewer was used to lever the radar tower into its final position. Once the epoxy
was dry, I cut the skewer short, and test-fitted the radome to the tower. I
found the radome to be too long, but by cutting away the constant-diameter
section on it, the resultant appearance was much better. I left the radome off
for ease of painting and masking. After the radar tower was fitted, I finished
by cementing the fuselage seam together between the windshield and the radome.
 Wing
assembly was straightforward; the only thing I changed was to cut slots for the
wing spars on the wing halves before cementing them together. Fit here was very
good; be sure to apply some cement to the mating surfaces on the wheel wells so
that they fit tightly against the lower wing half. The other thing to watch for
is that the leading edges stay straight; on mine the wingtips curved upward
slightly, which is noticeable when the model is viewed in profile. The fin and
stabilizers also fit together very well. On the vertical fin, I opened up the
intake on the lower leading edge with some carving and filing.
Wing
assembly was straightforward; the only thing I changed was to cut slots for the
wing spars on the wing halves before cementing them together. Fit here was very
good; be sure to apply some cement to the mating surfaces on the wheel wells so
that they fit tightly against the lower wing half. The other thing to watch for
is that the leading edges stay straight; on mine the wingtips curved upward
slightly, which is noticeable when the model is viewed in profile. The fin and
stabilizers also fit together very well. On the vertical fin, I opened up the
intake on the lower leading edge with some carving and filing.
The landing gear presented another conundrum. As molded, it is significantly too tall, which makes the cast-metal struts useless. I cut a 5mm section out of one of the plastic struts to reduce them to proper scale height, drilled holes for reinforcing pins, temporarily reassembled the struts, and test-fitted the struts to the wing. Unfortunately, scale height left the fin on the ventral tank practically dragging the ground. I ended up taking only 2.5mm out of the struts, which still left them too tall but at least the sit of the model was better. The plastic struts, with reinforcements, are adequate to support the finished model.
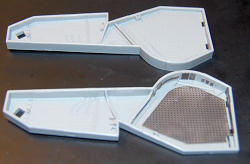
 Trumpeter
has the modeler assemble the main gear doors to the struts at a 45 degree angle
to the line of flight. This is wrong, but the fix is easy--just cut off the
triangular stubs used to mount the doors, and cement the concave sections of the
doors flush with the struts. The strut doors also needed to be altered so that
the section that folds out is actually folded out. Trumpeter scribed in this
section but it is completely mismatched with the interior detail on the door, so
that had to be filled in and sanded smooth. By holding the part up to the light,
I was able to place Dymo tape so that the folding section could be scribed
properly. After scribing through on the vertical plane, I bent this section out.
Trumpeter
has the modeler assemble the main gear doors to the struts at a 45 degree angle
to the line of flight. This is wrong, but the fix is easy--just cut off the
triangular stubs used to mount the doors, and cement the concave sections of the
doors flush with the struts. The strut doors also needed to be altered so that
the section that folds out is actually folded out. Trumpeter scribed in this
section but it is completely mismatched with the interior detail on the door, so
that had to be filled in and sanded smooth. By holding the part up to the light,
I was able to place Dymo tape so that the folding section could be scribed
properly. After scribing through on the vertical plane, I bent this section out.
With all of the parts assembled, filled, altered, sanded, shoved, and cursed at more or less to my satisfaction, it was finally, FINALLY, time to paint.
| COLORS & MARKINGS |
I had previously obtained artwork for the 74 Squadron Lightning F3 roundel bars and fin flashes. Using color copies of the artwork, double-stick tape, a straightedge, and a sharp #11 blade, I made masks for these items using Tamiya tape. After applying Floquil Reefer White as a base coat on the fuselage spine, fin and roundel bar areas, I masked off the perimeters of the roundel bars and fin flashes using photocopies of these markings as guides. To get the positioning of the roundel bars right, I used a photocopy of a roundel from the Xtradecal sheet as a guide; the roundel bars needed to be up to, but not touching, the roundel, so proper spacing was critical.
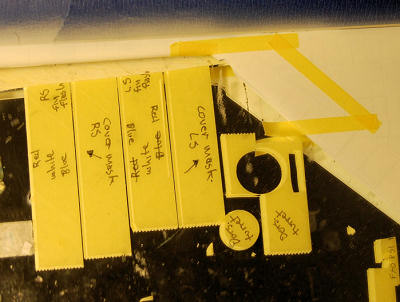 Then each
section of tape corresponding to each color on the fin flash was applied to the
model. The fin flash was then painted, removing and reapplying masks as needed,
first with Xtracolor White, then Xtracolor Roundel Blue, then Testor's
Then each
section of tape corresponding to each color on the fin flash was applied to the
model. The fin flash was then painted, removing and reapplying masks as needed,
first with Xtracolor White, then Xtracolor Roundel Blue, then Testor's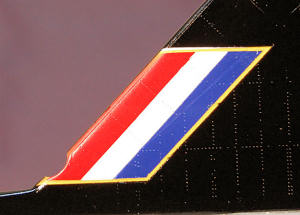 Italian Red. Once those three colors were dry, I applied a covering mask over
this part of the fin flash and uncovered the yellow surround. The yellow
surround and the roundel bars were then painted with Floquil Reefer Yellow,
which looked like a close match with the yellow on the Xtradecal sheet. Once
this was dry, I masked off the entire fin flash using a pre-cut covering mask.
Italian Red. Once those three colors were dry, I applied a covering mask over
this part of the fin flash and uncovered the yellow surround. The yellow
surround and the roundel bars were then painted with Floquil Reefer Yellow,
which looked like a close match with the yellow on the Xtradecal sheet. Once
this was dry, I masked off the entire fin flash using a pre-cut covering mask.
The roundel bars were finished by applying the pre-cut masks to the parts of
the bars that were to remain yellow. This proved to be much more difficult than
I had 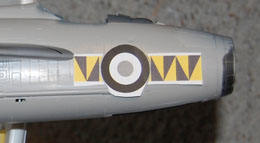 anticipated
(I think my exact phrase for it was "having kittens"), but eventually I got it
done. The black parts of the roundel bars, fuselage spine, canopy frames, and
fin were painted with Floquil CSX Black, a gloss shade. Once dry, I masked off
the upper part of the vertical tail to paint the dilectric panels with SP Dark
Lark Gray, then masked off and painted the leading edge of the fin with Floquil
Old Silver. O
anticipated
(I think my exact phrase for it was "having kittens"), but eventually I got it
done. The black parts of the roundel bars, fuselage spine, canopy frames, and
fin were painted with Floquil CSX Black, a gloss shade. Once dry, I masked off
the upper part of the vertical tail to paint the dilectric panels with SP Dark
Lark Gray, then masked off and painted the leading edge of the fin with Floquil
Old Silver. O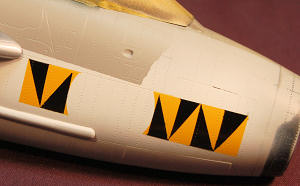 nce
that was all done, I pulled all masks from the painted areas.
nce
that was all done, I pulled all masks from the painted areas.
The Firestreak missles went together easily. The bulk of the missles were painted in Floquil Reefer White. The seeker heads are actually a dark smoke tint, so accordingly, I applied several coats of Tamiya Smoke to the clear seeker heads until I had a tint that matched the photos I had. After applying Future to the missle bodies, Trumpeter's missile marking decals were used; since Trumpeter provided markings for only one missle of each type (Red Top and Firestreak), I traded my Red Top markings to another modeler for his Firestreak markings, so that I would have enough decals for two Firestreaks. The Trumpeter decals went on fine using the Microscale decal system.
I then applied the tiger's head badge and aircraft letter to the fin using the markings from Xtradecal sheet 32009. These were Microscale-printed decals and went on nicely. Once dry, I clearcoated the painted areas using a mix of Polly Scale clear coats: 66% Clear Satin, 33% Clear Flat. After that was dry, I covered the markings with scrap paper, and taped off the fin, fuselage spine, and roundel bars for metalizing.
 The
fuselage, wings, and horizontal stabilizers were first painted with Mr. Surfacer
1000, to provide a base for Alclad II. After correcting surface imperfections,
the previously made scoops were cemented to the fuselage using white glue. Once
the glue was set, Alclad II Aluminum was applied to all natural metal areas,
with dissimilar panels masked off and painted with other Alclad shades including
Semi-Matte Aluminum and Duralamin.
The
fuselage, wings, and horizontal stabilizers were first painted with Mr. Surfacer
1000, to provide a base for Alclad II. After correcting surface imperfections,
the previously made scoops were cemented to the fuselage using white glue. Once
the glue was set, Alclad II Aluminum was applied to all natural metal areas,
with dissimilar panels masked off and painted with other Alclad shades including
Semi-Matte Aluminum and Duralamin.
Lightnings typically had a polished nose ring, so after applying the Alclad, the nose ring was masked off, and a base coat of Krylon Gloss Black was applied with an airbrush. After smoothing the gloss black using Micromesh sanding films, Alclad Polished aluminum was applied. Once this was dry, the black anti-glare area was masked off and painted with Floquil Grimy Black.
The remaining decals were then applied, using Xtradecal sheets 32009, 32019, and 32013. Most went on nicely with no problems. The roundels required some coaxing with Micro-sol to lay down over the front of the cable conduits, but repeated applications and patience won the day.
| FINAL CONSTRUCTION |
 The
landing gear was cemented to the fuselage and wings, followed by the landing
gear doors. The exhaust cones were press-fitted into place, and the rear
fuselage exhaust area was slid over it; this was a tight, but good fit. The AMS
resin seat was cemented in place, followed by the canopy. The radome was
attached, after painting it with Testors Faded Olive Drab, the two spine whip
antennas added (extras from the Revell Hawker Hunter F6) and, finally, the
under-intake pitot tube was added. Once that was all done, I poured myself a
stiff drink and celebrated the completion.
The
landing gear was cemented to the fuselage and wings, followed by the landing
gear doors. The exhaust cones were press-fitted into place, and the rear
fuselage exhaust area was slid over it; this was a tight, but good fit. The AMS
resin seat was cemented in place, followed by the canopy. The radome was
attached, after painting it with Testors Faded Olive Drab, the two spine whip
antennas added (extras from the Revell Hawker Hunter F6) and, finally, the
under-intake pitot tube was added. Once that was all done, I poured myself a
stiff drink and celebrated the completion.
| CONCLUSIONS |
Admittedly, I created a lot of extra work for myself by using the Eduard detail parts and by choosing a paint scheme that required a lot of extra painting. Even if I hadn't gone this route, however, Trumpeter made so many mistakes on this model it turned the project from an interesting challenge to an endurance test. There were moments when this project lay near-abandoned just from being overwhelmed by the sheer amount of work to be done. Having to fix the intake trunk/radar tower/nose gear bay area was taxing in the extreme, and this is just one of the areas that Trumpeter should have addressed before this kit went to market. Could this have been a rush job? Only Trumpeter knows, but one more year in development might have made all the difference between having this mistake-prone kit and one that was mostly correct.
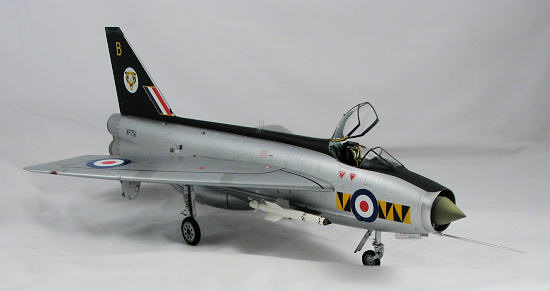
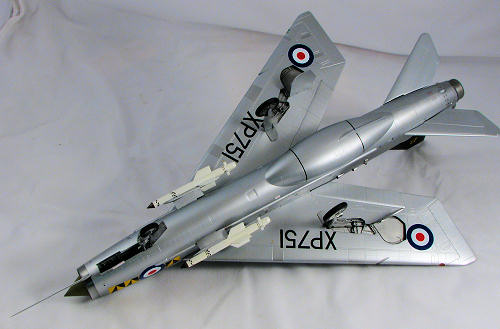
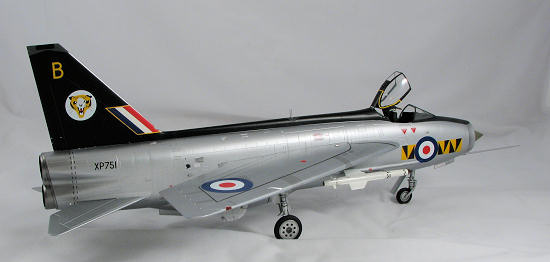
Still, in all, the completed beast looks impressive. I get a I-wouldn't-do-this-again-for-a-million-years-but-it-was-good-experience vibe about this model. One thing's for sure: few things will touch it for impressiveness. If you're not afraid of the extra work, the completed model can truly be something special, but this is most definitely not a beginner's project.
| REFERENCES |
 Lake,
Jon: "English Electric Lightning"; Wings of Fame Volume 7, 1997
Lake,
Jon: "English Electric Lightning"; Wings of Fame Volume 7, 1997
Aeroguide 8: Lightning: BAC Lightning F Mk. 3/Mk. 6, 1984
Thunder and Lightnings website: http://www.thunder-and-lightnings.co.uk/lightning/index.php
Aviation Picture Hangar website: http://www.aviation-picture-hangar.co.uk/Lightning.html
Restored MB Mk. 4 ejection seat: http://www.ejectorseats.co.uk/mkfourpics.html
February 2010
THANKS TO:
Stevens International for the review kit
Hannant's for the Xtradecal sheets
AMS Resin for the ejector seat
My wallet for the Eduard exterior set and seat harness sets
Tom Cleaver, the members of IPMS/St. Louis, and the gang at Britmodeller for their encouragement and help
Jennings Heilig for the roundel bar and fin flash patterns
Bill Clark for the extra Firestreak markings I needed (he's struggling with a Trumpeter Lightning F6 as I write this, but at least he now has enough Red Top markings!)
If you would like your product reviewed fairly and quickly, please contact me or see other details in the Note to Contributors.