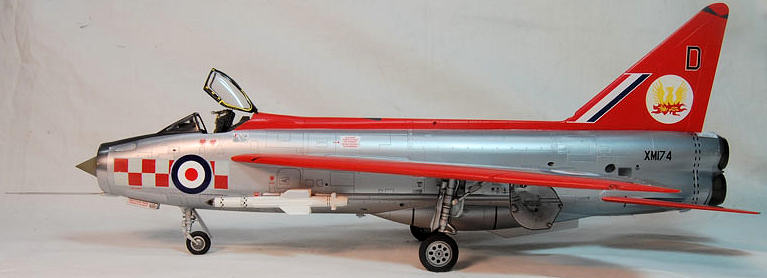
Eduard 1/48 English Electric Lightning F1A/F2
| KIT #: | 1134 |
| PRICE: | $94.00 MSRP |
| DECALS: | Four options |
| REVIEWER: | Andrew Abshier |
| NOTES: | Reissue of the Airfix kit with extra parts in resin and photoetch; canopy masks also included |
| HISTORY |
The English Electric Lightning was developed as the operational culmination of
research projects in Great Britain into high-speed flight. In 1949 a contract
was awarded to the English Electric Corporation to develop a high-speed
interceptor based on the P1 research aircraft. Although development showed
great potential for the Lightning to become a true multirole combat aircraft,
the Air Ministry, believing that the Lightning would be an interim type, stalled
development. What emerged was an austere point- defence interceptor, armed with
just two cannon and two Firestreak missiles. Even still, the Lightnings, upon
entering service in 1960, represented a quantum leap in capability for RAF
Fighter Command over the Hawker Hunters it would be replacing, and, in all
variants, would serve the RAF for nearly 28 years.
defence interceptor, armed with
just two cannon and two Firestreak missiles. Even still, the Lightnings, upon
entering service in 1960, represented a quantum leap in capability for RAF
Fighter Command over the Hawker Hunters it would be replacing, and, in all
variants, would serve the RAF for nearly 28 years.
The first Lightnings in service, the F1s of 74 Squadron, were quickly joined by
the improved F1As of 56 and 111 Squadrons. The F1As could be distinguished from
the F1s by the external cable conduits on both sides of the fuselage. The F1A,
and all subsequent Lightning variants, could also be fitted with an inflight
refueling probe underneath the left wing. The F1As were quickly followed by the
F2s, which equipped two squadrons, 19 Sqn. and 92 Sqn. The F2s were the last of
the first-generation Lightnings built with the pointed "witch's hat" tail; F3s
would introduce the larger-chord tail used on all later variants of the
Lightning.
The early Lightnings remained in front-line service until the mid 1960s, when
they began to be replaced by the Lightning F3. F1As went on to serve in
training units and in target facility flights. Most of the Lightning F2s were
converted to F2A standard in 1968-69, which brought them up to near-Lightning F6
standard; the few F2s that were not converted were retired in the early 1970s
along with the Lightning F1As. A number of airframes survive as gate guardians
and museum pieces.
| THE KIT |
Refer to my preview for what’s in the box.
| CONSTRUCTION |
Construction started with the wings. I started things off by fitting
the wing leading edges (parts 58 and 61) to the lower wing halves. The locator
tabs were removed and a small amount of CA glue was used on the inside corner of
the leading edge parts.
 After careful placement to ensure the edges were flush,
the remainder of the join was glued with Tenax, applied from the inside. By
going slowly and adjusting as I went, I was able to get a tight, flush join that
required no extra work.
After careful placement to ensure the edges were flush,
the remainder of the join was glued with Tenax, applied from the inside. By
going slowly and adjusting as I went, I was able to get a tight, flush join that
required no extra work.
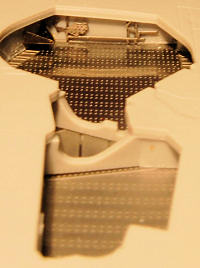
The photoetched (PE) bottoms for the wheel wells were added next. The inside of
the upper wing half needed a bit of thinning for clearance, but not much. Once
that was done, the wing halves were glued together, and the remaining PE details
for the wheel wells were added. Most of the PE parts went in easily, but I
found part PE49 to be too tall, so I omitted it. The etch bending was not that
hard, and the installed parts really added some good detail to the wheel well.
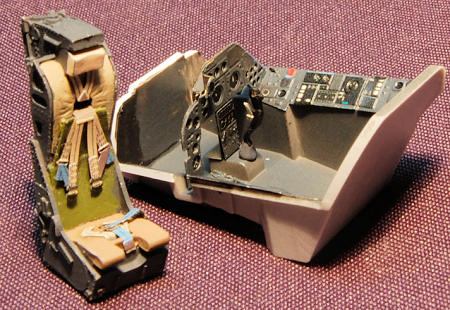 Attention then was turned to the cockpit. As mentioned in my preview, Eduard
incorrectly printed the instrument panel (IP) and side consoles in blue-gray,
rather than black (if you build an F3, the color is fine). To correct this, I
made a color photocopy of the etch parts, then used the copy as a template to
cut out masks for the parts of the IP and consoles already printed in black. I
then sprayed on Floquil SP Lark Dark Gray, an excellent near-black color. The
resultant contrast between the black-printed boxes and the rest of the panels
was subtle but noticeable.
Attention then was turned to the cockpit. As mentioned in my preview, Eduard
incorrectly printed the instrument panel (IP) and side consoles in blue-gray,
rather than black (if you build an F3, the color is fine). To correct this, I
made a color photocopy of the etch parts, then used the copy as a template to
cut out masks for the parts of the IP and consoles already printed in black. I
then sprayed on Floquil SP Lark Dark Gray, an excellent near-black color. The
resultant contrast between the black-printed boxes and the rest of the panels
was subtle but noticeable.
Eduard has two vertical panels (PE 31 and 32) that go in the back of the
cockpit. I mounted them, but they didn’t come close to meeting the cockpit
sills, so I removed them. I instead extended the right-hand console to the rear
bulkhead using part of the unneeded F2 console. The other parts were added
according to the instructions.
I did have a go at installing the color photo-etched harnesses on the resin
seat. I had a very hard time with it, ended up losing some of the harness
parts, and finally decided to substitute a resin MB Mk. 4 seat with molded-on
harnesses! A more dexterous modeler could probably make this work, but PE
harnesses have never been my best subject. (If you’re the same way, CMK makes a
good, and inexpensive, MB Mk. 4 seat; give the Airwaves version a miss, it‘s
rather crude).
The intake trunk halves were assembled. Unlike the Trumpeter kit, the Airfix
intake trunk meets the intake ring nicely, no effort required! Nose weight was
added to the radar tower and radome; the radome was painted in Testor’s faded
Olive Drab, then left off for ease of masking until final assembly.
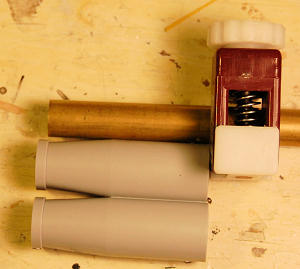 The PE flame holders were cemented in place as follows: I cemented together the
exhaust trunks, then inserted a spare section of brass tubing so that the end of
the brass tubing was about 4mm below the forwardmost rim of the exhaust trunks.
I then push-fit the flame holders from the front of the exhaust trunks, using
the tubing as a leveling surface, then glued the PE parts in place.
The PE flame holders were cemented in place as follows: I cemented together the
exhaust trunks, then inserted a spare section of brass tubing so that the end of
the brass tubing was about 4mm below the forwardmost rim of the exhaust trunks.
I then push-fit the flame holders from the front of the exhaust trunks, using
the tubing as a leveling surface, then glued the PE parts in place.
I had problems cementing the fuselage halves together at the nose. For some
reason, every Lightning I’ve built (two Airfix, and the Trumpeter 1/32nd) didn’t
want to go together on the upper nose section! It took some heavy-duty CA glue
and clamping to get things together. Fit on the fuselage was otherwise very
good.
The glareshield has all sorts of interesting PE and resin parts that busy it up
nicely. The only proviso is that you should cut a notch on the underside of the
gunsight part (part 11) so that it clears the IP; I didn‘t realize it was
needed, and had quite the merry time cutting it out without knocking off all the
PE parts on top! I also added a bulkhead from plastic card to the forwardmost
end of the cockpit tub to give the glareshield more support. After painting the
inside frames of the windshield, the windshield was cemented in place.
The wing to fuselage fit was good, not great. I tightened up the fit by using
the putty smash method described in detail in my B32 Dominator build on this
site. This enabled me to leave the wings off for painting and finishing, which
made life a lot easier for both, and I was also able to ensure that the correct
anhedral was achieved when the wings were installed.
 The Firestreak missiles were assembled, seams finished, and painted with Floquil
Reefer White. I then clearcoated with Future, after which I applied the missile
markings. The markings overlap, and I adjusted the decals so that the overlaps
would be hidden as much as possible by the missile rails. Once dry, the missiles
were clearcoated with Testor’s Satin. Seeker heads were smoke-tinted on the
actual missiles, so I gave the clear seeker heads several coats of Tamiya Smoke
before adding them to the missiles. The missiles were mounted on the rails and
set aside for final assembly.
The Firestreak missiles were assembled, seams finished, and painted with Floquil
Reefer White. I then clearcoated with Future, after which I applied the missile
markings. The markings overlap, and I adjusted the decals so that the overlaps
would be hidden as much as possible by the missile rails. Once dry, the missiles
were clearcoated with Testor’s Satin. Seeker heads were smoke-tinted on the
actual missiles, so I gave the clear seeker heads several coats of Tamiya Smoke
before adding them to the missiles. The missiles were mounted on the rails and
set aside for final assembly.
To complete assembly before painting, I added the vertical fin, after opening up
the intake at the base of the fin with a small dental burr.
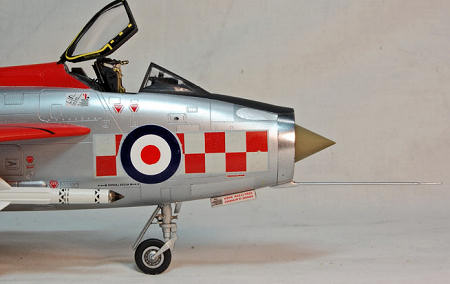
Although the Lightning F1A was fitted with guns, the 56 Squadron aircraft I was
modeling had the gun openings plated over, so I used the smooth plates (parts 30
and 34, intended for the Lightning F3) for the upper gun openings.
One note: Eduard has the modeler install an auxiliary scoop (Part 136) to the
dorsal spine. This scoop was not fitted on Lightning F1As, so I filled the hole
in the dorsal spine with stretched sprue, cut it flush, and sanded it smooth.
You’ll need the scoop for the later Lightning variants, starting with the F2.
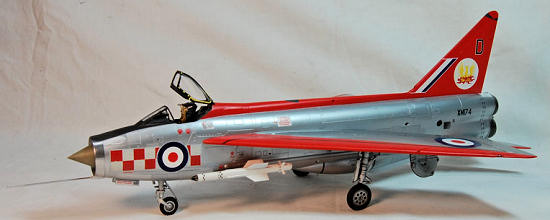
| COLORS & MARKINGS |
I started with painting the dorsal spine and vertical tail on the
fuselage, and the leading edges of the wings and horizontal stabilizers. After
priming with Floquil Reefer White, I airbrushed Testors Italian Red, in several
coats. The dilectric panels on the fuselage spine and fin were then taped over
using Scotch tape, and a sharp knife was used to cut openings for the dilectric
panels, which were then painted with Floquil Grimy Black. These panels were
then masked off using the previously cut out sections so that the finish on them
would remain flat after clear coating.
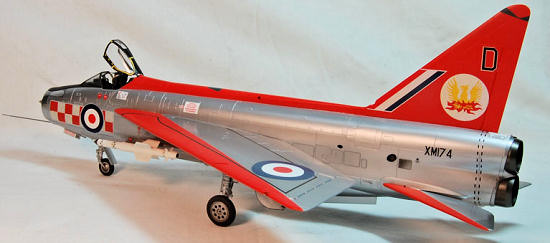 On the fuselage, I applied the decals to the vertical tail. The less ornate
squadron badge provided on the Eduard sheet was accurate for XM174, the aircraft
I was building, so that was used. The white outline for the fin flash was far
too thick, so the outline was reduced using a straightedge and a sharp blade
before applying the fin flash. Finally, the aircraft letter “D” needed for
XM174 was added from an Airfix kit decal I had on hand. All decals went on very
nicely using the Microscale decal system. The fuselage spine and vertical fin
was then clearcoated using Testor’s Satin finish.
On the fuselage, I applied the decals to the vertical tail. The less ornate
squadron badge provided on the Eduard sheet was accurate for XM174, the aircraft
I was building, so that was used. The white outline for the fin flash was far
too thick, so the outline was reduced using a straightedge and a sharp blade
before applying the fin flash. Finally, the aircraft letter “D” needed for
XM174 was added from an Airfix kit decal I had on hand. All decals went on very
nicely using the Microscale decal system. The fuselage spine and vertical fin
was then clearcoated using Testor’s Satin finish.
The forward windshield and glareshield were masked off and painted in Floquil
Grimy Black, and the canopy frames were painted with Floquil CSX Black. Nose
rings was typically polished on most Lightnings, so to represent this, I masked
off the antiglare panel and the outline of the nose ring and painted the area
first with Floquil CSX Black. Once the CSX Black was dry, Alclad Polished
Aluminum was airbrushed on. The resultant shine was striking! The antiglare
panel and nose ring were then masked off for the remainder of metalizing, along
with all the red areas. To protect the decals on the vertical fin, paper was
taped over the decal areas so that no tape would come in contact with the
decals. Once done, Mr. Surfacer 1000 was applied to all surfaces to receive
Alclad II. Once small faults were identified and fixed, a second coat of Mr.
Surfacer was applied.
Alclad II Aluminum was then sprayed overall, with dissimilar
panels sprayed in different shades of Alclad and Testor’s non-buffing Aluminum,
using photo references as a guide. To get the demarcation between the dark
exhaust and the lighter areas, I used Silly Putty, carefully applied using
toothpicks and blunt probes. Other dissimilar panels were masked off using
Tamiya tape or Scotch tape, with a sharp #11 blade used to cut out panels for
painting.
Decals were then applied to the wings. Eduard did not do the walkway stripes
correctly, so I used the Airfix instructions as a reference; with some cutting,
trimming, and some stripe sections from the spares b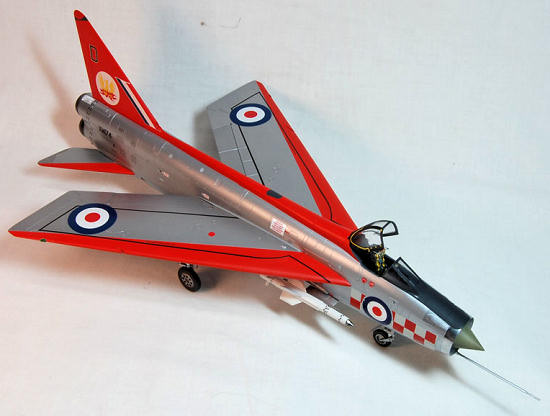 ox, I was able to accurately
portray the walkway stripes. The roundels, stencils, and serial numbers were
then added from the Eduard sheet. Once the decals were dry, I masked off the
metal areas, using paper to cover the decals and tape otherwise, to apply Testor’s Satin finish to the red areas.
ox, I was able to accurately
portray the walkway stripes. The roundels, stencils, and serial numbers were
then added from the Eduard sheet. Once the decals were dry, I masked off the
metal areas, using paper to cover the decals and tape otherwise, to apply Testor’s Satin finish to the red areas.
Returning to the fuselage, decaling revealed some other errors on the Eduard
sheet. One prominent stencil read KEEP CLEANER WHEN ENGINE IS RUNNING(!);
fortunately I had a Barracudacals Lightning stencil sheet on hand, and was able
to replace those stencils with ones with proper terminology from that sheet.
Other stencils needed for the F1A weren’t even provided on the Eduard sheet, so
again the Barracudacals sheet was used to fill in the gaps. Eduard also missed
the black striping for the ventral tank, so I used the stripes from the Airfix
kit decal.
As mentioned in my preview, Eduard did not do the 56 Sqn. roundel bars
correctly, so these were replaced with items from the Airfix kit decal. The
Eduard roundel was a bit too large to go with the Airfix bars, so it was
replaced with a roundel from a Cutting Edge Lightning decal. The Airfix decals,
once the heavy carrier film was trimmed away, worked fine with the Microscale
decal system.
Finally, the yellow striping and hash marks were applied to the canopy. After
applying the decals, the striping really looked too heavy. I will eventually
strip the canopy and replace the striping with that provided on the Airfix kit
decal; I‘m showing the Eduard version for this review so you can see what you
think.
A note for those building this kit: there are subtle but definite differences in
stenciling between the F1A and F2 variants of the Lightning. I would advise
keeping the Airfix kit instructions close by when applying stencils on your
model, so that you can get things right.
| FINAL CONSTRUCTION |
 The landing gear is well molded. I painted the oleo sections with Floquil
Bright Silver, and used Old Silver for the rest. After a wash with Tamiya
Black, I clear-coated all but the oleos with Testors Satin.
The landing gear is well molded. I painted the oleo sections with Floquil
Bright Silver, and used Old Silver for the rest. After a wash with Tamiya
Black, I clear-coated all but the oleos with Testors Satin.
Eduard provides brake lines for the struts and the strut-retractor arm linkage.
Be careful that you orient the wheels correctly, and install the brake lines
before gluing the struts to the wings. It’s tricky, but it CAN be done. For
the retractor arm-strut linkage, I would glue that to the retractor arm first,
then glue the retractor arm to the strut; I tried gluing the linkage in place
after 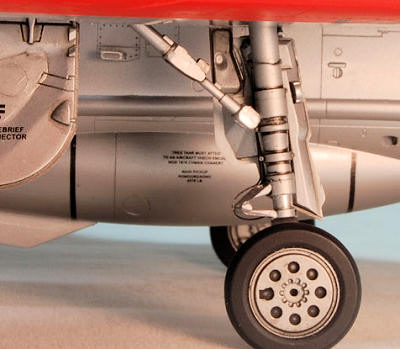 gluing the plastic parts together, and I couldn’t make it work. Again, a
more dexterious modeler could probably make this work.
gluing the plastic parts together, and I couldn’t make it work. Again, a
more dexterious modeler could probably make this work.
To represent the aluminum plates used to cover the gun openings, I cut out a
small piece of aluminum foil, and stuck it, dull side out, to a small piece of
Scotch low-tack double-stick tape. This in turn was stuck to a backing sheet
from a label, and the plates were carefully cut to shape using iris scissors.
After peeling off the backing, I applied the foil to the gun plates, then
burnished down the edges using brass tubing in a rolling motion.
After gluing the landing gear and doors to the wings, I glued the wings to the
fuselage. I then added the horizontal stabilizers, nose gear, nose gear doors,
Firestreak missiles, and various other small parts. The resin ejection seat was
completed by using Eduard’s pre-printed face curtain pulls from the kit, then
was added to the cockpit. I completed the build by gluing the canopy in the
open position.
| CONCLUSIONS |
The “bones” of this kit, the Airfix Lightning, are very good--I would
call it the best Lightning kit in any scale--and it is welcome to have the kit
back in general availability. Eduard’s extras were a mixed bag, as it turned
out; the wheel well and strut e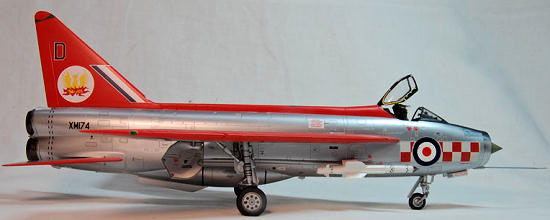 nhancements were very nice and add a lot to the
model, but I thought the cockpit, while significantly improved by Eduard’s
parts, would have benefited from a resin tub with more cast-on detail. The “Brassin”
seat with it’s added-on harnesses and details may be beyond the skills of many
other modelers besides me, and the brake line mounting is very difficult. Given
the limited utility of the PE parts for the cockpit and the error-prone decal
sheet, I would have to say that the kit is priced rather high for what you get.
nhancements were very nice and add a lot to the
model, but I thought the cockpit, while significantly improved by Eduard’s
parts, would have benefited from a resin tub with more cast-on detail. The “Brassin”
seat with it’s added-on harnesses and details may be beyond the skills of many
other modelers besides me, and the brake line mounting is very difficult. Given
the limited utility of the PE parts for the cockpit and the error-prone decal
sheet, I would have to say that the kit is priced rather high for what you get.
Having said that, what I got for my work was a very nice model, and the
enhancements that I was able to do from the kit really brought the model to
life. It was worth it just to build the colorful 56 Squadron markings, and I’ve
gotten a lot of compliments on my finished model. Recommended for experienced
modelers who have handled PE parts before; this is most definitely not a
beginner‘s kit.
Review sample provided by Eduard via Tom Cleaver.
| REFERENCES |
Lake, Jon: "English Electric Lightning"; Wings of Fame Volume 7, 1997
Thunder and Lightnings website:
http://www.thunder-and-lightnings.co.uk/lightning/index.php
Aviation Picture Hangar website:
http://www.aviation-picture-hangar.co.uk/Lightning.html
Airfix Lightning F1/F1A/F2/F3 instructions
April 2010
Copyright ModelingMadness.com. All rights reserved. No reproduction in part or in whole without express permission from the editor.
If you would like your product reviewed fairly and quickly, please contact the editor or see other details in the Note to Contributors.
Back to the Review Index Page 2023