
| KIT #: | PK-102/80327 |
| PRICE: | $ |
| DECALS: | |
| REVIEWER: | Nicolai Plesberg |
| NOTES: | Three kits |
| HISTORY |
The SEPECAT Jaguar arose as an Anglo-French joint-venture between the British Aircraft Corporation (BAC) and Bréguet in the consortium named SEPECAT – Société Européenne de Production de l’Avion d’Ècole de Combat et d’Appui Tactique – the European company for the production of a combat trainer and tactical support aircraft. Originally conceived as a trainer aircraft with a light ground attack capability, the requirements soon grew to include supersonic performance as well as the tactical roles of reconnaissance and nuclear strike.
Based in part of the Bréguet Br 121, but with a redesigned wing by the BAC to incorporate high lift devices as well as insurance of having a reasonable range (fuel capacity for 2600 miles). A separate engine consortium was set up, consisting of Rolls-Royce and Turboméca, to design a new engine, which resulted in the creation of the Adour turbofan with afterburning.
 A series of
eight prototypes were built and the first flight took place on 8 September 1968,
by the way a Jaguar E, the French two-seater. Another E flew on 11 February
1969. The prototypes for the Jaguar A – the French single-seater, flew
respectively on 23 March and 27 May 1969. The first British single-seat Jaguar S
flew on 12 October 1969 and the first Jaguar B (British two-seater) flew on 30
August 1971. The flight testing programme went forward so that the first
production examples reached the Armée de l’Air and the RAF in 1973. Despite a
similar airframe the British and French Jaguars have different avionics fit. The
armaments fit are also different including the fixed 30mm cannon; British planes
have Aden guns while the French have DEFAs.
A series of
eight prototypes were built and the first flight took place on 8 September 1968,
by the way a Jaguar E, the French two-seater. Another E flew on 11 February
1969. The prototypes for the Jaguar A – the French single-seater, flew
respectively on 23 March and 27 May 1969. The first British single-seat Jaguar S
flew on 12 October 1969 and the first Jaguar B (British two-seater) flew on 30
August 1971. The flight testing programme went forward so that the first
production examples reached the Armée de l’Air and the RAF in 1973. Despite a
similar airframe the British and French Jaguars have different avionics fit. The
armaments fit are also different including the fixed 30mm cannon; British planes
have Aden guns while the French have DEFAs.
During its service life the Jaguar has been progressively updated most notably after the participation in Desert Storm in 1991 were the RAF GR.1 / T.2s became GR.3 / T.4s with enhanced capability in delivering smart munitions as well as new engines, HUD, night vision goggles compatibility and upgraded avionics.
The Jaguar has also been exported to a number of countries in the guise of the Jaguar International, the export variant. This is based on a British airframe (both GR.1s and T.2s). By far the most important export client has been India, which have received 40 British built planes plus another 120 licence-built by Hindustan Aeronautics Limited. Ecuador, Oman and Nigeria also bought Jaguars, but in much more modest numbers, respectively 12, 24 and 18. The shortest service period of any Jaguars was in the service of the Nigerian Air Force, which took delivery of the first aircraft in 1984, but already withdrew them from service in 1991 due to financial issues. Omani Jaguars served until 2014 while the most significant users, the United Kingdom and France retired their Jaguar fleets in 2007 and 2005 respectively. India, however, continues to use their Jaguars as the sole operator left.
| THE KIT |
Matchbox:
This kit was first released in 1974 as the “BAC S Jaguar”, but in later boxings was referred to as the Jaguar GR.1 as this better covered what the box actually contained. The kit is molded, flash free, in three colors dark green, light grey and medium grey. There are 54 parts including the clear canopy. Concerning the under wing stores the kit provides a combined fuel tank / rocket pod and four Martel missiles together with the associated pylons.
Anyway the surface detailing
consists of those famous / feared trench panel lines and some simplified items.
These consist, first and foremost, of the landing gear, which only look
partially as the real thing. The burner cans and gear bays also lack detail and
the cockpit interior is nothing more than an oversized seat, a
 pilot and
not much else. The canopy also has a “flattened” appearance. The fit is, on the
other hand pretty good, but filler will be required here and there. Two options
are possible from the kit sheet but as I found some aftermarket decals, which
also contained instrument panels, I won’t mention them any further as such – at
least for now.
pilot and
not much else. The canopy also has a “flattened” appearance. The fit is, on the
other hand pretty good, but filler will be required here and there. Two options
are possible from the kit sheet but as I found some aftermarket decals, which
also contained instrument panels, I won’t mention them any further as such – at
least for now.
Heller:
This kit also stems from the mid 1970s, but as it offers the possibility to construct either a single- or a two-seater its engineering is quite different. The fuselage is split in four parts; two front and two rear parts with two different front fuselages. The wings are in one piece tip-to-tip and some more detailed gear legs are available although still not perfect. No under wing / fuselage stores are available so the aftermarket or scratch-building comes into play here. It also has raised panel lines / rivets, so some care / recribing may be required during construction if so wished. The kit consists of about 50 parts molded in a medium brown plastic and two parts in clear, the single-seat and two-seat canopies.
Variants possible are by the way a French single-seater (Jaguar A), a French two-seater (Jaguar E) and a British two-seater (Jaguar B) or T.Mk 2. A British single-seat GR.1 cannot as such be build straight from the box without extensive modifications done to the nose (laser rangefinder) and fin (RWR fairing).
The decal sheet is relatively nicely printed but some slight register issues are present.
| CONSTRUCTION |
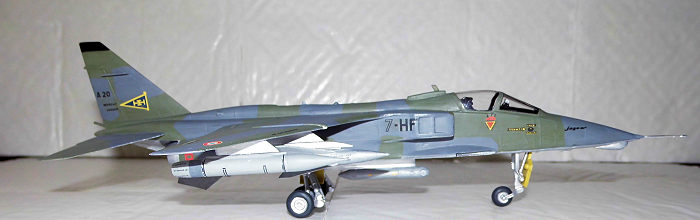
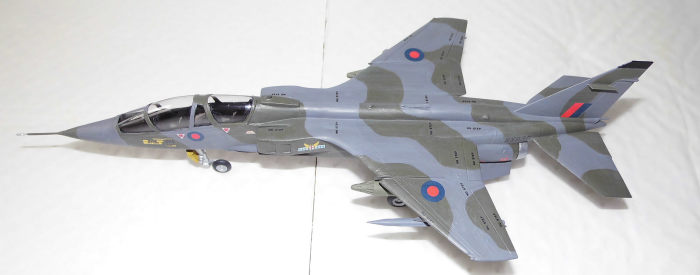
As I had three kits in my stash, a Matchbox kit and two Heller kits, I decided to construct two British – a GR.1 from the Matchbox kit and a T.Mk.2 from one of the Heller kits. With the remaining Heller kit, I long stayed undecided whether to do a French single-seat Jaguar A or a two-seat Jaguar E. In the end I chose a French single-seater, because I had easier getting photos of those planes than what the two-seat option offered.
So decided I began construction with the Matchbox kit by cutting off the intake splitter plates and thinning the edges getting a more realistic look in this area. As the forward part of the Matchbox kit fuselage looked a little bland, I took my razor saw and cut off the front fuselage just behind the cockpit as my plan was to draft the redundant Heller single seat front fuselage to the Matchbox fuselage. In that way it would be a lot easier to use the Heller canopy (being more accurate in outline than the Matchbox canopy) and interior parts to soup up the Matchbox kit. My cuts were pretty precise so the fit between the Heller front fuselage matched the Matchbox fuselage pretty well. I also cut off the Heller nose so I could still use the original Matchbox nose pieces, as the Heller nose are not suited for the GR.1 variant. The pieces were then carefully glued together; some shimming was necessary and I also glued Evergreen bits across the seams to strengthen them and also paying respects to the interior parts – that the shims were out of the way for those when trapping the interior and closing the fuselage without any trouble.
As the idea of gluing the front and rear fuselage parts together went well with the Matchbox / Heller parts, I decided to do the exact same thing with the fuselage parts of the two Heller kits as I figured it would give a smoother fit all around. When all the fuselage seams had dried I carefully gave them some more glue from the bottle strengthening them further.
 While that
dried I began gluing the interior parts together; the seats were glued to the
floors and the control columns to the instrument panels. For the two British
Jaguars I made a template based on a decal to fabricate three new instrument
panels. They also required some trimming of the other interior parts to fit
properly, but that was really not hard to do. The French Jaguar got a kit panel,
as there were only three panel decals available. Next step I painted the
interiors and interior of intakes on all three kits satin black. Naturally it
took a couple of coats to cover it properly but no news in that. Then I glued in
the amount of nose weight required in all three kit noses – as there are plenty
of room it shouldn’t be a problem to get enough weight glued in. Then I resumed
on the interior by painting seat cushions army green (Humbrol 102) and some
touch up of the satin black (Humbrol 85). The decals were put on the panels for
the two British planes and the nose gear bay plus interior for the French was
glued into the right fuselage half and alignment secured with the left half.
While that
dried I began gluing the interior parts together; the seats were glued to the
floors and the control columns to the instrument panels. For the two British
Jaguars I made a template based on a decal to fabricate three new instrument
panels. They also required some trimming of the other interior parts to fit
properly, but that was really not hard to do. The French Jaguar got a kit panel,
as there were only three panel decals available. Next step I painted the
interiors and interior of intakes on all three kits satin black. Naturally it
took a couple of coats to cover it properly but no news in that. Then I glued in
the amount of nose weight required in all three kit noses – as there are plenty
of room it shouldn’t be a problem to get enough weight glued in. Then I resumed
on the interior by painting seat cushions army green (Humbrol 102) and some
touch up of the satin black (Humbrol 85). The decals were put on the panels for
the two British planes and the nose gear bay plus interior for the French was
glued into the right fuselage half and alignment secured with the left half.
When instrument decals had dried they were sealed in with flat varnish. I then added some plastic bits inside the rear part of both Heller kits so the rear lower fuselage part (35) could be easier aligned. Then I glued the fuselage for the French Jaguar together. Some adjustment of the instrument panels for the British Jags was necessary to get a proper fit and they, together with the interiors was glued to the right fuselage halves of both aircraft (and the nose wheel well for the GR.1). The rear bottom fuselage piece for the French aircraft was adjusted (sanded off a half millimetre in each side) then glued in place. Some gluefilling of the fuselage seam was done to strengthen it. As the interiors for the two Brit Jags were dry the fuselages were glued together.
As the fuselages had set the closed part of the nose gear doors was glued in place as was the rear lower fuselage piece on the GR.1. The procedure for the rear fuselage piece on the T.2 was repeated from the French Jag. In addition to that, I had to reglue the whole nose section as the plastic glue oddly had failed to bind the join properly. This was done with CA glue. When these small repairs had set the fuselage seams were sanded and filled. They took some sessions to deal with, especially the GR.1 as the fit between the Matchbox / Heller fuselage parts were not perfect, but on the other hand not totally bad either. Eventually the fuselage seams got invisible and I was able to glue the intakes, wings and tail planes onto the fuselages of all three Jags in one session. These seams also required some gluefilling and filler for the more serious unaligned seams and needed several sessions to be perfectly done. I also scribed in the outline of the closed nose gear doors on the two Heller kits as they aren’t present in the kit parts.
 While all
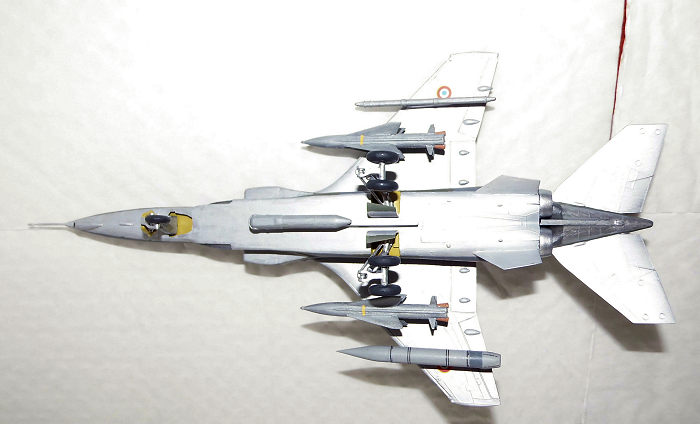
these went along I also began to search my spares department for stores to put
under the wings / fuselages. I found some suitable bombs and drop tanks for the
GR1 (the fins were cut from sheet styrene), some further bombs and Matra rocket
pods, a jammer pod plus a Phimat chaff dispenser to the T.2 and some AS.30L
missiles, an Atlis pod and a Barracuda pod (Query: does anyone know what the
heck the last item is – I tried to google it, but had zero luck!) for the French
A. Some of the exotic things most notably for the French Jag came from a Heller
Hi-Tech weapon set. They were painted and decaled accordingly to those
instructions. The pylons for all those goodies were cut from 1,5 mm styrene
sheet and sanded to shape.
While all
these went along I also began to search my spares department for stores to put
under the wings / fuselages. I found some suitable bombs and drop tanks for the
GR1 (the fins were cut from sheet styrene), some further bombs and Matra rocket
pods, a jammer pod plus a Phimat chaff dispenser to the T.2 and some AS.30L
missiles, an Atlis pod and a Barracuda pod (Query: does anyone know what the
heck the last item is – I tried to google it, but had zero luck!) for the French
A. Some of the exotic things most notably for the French Jag came from a Heller
Hi-Tech weapon set. They were painted and decaled accordingly to those
instructions. The pylons for all those goodies were cut from 1,5 mm styrene
sheet and sanded to shape.
When the airframes were finished I cleaned the edges of the cockpit plus upper parts of the seats with a moist cotton bud to remove any sanding residue residing there. The remaining surroundings were then painted satin black and left to cure. The canopies were washed and dried then attached to the cockpit edges with gloss varnish – as usual the gaps were filled with more gloss and superfluous dried gloss sanded away with a light hand when dry. The last missing from the airframe, apart from antennae and the gear, were the two belly fins which were attached. As the belly fins in the Heller kits are broader than the Matchbox ones the latter were extended by a shim glued in place and accordingly blended in with filler and sanding. When done they were glued in place and made the Matchbox kit almost indistinguishable from the Heller kits regarding this.
The next issue, I dealt with, was
to assemble the main gear legs of the two Heller kits. A modification is
necessary here or it will look odd. If the wheels are attached to the axles as
they appear in the kit the inner wheels cannot be upright simply because there
is not enough clearance from the gear leg. The best way of dealing with this is
to extend the axles a bit so clearance is created. Whether this is the correct
way is a bit difficult for me to say because the gear legs seems a bit
misconceived even though the are way better than Matchbox’ highly simplified
ones. Anyway I chose to stick with them as I wasn’t in the mood to do the whole
corre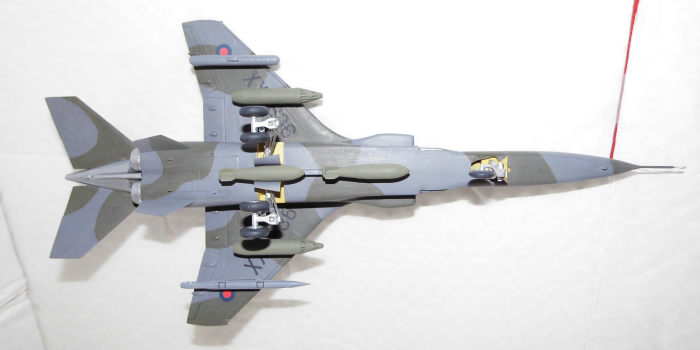 ctional
effort here. As the gear legs were ready, including the nose legs, they were
painted silver, as was the wheel hubs. Tires went tire black and gear bays plus
inner side of doors went chromate yellow (Model Master 1584). Wheels were then
glued to the gear legs and before they were glued to the models the airframes
were cleaned to get ready for paint. However, just after attaching it, I
discovered that the GR.1 sat with a noticeable nose down attitude – at least
compared to the French Jaguar, as I assumed that the stance should be the same.
I measured the difference to 5 millimetres and it was caused by the deeper gear
bay piece from the Heller kit compared to the nonexistent gear bay in the
Matchbox kit – in addition a shorter nose gear leg made the stance difference
look out! With a quick decision I got the nose gear leg off without messing too
much up, made the extension, touched it up with silver paint before gluing it in
place for the second time. As the stance now matched the French Jag I only
needed to add my homemade pylons plus the camera pod to the nose of the Jaguar
A, which by the way also was made from parts in my spares department. After the
usual cleaning session I went into paint mode.
ctional
effort here. As the gear legs were ready, including the nose legs, they were
painted silver, as was the wheel hubs. Tires went tire black and gear bays plus
inner side of doors went chromate yellow (Model Master 1584). Wheels were then
glued to the gear legs and before they were glued to the models the airframes
were cleaned to get ready for paint. However, just after attaching it, I
discovered that the GR.1 sat with a noticeable nose down attitude – at least
compared to the French Jaguar, as I assumed that the stance should be the same.
I measured the difference to 5 millimetres and it was caused by the deeper gear
bay piece from the Heller kit compared to the nonexistent gear bay in the
Matchbox kit – in addition a shorter nose gear leg made the stance difference
look out! With a quick decision I got the nose gear leg off without messing too
much up, made the extension, touched it up with silver paint before gluing it in
place for the second time. As the stance now matched the French Jag I only
needed to add my homemade pylons plus the camera pod to the nose of the Jaguar
A, which by the way also was made from parts in my spares department. After the
usual cleaning session I went into paint mode.
| COLORS & MARKINGS |
First order of business was to paint the canopy frames flat black before continuing further on. The two British Jaguars were painted with Dark Sea Grey (Humbrol 164) all over with a disruptive camouflage pattern of Dark Green (Humbrol 163) in a wraparound scheme. I had to use several reference pictures to get about this but it went remarkably well. The French Jaguar was painted in the scheme suggested in Heller’s instructions, which is silver for the underside, Dark Grey (Humbrol 125) and Army Green (Humbrol 102) for the sides and upper surfaces camouflage scheme. The fin tips for all three went satin black Humbrol 85) and burner cans went burned metal (Humbrol 53). The arrester hooks went grey metallic (Humbrol 56) and when all the color coverage / demarcation lines were in order the gloss coat for the decals was applied.
Jaguar GR.1:
The roundels and fin flashes came
from the Matchbox kit sheet and, as usual with Matchbox decals (my experience),
they worked excellently without any hiccups. The other decals also went on with
no troubles other than they were a bit stiff, because I had secured them with
varnish to prevent disintegration as they
 had looked
suspicious on the sheet.
had looked
suspicious on the sheet.
Jaguar T.2:
Here I also used the national markings from the kit sheet but the fin flashes were a bit off register so this was corrected by trimming the edges. The Heller decals worked excellently too so no criticism here! The remaining decals behaved the same way as on the GR.1.
Jaguar A:
Heller’s kit decals all the way! Primarily because I didn’t have anything else to use. As before they performed admirably so it was really a breeze to apply them. There were slight register issues apparent, but nothing to worry about, since they were very small and insignificant.
Upon drying and after cleaning remaining decal glue off (this is especially important with Matchbox decals as they come with more than adequate glue!) they were sealed with a gloss coat before receiving a flat coat – actually two flat coats as the coverage in the first run wasn’t adequate.
The final leg consisted of making and attaching some smaller details, some of them scratch-build, which of course were painted the required colors and attaching the burner cans plus the stores and my three Jaguars were finished.
| CONCLUSIONS |
If you, as I sometimes do, get to build some ancient kits as in this case, since I believe these two kits are not the top of the pop so to speak. Did I have a disaster or two? Sure, the drop tanks on the British GR.1 have a nose upwards altitude which I don’t believe is right, but that’s the deal when making your own pylons. Maybe the wing incidence on the Matchbox kit is a bit different compared with the Heller kit or what, I dunno. The armaments fit may not fit the time period either, but it’s really hard to get around pictures of planes with real hardware under the wings so…but the really great success with this project, was, that the Matchbox fuselage and the Heller ditto let themselves easily blend into each other; easier than I’d expected.
Anyway the kits build fairly easy and if you’re eager to try a new painting technique then these kits are fine for such experiments, but regarding accuracy…. well they sure do look like Jaguars to me so they can’t be far off. They are pretty easy to put together so most modelers should have no trouble in building them.
| REFERENCES |
Wikipedia, the Online Encyclopedia
The Encyclopedia of Modern Warplanes,General Editor: Bill Gunston,© 1995 Aerospace Publishing Limited, Blitz Editions, ISBN 1-85605-290-7
Warbirds no25: RAF Airpower Today,Michael J. Gething & Lindsay T. Peacock,Arms and Armour Press 1984 ISBN 0-85368-634-3. This booklet contains some photos of Jaguars from Sqn 14 from RAF Germany which turned out to be very useful when placing the decals as there was no decal placement guide with the decals!
17 October 2023
Copyright ModelingMadness.com. All rights reserved. No reproduction in
part or in whole without express permission from the editor.
If you would like your product reviewed fairly and fairly quickly, please
contact
the editor or see other details in the
Note to
Contributors. Back to the Main Page
Back to the Review
Index Page
Back to the Previews Index Page