|
KIT: |
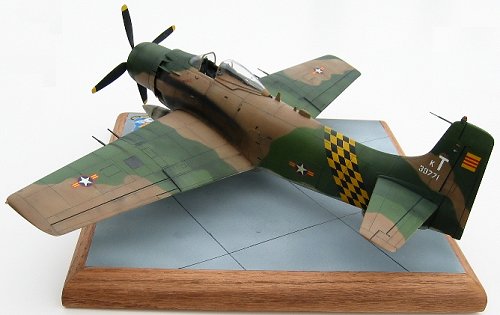
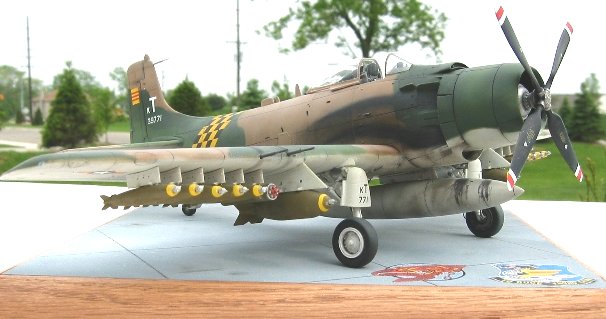
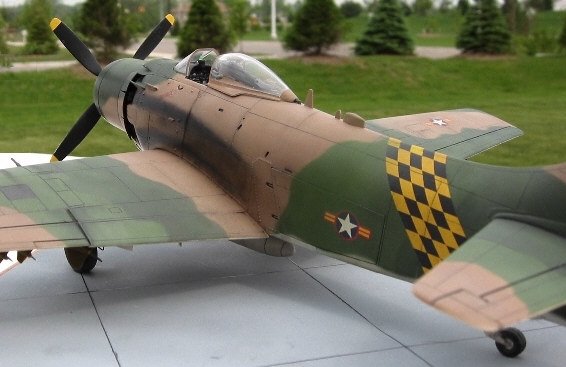
Tamiya 1/48 A-1H Skyraider |
|
KIT # |
61073 |
|
PRICE: |
$32.00 |
|
DECALS: |
2 aircraft |
|
REVIEWER: |
Triet Cam |
|
NOTES: |
Cutting Edge 48-097 decals used |
|
HISTORY |
A trip to Saigon, Vietnam in 1995 got me back into modeling after 17 year absence - this was my fourth completion. While there, I saw an old picture we left behind. It was my dad climbing down from an A-1H returning from a mission. An unknown photographer took the picture, probably in the late 60s, possibly during Tet Offensive. I also visited Bien Hoa airbase where his squadron, the 518th FS was. The guns are silent now, only the ghosts of the past remained at the world’s once busiest airport. The north end of the field was a bone yard of many old warplanes including many Skyraiders resting, mostly the H’s and a few E’s. Barely recognizable, it’s a sad ending for a prolific attacker. It was the only fighter to wear the brunt of the entire war – from the beginning to the end.
The 518th VNAF was opened in June 1963 in Bien Hoa, to support the ARVN troops in the Military Region Cor. III, which was the deep south VN and part of the Central Highland. They continued to operate the Skyraiders until the fall of Saigon in 1975. The Skyraider was a great low level attacker, and VNAF pilots used it effectively, with many boasting over 6000 savage combat hours. But by 1972 it was obsolete, and due to lack of spare parts, only three squadrons left operating the old warrior. Coupled with serious threats from the new Soviets SA-7 made it even more difficult for Skyraider pilots. The last one lost in combat was on April 29, 1975, when a pair from 518th, 514th and a lone AC-119 fended off the Communist onslaught into Saigon. The battle over Saigon went all night until an SA-7 hit the AC-119, killing the crew. Shortly after, another SA-7 hit one A1-H of the 518th sq. killing the pilot instantly. He had flown combat missions over seven years. The remaining escaped to U Tapao, Thailand, and a sad and one of the most violent chapters in history is closed. When done 58000 American lie dead along with two million Vietnamese, and the wounds are still healing after 25 years.
|
THE KIT |
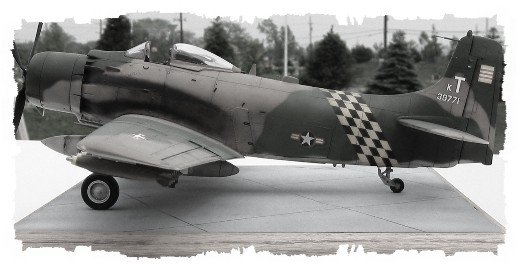
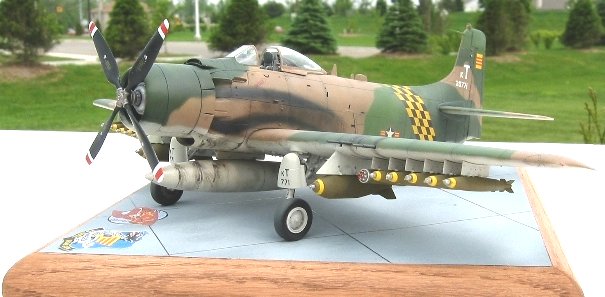
When returning to the US, I set out to build the same aircraft from the picture. Tamiya offered their superb 1/48th A1-H US Navy version, and later in 1999, the USAF version.
This was the USAF version released by Tamiya with late war ordinances included, and a substantial price increase. The kit contained eight light gray sprues in five separate bags, a full size sheet template for cutting out masking patterns. Decal options included two USAF 56th SOW group, one is night fighter. Paint instructions called for Tamiya brand, obviously. No flash and very little sink marks visible inside gear doors. This is one great-engineered kit, typical Tamiya quality.
|
CONSTRUCTION |
 Construction started at the cockpit, then painted dark gull gray. I thought of
using the CMK interior set but decided not, since the only improvement I saw was
the pilot seat. The IP was painted gloss black, then decal applied over with Solvaset solution to help snug around the recess round gauges. The cockpit was
given a coat of clear gloss, follow by a black wash, and dry brushing to bring
out raised details. A coat of Polyscale flat was given and it was done. Seat
belts were made from drafting tape. Gun sight glass was made from a Sprite
bottle.
Construction started at the cockpit, then painted dark gull gray. I thought of
using the CMK interior set but decided not, since the only improvement I saw was
the pilot seat. The IP was painted gloss black, then decal applied over with Solvaset solution to help snug around the recess round gauges. The cockpit was
given a coat of clear gloss, follow by a black wash, and dry brushing to bring
out raised details. A coat of Polyscale flat was given and it was done. Seat
belts were made from drafting tape. Gun sight glass was made from a Sprite
bottle.
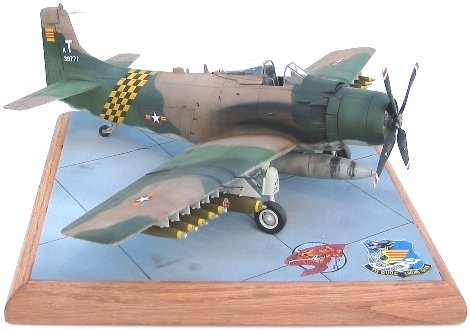
The fuselage went together next. The fit and finish is just amazing, no filler needed, just minimum sanding. For air force A1, tail hook was not used, so the hole is filled. The engine assembly is next. There are two options for display, open engine and cowl flaps, or closed. I chose open, since late A1’s did not use engine covers, and to display the nicely detailed engine. I painted the fuselage near the exhaust the appropriate colors before the exhaust pipes went on. This is to avoid over spraying into the exhaust pipes later on. It’s hard to reach under the cowl flaps and repaint the pipes. The exhaust pipes are a little short. The actual ones extended beyond the flaps, looking from side view. It is an easy fix, but I did not notice until the cowl was glued on.
The wings were next. It’s a good idea that landing gear doors and wing bulkheads are molded as one piece. This is stronger than door hinge glued into wings. The down side is a little difficult masking for painting. All flaps are up and dive brakes closed. Landing struts went on next with tires left out until the end.
|
PAINT & DECALS |
I used Model Masters enamel and acrylic paints, and Handy Tack as masking. I sprayed upper enamel dark tan (FS30219), underneath enamel white. Aircraft gray was diluted 75% with thinner and sprayed underneath to retain a lighter gray tone – straight FS36620 is too dark. The acrylic medium green (FS34079) was next, proceeded by dark green (FS34102). Tamiya gloss coat was final.
 I used Cutting Edge's VNAF decal
sheet. I missed out on
this sheet before, so when CE re-released this last year, I quickly grabbed two.
It offered six different schemes based on actual aircraft, in gull gray or SEA
tones, but only enough insignias for two models. This was well researched, and
the only one I know to cover this subject 48th scale at the time.
Decal quality is great, very thin but strong and reacted to Solvaset without
problems. However, there is a problem with white over print around the insignia.
I did not see this on the sheet until the decal was on the wing. I moved that to
the bottom wing, and used a drafting circle template to trim the rest as close
as possible. But the white can still be seen, and nothing can be done at this
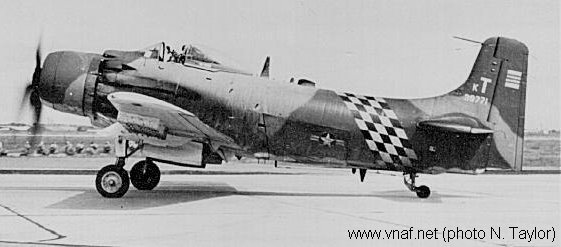
point to hide that. The squadron code marking on the picture was not legible
because the tail was badly shot off. It’s either kI, kT, kF, or kP. My dad thinks
it’s kT, so it is, and no point in asking him the serial numbers when he can’t
even remember the tail code. I found the actual plane from vnaf.net with the
same marking. I don’t know if it’s his plane, since he wasn’t sure. If it
indeed was, then this plane was eventually lost in action, because he was shot
down in Tay Ninh, near Cambodia border in 1973, and spent a month behind enemy
lines.
I used Cutting Edge's VNAF decal
sheet. I missed out on
this sheet before, so when CE re-released this last year, I quickly grabbed two.
It offered six different schemes based on actual aircraft, in gull gray or SEA
tones, but only enough insignias for two models. This was well researched, and
the only one I know to cover this subject 48th scale at the time.
Decal quality is great, very thin but strong and reacted to Solvaset without
problems. However, there is a problem with white over print around the insignia.
I did not see this on the sheet until the decal was on the wing. I moved that to
the bottom wing, and used a drafting circle template to trim the rest as close
as possible. But the white can still be seen, and nothing can be done at this
point to hide that. The squadron code marking on the picture was not legible
because the tail was badly shot off. It’s either kI, kT, kF, or kP. My dad thinks
it’s kT, so it is, and no point in asking him the serial numbers when he can’t
even remember the tail code. I found the actual plane from vnaf.net with the
same marking. I don’t know if it’s his plane, since he wasn’t sure. If it
indeed was, then this plane was eventually lost in action, because he was shot
down in Tay Ninh, near Cambodia border in 1973, and spent a month behind enemy
lines.
|
WEATHERING |
 Heavy weathering is what I’m after. I lightened
random upper panels to show faded paint, then applied a wash with water and
pastels mix, consisting of black, light gray and earth. A coat of Polyscale flat
sealed everything. Then I proceeded to grunge the plane. From memory
recollections, these planes in Tan Son Nhut airbase were dirty to the point of
grotesque. It’s interesting that most photographs showed these planes much
cleaner than they were. Those of you served there would remember during summer
it can get to 100 degree and 100% humidity easily. Along with the monsoon down
pour and the pollution, they will wear out clean airplanes in no time. But my
method is strictly personal. The only disappointment was when a final flat coat
was put on; the heavy faded paint did not stand out. Exhaust stains were
painted with Tamiya smoke, followed by heavy black pastel applications over.
Heavy weathering is what I’m after. I lightened
random upper panels to show faded paint, then applied a wash with water and
pastels mix, consisting of black, light gray and earth. A coat of Polyscale flat
sealed everything. Then I proceeded to grunge the plane. From memory
recollections, these planes in Tan Son Nhut airbase were dirty to the point of
grotesque. It’s interesting that most photographs showed these planes much
cleaner than they were. Those of you served there would remember during summer
it can get to 100 degree and 100% humidity easily. Along with the monsoon down
pour and the pollution, they will wear out clean airplanes in no time. But my
method is strictly personal. The only disappointment was when a final flat coat
was put on; the heavy faded paint did not stand out. Exhaust stains were
painted with Tamiya smoke, followed by heavy black pastel applications over.
The guns and pitot tube were replaced with Minimeca tubing and painted with MM gunmetal metalizer. Brake lines were added from 0.01 brass rod. The base was made from scrap 1x10 with wood trim molding.
|
CONCLUSIONS |
So, after six years, my quest to build my dad’s Skyraider is done, but the tail code is questionable. Overall, this is a great kit, fun and simple to do, and can be built into a great model by all skill levels. There are so many interesting schemes to choose, by undoubtedly one of the greatest aircraft of all time.
Dedicate to those who fought and died in the air war over Vietnam, and my dad, who lived in a violent life for 10 years.
|
REFERENCES |
 “Flying Dragon: The South Vietnamese Air Force” by Robert Mikesh. Osprey Pub.
Highly recommended
“Flying Dragon: The South Vietnamese Air Force” by Robert Mikesh. Osprey Pub.
Highly recommended
“www.vnaf.net” web page. Leon Wohlert did a superb job of gathering photographs for this site.
“Skyraider.org” web page. Have many USAF and NAVY Spad pictures.
“VNAF: South Vietnamese Air Force 1945-1975” by Jim Mesko. Squadron Pub.
“Douglas A-1 Skyraider” by Frederick Johnsen.. Schiffer Pub.
And my dad, a former Spad driver.
If you would like your product reviewed fairly and quickly where it will be seen by well over 150,000 visitors a month, please contact me or see other details in the Note to Contributors.