Tamiya 1/32 F-4E Phantom II
|
KIT # |
60310 |
|
PRICE: |
$119.00 |
|
DECALS: |
See review |
|
REVIEWER: |
|
|
NOTES: |
Bits from Cutting Edge, Seamless Suckers, CAM, Flight Path, Eduard and Verlinden. |
|
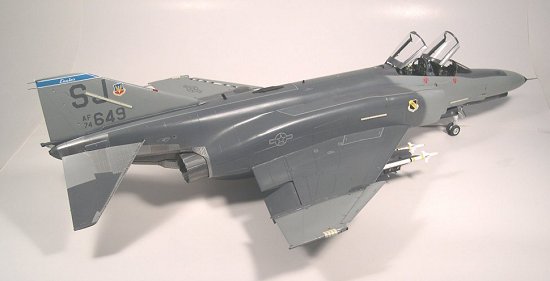
HISTORY |
I'll skip the history of the F-4, since it has been
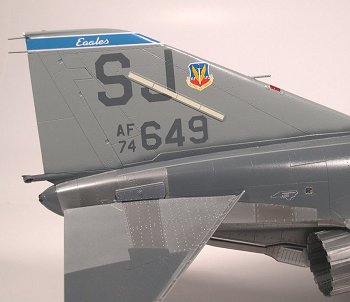
told many times before. The subject of my model is an late-block F-4E
from the 334 th Tactical Fighter Squadron, 4
th
Tactical Fighter Wing at Seymour Johnson AFB, NC in 1989. 4th
TFW Phantoms are of particular interest to me since I spent a lot of time
dodging them (probably more like them dodging me!) during the
 early years of my aviation career in eastern North Carolina. These jets
were all fitted with TISEO (Target Identification System
Electro-Optical), a television-based "telescope" for visually identifying
a target (such as a student pilot in a Cessna) at long range, and the
ARN-101 navigation system. "Arnie" F-4Es can be identified by the
elongated pyramid-shaped antenna fairing on the fuselage spine. In the
rear cockpit, a keypad was installed on the right console, and a new
display was installed on the rear instrument panel. Static discharge
wicks were placed on the trailing edges of the wings, tail, and
stabilators, but these were removed by the late '80s. The 4th
TFW had a long and distinguished career with the Phantom II, spanning
over twenty years, and including more than 8000 combat missions in Viet
Nam. The 334 th TFS was the last of the 4
th TFW
squadrons to convert to the F-15E, giving up their Phantoms in December,
1990.
early years of my aviation career in eastern North Carolina. These jets
were all fitted with TISEO (Target Identification System
Electro-Optical), a television-based "telescope" for visually identifying
a target (such as a student pilot in a Cessna) at long range, and the
ARN-101 navigation system. "Arnie" F-4Es can be identified by the
elongated pyramid-shaped antenna fairing on the fuselage spine. In the
rear cockpit, a keypad was installed on the right console, and a new
display was installed on the rear instrument panel. Static discharge
wicks were placed on the trailing edges of the wings, tail, and
stabilators, but these were removed by the late '80s. The 4th
TFW had a long and distinguished career with the Phantom II, spanning
over twenty years, and including more than 8000 combat missions in Viet
Nam. The 334 th TFS was the last of the 4
th TFW
squadrons to convert to the F-15E, giving up their Phantoms in December,
1990.
|
THE KIT |
Tamiya's F-4E kit represents a Viet Nam-era version
of the jet. It is basically the same kit as the F-4C/D, with extra parts
for the gun nose, plus the slotted stabilators and undersized afterburner
nozzles from the F-4J kit. The nose is accurate in shape (unlike the
Revell F-4E kit) and molded in clear plastic to display the well-detailed
radar unit and 20mm Gatling gun. The clear parts are probably wasted on
most 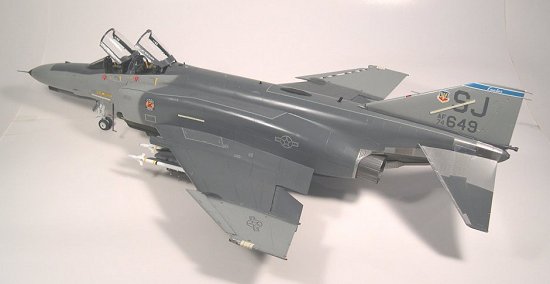 modelers, who will probably paint over them. A better option would
have been to include a removable radome and access panels for the gun,
like Tamiya did for their F-15E. Modelers wanting to display the radar
will want to replace the plastic radar dish with a more delicate
photo-etched one. Both the early, short gun muzzle and the later Midas
muzzle are included. Decals are included for two Viet Nam jets. Since
the early F-4Es' cockpit was the same as the F-4D, the kit uses the same
parts found in the F-4C/D kit.
modelers, who will probably paint over them. A better option would
have been to include a removable radome and access panels for the gun,
like Tamiya did for their F-15E. Modelers wanting to display the radar
will want to replace the plastic radar dish with a more delicate
photo-etched one. Both the early, short gun muzzle and the later Midas
muzzle are included. Decals are included for two Viet Nam jets. Since
the early F-4Es' cockpit was the same as the F-4D, the kit uses the same
parts found in the F-4C/D kit.
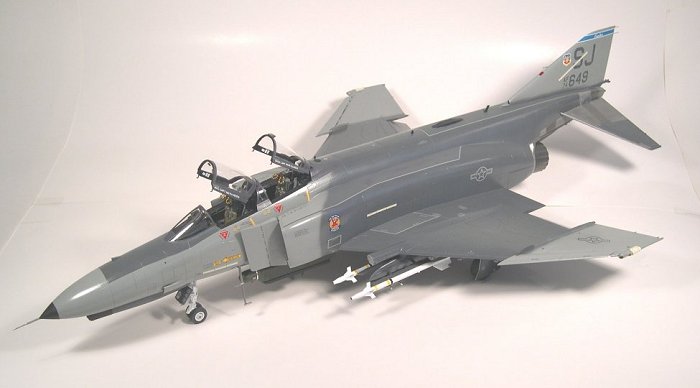
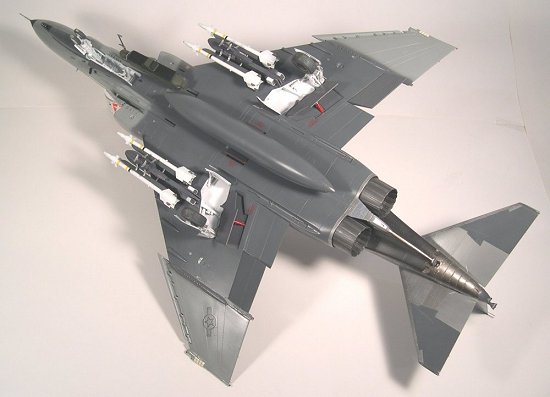
Early F-4Es had a "hard wing" which used the same leading edge flaps found on the other versions of the F-4. These leading edge devices were hinged on the underside and would drop down when the flaps were lowered. In an effort to improve control at high angles of attack, leading edge slats were fitted to the F-4E fleet soon after the Viet Nam war. Apparently only about a half dozen slat-winged F-4Es actually flew combat in Viet Nam. Cutting Edge sells an "update set" to convert the Tamiya kit to a late-block F-4E. The set includes cockpit parts, new inboard wing leading edges with extended slats, new outer wing panels with slats, ARN-101 antenna, and a new wing leading edge section with a TISEO. I also added Seamless Suckers intakes, CAM seats, and robbed Eduard F-4J and Verlinden F-4C/D detail sets for various tidbits. Eduard has since released several very good detail sets specifically for the F-4E kit, but the Verlinden set still has a lot of parts Eduard and Cutting Edge don't provide.
|
CONSTRUCTION |
 Assembly of the Tamiya F-4s start with the intakes,
which are not known for their fit or ease of construction. Seamless
Suckers' updated intake ducts are molded as a single piece. All one has
to do is remove some plastic on the fuselage, then drop the intake duct
in the hole. I had to add .030 styrene strip to the aft edges of my
intakes to move them forward a little. If left as-is, the intakes will
sit too far aft and interfere with the forward edge of the wing where it
meets the intakes. Taping the lower wing section to the fuselage will
ensure the intakes are fitted properly. A little filler around the
edges, and done! The entire operation only took a little over an hour,
including First Aid for an Xacto wound. The only downside to the new
intakes is that now you have a seam to fill between the intake and the
fuselage where the vari-ramp meets the intake. Still, it's a lot better
wrestling with the kit intake ducts.
Assembly of the Tamiya F-4s start with the intakes,
which are not known for their fit or ease of construction. Seamless
Suckers' updated intake ducts are molded as a single piece. All one has
to do is remove some plastic on the fuselage, then drop the intake duct
in the hole. I had to add .030 styrene strip to the aft edges of my
intakes to move them forward a little. If left as-is, the intakes will
sit too far aft and interfere with the forward edge of the wing where it
meets the intakes. Taping the lower wing section to the fuselage will
ensure the intakes are fitted properly. A little filler around the
edges, and done! The entire operation only took a little over an hour,
including First Aid for an Xacto wound. The only downside to the new
intakes is that now you have a seam to fill between the intake and the
fuselage where the vari-ramp meets the intake. Still, it's a lot better
wrestling with the kit intake ducts.
Once the intakes were installed, I moved on to the
cockpit. The aft bulkhead in the rear cockpit of an F-4 is vertical, not
sloped as depicted in the kit, so I built a new bulkhead and extended the
floor to match. I detailed the rear bulkhead with styrene strip, brass
tube and wire. The avionics shelves just aft of the side consoles were
built up with styrene and brass. Cutting Edge's "Update" includes
cockpit parts that correctly show the ARN-101 keypad on the right rear
console and the extra display added to the rear instrument
 panel. The
resin parts are beautifully cast and are direct replacements for the kit
parts. My only complaints about Cutting Edge's cockpit parts are the
front radar screen appears to be too small, and they didn't include any
of the black boxes aft of the rear cockpit consoles. I made a larger
front radar screen using a Waldron Punch & Die set and found some black
boxes in the VLS cockpit set. The instrument panels were dressed up with
a combination of Waldron and Reheat instruments. The back side of the
rear instrument panel received short lengths of brass tube for the
instrument casings and what seemed like a couple of feet of wire and fine
solder. When the area behind the front seat of your F-4 model begins to
look like a mass of black spaghetti, you know you've almost got enough
wire there.
panel. The
resin parts are beautifully cast and are direct replacements for the kit
parts. My only complaints about Cutting Edge's cockpit parts are the
front radar screen appears to be too small, and they didn't include any
of the black boxes aft of the rear cockpit consoles. I made a larger
front radar screen using a Waldron Punch & Die set and found some black
boxes in the VLS cockpit set. The instrument panels were dressed up with
a combination of Waldron and Reheat instruments. The back side of the
rear instrument panel received short lengths of brass tube for the
instrument casings and what seemed like a couple of feet of wire and fine
solder. When the area behind the front seat of your F-4 model begins to
look like a mass of black spaghetti, you know you've almost got enough
wire there.
Before moving on to the wings, I cleaned up the fuselage a little. The raised panels that have caused considerable debate on some of the internet forums are not present in any of my photos, so I removed them. I filled the panel lines for the ram air turbine bay on the upper left side of the fuselage, then scribed a single rectangular panel in its place. The F-4E and F had avionics installed here.
I cut away a section of the left wing's top and
bottom halves in order to install the new resin leading edge containing
the TISEO. With careful test fitting and trimming, the resin part fits
well. I hollowed out the lump that was
 supposed to represent the camera,
and dropped an MV Products lens inside. I built my model "slats in
/flaps up" since the USAF usually parked their jets this way. Cutting
Edge's instructions don't mention how to build the slats in the retracted
position and neglect to mention that the flaps should be lowered if the
slats are "out" (extended). Other than during maintenance, the only time
the flaps were up with the slats out was in flight with the landing gear
up. To build the slats "in", I threw out the Cutting Edge inboard wing
leading edge parts, and scribed new panel lines in the wings to depict
the retracted inboard slats. I then modified the resin slat actuator
fairings by removing the actuator arms and filling the resulting slots.
These were then attached to the undersides of the wings.
supposed to represent the camera,
and dropped an MV Products lens inside. I built my model "slats in
/flaps up" since the USAF usually parked their jets this way. Cutting
Edge's instructions don't mention how to build the slats in the retracted
position and neglect to mention that the flaps should be lowered if the
slats are "out" (extended). Other than during maintenance, the only time
the flaps were up with the slats out was in flight with the landing gear
up. To build the slats "in", I threw out the Cutting Edge inboard wing
leading edge parts, and scribed new panel lines in the wings to depict
the retracted inboard slats. I then modified the resin slat actuator
fairings by removing the actuator arms and filling the resulting slots.
These were then attached to the undersides of the wings.
The outer wing panels needed some help before being
attached to the model. I started by correcting the panel lines, which
were different on the slatted wings. The new resin panels did not fit
well and the hinges didn't fit the kit wing. After much fitting, filing,
and swearing I finally decided to just completely remove the hinges and
their fairings on the underside of the outer wing panels. Once the wing
panels were attached, I cut the hinge fairings from the kit's outer wing
panels, and super glued them to the resin parts. This allowed the outer
and inner hinge fairings to match up perfectly and hid the area where I
removed resin to reduce the excessive dihedral of the resin wing panels.
The outer wing panels were also thinner than the corresponding wing
section, but the new hinge fairings helped hide this, too. Before adding
the outboard slats, I made new
 wing fences from .010 sheet styrene to
correct the shape at the very front edges. The outboard slats were
missing a small triangular plate on their inboard ends, which was quickly
fixed with sheet styrene.
wing fences from .010 sheet styrene to
correct the shape at the very front edges. The outboard slats were
missing a small triangular plate on their inboard ends, which was quickly
fixed with sheet styrene.
The vertical stabilizer has a couple of raised panels that need to be removed. The kit part for the ram air intake at the base of the tail was replaced with one made from brass and styrene. The pitot tube for the artificial feel system bellows was replaced with brass tube since I figured I would eventually break this off. I have seen several reviews mentioning fit problems with the tail. After some experimenting, I found that the large tab jutting out of the fuselage interfered with a brace inside the tail. I removed some plastic from the top of the tab, and the tail fit the fuselage much better, with just a very small gap to fill.
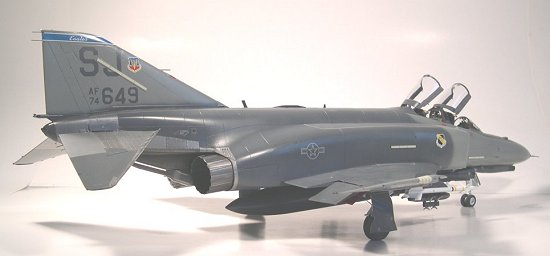
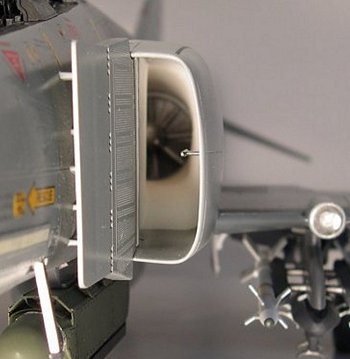
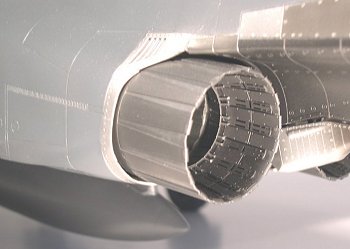 In spite of all of the research Tamiya put into
their F-4 kits, they somehow got the exhausts much too small in
diameter. My theory is that the guy who designed the exhausts usually
works in Tamiya's 1/35 armor department and got confused about what scale
he was supposed to be working in. Cutting Edge seems to have used the
Tamiya nozzles as the basis for their new ones, since theirs are also too
small. The nozzles found in the Revell F-4E kit are the correct
diameter, they just lack any interior detail. Much to my delight, I
found a pair of long J-79 nozzles in my 1/32 Revell RF-4C kit (they were
left over from the RF-4E version of the kit). After some experimenting
with the Tamiya nozzles, I found that they fit right inside the Revell
nozzles, solving the problem of mating them to the Tamiya afterburner
cans. The only changes I had to make was to remove what little detail
there was inside the Revell nozzles and cut away the "turkey feathers" of
the Tamiya nozzles. The Revell nozzles are shorter than the Tamiya ones
and don't completely cover the base of the Tamiya parts, so I extended
the Revell nozzles with sheet styrene. On the suggestion of another
person using the Revell nozzles, I used photo-etched parts from the
Eduard F-4J detail set to build up the interior of the nozzles. Much
better than my original plan of using sheet styrene. I had to remove
some plastic from the keel, above and between the engines, to make room
for the wider nozzles. Go slow and do a lot of test-fitting. Once
installed, the Revell nozzles are a major improvement to the looks of the
rear of the model.
In spite of all of the research Tamiya put into
their F-4 kits, they somehow got the exhausts much too small in
diameter. My theory is that the guy who designed the exhausts usually
works in Tamiya's 1/35 armor department and got confused about what scale
he was supposed to be working in. Cutting Edge seems to have used the
Tamiya nozzles as the basis for their new ones, since theirs are also too
small. The nozzles found in the Revell F-4E kit are the correct
diameter, they just lack any interior detail. Much to my delight, I
found a pair of long J-79 nozzles in my 1/32 Revell RF-4C kit (they were
left over from the RF-4E version of the kit). After some experimenting
with the Tamiya nozzles, I found that they fit right inside the Revell
nozzles, solving the problem of mating them to the Tamiya afterburner
cans. The only changes I had to make was to remove what little detail
there was inside the Revell nozzles and cut away the "turkey feathers" of
the Tamiya nozzles. The Revell nozzles are shorter than the Tamiya ones
and don't completely cover the base of the Tamiya parts, so I extended
the Revell nozzles with sheet styrene. On the suggestion of another
person using the Revell nozzles, I used photo-etched parts from the
Eduard F-4J detail set to build up the interior of the nozzles. Much
better than my original plan of using sheet styrene. I had to remove
some plastic from the keel, above and between the engines, to make room
for the wider nozzles. Go slow and do a lot of test-fitting. Once
installed, the Revell nozzles are a major improvement to the looks of the
rear of the model.
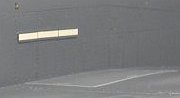
The rest of the model went together like a normal Tamiya F-4. Rather than try to mask around the stabilators when painting, I removed them from the pivot mechanism so I could add them later. This also allowed me to clean up the seams where the keel meets the fuselage and correct the large gap between the fuselage and the stabilators. The stabilators will no longer be moveable, but I have found that moving parts lead people to try moving other, non-moveable bits. Many USAF F-4s had an arrowhead-shaped stiffener on the top and bottom of the stabilators. I added these using .005 styrene, then used a compass point to make rivets to match those on the stabilators. The formation light panels on the F-4 were not exactly flush to the skin of the airplane, protruding almost 1/2 inch from the surface. The panels on the tail and fuselage were made with strips of .010 styrene, while the wing tip panels were cut from lead foil.
|
CAMOUFLAGE & MARKINGS |
 I wanted the walkways to have a rougher texture than
flat paint could give, so I tried a method I found on Master Modeler
Scott Murphy's web site. Before spraying the camouflage colors, I masked
the walkways, then sprayed them with 3M spray adhesive. I then sprinkled
on talc, then blew the excess off, leaving a slightly rough surface. The
surface is fragile, and can be easily damaged in handling. It didn't
turn out quite like I had wanted, but it still looks pretty good.
Something a little more coarse than talc would work better in 1/32 scale.
I wanted the walkways to have a rougher texture than
flat paint could give, so I tried a method I found on Master Modeler
Scott Murphy's web site. Before spraying the camouflage colors, I masked
the walkways, then sprayed them with 3M spray adhesive. I then sprinkled
on talc, then blew the excess off, leaving a slightly rough surface. The
surface is fragile, and can be easily damaged in handling. It didn't
turn out quite like I had wanted, but it still looks pretty good.
Something a little more coarse than talc would work better in 1/32 scale.
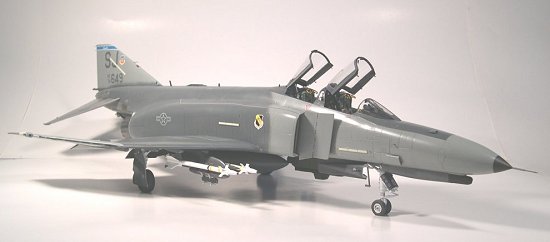
I painted the Hill Grey II camouflage using Polly S Neutral Grey (FS 36270) and Gunship Grey (FS 36118). The speed brake wells of 4th TFW F-4Es were Gunship Grey, with the insides of the speed brakes themselves gloss red. The natural metal areas were initially painted with Alclad II Dark Aluminum and Steel, then detailed with various other shades of Alclad and Metalizer.
 Decals came from a variety of sources, including
Mike Grant Decals, Leading Edge, Aeromaster, and CAM. There are no
aftermarket Gunship Grey "SJ" tail codes in 1/32 scale, so I had to
improvise. I found an F-15E decal sheet and lightly cut around the "SJ"
and appropriate serial numbers. I then sprayed a light coat of Polly S
Gunship Grey, then quickly dried it with a hair dryer. When dipped in
water, the tail codes separated from the cut sections and I applied them
like normal decals. I couldn't find any light grey Gothic font numbers
for the nose gear door, so I painted the door Neutral Grey, used some
Woodland Scenics dry transfer numbers as masks, and sprayed on a thin
coat of Gunship Grey, so that the numbers were just barely visible. I
then used a toothpick to gently scrape the dry transfers away, leaving
light grey numbers.
Decals came from a variety of sources, including
Mike Grant Decals, Leading Edge, Aeromaster, and CAM. There are no
aftermarket Gunship Grey "SJ" tail codes in 1/32 scale, so I had to
improvise. I found an F-15E decal sheet and lightly cut around the "SJ"
and appropriate serial numbers. I then sprayed a light coat of Polly S
Gunship Grey, then quickly dried it with a hair dryer. When dipped in
water, the tail codes separated from the cut sections and I applied them
like normal decals. I couldn't find any light grey Gothic font numbers
for the nose gear door, so I painted the door Neutral Grey, used some
Woodland Scenics dry transfer numbers as masks, and sprayed on a thin
coat of Gunship Grey, so that the numbers were just barely visible. I
then used a toothpick to gently scrape the dry transfers away, leaving
light grey numbers.
I gave the entire model a satin finish, but left the radome glossy, as the radomes of the 4th TFW F-4s seemed shinier than the rest of the jet. The walkways were outlined with strips of Neutral Grey and Gunship Grey decal film and then sprayed with Polly S clear flat. Looking back, I probably should have hit them with a thin coat of Tamiya Smoke first. The flat overcoat makes them look a little too light. I didn't weather the model, mainly due to my fear of ruining a good paint job with my inexperience with that mysterious art.
|
FINAL CONSTRUCTION |
I spruced up the main landing gear by adding new
tie-down rings made from brass wire, and used Eduard parts to build up
the mechanism that compresses the struts upon retraction. I left the
upper ends of the struts unmodified, sacrificing accuracy for more solid
mounting points. I didn't want the gear to collapse under the weight of
all of that resin! I added
 some wiring and linkages to the nose gear
strut, placards from Reheat, then finished everything off with a set of
Cutting Edge resin wheels.
some wiring and linkages to the nose gear
strut, placards from Reheat, then finished everything off with a set of
Cutting Edge resin wheels.
F-4Es of the 4th TFW were usually seen carrying an F-15-type centerline drop tank, and an ALQ-131 jamming pod. Revell's RF-4C and F-4E kits, as well as Cutting Edge, have the correct drop tank (the ones in the Tamiya F-15 kits are too small. Same guy who designed the F-4 exhausts?), and Flight Path sells a resin and metal ALQ-131. The pod became a kit in itself, because I had to rebuild the entire upper section to better represent the real thing. As is, the photo-etched portion of the pod is much too tall. 4th TFW F-4s seemed to always carry a single inert AIM-9P. Just for fun, my models carries four "live" Cutting Edge Sidewinders. ARN-101 F-4Es originally had a forest of static dissipator wicks installed on the wings, stabilators, and tail. By the late '80s, these had been removed except for the two on the tail. I made the small rectangular wick mounts on the wings and stabilators from plastic stock and wire, then finished off the model by adding two wicks to the tail.
|
CONCLUSIONS |
Even though my goals often far exceeded my modeling skills (and my budget, much to the amusement of IPMS Eagle Squadron!), I learned a lot and thoroughly enjoyed building the big Tamiya Phantom. Straight out of the box, it can be built into an accurate example of an early F-4E. If you want slats but don't need the ARN-101 or TISEO, the Revell F-4E is a good alternative to the Cutting Edge set, especially since the price of the resin set has doubled since I bought mine. The Revell kits can be found for about half the cost of the Cutting Edge set and you'll also get the added bonus of the F-15-type drop tank, non-ARN-101 cockpit consoles, and correctly-sized afterburner nozzles. Of course there's always the question of why not just build the Revell kit. Personally, I just couldn't live with that nose!
All of the Tamiya Phantoms are impressive models when finished, but due to their complexity and fit problems they are definitely not for beginners.
November 2003
|
REFERENCES |
Personal photos
Superbase 23, Seymour Johnson, Mark R. Wagner, Osprey Aerospace
Detail & Scale F-4E Phantom II, Bert Kinsey, Squadron Signal
Verlinden Lock-On # F-4E Phantom II, Francois Verlinden, VLS Publishing
F-4E "Dash 1"
Copyright ModelingMadness.com. All rights reserved. No reproduction without express permission.
If you would like your product reviewed fairly and fairly quickly, please contact the editor or see other details in the Note to Contributors.