| KIT: | Italeri 1/72 C-47 Skytrain |
| KIT # | 127 |
| PRICE: | |
| DECALS: | See Review |
|
REVIEW & PHOTOS : |
Will Alcott |
| NOTES: | Converted to EC-47N with scratchbuilt parts |
|
HISTORY |
Certainly near the top of any list of the most significant aircraft of all time, the Douglas DC-3/C-47 family managed to pioneer air travel as we know it, play a significant role in the Second World War, Berlin Airlift, Korea and Vietnam, and still soldier on in ever-decreasing numbers to the present day. At the onset of American involvement in the Vietnam war, many C-47s continued to serve with the USAF, hauling mail and as squadron hacks. The unconventional nature of the war demanded unconventional responses, and with newer aircraft unavailable to fill specialised roles, it fell upon the venerable C-47 to go to war once more. Most famously, the elderly gooney bird was armed to the teeth and pressed into service as the AC-47 Spooky gunship. Other aircraft took on the war to win the hearts and minds, dropping leaflets as "BS Bombers". Another task that received little glory was electronic intelligence gathering, as performed by the EC-47. The job of the "Electric Goons" was to locate Viet Cong transmitters, providing targeting information for air strikes.
Several variants of the EC-47 were converted from C-47A and -B models. According to serial number records, about 70 aircraft were at one time or another designated EC-47. The aircraft were externally modified with an array of dipole and wire aerials, along with a weather radar in an elongated nose. Some aircraft were re-engined. Systems were continually upgraded, and later models sprouted a forest of blade aerials. In Vietnam, the EC-47s served with 360th, 361st and 362nd Tactical Electronic Warfare Squadrons (TEWS), manned by personnel from the 6994th Security Squadron (SS). Several aircraft also served with the Air Force of the Republic of Vietnam (VNAF).
For an excellent site covering all aspects of the EC-47 and its crews, see
The EC-47's History Site.|
THE KIT |
The basis for this simple conversion is the Italeri C-47. This kit has been around for many years now, but holds up well. It has recently been reissued in an Airfix box. The kit has been released in various guises, including a C-47, civilian DC-3, and AC-47 gunship. I started with the stock C-47 kit. Unusual for an Italeri kit of this vintage, all panel lines are recessed. The scribing is quite heavily done, but can be toned down with a few coats of paint. All control surfaces are moulded with a heavy fabric texture. Optional parts include 3 styles of carburettor intakes, and an ID beacon atop the tail for post-war variants. This boxing includes markings for a D-Day striped RAF bird, and a cigar-chomping, shark-mouthed, post-war USMC transport. The decals are in the early Italeri style, very flat, and very prone to silvering. The printing is poor- the grey in the RAF codes and the brown of the cigar are created by printing a pattern of black dots over white and red respectively. For this conversion, all these decals can be consigned to the spares box.
A basic interior provides a flight deck with a pair of seats, control columns, and a simple instrument panel/centre console. Then navigator's compartment is separated by bulkheads fore and aft, and contains no detail. There is no aperture in the roof for the astrodome. The cargo section includes basic benches moulded on the floor, and a rear bulkhead. There is no stringer or rib detail on the fuselage sides. The cargo door is provided as two separate sections, with some interior detail. The crew door on the forward port side of the fuselage is moulded in the closed position.
 A pair of well moulded engines are provided, with nice cooling-fin detail,
and two complete banks of cylinders. The main wheels and landing gear legs are
also well done, with tread detail on the wheels. The main gear legs are to scale
and very delicate- one of mine had broken in two at the knuckle joint of the
gear. My kit was purchased second hand, and many small parts had come adrift
from the sprues. The trailing edge of the rudder was cracked on one fuselage
half.
A pair of well moulded engines are provided, with nice cooling-fin detail,
and two complete banks of cylinders. The main wheels and landing gear legs are
also well done, with tread detail on the wheels. The main gear legs are to scale
and very delicate- one of mine had broken in two at the knuckle joint of the
gear. My kit was purchased second hand, and many small parts had come adrift
from the sprues. The trailing edge of the rudder was cracked on one fuselage
half.
A small sprue of clear parts provides the windscreen, astro-compass blister, landing light covers, ID beacon, and all the cabin windows. The cabin windows are a bit distorted, but fit well, providing you put them into the right holes. I have found from previous experience that the V-shaped windscreen is weak at its centre, and is prone to crack in two.
|
CONSTRUCTION |
I began construction with the interior. Little is visible through the windows, so I used the kit parts, with only belts added to the crew seats, and everything painted interior green. I added some thin sheet to cover the holes in the cargo compartment walls in line with the wing fillets. This prevents you seeing through into the wing. I had little information on the interior layout of the EC-47, so I left the rest of the interior bare. I added the kit cabin windows, secured with lots of superglue to ensure they wouldn't get knocked inside (or so I thought). The Italeri kit is missing the navigator's compartment window, so I drilled and filed a slot in the fuselage side, which I filled with a scrap of clear plastic, filed and polished to shape.
The most difficult part of the conversion is the extension of the nose to model the radome for the weather radar. Prior to gluing the fuselage halves together, I cut horizontal and vertical slots into the nose, with the slots running from the tip of the nose back to the first panel line. These slots would later allow me to insert formers for the new nose. When assembling the fuselage, I added reinforcements to the inside of the fuselage underside aft of the wing cutout, as this area tends to be weak and collapse under sanding.
Once the fuselage halves had set, I added formers to define the plan and profile of the extended nose, cut from thick plastic card. I based the profile on photos in C-47 In Action. The extended nose is subtly different from the stock nose- it is slightly more pointed. Some early EC-47s (formerly RC-47s), including those supplied to the VNAF, had a much longer nose. The shape of the nose was then built up with Miliput. Masking tape was applied along the nose panel line, and the Miliput blended into the contour of the standard fuselage at this point. The Miliput was sanded back until the edges of the formers were visible.
The damaged rudder was rebuilt by supergluing a length of stretched sprue along the trailing edge, and building up the missing areas with layers of superglue. The fabric texture was removed from all the control surfaces. The rudder and elevators have reasonably thin trailing edges, and do not require any thinning to give a reasonable appearance. The wings however have quite thick trailing edges, that can use a lot of scraping and sanding.
 The wing is split into 5 pieces- the upper wings as complete port and
starboard halves, with the underside split at the joint outboard of the engine
nacelles. I glued the upper wings to the fuselage first, to minimise the seam at
the wing roots. This eliminated any major gaps, but I still needed to clean this
area up subsequently. I reinforced the inside of the upper wing to fuselage
joint with sections of sprue and superglue for added strength. I then added the
underside centre section to this assembly, taking care to ensure correct
alignment. Finally I added the outer wings. To provide a good joint along the
seam between the centre and outer wing sections, I ran glue along the parts,
then clamped the model by the wingtip, so the weight of the fuselage closed the
gap. The elevators were added next, and left a fair gap. The seams were filled
with stretched sprue and superglue, then panel lines rescribed to replace those
lost in sanding. The landing lights were drilled out and new lenses added. The
landing light covers do not fit well, and don't appear to be the correct shape
(the corners should be more rounded).
The wing is split into 5 pieces- the upper wings as complete port and
starboard halves, with the underside split at the joint outboard of the engine
nacelles. I glued the upper wings to the fuselage first, to minimise the seam at
the wing roots. This eliminated any major gaps, but I still needed to clean this
area up subsequently. I reinforced the inside of the upper wing to fuselage
joint with sections of sprue and superglue for added strength. I then added the
underside centre section to this assembly, taking care to ensure correct
alignment. Finally I added the outer wings. To provide a good joint along the
seam between the centre and outer wing sections, I ran glue along the parts,
then clamped the model by the wingtip, so the weight of the fuselage closed the
gap. The elevators were added next, and left a fair gap. The seams were filled
with stretched sprue and superglue, then panel lines rescribed to replace those
lost in sanding. The landing lights were drilled out and new lenses added. The
landing light covers do not fit well, and don't appear to be the correct shape
(the corners should be more rounded).
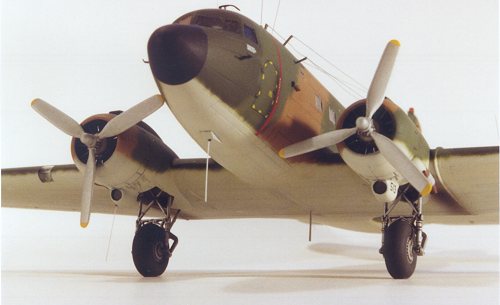
The engines were assembled, painted and weathered appropriately, then added to the cowls, along with the oil cooler inserts. The cowls were then added to the wings. The fit was reasonably good after a little clean-up of the mating surfaces. The aircraft I was modelling featured the long style of carb intake. The kit parts are missing an exhaust slot at the back of the intake fairing. I drilled this out, then added a floor for the ramp from scrap. Take care to ensure the intakes are properly aligned with the cowls. I needed to add some stretched sprue shims and fill gaps with Tipex (White out) to eliminate gaps.
After carefully cleaning-up the opening for the windscreen, I added the kit part. This left slight gaps which I filled with scraps of sprue. The stress proved too much, however, and the windscreen split in two. After looking at different ways to fix this, I ended up adding the centre frame of the windscreen from a bit of strip, then adding new sections of clear styrene sheet to form the windscreen. I then defined the framing by masking. I also managed to knock one of the strips of windows inside the fuselage, and despite my best efforts, never retrieved it. I ended-up using Krystal Klear to replace all the side windows. The particular aircraft I modelled had the astro-compass blister plated over. To simulate this, I glued the blister in place, then carefully lopped off the bubble part, leaving only the base fairing. This was then covered with a disc of thin plastic card.
 The aft-most window on the starboard side of many EC-47s was replaced with a
leaflet dispenser, to hide the true mission of the aircraft. I had no details of
this, so fabricated a simple chute from scrap plastic. At this stage I started
thinking about all the fiddly bits that would be needed later. The "banjo" wire
aerial mounts were made from scrap plastic filed to an airfoil section, and
topped with short lengths of stretched sprue. The blade aerials were carved from
sheet. The bases of the whip aerials were carved from scrap, then drilled out
with the smallest drill I had at hand. For the wing dipole mounts I drilled
small holes through the wing, then inserted short lengths of rod. The rod was
then cut down so only a small nub remained, and this was drilled out to give an
appropriate mount. The trailing aerial mount under the tail was made from a hunk
of sprue, a section of rod filed to a flared tube shape, and a short length of
curved stretched sprue.
The aft-most window on the starboard side of many EC-47s was replaced with a
leaflet dispenser, to hide the true mission of the aircraft. I had no details of
this, so fabricated a simple chute from scrap plastic. At this stage I started
thinking about all the fiddly bits that would be needed later. The "banjo" wire
aerial mounts were made from scrap plastic filed to an airfoil section, and
topped with short lengths of stretched sprue. The blade aerials were carved from
sheet. The bases of the whip aerials were carved from scrap, then drilled out
with the smallest drill I had at hand. For the wing dipole mounts I drilled
small holes through the wing, then inserted short lengths of rod. The rod was
then cut down so only a small nub remained, and this was drilled out to give an
appropriate mount. The trailing aerial mount under the tail was made from a hunk
of sprue, a section of rod filed to a flared tube shape, and a short length of
curved stretched sprue.
While studying photos of the real thing, I noticed the kit exhausts seemed very simplified. I filed down the outlet end to a flattened section, then added a small inlet pipe and stretched sprue details. As final touches, I drilled out the navigation lights in the wingtips to accept replacements carved from clear sprue, and drilled tiny holes in the trailing edges of the wings for static wicks. The trailing edges of the rudder and elevator were too thin to be drilled out, so I scribed groves and superglued short lengths of monofilament thread in place. Be sure to get the curvature of the thread right so the wicks appear to sag under gravity! At this stage everything was ready for painting. I left off the more fragile antennae details, leaving only the reasonably solid mounts. I superglued all the small bits to scraps of sprue or resin to provide a handling point during painting.
|
PAINT & DECALS |
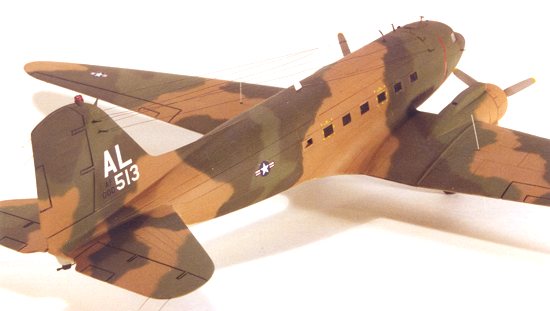
The aircraft was painted in the standard South East Asia scheme, as detailed in Technical Order 1-1-4. I used Humbrol colours, sprayed freehand with a Paasche H airbrush. Light weathering was applied, with washes of black and brown, largely aimed at highlighting the control surfaces. My reference photo showed a very clean aircraft.
Modeldecal did actually produce decals for an EC-47N with nose art, and these can still be found from time to time. I used markings from the spares box, and USAF code sheets. Note the last three digits of the serial are repeated on the outboard side of the oil cooler fairings. To liven the scheme up, I used tiny blocks of solid yellow decal to create the emergency exit markings around the crew door and windows. Note that these appear to vary considerably from aircraft to aircraft. The decals were applied after a coat of Humbrol clear gloss, and were sealed with Humbrol clear flat.
 Once the paint and decals were fully dry, the fun part begins- turning this
C-47 into an EC-47. The array of aerials fitted to a C-47 varies considerably,
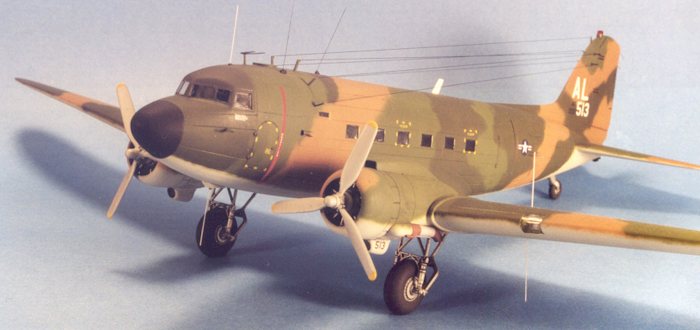
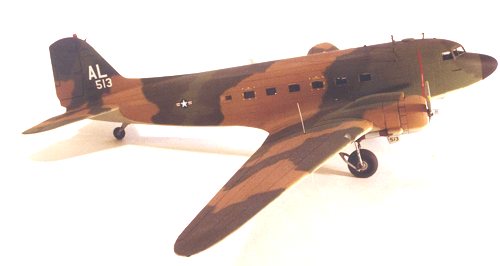
so it's important to pick a specific aircraft to model. I chose to depict
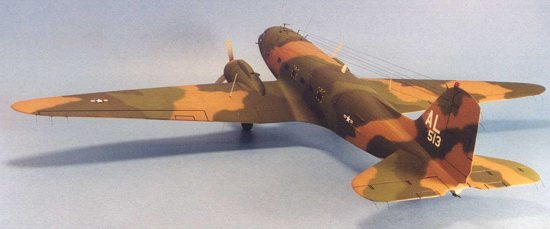
42-100513, an EC-47N that served with the 361 TEWS, at Phu Cat AB in September,
1970. This particular bird is well illustrated in the Squadron-Signal In Action
volume. This aircraft was one of a small number fitted with an array of six wire
aerials, in addition to the wing and fuselage dipoles and whip aerials. The wire
aerials were simulated with monofilament thread, on scratch built mounts. The
dipoles and whip aerials were made from stretched sprue. The dipoles are quite
upright at rest. The wing dipoles are mounted at right angles to the wing rather
than purely vertical.
Once the paint and decals were fully dry, the fun part begins- turning this
C-47 into an EC-47. The array of aerials fitted to a C-47 varies considerably,
so it's important to pick a specific aircraft to model. I chose to depict
42-100513, an EC-47N that served with the 361 TEWS, at Phu Cat AB in September,
1970. This particular bird is well illustrated in the Squadron-Signal In Action
volume. This aircraft was one of a small number fitted with an array of six wire
aerials, in addition to the wing and fuselage dipoles and whip aerials. The wire
aerials were simulated with monofilament thread, on scratch built mounts. The
dipoles and whip aerials were made from stretched sprue. The dipoles are quite
upright at rest. The wing dipoles are mounted at right angles to the wing rather
than purely vertical.
With the fully array of aerials in place, this is a very delicate model, that is very tricky to pick up! The monofilament aerials are very sensitive to temperature changes, and tend to sag if the model sits in the cold trunk (boot) of the car for too long. Elastic thread might be a better choice.
|
CONCLUSIONS |
The EC-47 is a great choice if you're looking for a model that causes double-takes. At first glance, it is easily mistaken for a gunship. The change in the nose contour is very subtle, but I'm quite happy with the way it came out. I can't make any guarantees about the accuracy of this model- I did the best I could with available photos. If you're interested in trying this conversion yourself, have a look at the
EC-47's History Site- the photos are quite inspirational!
|
REFERENCES |
C-47 in Action
|
EDITOR'S FOOTNOTE |
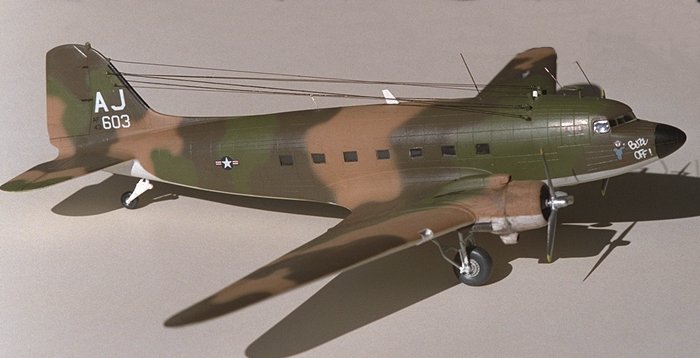
The EC-47N is a project that your editor undertook back in the mid-1980s. In this case, the kit used was the ESCI R4D 'Polar Explorer' version. This kit already has the extended nose so you don't have to do any of the additional bodywork that Will did for his kit. There really is very little difference between the ESCI and Italeri C-47 kits other than the fact that the ESCI one is much more difficult to find. My personal preference in 1/72 C-47s is the Italeri kit, mainly because I feel its detailing is better done and not as pronounced as the ESCI version.
Below is an image of the editor's rather crudely done ESCI-based EC-47N from 1986. Brass wire was used for the HF long-wire antennas and a Modeldecal sheet used for the markings. As for other info on the plane, I recommend visiting the web site listed above.
If you would like your product reviewed fairly and quickly by a site that averages thousands of visits a day, please
contact me or see other details in the Note to Contributors.