
Hasegawa 1/72 Shinmeiwa PS-1/SS-2
| KIT #: | K-8 |
| PRICE: | $26.98 MSRP |
| DECALS: | Two options |
| REVIEWER: | Bob Zoglio |
| NOTES: |
| THE KIT |
This kit was most
likely issued back in the 1970’s. It is a large scale reproduction of the
Japanese Self Maritime Force STOL aircraft that was initially used for
anti-submarine patrol. Subsequently the Japanese Air/Sea Rescue service
found a need 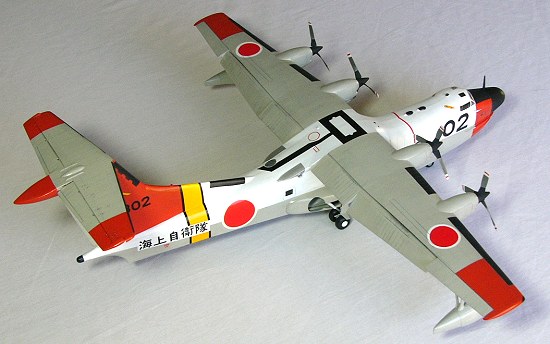 for this aircraft too. As a result the kit offers both
versions to build. Today, the anti-submarine role has been taken over by
the JMSDF P-3 Orion. However, when comparing the actual photo of the
existing Air/Sea Rescue versions, one immediately notices the kit isn’t
100% faithful to some of the smaller details. This is readily noticeable in
the main gear blister doors on the side. In addition the paint scheme has
changed often through the service life of this plane. Therefore you really
need to use reference pictures constantly
for this aircraft too. As a result the kit offers both
versions to build. Today, the anti-submarine role has been taken over by
the JMSDF P-3 Orion. However, when comparing the actual photo of the
existing Air/Sea Rescue versions, one immediately notices the kit isn’t
100% faithful to some of the smaller details. This is readily noticeable in
the main gear blister doors on the side. In addition the paint scheme has
changed often through the service life of this plane. Therefore you really
need to use reference pictures constantly
As for the molding, please keep in mind one important item. Pieces, especially the fuselage and cowl halves, are not of uniform thickness. In fact, an access door at the bottom of the hull is small on one of the dimensions and need styrene to close the gap. This kit is a far departure from today’s Accurate Miniatures, Tamiya, or Hasegawa offerings. It is a challenge and requires you to think several steps ahead in the modeling process. This is a good time to take out the masking tape and pre-assemble the kit to verify fit problems. I wish I did. But first decide on which version you will build. Most internet photos are of the colorful Air/Sea Rescue version.
| CONSTRUCTION |
Construction
started with all the minor sub assemblies, such as floats, flaps,
searchlight, propeller, and anything else of that nature. Then I moved to
the cockpit. Since I could find no photos, I decided to let the imagination
go wild. I scratch built new crew seats, consoles, added wall details, and
super detailed the navigator’s desk. I then added the walkway that goes
from the cockpit to the center fuselage. Bear in mind a lot of this detail
will not be seen, but at least concentrate on the seats since they are more
prominently visible. The rudder was detailed with the etching (indenting)
of the leading edge t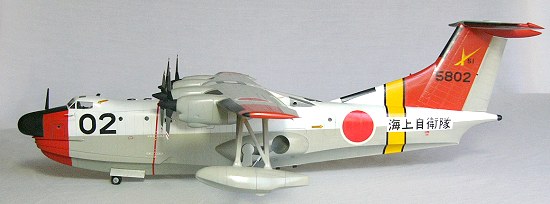 o
resemble the recesses seen on the aluminum of real aircraft. The same for
done for the elevators after they were separated.
o
resemble the recesses seen on the aluminum of real aircraft. The same for
done for the elevators after they were separated.
I used aluminum rod to replace the exhaust blower just behind the trailing edge of the wing. Similarly the exhaust for each engine was replaced with aluminum rod.
The toughest part is the hull. This model was built by Hasegawa as part toy and part model so it has major fit problems. For example the lower front hull, or the “gaping maw”, will be the most time consuming area to fix. Remember the plastic is not of all uniform thickness, so you will need a scraper to thin down certain areas of the sides. I tried to save all the rivet detail when reinforcing this area, but in the end, decided it was a lost cause. However, investment in a pounce wheel is a good idea. I have the Micro Mark wheels, but I recently found that dousekp@quick.cz has what appears to be the definitive pounce wheels that were designed from the start to replicate rivets. Unfortunately I did not have them at the time.
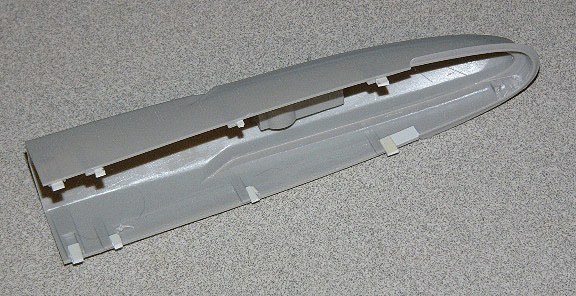 The
fuselage was reinforced with evergreen styrene.
The
fuselage was reinforced with evergreen styrene.
 Then
the walls were braced with sprue rods going from one side to the next. The
key here is to make the fuselage strong so you don’t pop the glue seam. And
you are also trying to keep the sides rigid and not “bowed”. I overdid this
area, but I know it is solid as Gibraltar. After playing with the fit for a
few days I then glued it all together. I then sanded off the remainder of
the rivet detail forward of the wing and scribed vertical seam lines. With
the pounce wheels I had, I tried to add the lost rivet detail to the top
half of the fuselage.
Then
the walls were braced with sprue rods going from one side to the next. The
key here is to make the fuselage strong so you don’t pop the glue seam. And
you are also trying to keep the sides rigid and not “bowed”. I overdid this
area, but I know it is solid as Gibraltar. After playing with the fit for a
few days I then glued it all together. I then sanded off the remainder of
the rivet detail forward of the wing and scribed vertical seam lines. With
the pounce wheels I had, I tried to add the lost rivet detail to the top
half of the fuselage.
The engine cowl
halves should taped first and then test fit to the wings. This analysis is
necessary since there is uneven thickness in the mating surfaces. Add shims
if necessary. Once done I glued and reinforced the top seam first. When dry
the 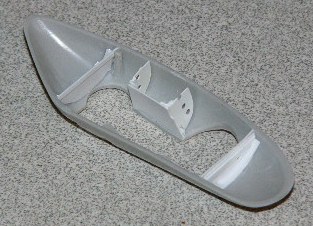 bottom seem was glued.
This two step process helps eliminate the warping in the cowl. I then
scribed more correctly shaped access panels to the engine. Also, the center
of each prop hub was carefully drilled out. These hubs are nearly identical
to the P-3.
bottom seem was glued.
This two step process helps eliminate the warping in the cowl. I then
scribed more correctly shaped access panels to the engine. Also, the center
of each prop hub was carefully drilled out. These hubs are nearly identical
to the P-3.
The circular wheel wells were then cut into the hull as suggested. Don’t follow the outlined holes specified. Use your eyeballs to ensure the alignment when visualizing the retraction of the gear. The gear well blisters were then test fit and outlined in pencil. There is not enough for the gear blisters to grab onto, so it’s best to add bracing and detail to spruce things up. Now they are so solid they feel as if molded in to the fuselage halves. However, before gluing the blisters to the hull, now would be the best time to glue and mount the small gear doors. They fold or roll down into the bulges. Your guess is as good as any.
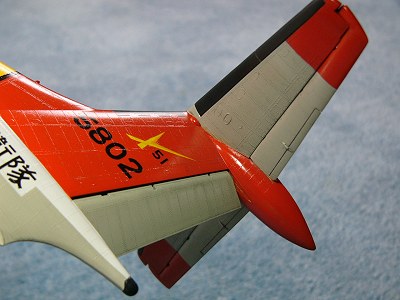 The T-tail was
extremely flimsy and a lot of time went in to reinforcing this joint to
make it rigid. The elevators were then reattached.
The T-tail was
extremely flimsy and a lot of time went in to reinforcing this joint to
make it rigid. The elevators were then reattached.
The nose gear doors were attached using the Waldron punch tool to create strong hinges. As a mental note, attach some generous amounts of evergreen above the nose gear well on the inside of the hull. The nose gear is so weak looking that reinforcing above the nose wheel well will give you something to mount into should you need to fabricate a replacement gear leg.
At this point I had a good idea of how much weight was needed. However, I had to cut notches into the bulkhead behind the radome. From here I pressed in carpet foam and five nickels and two pennies. The foam prevented it from clanging around and “taking out” the cockpit when the model was handled. The radome was now glued in place.
The side blister windows are incorrectly shown as applying to the middle of the fuselage. They don’t go there, as there is already a clear plastic part molded for this purpose. Instead, carefully guess where the blisters go, and drill two pilot holes to accept the blister. The blister has two male prongs for this propose. I mounted one of these blister windows slightly aft of where it should be. I found this out when I placed the red propeller warning decal on fuselage. Save yourself the headache and attach the blister after the kit is decaled.
| COLORS & MARKINGS |
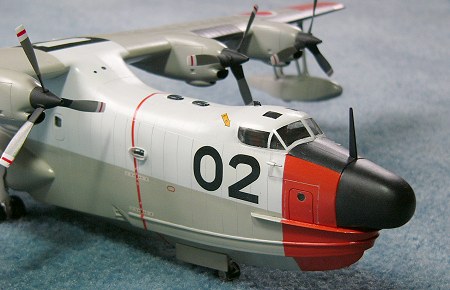 I used Tamiya White
for the upper hull and Gunze H51 Light Gull grey for the wings and bottom
hull. I had a discarded screw from a P-3 during my military days and found
this color to be dead-on. Then the black nose, deicer boots, and prop hubs
were painted roughly using ¾ flat black with ¼ white. The International
Orange was used by mixing Tamiya Red and yellow to the correct proportions.
The decals were satisfactory until you realized the hinomaru’s on the upper
and lower wing were too big. With no suitable spares in the decal box, I
bought the Fiskars Circle Cutter found in fabric stores. This allowed me to
cut both white and red circles for the wing.
I used Tamiya White
for the upper hull and Gunze H51 Light Gull grey for the wings and bottom
hull. I had a discarded screw from a P-3 during my military days and found
this color to be dead-on. Then the black nose, deicer boots, and prop hubs
were painted roughly using ¾ flat black with ¼ white. The International
Orange was used by mixing Tamiya Red and yellow to the correct proportions.
The decals were satisfactory until you realized the hinomaru’s on the upper
and lower wing were too big. With no suitable spares in the decal box, I
bought the Fiskars Circle Cutter found in fabric stores. This allowed me to
cut both white and red circles for the wing.
| CONCLUSIONS |
This kit broadsided
me with the complexity. It is nowhere near today’s standards. Should I make
it again, I now know the pitfalls. Invest in a pounce wheel, preferably the
one referenced above, as well as lots of evergreen plastic, and a good
scraper. A scriber is necessary too. Test fit constantly and often. Take
nothing for granted. Even the large main gear door did not line up with the
locator pins. All in all this is a beautiful plane and quite colorful. I
don’t regret building it, but wish I had a review to go by. As a symbol of
Japanese aviation, the direct
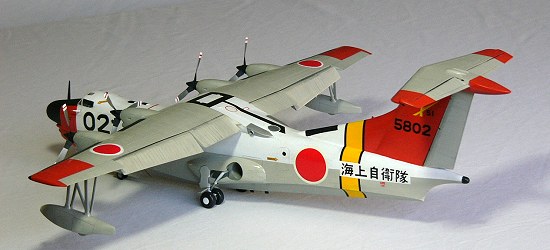 descendant of the Emily flying boat, I was
disappointed by the fit problems. This aircraft was both designed and built
by the Japanese people. Hasegawa should be chastised for not retooling this
kit years ago. Yet the huge Shinmeiwa grows on me everyday I see it. She is
quite beautiful and I may have to make another someday.
descendant of the Emily flying boat, I was
disappointed by the fit problems. This aircraft was both designed and built
by the Japanese people. Hasegawa should be chastised for not retooling this
kit years ago. Yet the huge Shinmeiwa grows on me everyday I see it. She is
quite beautiful and I may have to make another someday.
December 2004
Copyright ModelingMadness.com.
If you would like your product reviewed fairly and fairly quickly, please contact the editor or see other details in the Note to Contributors.